CSS简单入门
— Java攻城狮学习路线 —
一. 什么是CSS
CSS指层叠样式表(Cascading Style Sheets),定义如何显示HTML元素
二. CSS语法
/* 选择器 { 声明; 声明;}*/

    h1 { color:blue;font-size:12px;}

      /* 属性:值*/
样式
1.选择器
选择器优先级:内联>外联; id>类>元素>伪类
- id选择器
id选择器为标有特定id的HTML元素设置样式
#para1 {

    text-align:center;

    color:red;

}
- class选择器
选中同一class元素
.center {

    text-align:center;

}
- 元素选择器
选中同一类元素
p {

    text-align:center;

}
- 伪类和伪元素
<!-- 伪类语法 -->

selector:pseudo-class { property:value; }

selector.class:pseudo-class { property:value; }

<!--anchor 伪类 -->

a:link {color:#FF0000;} /* 未访问的链接 */

a:visited {color:#00FF00;} /* 已访问的链接 */

a:hover {color:#FF00FF;} /* 鼠标划过链接 */

a:active {color:#0000FF;} /* 已选中的链接 */

<!-- 孩子选择 -->

p:first-child {color:blue;} /*p下第一个孩子*/

p:nth-child(2) {} /*p下第2个孩子(下标从1开始)*/

<!-- 伪元素语法 -->

selector:pseudo-element {property:value;}

selector.class:pseudo-element {property:value;}

<!--:first-line-->

p:first-line { color:#ff0000;} /* 对p的第一行文本进行格式化*/

<!--:first-letter-->

p:first-letter {color:#ff0000;} /*文本首字母设置样式*/

<!--:before-->

h1:before {content:url(smiley.gif);} /*元素前插入新内容*/

<!--:after-->

h1:after{content:url(smiley.gif);} /*元素后插入新内容*/
-属性选择器
/*通过属性设定样式*/

*把包含title属性的元素设置样式*/

[title] {

    color:blue;

}

/* 改变title='run'元素样式*/

[title=runoob]{

    border:5px solid green;

}
- 组合选择器
- 后代选取器
/*匹配所有后代相同元素(利用空格分隔)*/

div p {

    background-color:yellow;

}
- 子元素选择器
/*只能匹配子元素中相同元素(利用>连接)*/

div>p {

    background-color:yellow;

}
- 相邻兄弟选择器
<!--选择紧邻兄弟元素(利用+连接)-->

div+p {

  background-color:yellow;

}
- 普通兄弟选择器
/*选取所有指定元素后相邻兄弟元素(利用~连接)*/

div~p

{

  background-color:yellow;

}
2.背景
背景用于定义HTML元素的背景
- 背景颜色: background-color
body {background-color:#b0c4de;}
- 背景图像:background-image
body {background-image:url('paper.gif');}
- 背景水平或垂直平铺:background-repeat:repeat-x
body{

    background-image:url('gradient2.png');

    background-repeat:repeat-x;

}
- 背景不平铺:background-repeat:no-repeat
body{

    background-image:url('img_tree.png');

    background-repeat:no-repeat;

}
- 背景简写:依次为背景颜色、图片、不平铺...
body {background:#ffffff url('img_tree.png') no-repeat right top;}
3.文本
设置文字样式
- 文本颜色:color
/*设置文字的颜色*/

body {color:red;}

h1 {color:#00ff00;}

h2 {color:rgb(255,0,0);}
- 文本对齐方式:
/*设置文本水平对齐方式*/

h1 {text-align:center;}

p.date {text-align:right;}

p.main {text-align:justify;}
- 文本修饰:
/*设置或删除文本的装饰*/

a {text-decoration:none;}

h1 {text-decoration:overline;}

h2 {text-decoration:line-through;}

h3 {text-decoration:underline;}
- 文本转换:
/*指定文本中的大写和小写字母*/

p.uppercase {text-transform:uppercase;}

p.lowercase {text-transform:lowercase;}

p.capitalize {text-transform:capitalize;}
- 文本缩进:
/*指定文本的第一行的缩进*/

p {text-indent:50px;}
4.字体
定义字体加粗、大小、文字样式
- 字体系利:font-family
p{font-family:"Times New Roman", Times, serif;}
- 字体样式:font-style
p.normal {font-style:normal;}

p.italic {font-style:italic;}

p.oblique {font-style:oblique;}
- 字体大小:font-size
/*像素设置*/

h1 {font-size:40px;}

h2 {font-size:30px;}

p {font-size:14px;}

/*em设置(1em=16px)*/

h1 {font-size:2.5em;} /* 40px/16=2.5em */

h2 {font-size:1.875em;} /* 30px/16=1.875em */

p {font-size:0.875em;} /* 14px/16=0.875em */

/*em和百分比设置*/

body {font-size:100%;}

h1 {font-size:2.5em;}

h2 {font-size:1.875em;}

p {font-size:0.875em;}
5.链接
- 链接样式
a:link {color:#000000;}      /* 未访问链接*/

a:visited {color:#00FF00;}  /* 已访问链接 */

a:hover {color:#FF00FF;}  /* 鼠标移动到链接上 */

a:active {color:#0000FF;}  /* 鼠标点击时 */

/*a:hover 必须跟在 a:link 和 a:visited后面

a:active 必须跟在 a:hover后面*/
- 文本修饰
/*删除下划线*/

a:link {text-decoration:none;}

a:visited {text-decoration:none;}

a:hover {text-decoration:underline;}

a:active {text-decoration:underline;}
- 背景颜色
a:link {background-color:#B2FF99;}

a:visited {background-color:#FFFF85;}

a:hover {background-color:#FF704D;}

a:active {background-color:#FF704D;}
6.列表
- 不同列表项标记:list-style-type
ul.a {list-style-type: circle;}

ul.b {list-style-type: square;}

ol.c {list-style-type: upper-roman;}

ol.d {list-style-type: lower-alpha;}
- 作为列表项标记的图像:list-style-image
ul {

    list-style-image: url('sqpurple.gif');

}
- 简写属性
ul {

    list-style: square url("sqpurple.gif");

}
7.表格
- 表格边框:border
table, th, td {

border: 1px solid black;

}
- 折叠边框:border-collapse
table {

border-collapse:collapse;

}
- 表格宽度和高度:width和height
table {

width:100%;

}

th {

height:50px;

}
- 表格文字对齐:text-align
td {

text-align:right;

}
- 表格填充:padding
td {

padding:15px;

}
- 表格颜色:
table, td, th {

border:1px solid green;

}

th {

background-color:green;

color:white;

}
布局
1.盒子模型
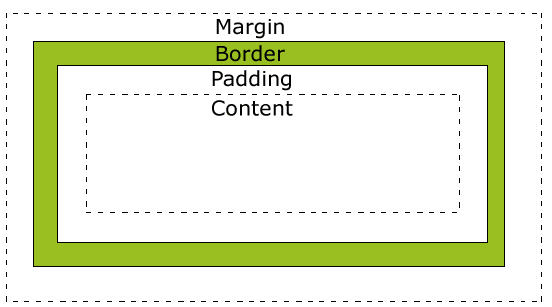
- Margin(外边距) - 清除边框外的区域,外边距是透明的。
- Border(边框) - 围绕在内边距和内容外的边框。
- Padding(内边距) - 清除内容周围的区域,内边距是透明的。
- Content(内容) - 盒子的内容,显示文本和图像。
2.margin
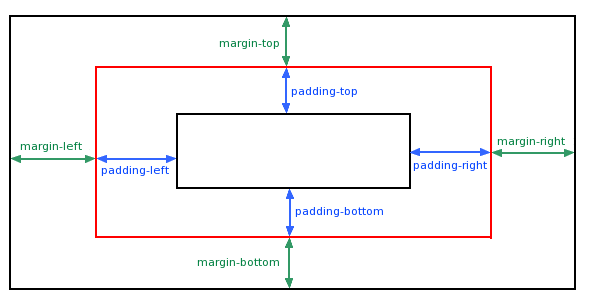
- 单边外边距
margin-top:100px;

margin-bottom:100px;

margin-right:50px;

margin-left:50px;
- 简写
margin:25px 50px 75px 100px;

/* tips:居中显示 */

magin:0 auto;
3.padding
- 单边内边距
padding-top:25px;

padding-bottom:25px;

padding-right:50px;

padding-left:50px;
- 简写
padding:25px 50px 75px 100px;
4.border
- 边框样式:border-style
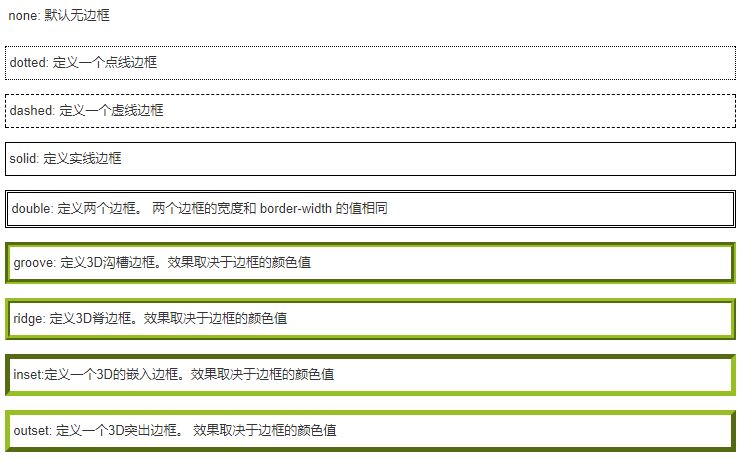
- 边框宽度:border-width
p.one {

    border-style:solid;

    border-width:5px;

}

p.two {

    border-style:solid;

    border-width:medium;

}
- 边框颜色:border-color
p.one {

    border-style:solid;

    border-color:red;

}

p.two {

    border-style:solid;

    border-color:#98bf21;

}
- 边框单独设置
p {

    border-top-style:dotted;

    border-right-style:solid;

    border-bottom-style:dotted;

    border-left-style:solid;

}

p {

    border-style:dotted solid double dashed;

                /*上     右     底     左*/

}
- 边框简写
border:5px solid red;
5.尺寸
设置元素的高度和宽度
- 设置元素高度:height
- 设置元素宽度:width
- 设置行高:line-height
- 设置元素最大高度:max-height
- 设置元素最大宽度:max-width
- 设置元素最小高度:min-height
- 设置元素最小宽度:min-width
6.显示
- display、visibility
<!--隐藏元素-->

h1.hidden {visibility:hidden;} /*仍占用空间*/

h1.hidden {display:none;} /*不占用空间*/

<!--改变元素显示-->

li {display:inline;}

span {display:block;}
7.定位
- static
/*静态定位的元素不会受到 top, bottom, left, right影响*/

position:static;
- fixed
/*元素的位置相对于浏览器窗口是固定位置*/

p.pos_fixed {

    position:fixed;

    top:30px;

    right:5px;

}
- relative
/*相对定位元素的定位是相对其正常位置*/

/*相对定位元素经常被用来作为绝对定位元素的容器块*/

h2.pos_left{

    position:relative;

    left:-20px;

}

h2.pos_right{

    position:relative;

    left:20px;

}
- absolute
/*绝对定位的元素的位置相对于最近的已定位父元素,

如果元素没有已定位的父元素,那么它的位置相对于<html>*/

h2{

    position:absolute;

    left:100px;

    top:150px;

}

/*absolute 定位使元素的位置与文档流无关,因此不占据空间。

absolute 定位的元素和其他元素重叠。*/
- sticky
/*吸附效果,类似relative和fixed结合*/

position:sticky;
- z-index
/*z-index属性指定了一个元素的堆叠顺序*/

z-index:-1;
8.浮动
可以实现图片排列及文字环绕
- 相邻浮动
div1 {

    float:left;

    width:110px;

    height:90px;

}

div2 {

    float:left;

    width:110px;

    height:90px;

}
- 清除浮动
div {

    clear:both;

}
9.对齐
- 元素居中(margin:auto)
div {

    margin: auto;

    width: 50%;

    border: 3px solid green;

}
- 文本居中(text-align:center)
text-align: center;
- 图片居中(margin: auto)
img {

    display: block;

    margin: auto;

    width: 40%;

}
- 左右对齐-定位方式(position: absolute)
.right {

    position: absolute;

    right: 0px;

    width: 300px;

    border: 3px solid #73AD21;

    padding: 10px;

}
- 左右对齐-float方式
.right {

    float: right;

    width: 300px;

    border: 3px solid #73AD21;

    padding: 10px;

}
- 垂直居中-使用padding
.center {

    padding: 70px 0;

    border: 3px solid green;

}
- 垂直居中-使用line-height
.center {

    line-height: 200px;

    height: 200px;

    border: 3px solid green;

    text-align: center;

}

/* 如果文本有多行,添加以下代码: */

.center p {

    line-height: 1.5;

    display: inline-block;

    vertical-align: middle;

}
- 垂直居中-使用position和transform
.center {

    height: 200px;

    position: relative;

    border: 3px solid green;

}

.center p {

    margin: 0;

    position: absolute;

    top: 50%;

    left: 50%;

    transform: translate(-50%, -50%);

}
10.透明度
设置颜色透明度
opacity:0.5;

rgba(); /*a代表透明度*/
CSS简单入门的更多相关文章
- 一个CSS简单入门网站
讲的知识简单明了,很实用: http://zh.learnlayout.com/
- JavaScript操作HTML&CSS简单入门
- Java攻城狮学习路线 - 一. JavaScript基础 输出 使用 window.alert() 弹出警告框. 使用 document.write() 方法将内容写到 HTML 文档中. 使用 ...
- Vue的简单入门
Vue的简单入门 一.什么是Vue? vue.js也一个渐进式JavaScript框架,可以独立完成前后端分离式web项目 渐进式:vue可以从小到控制页面中的一个变量后到页面中一块内容再到整个页面, ...
- Bootstrap简单入门
Bootstrap简单入门 BootStrap基本模板 <!DOCTYPE html> <html> <head> <meta charset="U ...
- Python爬虫的简单入门(一)
Python爬虫的简单入门(一) 简介 这一系列教学是基于Python的爬虫教学在此之前请确保你的电脑已经成功安装了Python(本教程使用的是Python3).爬虫想要学的精通是有点难度的,尤其是遇 ...
- 一篇文章带你了解网页框架——Vue简单入门
一篇文章带你了解网页框架--Vue简单入门 这篇文章将会介绍我们前端入门级别的框架--Vue的简单使用 如果你以后想从事后端程序员,又想要稍微了解前端框架知识,那么这篇文章或许可以给你带来帮助 温馨提 ...
- 一篇文章带你了解轻量级Web服务器——Nginx简单入门
一篇文章带你了解轻量级Web服务器--Nginx简单入门 Nginx是一款轻量级的Web服务器/反向代理服务器及电子邮件代理服务器 在本篇中我们会简单介绍Nginx的特点,安装,相关指令使用以及配置信 ...
- 用IntelliJ IDEA创建Gradle项目简单入门
Gradle和Maven一样,是Java用得最多的构建工具之一,在Maven之前,解决jar包引用的问题真是令人抓狂,有了Maven后日子就好过起来了,而现在又有了Gradle,Maven有的功能它都 ...
- [原创]MYSQL的简单入门
MYSQL简单入门: 查询库名称:show databases; information_schema mysql test 2:创建库 create database 库名 DEFAULT CHAR ...
随机推荐
- PyCharm 恢复默认设置 | JetBrains IDE 配置文件安装目录
网上的答案为什么都乱七八糟并且全都全篇一律?某度知道是发源地? 先说 Mac 按需运行下面的 rm 删除命令 # Configuration rm -rf ~/Library/Preferences/ ...
- C# --MVC实现简单上传下载
首先创建一个默认的控制器Defaultcontroller 然后生成视图View 在视图里面 创建文件选择器 创建上传.下载按钮 代码如下 <body> <div> <f ...
- 团体程序设计天梯赛-练习集-L1-042. 日期格式化
L1-042. 日期格式化 世界上不同国家有不同的写日期的习惯.比如美国人习惯写成“月-日-年”,而中国人习惯写成“年-月-日”.下面请你写个程序,自动把读入的美国格式的日期改写成中国习惯的日期. 输 ...
- Android内存优化————加载长图
项目中总会遇到加载长图的需求,图片的长度可能是手机长度的很多倍,也就是需要通过滑动来查看图片.比较简单的实现方式就是使用ScrollView来加载长图,但是这样做有一个很严重的问题,就是内存消耗严重. ...
- 一个休假申请页对input标签各种属性的用法案例(手机端)
<%@ page language="java" import="java.util.*" contentType="text/html; ch ...
- jboss的下载安装、环境变量配置以及部署
1. 下载安装 http://jbossas.jboss.org/downloads/ jdk为1.7 我下载的是:JBoss AS7.1.1.Final 2. 解压安装包 D:\program ...
- C# 常用语句
var list = dt.AsEnumerable().Select(t => t.Field<string>("Bed")).ToList();Select( ...
- Git 基础教程 之 --no-ff模式合并
① 创建并切换dev分支 ② 修改readme.txt,并add,commit ③ 切回master ④ 合并 git merge --no-ff -m “merge with no-ff”d ...
- Git 基础教程 之 远程仓库
① 注册GitHub账号 由于本地Git仓库和GitHub仓库之间的传输是SSH加密的,所以需要一点设置: a, 创建SSH Key 在用户主目录下,看是否有 .ssh 目录,若无 ...
- 暑假集训D14总结
%dalao 今天dalao继续来讲课~讲的是一个叫kd树的奇怪东西= = 然而啥都没听懂 考试 今天多校联考,日常炸= = 照例打了前两道题的暴力(T1随便hash一下就水过了啊喂),然后开始推T3 ...