android--------自定义控件 之 ViewGroup
前面几篇讲了自定义控件的组合控件,地址:http://www.cnblogs.com/zhangqie/p/8985612.html
今天这篇博文主要来说说 自定义控件的 ViewGroup。
什么是ViewGroup?
ViewGroup是一种容器。它包含零个或以上的View及子View
ViewGroup有什么作用?
ViewGroup内部可以用来存放多个View控件,并且根据自身的测量模式,来测量View子控件,并且决定View子控件的位置。这在下面会逐步讲解它是怎么测量及决定子控件大小和位置的。
自定义控件
public class FlowLayoutb extends ViewGroup {

    private int horizontolSpacing;

    private int verticalSpacing;

    public FlowLayoutb(Context context) {

        super(context);

        init(context);

    }

    public FlowLayoutb(Context context, AttributeSet attrs, int defStyle) {

        super(context, attrs, defStyle);

        init(context);

    }

    private Line currentline;// 当前的行

    private int useWidth = 0;// 当前行使用的宽度

    private List<Line> mLines = new ArrayList<Line>();

    private int width;

    public FlowLayoutb(Context context, AttributeSet attrs) {

        super(context, attrs);

        init(context);

    }

    private void init(Context context) {

        horizontolSpacing = Util.dip2px(13, context);

        verticalSpacing = Util.dip2px(13, context);

    }

    // 测量 当前控件Flowlayout

    // 父类是有义务测量每个子View的

    @Override

    protected void onMeasure(int widthMeasureSpec, int heightMeasureSpec) {

        mLines.clear();

        currentline = null;

        useWidth = 0;

        /**

         * 获得此ViewGroup上级容器为其推荐的宽和高,以及计算模式

         */

        int widthMode = MeasureSpec.getMode(widthMeasureSpec);

        int heightMode = MeasureSpec.getMode(heightMeasureSpec);

        // 计算出所有的childView的宽和高

        measureChildren(widthMeasureSpec, heightMeasureSpec);

        width = MeasureSpec.getSize(widthMeasureSpec) - getPaddingLeft() - getPaddingRight();

        int height = MeasureSpec.getSize(heightMeasureSpec) - getPaddingBottom() - getPaddingTop(); // 获取到宽和高

        int childeWidthMode;

        int childeHeightMode;

        //  为了测量每个子View 需要指定每个子View测量规则

        childeWidthMode = widthMode == MeasureSpec.EXACTLY ? MeasureSpec.AT_MOST : widthMode;

        childeHeightMode = heightMode == MeasureSpec.EXACTLY ? MeasureSpec.AT_MOST : heightMode;

        int childWidthMeasureSpec = MeasureSpec.makeMeasureSpec(childeWidthMode, width);

        int childHeightMeasureSpec = MeasureSpec.makeMeasureSpec(childeHeightMode, height);

        currentline = new Line();// 创建了第一行

        for (int i = 0; i < getChildCount(); i++) {

            View child = getChildAt(i);

            // 测量每个子View

            child.measure(childWidthMeasureSpec, childHeightMeasureSpec);

            int measuredWidth = child.getMeasuredWidth();

            useWidth += measuredWidth;// 让当前行加上使用的长度

            if (useWidth <= width) {

                currentline.addChild(child);//这时候证明当前的子View是可以放进当前的行里,放进去

                useWidth += horizontolSpacing;

            } else {

                //换行

                newLine(child);

            }

        }

        if (!mLines.contains(currentline)) {

            mLines.add(currentline);// 添加最后一行

        }

        int totalheight = 0;

        for (Line line : mLines) {

            totalheight += line.getHeight();

        }

        totalheight += verticalSpacing * (mLines.size() - 1) + getPaddingTop() + getPaddingBottom();

        System.out.println(totalheight);

        setMeasuredDimension(width + getPaddingLeft() + getPaddingRight(), resolveSize(totalheight, heightMeasureSpec));

    }

    private void newLine(View child) {

        mLines.add(currentline);// 记录之前的行

        currentline = new Line();// 创建新的一行

        currentline.addChild(child);

        useWidth = currentline.lineWidth;

    }

    private class Line {

        int height = 0; //当前行的高度

        int lineWidth = 0;

        private List<View> children = new ArrayList<View>();

        /**

         * 添加一个子View

         *

         * @param child

         */

        public void addChild(View child) {

            children.add(child);

            if (child.getMeasuredHeight() > height) {

                height = child.getMeasuredHeight();

            }

            lineWidth += child.getMeasuredWidth();

        }

        public int getHeight() {

            return height;

        }

        /**

         * 返回子View的数量

         *

         * @return

         */

        public int getChildCount() {

            return children.size();

        }

        public void layout(int l, int t) {

            lineWidth += horizontolSpacing * (children.size() - 1);

            int surplusChild = 0;

            int surplus = width - lineWidth;

            if (surplus > 0 && children.size() > 0) {

                surplusChild = surplus / children.size();

            }

            for (int i = 0; i < children.size(); i++) {

                View child = children.get(i);

                child.layout(l, t, l + child.getMeasuredWidth() + surplusChild, t + child.getMeasuredHeight());

                l += child.getMeasuredWidth() + surplusChild;

                l += horizontolSpacing;

            }

        }

    }

    // 分配每个子View的位置

    @Override

    protected void onLayout(boolean changed, int l, int t, int r, int b) {

        l += getPaddingLeft();

        t += getPaddingTop();

        for (int i = 0; i < mLines.size(); i++) {

            Line line = mLines.get(i);

            line.layout(l, t);  //交给每一行去分配

            t += line.getHeight() + verticalSpacing;

        }

    }

}
自定义ViewGroup的步骤:
- 继承ViewGroup,覆盖构造方法
- 重写onMeasure方法测量子控件和自身宽高
- 实现onLayout方法摆放子控件
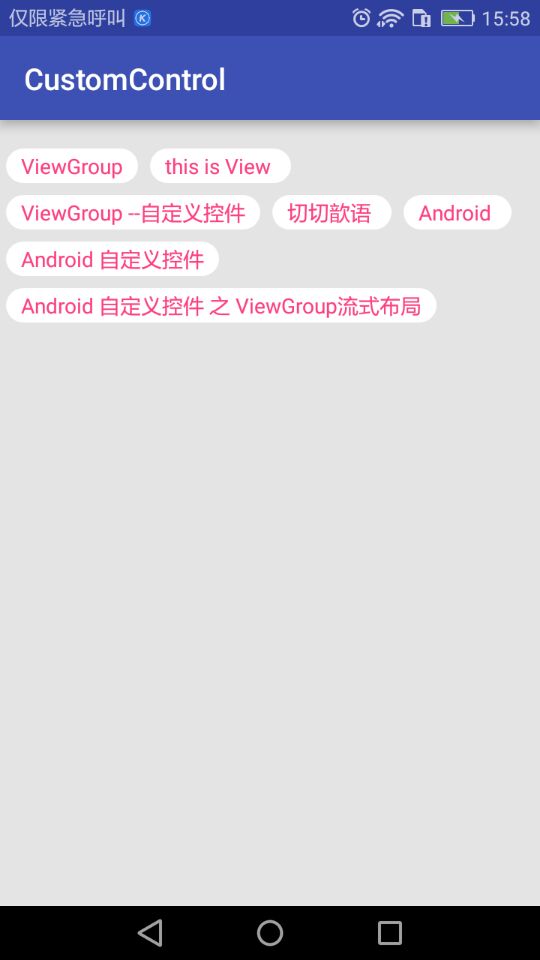
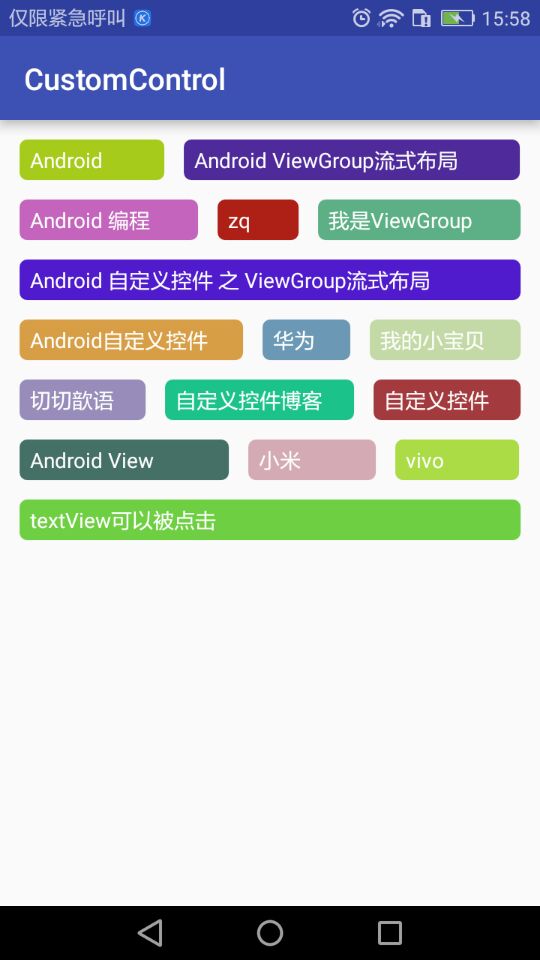
效果图:
源码地址:https://github.com/DickyQie/android-custom-control
参考资料:
https://blog.csdn.net/shineflowers/article/details/48055879
https://blog.csdn.net/zxt0601/article/details/50533658
https://blog.csdn.net/shakespeare001/article/details/51089453
android--------自定义控件 之 ViewGroup的更多相关文章
- android 自定义控件之ViewGroup生命周期执行步骤
前言 了解ViewGroup的生命周期的执行步骤对于自己自定义ViewGroup的时候十分重要,清楚了整个流程才能对ViewGroup有更深的理解.本文从个人的总结,来阐述一下执行的顺序.执行说明 首 ...
- Android自定义控件之自定义ViewGroup实现标签云
前言: 前面几篇讲了自定义控件绘制原理Android自定义控件之基本原理(一),自定义属性Android自定义控件之自定义属性(二),自定义组合控件Android自定义控件之自定义组合控件(三),常言 ...
- Android自定义控件之自定义组合控件
前言: 前两篇介绍了自定义控件的基础原理Android自定义控件之基本原理(一).自定义属性Android自定义控件之自定义属性(二).今天重点介绍一下如何通过自定义组合控件来提高布局的复用,降低开发 ...
- Android自定义控件之自定义属性
前言: 上篇介绍了自定义控件的基本要求以及绘制的基本原理,本篇文章主要介绍如何给自定义控件自定义一些属性.本篇文章将继续以上篇文章自定义圆形百分比为例进行讲解.有关原理知识请参考Android自定义控 ...
- Android自定义控件之基本原理
前言: 在日常的Android开发中会经常和控件打交道,有时Android提供的控件未必能满足业务的需求,这个时候就需要我们实现自定义一些控件,今天先大致了解一下自定义控件的要求和实现的基本原理. 自 ...
- Android自定义控件 开源组件SlidingMenu的项目集成
在实际项目开发中,定制一个菜单,能让用户得到更好的用户体验,诚然菜单的样式各种各样,但是有一种菜单——滑动菜单,是被众多应用广泛使用的.关于这种滑动菜单的实现,我在前面的博文中也介绍了如何自定义去实现 ...
- Android自定义控件之基本原理(一)
前言: 在日常的Android开发中会经常和控件打交道,有时Android提供的控件未必能满足业务的需求,这个时候就需要我们实现自定义一些控件,今天先大致了解一下自定义控件的要求和实现的基本原理. 自 ...
- Android自定义控件之自定义组合控件(三)
前言: 前两篇介绍了自定义控件的基础原理Android自定义控件之基本原理(一).自定义属性Android自定义控件之自定义属性(二).今天重点介绍一下如何通过自定义组合控件来提高布局的复用,降低开发 ...
- Android自定义控件View(三)组合控件
不少人应该见过小米手机系统音量控制UI,一个圆形带动画效果的音量加减UI,效果很好看.它是怎么实现的呢?这篇博客来揭开它的神秘面纱.先上效果图 相信很多人都知道Android自定义控件的三种方式,An ...
- android之自定义viewGroup仿scrollView的两种实现(滚动跟粘性)
最近一直在研究自定义控件,一般大致分为三种情况:自绘控件,组合控件,继承控件.接下来我们来看下继承控件.在此借鉴一位博主的文章,补充粘性的实现效果,并且加注自己的一些理解.大家也可以查看原文博客.an ...
随机推荐
- topcoder srm 445 div1
problem1 link 这个的结论是只需要考虑坐标是整数或者是整数.5,比如(2.5,3),(4,3.5),(1.5,4.5)这样的时候.这个详细证明起来应该挺麻烦的.这里有一些讨论. probl ...
- Flask学习【第2篇】:Flask基础
知识点回顾 flask依赖wsgi,实现wsgi的模块:wsgiref,werkzeug,uwsgi 实例化Flask对象,里面是有参数的 app = Flask(__name__,template_ ...
- git用法-打补丁【转】
本文转载自:https://www.cnblogs.com/yandufeng/p/5580765.html 1. git cherry-pick 作用:从一个branch上选择一个commit,添加 ...
- 数论+矩阵快速幂|斐波那契|2014年蓝桥杯A组9-fishers
标题:斐波那契 斐波那契数列大家都非常熟悉.它的定义是: f(x) = 1 .... (x=1,2) f(x) = f(x-1) + f(x-2) .... (x>2) 对于给定的整数 n 和 ...
- 修改控制台为Consolas字体
windows下控制台字体修改为Consolas字体比较好看,修改步骤如下: 临时修改 命令行cmd命令进入控制台,输入chcp 437命令,执行. 右键点击标题栏进入属性,修改字体为Consolas ...
- Validation in jQuery
jquery.validate.js github地址 官方主页 doc demo jquery-validation-unobtrusive github地址 demo doc
- ZooKeeper分布式过程协同技术详解2——了解ZooKeeper
这个服务如何实现这些协作方面的原语? ZooKeeper基础
- Druid介绍
Druid (大数据实时统计分析数据存储) Druid 是一个为在大数据集之上做实时统计分析而设计的开源数据存储.这个系统集合了一个面向列存储的层,一个分布式.shared-nothing的架构,和一 ...
- 转载:linux tar 解压命令总结
把常用的tar解压命令总结下,当作备忘: tar -c: 建立压缩档案 -x:解压 -t:查看内容 -r:向压缩归档文件末尾追加文件 -u:更新原压缩包中的文件 这五个是独立的命令,压缩解压都要用到其 ...
- Android RealativeLayout 布局gravity不能居中的解决办法
对于LinerLayout中的gravity发现复制到realativeLayout布局中发现不起作用,后来发现只要在他的每个子组件中使用 android:layout_centerVertical ...