Neo4J 图库的集群部署与基础使用
Ned4J 图库的集群部署与基础使用
部署机器
| 名称 | 配置 | IP |
|---|---|---|
| server1 | 8 核 16G | 172.16.0.2 |
| server2 | 8 核 16G | 172.16.0.3 |
| server3 | 8 核 16G | 172.16.0.4 |
| server4 | 8 核 16G | 172.16.0.5 |
# 创建项目目录

mkdir -p /opt/neo4j/

# 环境变量

export USER_ID="$(id -u)"

export GROUP_ID="$(id -g)"

export NEO4J_DOCKER_IMAGE=neo4j:5-community

export NEO4J_EDITION=docker_compose

export EXTENDED_CONF=yes

export NEO4J_ACCEPT_LICENSE_AGREEMENT=yes

export NEO4J_AUTH=neo4j/your_password
neo4j.conf 配置文件
# Setting that specifies how much memory Neo4j is allowed to use for the page cache.

server.memory.pagecache.size=100M

# Setting that specifies the initial JVM heap size.

server.memory.heap.initial_size=100M

# The behavior of the initial discovery is determined by the parameters `dbms.cluster.discovery.resolver_type` and `dbms.cluster.discovery.endpoints`.

# The DNS strategy fetches the IP addresses of the cluster members using the DNS A records.

# ### dbms.cluster.discovery.resolver_type=DNS

# The value of `dbms.cluster.discovery.endpoints` should be set to a single domain name and the port of the discovery service.

# The domain name returns an A record for every server in the cluster when a DNS lookup is performed.

# Each A record returned by DNS should contain the IP address of the server in the cluster.

# The configured server uses all the IP addresses from the A records to join or form a cluster.

# The discovery port must be the same on all servers when using this configuration.

# ### dbms.cluster.discovery.endpoints=neo4j-network:5000

# Address (the public hostname/IP address of the machine)

# and port setting that specifies where this instance advertises for discovery protocol messages from other members of the cluster.

# ### server.discovery.advertised_address=$(hostname -i)

# Address (the public hostname/IP address of the machine)

# and port setting that specifies where this instance advertises for Raft messages within the cluster.

# ### server.cluster.raft.advertised_address=$(hostname)

 # Address (the public hostname/IP address of the machine)

 # and port setting that specifies where this instance advertises for requests for transactions in the transaction-shipping catchup protocol.

# ### server.cluster.advertised_address=$(hostname)

# Enable server-side routing

# ###dbms.routing.enabled=true

# Use server-side routing for neo4j:// protocol connections.

# ###dbms.routing.default_router=SERVER

# The advertised address for the intra-cluster routing connector.

# ###server.routing.advertised_address=$(hostname)

# HTTP Connector

#

dbms.connector.http.type=HTTP

dbms.connector.http.enabled=true

dbms.connectors.default_listen_address=0.0.0.0

#

#dbms.connector.http.address=0.0.0.0:#{default.http.port}

dbms.connector.http.address=0.0.0.0:7474

dbms.connector.http.listen_address=0.0.0.0:7474
Docker-Compose.yml 文件
version: '3.8'

# Custom top-level network

networks:

  neo4j-internal:

services:

  server1:

    # Docker image to be used

    image: ${NEO4J_DOCKER_IMAGE}

    # Hostname

    hostname: server1

    # Service-level network, which specifies the networks, from the list of the top-level networks (in this case only neo4j-internal), that the server will connect to.

    # Adds a network alias (used in neo4j.conf when configuring the discovery members)

    networks:

      neo4j-internal:

        aliases:

          - neo4j-network

    # The ports that will be accessible from outside the container - HTTP (7474) and Bolt (7687).

    ports:

      - "7474:7474"

      - "7687:7687"

    # Uncomment the volumes to be mounted to make them accessible from outside the container.

    volumes:

      - /opt/neo4j/neo4j.conf:/conf/neo4j.conf # This is the main configuration file.

      - /opt/neo4j/data/server1:/var/lib/neo4j/data

      - /opt/neo4j/logs/server1:/var/lib/neo4j/logs

      - /opt/neo4j/conf/server1:/var/lib/neo4j/conf

      - /opt/neo4j/import/server1:/var/lib/neo4j/import

      #- /opt/neo4j/metrics/server1:/var/lib/neo4j/metrics

      #- /opt/neo4j/licenses/server1:/var/lib/neo4j/licenses

      #- /opt/neo4j/ssl/server1:/var/lib/neo4j/ssl

    # Passes the following environment variables to the container

    environment:

      - NEO4J_ACCEPT_LICENSE_AGREEMENT

      - NEO4J_AUTH

      - EXTENDED_CONF

      - NEO4J_EDITION

      - NEO4J_initial_server_mode__constraint=PRIMARY

    # Simple check testing whether the port 7474 is opened.

    # If so, the instance running inside the container is considered as "healthy".

    # This status can be checked using the "docker ps" command.

    healthcheck:

      test: ["CMD-SHELL", "wget --no-verbose --tries=1 --spider localhost:7474 || exit 1"]

    # Set up the user

    user: ${USER_ID}:${GROUP_ID}

  server2:

    image: ${NEO4J_DOCKER_IMAGE}

    hostname: server2

    networks:

      neo4j-internal:

        aliases:

          - neo4j-network

    ports:

      - "7475:7474"

      - "7688:7687"

    volumes:

      - /opt/neo4j/neo4j.conf:/conf/neo4j.conf

      - /opt/neo4j/data/server2:/var/lib/neo4j/data

      - /opt/neo4j/logs/server2:/var/lib/neo4j/logs

      - /opt/neo4j/conf/server2:/var/lib/neo4j/conf

      - /opt/neo4j/import/server2:/var/lib/neo4j/import

      #- /opt/neo4j/metrics/server2:/var/lib/neo4j/metrics

      #- /opt/neo4j/licenses/server2:/var/lib/neo4j/licenses

      #- /opt/neo4j/ssl/server2:/var/lib/neo4j/ssl

    environment:

      - NEO4J_ACCEPT_LICENSE_AGREEMENT

      - NEO4J_AUTH

      - EXTENDED_CONF

      - NEO4J_EDITION

      - NEO4J_initial_server_mode__constraint=PRIMARY

    healthcheck:

      test: ["CMD-SHELL", "wget --no-verbose --tries=1 --spider localhost:7474 || exit 1"]

    user: ${USER_ID}:${GROUP_ID}

  server3:

    image: ${NEO4J_DOCKER_IMAGE}

    hostname: server3

    networks:

      neo4j-internal:

        aliases:

          - neo4j-network

    ports:

      - "7476:7474"

      - "7689:7687"

    volumes:

      - /opt/neo4j/neo4j.conf:/conf/neo4j.conf

      - /opt/neo4j/data/server3:/var/lib/neo4j/data

      - /opt/neo4j/logs/server3:/var/lib/neo4j/logs

      - /opt/neo4j/conf/server3:/var/lib/neo4j/conf

      - /opt/neo4j/import/server3:/var/lib/neo4j/import

      #- /opt/neo4j/metrics/server3:/var/lib/neo4j/metrics

      #- /opt/neo4j/licenses/server3:/var/lib/neo4j/licenses

      #- /opt/neo4j/ssl/server3:/var/lib/neo4j/ssl

    environment:

      - NEO4J_ACCEPT_LICENSE_AGREEMENT

      - NEO4J_AUTH

      - EXTENDED_CONF

      - NEO4J_EDITION

      - NEO4J_initial_server_mode__constraint=PRIMARY

    healthcheck:

      test: ["CMD-SHELL", "wget --no-verbose --tries=1 --spider localhost:7474 || exit 1"]

    user: ${USER_ID}:${GROUP_ID}

  server4:

    image: ${NEO4J_DOCKER_IMAGE}

    hostname: server4

    networks:

      neo4j-internal:

        aliases:

          - neo4j-network

    ports:

      - "7477:7474"

      - "7690:7687"

    volumes:

      - /opt/neo4j/neo4j.conf:/conf/neo4j.conf

      - /opt/neo4j/data/server4:/var/lib/neo4j/data

      - /opt/neo4j/logs/server4:/var/lib/neo4j/logs

      - /opt/neo4j/conf/server4:/var/lib/neo4j/conf

      - /opt/neo4j/import/server4:/var/lib/neo4j/import

      #- /opt/neo4j/metrics/server4:/var/lib/neo4j/metrics

      #- /opt/neo4j/licenses/server4:/var/lib/neo4j/licenses

      #- /opt/neo4j/ssl/server4:/var/lib/neo4j/ssl

    environment:

      - NEO4J_ACCEPT_LICENSE_AGREEMENT

      - NEO4J_AUTH

      - EXTENDED_CONF

      - NEO4J_EDITION

      - NEO4J_initial_server_mode__constraint=SECONDARY

    healthcheck:

      test: ["CMD-SHELL", "wget --no-verbose --tries=1 --spider localhost:7474 || exit 1"]

    user: ${USER_ID}:${GROUP_ID}
version: '2'

services:

  neo4j:

    image: docker.io/bitnami/neo4j:5

    ports:

      - '7474:7474'

      - '7473:7473'

      - '7687:7687'

    volumes:

      - 'neo4j_data:/bitnami'

    environment:

      - NEO4J_AUTH=neo4j/bitnami1

volumes:

  neo4j_data:

    driver: local
Neo4J 的基础使用
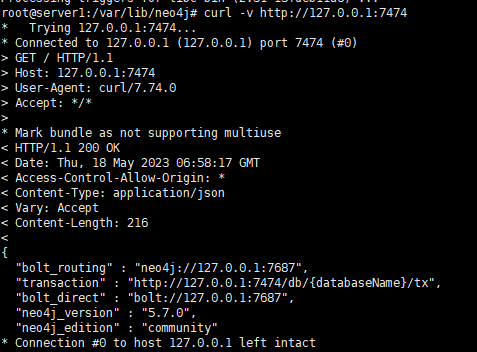
基于 7474 端口的访问
通过远程配置的IP访问与配置,特别需要注意的就是对应的Auth这块,从而基于对应的外部IP才可以访问 比如 http://192.168.1.217:7474/
参考
Neo4J 图库的集群部署与基础使用的更多相关文章
- HBase集群部署与基础命令
HBase 集群部署 安装 hbase 之前需要先搭建好 hadoop 集群和 zookeeper 集群.hadoop 集群搭建可以参考:https://www.cnblogs.com/javammc ...
- Storm1.0.3集群部署
Storm集群部署 所有集群部署的基本流程都差不多:下载安装包并上传.解压安装包并配置环境变量.修改配置文件.分发安装包.启动集群.查看集群是否部署成功. 1.所有的集群上都要配置hosts vi ...
- Kafka集群部署 (守护进程启动)
1.Kafka集群部署 1.1集群部署的基本流程 下载安装包.解压安装包.修改配置文件.分发安装包.启动集群 1.2集群部署的基础环境准备 安装前的准备工作(zk集群已经部署完毕) 关闭防火墙 c ...
- Storm集群部署及单词技术
1. 集群部署的基本流程 集群部署的流程:下载安装包.解压安装包.修改配置文件.分发安装包.启动集群 注意: 所有的集群上都需要配置hosts vi /etc/hosts 192.168.239.1 ...
- 2.Storm集群部署及单词统计案例
1.集群部署的基本流程 2.集群部署的基础环境准备 3.Storm集群部署 4.Storm集群的进程及日志熟悉 5.Storm集群的常用操作命令 6.Storm源码下载及目录熟悉 7.Storm 单词 ...
- openstack(pike 版)集群部署(一)----基础环境部署
一.环境 1.系统: a.CentOS Linux release 7.4.1708 (Core) b.更新yum源和安装常用软件 # yum -y install epel-release ba ...
- k8s1.9.0安装--基础集群部署
二.基础集群部署 - kubernetes-simple 1. 部署ETCD(主节点) 1.1 简介 kubernetes需要存储很多东西,像它本身的节点信息,组件信息,还有通过kubernetes运 ...
- Dubbo入门到精通学习笔记(二十):MyCat在MySQL主从复制的基础上实现读写分离、MyCat 集群部署(HAProxy + MyCat)、MyCat 高可用负载均衡集群Keepalived
文章目录 MyCat在MySQL主从复制的基础上实现读写分离 一.环境 二.依赖课程 三.MyCat 介绍 ( MyCat 官网:http://mycat.org.cn/ ) 四.MyCat 的安装 ...
- 2.Ceph 基础篇 - 集群部署及故障排查
文章转载自:https://mp.weixin.qq.com/s?__biz=MzI1MDgwNzQ1MQ==&mid=2247485243&idx=1&sn=e425c31a ...
- 理解 OpenStack + Ceph (1):Ceph + OpenStack 集群部署和配置
本系列文章会深入研究 Ceph 以及 Ceph 和 OpenStack 的集成: (1)安装和部署 (2)Ceph RBD 接口和工具 (3)Ceph 物理和逻辑结构 (4)Ceph 的基础数据结构 ...
随机推荐
- What's the best way to read and understand someone else's code?
Find one thing you know the code does, and trace those actions backward, starting at the end Say, fo ...
- 强大的 apt-get 命令
强大的 apt-get 命令(小结) 一.ubuntu下管理软件最方便的非 apt-get 工具莫属了,它的常见用法稍微整理一下供以后参考(详细见 man apt-get ): 1.更新源,升级软件和 ...
- 【享元设计模式详解】C/Java/JS/Go/Python/TS不同语言实现
简介 享元模式(Flyweight Pattern),是一种结构型设计模式.主要用于减少创建对象的数量,以减少内存占用和提高性能.它摒弃了在每个对象中保存所有数据的方式,通过共享多个对象所共有的相同状 ...
- 包和正则表达式 re模块的使用
包的使用: import.sys print(sys.path) #查看执行文件的环境 环境变量是以执行文件为准的,所有被导入的模块或者后续的其他文件引用的sys.path都是参照执行文件的sys.p ...
- Android ViewGroup的事件分发机制-源码分析
为了更好的理解ViewGroup的事件分发机制,我们在自定义一个MyLinerLayout. public class MyLinearLayout extends LinearLayout { pr ...
- MySQL(十)表空间结构:区、段与碎片区
表空间结构:区.段与碎片区 为什么要有区? B+树中的每一层的页都会形成一个双向链表,双向链表之间的物理位置可能会离得非常远,当遇到范围查询的适用场景的时候,就会定位到最左边和最右边的记录,然后沿 ...
- ROS2的安装与使用(超详细图文教程)
ROS2的安装与使用(超详细图文教程) 如果前面的虚拟机以及Ubuntu22.04镜像都安装好了,根据目录直接跳到ROS2的安装. 资料参考于:古月居 VMware虚拟机的安装 安装地址: 对于不了解 ...
- 牛客网:华为机试题(python版本)
输入一行:input() 输入的一行有多个信息:input().split() 有多组测试用例(多组同时输入): while true try except... 1.计算字符串最后一个单词的长度,单 ...
- 【机器学习与深度学习理论要点】20. 什么是激活函数,为什么要用激活函数,常见的激活函数和特点,softmax函数
1)什么是激活函数,为什么要用激活函数? 激活函数,指神经网络中将输入信号的总和转换为输出信号的函数,激活函数将多层感知机输出转换为非线性,使得神经网络可以任意逼近任何非线性函数,这样神经网络就可以应 ...
- 记一次 Oracle 下的 SQL 优化过程
1. 介绍 事情是这样的,UAT 环境的测试小伙伴向我扔来一个小 bug,说是一个放大镜的查询很慢,转几分钟才出数据,我立马上开发环境试了一下,很快啊我说,放大镜的数据立马就出来了,然后我登录 UAT ...