WPF入门教程系列八——布局之Grid与UniformGrid(三)
五. Grid
Grid顾名思义就是“网格”,它的子控件被放在一个一个实现定义好的小格子里面,整齐配列。 Grid和其他各个Panel比较起来,功能最多也最为复杂。要使用Grid,首先要向RowDefinitions和ColumnDefinitions属性中添加一定数量的RowDefinitions和 ColumnDefinitions元素,从而定义行数和列数。而放置在Grid面板中的控件元素都必须显示采用附加属性语法定义其 放置所在的行和列,它们都是以0为基准的整型 值,如果没有显式设置任何行或列,Grid将会隐式地将控件加入在第0行第0列。由于Grid的组成并非简单的添加属性标记来区分行列,这也使得用户在实际应用中可以具体到某一单 元格中,所以布局起来就很精细了。
Grid的单元格可以是空的,一个单元格中可以有多个元素,而在单元格中元素是根据它们的Z顺序一个接着一个呈现的。与Canvas一样,同一个单元格中 的子元素不会与其他元素交互布局,信息——它们仅仅是重叠而已。接下来我们来使用一些实际的代码演示一下如何使用GRID。
1) Grid的列宽与行高可采用固定、自动、按比列三种方式定义
<Grid>

    <Grid.RowDefinitions>

        <RowDefinition Height="Auto" />

        <RowDefinition Height="Auto" />

        <RowDefinition Height="*" />

        <RowDefinition Height="40" />

    </Grid.RowDefinitions>

    <Grid.ColumnDefinitions>

        <ColumnDefinition Width="Auto" />

        <ColumnDefinition Width="300" />

    </Grid.ColumnDefinitions>

</Grid>
注意:这里介绍一下Grid高度、宽度的几种定义方式:
|
名称 |
说明 |
|
绝对尺寸 |
就是给一个实际的数字,但通常将此值指定为整数,像上图中中那样 |
|
自动(Autosizing) |
值为Auto,实际作用就是取实际控件所需的最小值 |
|
StarSizing |
值为*或N*,实际作用就是取尽可能大的值,当某一列或行被定义为*则是尽可能大,当出现多列或行被定义为*则是代表几者之间按比例方设置尺寸 |
第一种,固定长度——宽度不够,会裁剪,不好用。单位pixel。
第二种,自动长度——自动匹配列中最长元素的宽度。
第三种,比例长度——*表示占用剩余的全部宽度;两行都是*,将平分剩余宽度;像上面的一个2*,一个*,表示前者2/3宽度。
2) 跨越多行和多列
<Rectangle Fill="Silver" Grid.Column="1" Grid.ColumnSpan="3"/>
使用Grid.ColumnSpan和Grid.RowSpan附加属性可以让相互间隔的行列合并,所以元素也可以跨越多个单元格。
3) 使用GridSplit分割
<GridSplitter Height="6" VerticalAlignment="Stretch" HorizontalAlignment="Stretch"

               Grid.Row="2" Grid.Column="2"></GridSplitter>
使用GridSplit控件结合Grid控件实现类似于WinForm中SplitContainer的功能,这个大家在WinForm当中经常用到,我们也不多做介绍。
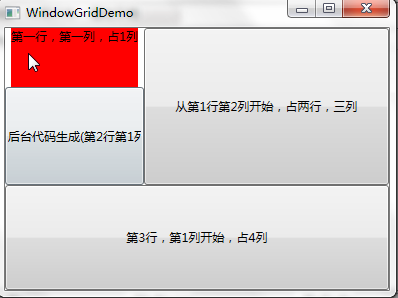
4) XAML代码实现下图效果(用XAML):
<Window x:Class="WpfApp1.WindowGridDemo"

        xmlns="http://schemas.microsoft.com/winfx/2006/xaml/presentation"

        xmlns:x="http://schemas.microsoft.com/winfx/2006/xaml"

        Title="WindowGridDemo" Height="300" Width="400">

    <Grid>

        <Grid.RowDefinitions>

            <RowDefinition Height="61*"/>

            <RowDefinition Height="101*"/>

            <RowDefinition Height="108*"/>

        </Grid.RowDefinitions>

        <Grid.ColumnDefinitions>

            <ColumnDefinition Width="139"/>

            <ColumnDefinition Width="184*"/>

            <ColumnDefinition Width="45*" />

            <ColumnDefinition Width="250*"/>

        </Grid.ColumnDefinitions>

        <TextBlock   Grid.Row="0" Grid.ColumnSpan="1"  Text="第一行,第一列,占1列" Background="Red" HorizontalAlignment="Center"  />

        <Button Grid.Row="0" Grid.Column="1" Grid.ColumnSpan="3" Grid.RowSpan="2" Content="从第1行第2列开始,占两行,三列" />

        <Button  Grid.Row="2" Grid.Column="0" Grid.ColumnSpan="4" Content="第3行,第1列开始,占4列" />

        <Button Grid.Row="1" Name="btnAddByCode" Click="btnAddByCode_Click" >后台代码生成(第2行第1列)</Button>

    </Grid>

</Window>
5) 下图,以C#代码实现:

using System;

using System.Collections.Generic;

using System.Linq;

using System.Text;

using System.Threading.Tasks;

using System.Windows;

using System.Windows.Controls;

using System.Windows.Data;

using System.Windows.Documents;

using System.Windows.Input;

using System.Windows.Media;

using System.Windows.Media.Imaging;

using System.Windows.Shapes;

namespace WpfApp1

{

    /// <summary>

    /// WindowGridDemo.xaml 的交互逻辑

    /// </summary>

    public partial class WindowGridDemo : Window

    {

        public WindowGridDemo()

        {

            InitializeComponent();

        }

        public void btnAddByCode_Click(object sender, RoutedEventArgs e)

        {

            Grid grid = new Grid();

            grid.Width = Double.NaN;    //相当于在XAML中设置Width="Auto"

            grid.Height = Double.NaN;   //相当于在XAML中设置Height="Auto"

            //把grid添加为窗体的子控件

            this.Content = grid;

            //列一

            ColumnDefinition cd1 = new ColumnDefinition();

            cd1.Width = new GridLength();

            grid.ColumnDefinitions.Add(cd1);

            //列二

            ColumnDefinition cd2 = new ColumnDefinition();

            cd2.Width = new GridLength(, GridUnitType.Star);

            grid.ColumnDefinitions.Add(cd2);

            //列三

            ColumnDefinition cd3 = new ColumnDefinition();

            cd3.Width = new GridLength(, GridUnitType.Star);

            grid.ColumnDefinitions.Add(cd3);

            //行一

            RowDefinition row1 = new RowDefinition();

            row1.Height = new GridLength();

            grid.RowDefinitions.Add(row1);

            //行二

            RowDefinition row2 = new RowDefinition();

            row2.Height = new GridLength(, GridUnitType.Star);

            grid.RowDefinitions.Add(row2);

            //行三

            RowDefinition row3 = new RowDefinition();

            row3.Height = new GridLength();

            grid.RowDefinitions.Add(row3);

            //把单元格添加到grid中

            Rectangle r0c1 = new Rectangle();

            r0c1.Fill = new SolidColorBrush(Colors.Gray);

            r0c1.SetValue(Grid.ColumnProperty, );

            r0c1.SetValue(Grid.RowProperty, );

            grid.Children.Add(r0c1);

            Rectangle r1c23 = new Rectangle();

            r1c23.Fill = new SolidColorBrush(Colors.Yellow);

            r1c23.SetValue(Grid.ColumnProperty, );

            r1c23.SetValue(Grid.ColumnSpanProperty, );

            r1c23.SetValue(Grid.RowProperty, );

            r1c23.SetValue(Grid.RowSpanProperty, );

            grid.Children.Add(r1c23);

        }

    }

}
六、 UniformGrid
介绍了前面的Grid,接下来介绍的这个UniformGrid 就是Grid的简化版,每个单元格的大小相同,不需要定义行列集合。每个单元格始终具有相同的大小,每个单元格只能容纳一个控件,将自动按照定义在其内部的元素个数,自动创建行列,并通常保持相同的行列数。UniformGrid 中没有Row 和Column 附加属性,也没有空白单元格。
与Grid布局控件相比,UniformGrid布局控件很少使用。Grid面板是用于创建简单乃至复杂窗口布局的通用工具。UniformGrid面板是一个一种更特殊的布局容器,主要用于在一个刻板的网格中快速地布局元素。
下面用XAML代码实现一个示例,该示例使用4个按钮填充UniformGrid面板。:

<Window x:Class="WpfApp1.WindowUniformGrid"

        xmlns="http://schemas.microsoft.com/winfx/2006/xaml/presentation"

        xmlns:x="http://schemas.microsoft.com/winfx/2006/xaml"

        Title="WindowUniformGrid" Height="300" Width="300">

    <Grid>

        <UniformGrid Rows="2" Columns="2">

            <Button>第一个(0,0)</Button>

            <Button>第二个(0,1)</Button>

            <Button>第三个(1,0)</Button>

            <Button Name="btnAddByCode" Click="btnAddByCode_Click">第四个(1,1)</Button>

        </UniformGrid>

    </Grid>

</Window>
下面使用C#代码实现10个TextBlock的控件的布局。

using System;

using System.Collections.Generic;

using System.Linq;

using System.Text;

using System.Threading.Tasks;

using System.Windows;

using System.Windows.Controls;

using System.Windows.Controls.Primitives;

using System.Windows.Data;

using System.Windows.Documents;

using System.Windows.Input;

using System.Windows.Media;

using System.Windows.Media.Imaging;

using System.Windows.Shapes;

namespace WpfApp1

{

    /// <summary>

    /// WindowUniformGrid.xaml 的交互逻辑

    /// </summary>

    public partial class WindowUniformGrid : Window

    {

        public WindowUniformGrid()

        {

            InitializeComponent();

        }

        public void btnAddByCode_Click(object sender, RoutedEventArgs e)

        {

            UniformGrid wp = new UniformGrid();

            //把wp添加为窗体的子控件

            this.Content = wp;

            wp.Margin = new Thickness(, , , );

            wp.Background = new SolidColorBrush(Colors.Red);

            //遍历增加Rectangles

            TextBlock block;

            for (int i = ; i <= ; i++)

            {

                block = new TextBlock();

                block.Text = string.Format("第{0}个", i);

                wp.Children.Add(block);

            }

        }

    }

}
WPF入门教程系列八——布局之Grid与UniformGrid(三)的更多相关文章
- WPF入门教程系列六——布局介绍与Canvas(一)
从这篇文章开始是对WPF中的界面如何布局做一个较简单的介绍,大家都知道:UI是做好一个软件很重要的因素,如果没有一个漂亮的UI,功能做的再好也无法吸引很多用户使用,而且没有漂亮的界面,那么普通用户会感 ...
- WPF入门教程系列九——布局之DockPanel与ViewBox(四)
七. DockPanel DockPanel定义一个区域,在此区域中,您可以使子元素通过描点的形式排列,这些对象位于 Children 属性中.停靠面板其实就是在WinForm类似于Dock属性的元 ...
- WPF入门教程系列十——布局之Border与ViewBox(五)
九. Border Border 是一个装饰的控件,此控件绘制边框及背景,在 Border 中只能有一个子控件,若要显示多个子控件,需要将一个附加的 Panel 控件放置在父 Border 中.然后可 ...
- WPF入门教程系列七——布局之WrapPanel与StackPanel(二)
三. WrapPanel WrapPanel布局面板将各个控件从左至右按照行或列的顺序罗列,当长度或高度不够是就会自动调整进行换行,后续排序按照从上至下或从右至左的顺序进行. Orientation— ...
- WPF入门教程系列二十三——DataGrid示例(三)
DataGrid的选择模式 默认情况下,DataGrid 的选择模式为“全行选择”,并且可以同时选择多行(如下图所示),我们可以通过SelectionMode 和SelectionUnit 属性来修改 ...
- WPF入门教程系列(一) 创建你的第一个WPF项目
WPF入门教程系列(一) 创建你的第一个WPF项目 WPF基础知识 快速学习绝不是从零学起的,良好的基础是快速入手的关键,下面先为大家摞列以下自己总结的学习WPF的几点基础知识: 1) C#基础语法知 ...
- WPF入门教程系列(二) 深入剖析WPF Binding的使用方法
WPF入门教程系列(二) 深入剖析WPF Binding的使用方法 同一个对象(特指System.Windows.DependencyObject的子类)的同一种属性(特指DependencyProp ...
- WPF入门教程系列三——Application介绍(续)
接上文WPF入门教程系列二——Application介绍,我们继续来学习Application 三.WPF应用程序的关闭 WPF应用程序的关闭只有在应用程序的 Shutdown 方法被调用时,应用程序 ...
- WPF入门教程系列二——Application介绍
一.Application介绍 WPF和WinForm 很相似, WPF与WinForm一样有一个 Application对象来进行一些全局的行为和操作,并且每个 Domain (应用程序域)中仅且只 ...
随机推荐
- markDown使用
Markdown快速入门 基本语法 1.标题 使用"#"来表示标题的级别,个数越少,标题级别越高 2.段落和换行 使用这个标志来生成段落 在行末输入2个或者以上的空格再回车就可以换 ...
- 241. Different Ways to Add Parentheses
241. Different Ways to Add Parentheses https://leetcode.com/problems/different-ways-to-add-parenthes ...
- Python 学习---------Day6
18章 模块:宏伟蓝图 import 使客户端(导入者)以一个整体获取一个模块 from 允许客户端从一个模块文件中获取特定的变量名 reload 在不中止Python程序的情况下,提供了一种重新载入 ...
- 有一种感动叫ACM(记陈立杰在成都赛区开幕式上的讲话)
各位选手,各位教练,大家好,我是来自清华大学交叉信息学院的陈立杰,今天很荣幸站在这里代表全体参赛选手发言.对于我来说,这是我第一次正式参加ACM的比赛.不过我跟ACM之间的缘分,大概在很早的时候就已经 ...
- [UE4]CustomAnimationBlueprintNode 自定义动画蓝图节点
目的:在AnimationBlueprint中使用自定义动画控制节点. 主要过程: 1. 引用相关模块.在Client.Build.cs文件中,PublicDependencyModuleN ...
- Tomcat settings should be set in Tomcat Preference Page解决
选择tomcat version,然户找到该tomcat的主目录,输入在tomcat home,下面的参数会自动配置,点击apply. 然后在左边选择advanced,同样把tomcat的主目录复制在 ...
- jqm页面跳转问题
jqm里面页面跳转默认都是通过ajax请求的,必须重新刷新页面js方可有效,也就是js没有起作用,并不是js本身的问题,下面说说解决方法: 在使用jQuery Mobile进行Web开发中,当页面跳转 ...
- Oozie命令行常用命令汇总[转]
Oozie命令行常用命令汇总 有时候脚本跑多了就不愿意在OozieWeb端去看脚本的运行情况了.还好Oozie提供了很多命令行命令.能通过命令行直接检索自己想看到的脚本信息.在这里简单进行一下总结.一 ...
- debian/ubuntu 下ISE安装
1. planAhead无法打开的问题 原因: debian中使用dash,跟planAhead使用的bash略有不同 解决: 将/bin/sh 的链接从dash改为bash 2. FPGA Edit ...
- HTML5 简易转盘
这里我们使用两个Canvas进行转盘的绘画 canvas1用于绘画背景,Canvas2用于指针的转动: 把Canvas2背景设为透明并使用相对布局定位: #myCanvas2{ position: a ...