手把手构建LSTM的向前传播(Building a LSTM step by step)
- 阀门和状态描述
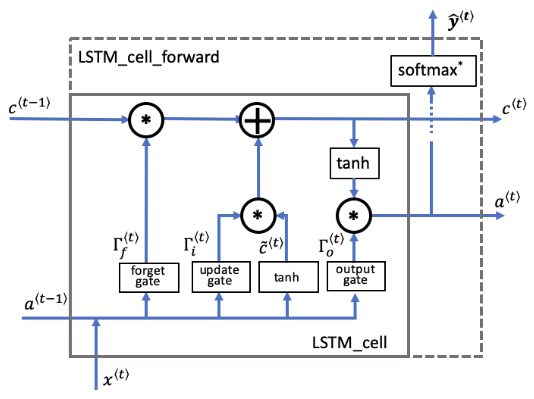
- LSTM cell
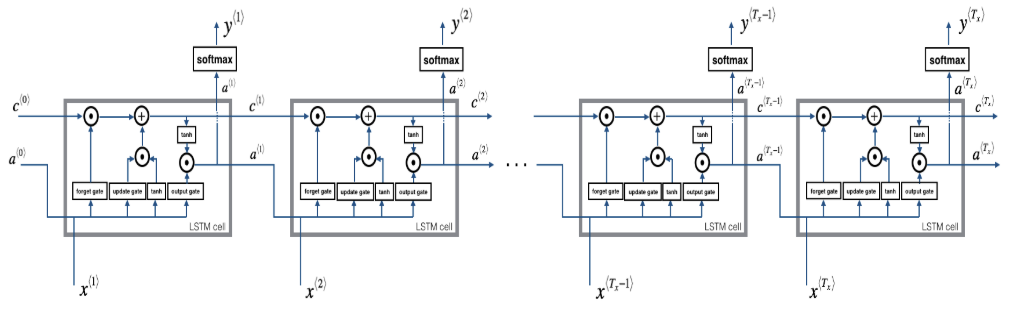
- LSTM整个过程
- 遗忘门,更新门,输出门的作用是什么,它们是怎么发挥作用的。
- 单元状态 cell state 是如何来选择性保留信息。
- 假设我们正在阅读一段文本中的单词,并计划使用LSTM跟踪语法结构,例如判断主体是单数(“ puppy”)还是复数(“ puppies”)。
- 如果主体更改其状态(从单数词更改为复数词),那么先前的记忆状态将过时,因此我们“忘记”过时的状态。
- “遗忘门”是一个张量,它包含介于0和1之间的值。
- 如果遗忘门中的一个单元的值接近于0,则LSTM将“忘记”之前单元状态相应单位的存储值。
- 如果遗忘门中的一个单元的值接近于1,则LSTM将记住大部分相应的值。

- 包含控制遗忘门行为的权重。
- 之前时间步长的隐藏状态和当前时间步长的输入连接在一起乘以。
- sigmoid函数让每个门的张量值在0到1之间。
- 遗忘门和之前的单元状态有相同的shape。
- 这就意味着它们可以按照元素相乘。
- 将张量和相乘相当于在之前的单元状态应用一层蒙版。
- 如果中的单个值是0或者接近于0,那么乘积就接近0.
- 这就是使得存储在对应单位的值在下一个时间步长不会被记住。
- 同样,如果中的1个值接近于1,那么乘积就接近之前单元状态的原始值。
- LSTM就会在下一个时间步长中保留对应单位的值。
- Wf: 遗忘门的权重
- Wb: 遗忘门的偏差
- ft: 遗忘门
- 候选值是包含当前时间步长信息的张量,它可能会存储在当前单元状态中。
- 传递候选值的哪些部分取决于更新门。
- 候选值是一个张量,它的范围从-1到1。
- 代字号“〜”用于将候选值与单元状态区分开。

- 'tanh'函数产生的值介于-1和+1之间。
- cct: 候选值
- 我们使用更新门来确定候选的哪些部分要添加到单元状态中。
- 更新门是包含0到1之间值的张量。
- 当更新门中的单位接近于0时,它将阻止候选值中的相应值传递到。
- 当更新门中的单位接近1时,它允许将候选的值传递到。
- 注意,我们使用下标“i”而不是“u”来遵循文献中使用的约定。

- 类似于遗忘门(此处为),用sigmoid函数乘后值就落在了0到1之间。
- 将更新门与候选元素逐元素相乘,并将此乘积()用于确定单元状态。
- wi是更新门的权重
- bi是更新门的偏差
- it是更新门
- 单元状态是传递到未来时间步长的“记忆/内存(memory)”。
- 新单元状态是先前单元状态和候选值的组合。

- 之前的单元状态通过遗忘门调整(加权)。
- 候选值通过更新门调整(加权)。
- c: 单元状态,包含所有的时间步长,c的shape是(na, m, T)
- c_next: 下一个时间步长的单元状态,的shape (na, m)
- c_prev: 之前的单元状态,的shape (na, m)

- 输出门决定时间步长要输出的预测值。
- 输出门与其他门一样,它包含从0到1的值。
- 输出门由之前的隐藏状态和当前的输入 决定。
- sigmoid函数让值的范围在0到1之间。
- wo: 输出门的权重
- bo: 输出门的偏差
- ot: 输出门
- 隐藏状态将传递到LSTM单元的下一个时间步长。
- 它用于确定下一个时间步长的三个门()。
- 隐藏状态也用于预测。
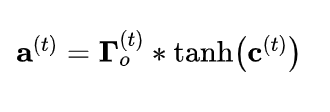
- 隐藏状态由单元状态结合输出门确定。
- 单元状态通过“ tanh”函数把值缩放到-1和+1之间。
- 输出门的作用就像一个“掩码mask”,它既可以保留的值,也可以使这些值不包含在隐藏状态中。
- a: 隐藏状态,包含时间步长,shape (na, m, Tx)
- a_prev: 前一步的隐藏状态,的shape (na, m)
- a_next: 下一步的隐藏状态,的shape (na, m)
- 此用例的预测是分类,所以我们用softmax。

- y_pred: 预测,包含所有的时间步长,的shape (ny, m, Tx),注意,本例中Tx=Ty。
- yt_pred: 当前时间步长t的预测值,shape是(ny, m)
def lstm_cell_forward(xt, a_prev, c_prev, parameters):
"""
Implement a single forward step of the LSTM-cell as described in Figure (4)
Arguments:
xt -- your input data at timestep "t", numpy array of shape (n_x, m).
a_prev -- Hidden state at timestep "t-1", numpy array of shape (n_a, m)
c_prev -- Memory state at timestep "t-1", numpy array of shape (n_a, m)
parameters -- python dictionary containing:
Wf -- Weight matrix of the forget gate, numpy array of shape (n_a, n_a + n_x)
bf -- Bias of the forget gate, numpy array of shape (n_a, 1)
Wi -- Weight matrix of the update gate, numpy array of shape (n_a, n_a + n_x)
bi -- Bias of the update gate, numpy array of shape (n_a, 1)
Wc -- Weight matrix of the first "tanh", numpy array of shape (n_a, n_a + n_x)
bc -- Bias of the first "tanh", numpy array of shape (n_a, 1)
Wo -- Weight matrix of the output gate, numpy array of shape (n_a, n_a + n_x)
bo -- Bias of the output gate, numpy array of shape (n_a, 1)
Wy -- Weight matrix relating the hidden-state to the output, numpy array of shape (n_y, n_a)
by -- Bias relating the hidden-state to the output, numpy array of shape (n_y, 1)
Returns:
a_next -- next hidden state, of shape (n_a, m)
c_next -- next memory state, of shape (n_a, m)
yt_pred -- prediction at timestep "t", numpy array of shape (n_y, m)
cache -- tuple of values needed for the backward pass, contains (a_next, c_next, a_prev, c_prev, xt, parameters)
Note: ft/it/ot stand for the forget/update/output gates, cct stands for the candidate value (c tilde),
c stands for the cell state (memory)
"""
# 从 "parameters" 中取出参数。
Wf = parameters["Wf"] # 遗忘门权重
bf = parameters["bf"]
Wi = parameters["Wi"] # 更新门权重 (注意变量名下标是i不是u哦)
bi = parameters["bi"] # (notice the variable name)
Wc = parameters["Wc"] # 候选值权重
bc = parameters["bc"]
Wo = parameters["Wo"] # 输出门权重
bo = parameters["bo"]
Wy = parameters["Wy"] # 预测值权重
by = parameters["by"]
# 连接 a_prev 和 xt
concat = np.concatenate((a_prev, xt), axis=0)
# 等价于下面代码
# 从 xt 和 Wy 中取出维度
# n_x, m = xt.shape
# n_y, n_a = Wy.shape
# concat = np.zeros((n_a + n_x, m))
# concat[: n_a, :] = a_prev
# concat[n_a :, :] = xt
# 计算 ft (遗忘门), it (更新门)的值
# cct (候选值), c_next (单元状态),
# ot (输出门), a_next (隐藏单元)
ft = sigmoid(np.dot(Wf, concat) + bf) # 遗忘门
it = sigmoid(np.dot(Wi, concat) + bi) # 更新门
cct = np.tanh(np.dot(Wc, concat) + bc) # 候选值
c_next = ft * c_prev + it * cct # 单元状态
ot = sigmoid(np.dot(Wo, concat) + bo) # 输出门
a_next = ot * np.tanh(c_next) # 隐藏状态
# 计算LSTM的预测值
yt_pred = softmax(np.dot(Wy, a_next) + by)
# 用于反向传播的缓存
cache = (a_next, c_next, a_prev, c_prev, ft, it, cct, ot, xt, parameters)
return a_next, c_next, yt_pred, cache
- 从变量x 和 parameters中获得 的维度。
- 初始化三维张量 , 和 .
- : 隐藏状态, shape
- : 单元状态, shape
- : 预测, shape (注意在这个例子里 ).
- 注意 将一个变量设置来和另一个变量相等是"按引用复制". 换句话说,就是不用使用c = a, 否则这两个变量指的是同一个变量,更改任何其中一个变量另一个变量的值都会跟着变。
- 初始化二维张量
- 储存了t时间步长的隐藏状态,它的变量名是a_next。
- , 时间步长0时候的初始隐藏状态,调用该函数时候传入的值,它的变量名是a0。
- 和 代表单个时间步长,所以他们的shape都是
- 通过传入函数的初始化隐藏状态来初始化 。
- 用0来初始化 。
- 变量名是 c_next.
- 表示单个时间步长, 所以它的shape是
- 注意: create c_next as its own variable with its own location in memory. 不要将它通过3维张量的切片来初始化,换句话说, 不要 c_next = c[:,:,0].
- 对每个时间步长,做以下事情:
- 从3维的张量 中, 获取在时间步长t处的2维切片 。
- 调用你之前定义的 lstm_cell_forward 函数,获得隐藏状态,单元状态,预测值。
- 存储隐藏状态,单元状态,预测值到3维张量中。
- 把缓存加入到缓存列表。
def lstm_forward(x, a0, parameters):
"""
Implement the forward propagation of the recurrent neural network using an LSTM-cell described in Figure (4).
Arguments:
x -- Input data for every time-step, of shape (n_x, m, T_x).
a0 -- Initial hidden state, of shape (n_a, m)
parameters -- python dictionary containing:
Wf -- Weight matrix of the forget gate, numpy array of shape (n_a, n_a + n_x)
bf -- Bias of the forget gate, numpy array of shape (n_a, 1)
Wi -- Weight matrix of the update gate, numpy array of shape (n_a, n_a + n_x)
bi -- Bias of the update gate, numpy array of shape (n_a, 1)
Wc -- Weight matrix of the first "tanh", numpy array of shape (n_a, n_a + n_x)
bc -- Bias of the first "tanh", numpy array of shape (n_a, 1)
Wo -- Weight matrix of the output gate, numpy array of shape (n_a, n_a + n_x)
bo -- Bias of the output gate, numpy array of shape (n_a, 1)
Wy -- Weight matrix relating the hidden-state to the output, numpy array of shape (n_y, n_a)
by -- Bias relating the hidden-state to the output, numpy array of shape (n_y, 1)
Returns:
a -- Hidden states for every time-step, numpy array of shape (n_a, m, T_x)
y -- Predictions for every time-step, numpy array of shape (n_y, m, T_x)
c -- The value of the cell state, numpy array of shape (n_a, m, T_x)
caches -- tuple of values needed for the backward pass, contains (list of all the caches, x)
"""
# 初始化 "caches", 用来存储每个时间步长的cache值的
caches = [] Wy = parameters['Wy']
# 从 x 和 parameters['Wy'] 的shape中获取纬度值
n_x, m, T_x = x.shape
n_y, n_a = Wy.shape
# 初始化 "a", "c" and "y"
a = np.zeros((n_a, m, T_x))
c = np.zeros((n_a, m, T_x))
y = np.zeros((n_y, m, T_x))
# 初始化 a_next and c_next
a_next = a0
c_next = np.zeros(a_next.shape)
# loop over all time-steps
for t in range(T_x):
# 从3维张量x中获取t时间步长的2维张量xt
xt = x[:, :, t]
# 更新下一个时间步长的隐藏状态, 下一个单元状态, 计算预测值
a_next, c_next, yt, cache = lstm_cell_forward(xt, a_next, c_next, parameters)
# 把下一个时间步长长的隐藏状态保存起来
a[:,:,t] = a_next
# 把下一个时间步长长的单元状态保存起来
c[:,:,t] = c_next
# 把预测值保存起来
y[:,:,t] = yt
# 保存缓存值
caches.append(cache) # 用于向后传播
caches = (caches, x)
return a, y, c, caches
手把手构建LSTM的向前传播(Building a LSTM step by step)的更多相关文章
- 用纯Python实现循环神经网络RNN向前传播过程(吴恩达DeepLearning.ai作业)
Google TensorFlow程序员点赞的文章! 前言 目录: - 向量表示以及它的维度 - rnn cell - rnn 向前传播 重点关注: - 如何把数据向量化的,它们的维度是怎么来的 ...
- 使用PyTorch构建神经网络以及反向传播计算
使用PyTorch构建神经网络以及反向传播计算 前一段时间南京出现了疫情,大概原因是因为境外飞机清洁处理不恰当,导致清理人员感染.话说国外一天不消停,国内就得一直严防死守.沈阳出现了一例感染人员,我在 ...
- 课程五(Sequence Models),第一 周(Recurrent Neural Networks) —— 1.Programming assignments:Building a recurrent neural network - step by step
Building your Recurrent Neural Network - Step by Step Welcome to Course 5's first assignment! In thi ...
- 课程一(Neural Networks and Deep Learning),第四周(Deep Neural Networks)——2.Programming Assignments: Building your Deep Neural Network: Step by Step
Building your Deep Neural Network: Step by Step Welcome to your third programming exercise of the de ...
- Sequence Models Week 1 Building a recurrent neural network - step by step
Building your Recurrent Neural Network - Step by Step Welcome to Course 5's first assignment! In thi ...
- Neural Networks and Deep Learning(week4)Building your Deep Neural Network: Step by Step
Building your Deep Neural Network: Step by Step 你将使用下面函数来构建一个深层神经网络来实现图像分类. 使用像relu这的非线性单元来改进你的模型 构建 ...
- 精通initramfs构建step by step
(一)hello world 一.initramfs是什么 在2.6版本的linux内核中,都包含一个压缩过的cpio格式 的打包文件.当内核启动时,会从这个打包文件中导出文件到内核的rootfs ...
- DeepLearningDTU: Building a RNN step by step
exercise 5: Week 5 - Recurrent Neural Networks Building your Recurrent Neural Network - Step by Step
- [2] TensorFlow 向前传播算法(forward-propagation)与反向传播算法(back-propagation)
TensorFlow Playground http://playground.tensorflow.org 帮助更好的理解,游乐场Playground可以实现可视化训练过程的工具 TensorFlo ...
随机推荐
- HDU-1040-As Easy As A+B(各种排序)
希尔排序 Accepted 1040 0MS 1224K 564 B G++ #include "cstdio" using namespace std; ]; int main( ...
- 极力推荐大佬的java项目的博客
此次说明:这是我从码云上拉取下来的java项目,仅供试验说明,不做任何获利渠道,若是发现有人拿此做其他用处,需像码云上这位大佬说明,特此感谢!!! 准备工作: 安装 maven,jdk1.8, ...
- Memcached笔记——(四)应对高并发攻击
近半个月过得很痛苦,主要是产品上线后,引来无数机器用户恶意攻击,不停的刷新产品各个服务入口,制造垃圾数据,消耗资源.他们的最好成绩,1秒钟可以并发6次,赶在Database入库前,Cache进行Mis ...
- 餐厅随评系列之四:Umu日本料理(米其林二星)
文章目录 在过去的几个月,工作和生活都极其忙碌,因此博客短暂停更了一阵子.慢慢积累下了很多素材,从近期开始恢复博客更新,不过很多内容估计得靠回忆了. 索性采取"倒叙"的方法,先从最 ...
- JavaScript是如何工作的(一)
简评:JavaScript 是越来越受欢迎了,很多团队都在采用这些语言工作.前端.后端.嵌入式设备等等,都可以看见它的身影.虽然我们知其然,但又知其所以然吗? 大家应该都知道 JavaScript 是 ...
- Python爬虫-百度模拟登录(一)
千呼万唤屎出来呀,百度模拟登录终于要呈现在大家眼前了,最近比较忙,晚上又得早点休息,这篇文章写了好几天才完成.这个成功以后,我打算试试百度网盘的其他接口实现.看看能不能把服务器文件上传到网盘,好歹也有 ...
- unittest实战(三):用例编写
# coding:utf-8import unittestfrom selenium import webdriverimport timefrom ddt import ddt, data, unp ...
- PHP网络爬虫实践:抓取百度搜索结果,并分析数据结构
百度的搜索引擎有反爬虫机制,我先直接用guzzle试试水.代码如下: <?php /** * Created by Benjiemin * Date: 2020/3/5 * Time: 14:5 ...
- IDEA中Git的使用详解
原文链接:https://www.cnblogs.com/javabg/p/8567790.html 工作中多人使用版本控制软件协作开发,常见的应用场景归纳如下: 假设小组中有两个人,组长小张,组员小 ...
- 那是我夕阳下的奔跑,电商网站PC端详情页图片放大效果实现
在详情页浏览时商品大图还是不能完全看清楚商品的细节,该特效实现鼠标悬停在商品大图上时,在商品大图右侧出现放大镜效果并根据鼠标的位置来改变右侧大图的显示内容,放大镜中的内容和鼠标悬停位置的内容相同.该特 ...