Unity破窗游戏制作(简易版)
Unity破窗游戏制作(简易版)
参考:“对不起,我选择摸鱼”—《扫雷》小游戏开发实战,算法、源代码,基于Unity3D开发 - 掘金 (juejin.cn)
到“制作默认方块(4)”均为相同操作
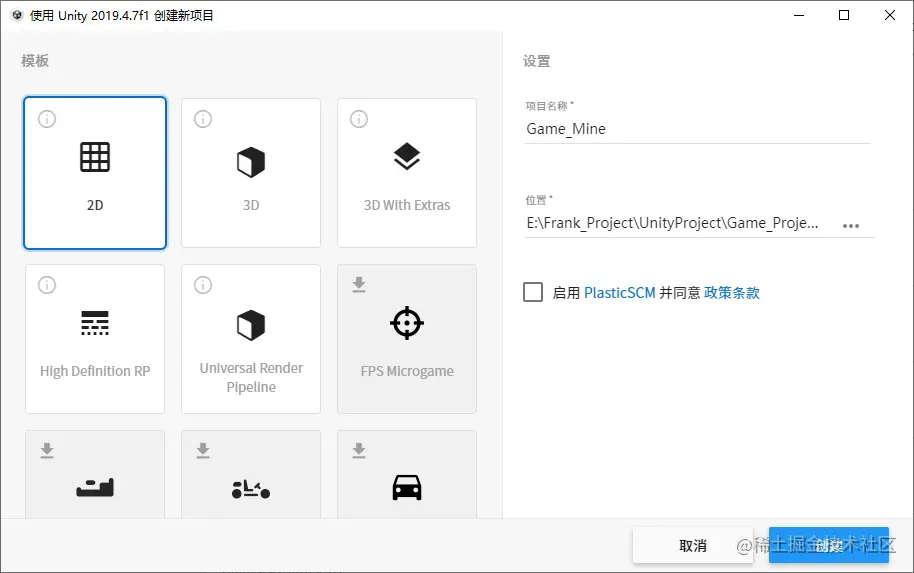
2-1、新建项目
(1)项目开发,从新建项目开始,我使用的Unity版本是Unity 2019.4.7f1,模板就选择2D,项目名称随意,别中文就行:
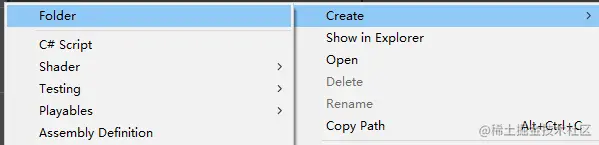
(2)创建目录,在Project视图,右击选择Create→Folder,新建几个文件夹:
(3)目录如下图所示:
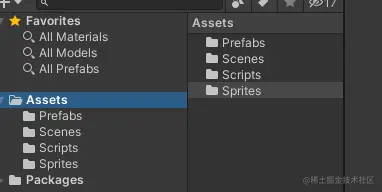
- Prefabs:预制体资源文件夹
- Scenes:场景资源文件夹
- Scripts:脚本资源文件夹
- Sprites:图片资源文件夹
2-2、导入资源
接下来将需要的资源导入:


全部右键另存为图片,然后导入到Project视图的Sprites文件夹内:
选中所有图片,在Inspector视图中,设置Pixels Per Unit为16:

之所以设置为16,是因为16X16这个单位在游戏世界中是一个比较适合的值。
2-3、设置摄像机属性
在Hierarchy视图中,选中Main Cameras对象,然后在Inspector视图中找到Camera组件,设置属性:
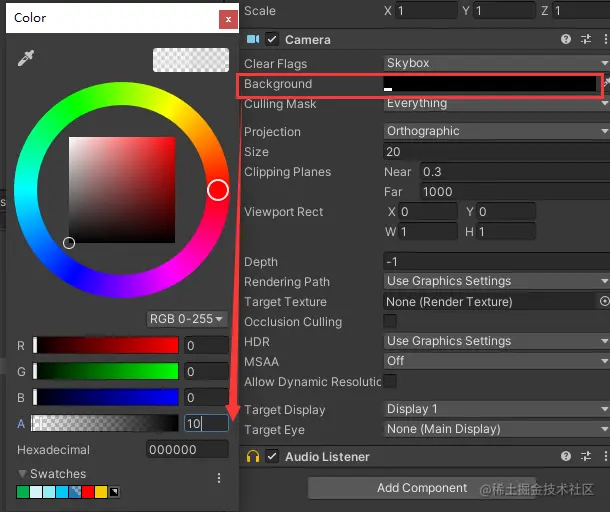
注意:Clear Flags设置为Skybox,Background按照图中设置,然后Size设置为20。
2-4、制作默认方块
(1)将Project视图的Sprites目录中的default对象拖入Hierarchy视图中:
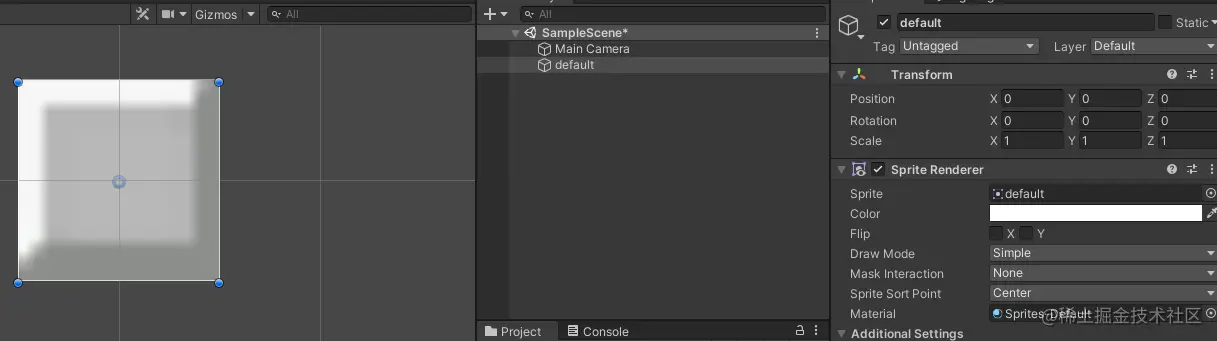
(2)选中default对象,在Inspector视图中,选择Add Componet→Physics 2D→Box Collider 2D,添加碰撞器组件:
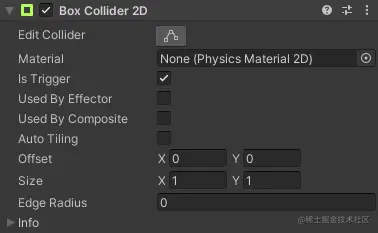
注意:勾选Is Trigger
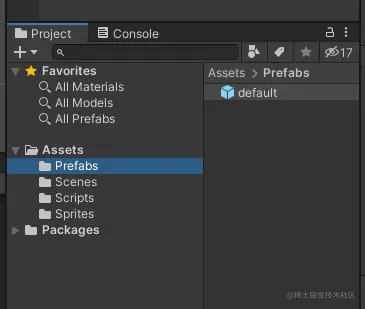
(3)选中default对象,拖回到Projcet视图的Prefabs文件夹内,做成一个预制体,我们将在后面的代码中去实例化生成它:
(4)Hierarchy视图中的default对象就可以删除了。
(5)新建脚本CreateBg.cs
using System.Collections;

using System.Collections.Generic;

using UnityEngine;

public class CreateBg : MonoBehaviour

{

    public GameObject block;//默认方块

    void Start()

    {

        //创建默认方块

        CreateBlock();

    }

    private void CreateBlock()

    {

        //创建方块父物体

        GameObject blockParent = new GameObject("blockParent");

        //创建10行10列的默认方块

        for (int i = 0; i < 10; i++)

        {

            for (int j = 0; j < 10; j++)

            {

                //Instantiate参数为:预制体 位置 旋转 父物体

                Instantiate(block, new Vector2(i, j), Quaternion.identity, blockParent.transform);

            }

        }

    }

}
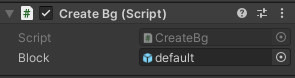
将脚本托给Main Camera对象,然后将预制体拖入Block卡槽中:
基本界面就做好了。
2-5、制作窗户类型
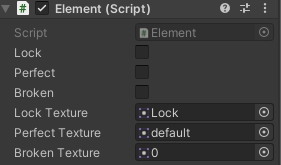
(1)新建一个脚本Element.cs,然后在Project视图的Prefabs文件夹中选中default对象,点击Add Componet→Element添加脚本:
 .....

 public bool Lock;//判断是否是锁住

 public bool Perfect;//判断是否是完好

 public bool Broken;

 public Sprite LockTexture;

 public Sprite PerfectTexture;

 public Sprite BrokenTexture;

 void Start()

    {

        //随机锁住

        Lock = Random.value < 0.1;

        Perfect = !Lock;

         // 在Grid注册

        int x = (int)transform.position.x;

        int y = (int)transform.position.y;

        Grids.elements[x, y] = this;

        if (Lock) Grids.elements[x, y].loadTexture(0);

    }

 public void loadTexture(int adjacentCount)

    {

        if (adjacentCount==0)

            GetComponent<SpriteRenderer>().sprite = LockTexture;

        else if(adjacentCount==1)

            GetComponent<SpriteRenderer>().sprite = PerfectTexture;

        else GetComponent<SpriteRenderer>().sprite = BrokenTexture;

    }

    .....
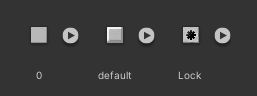
(2)选中default预制体,将对应的资源拖入Element.cs脚本的属性卡槽中:
(3)新建一个Grid.cs脚本,将脚本也添加到预制体default身上,Grid脚本将处理更加复杂的游戏逻辑:
using System.Collections;

using System.Collections.Generic;

using UnityEngine;

public class Grids : MonoBehaviour

{

    public static int w=4; // 网格的长

    public static int h=6; // 网格的高

    public static Element[,] elements = new Element[w, h];

    public static bool isPerfect(int x,int y)

    {

        ....

    }

    public static bool isBroken(int x, int y)

    {

        ....

    }

    public static void brokeWin(int x,int y)

    {

       ....

    }

    public static bool isWin()

    {

      ....

    }

    public static bool GameOver()

    {

        ....

    }

}
2-6、破坏窗户
Grids.cs:
 public static bool isPerfect(int x,int y)

    {

        if (x >= 0 && y >= 0 && x < w && y < h)

            return elements[x, y].Perfect;

        return false;

    }

    public static bool isBroken(int x, int y)

    {

        if (x >= 0 && y >= 0 && x < w && y < h)

            return elements[x, y].Broken;

        return false;

    }

    public static void brokeWin(int x,int y)

    {

        if (isPerfect(x , y)) { elements[x, y].loadTexture(2);elements[x, y].Broken = true; elements[x, y].Perfect = false; }

        else if (isBroken(x, y)) { elements[x, y].loadTexture(1); elements[x, y].Broken = false; elements[x, y].Perfect = true; }

    }
Elements.cs:
 void OnMouseUpAsButton()

    {

        if (!Lock)	//锁住的窗无法互动

        {

            //反转5格内的非锁住窗户

            int x = (int)transform.position.x;

            int y = (int)transform.position.y;

            Grids.brokeWin(x , y);

            Grids.brokeWin(x-1, y);

            Grids.brokeWin(x+ 1, y);

            Grids.brokeWin(x, y-1);

            Grids.brokeWin(x , y+1);

            //判断是否胜利

            if (Grids.isWin())

            {

                Debug.Log("Game Win");

            }

            if (Grids.GameOver())

            {

                Debug.Log("Game Over");

            }

        }

    }
2-7、判断是否已经破坏所有窗户
接下来,需要判断玩家破坏所有窗户,
接着修改Grid类的代码,添加函数isWin:
public static bool isWin()

    {

        foreach (Element elem in elements)

            if (elem.Perfect)

                return false;

        return true;

    }

    public static bool GameOver()

    {

        for(int i = 0; i < w; i++)

        {

            for(int j = 0; j < h; j++)

            {

                if (elements[i, j].Perfect && (i - 1 < 0 || !elements[i - 1, j].Perfect) && (i + 1 >= w || !elements[i + 1, j].Perfect) && (j - 1 < 0 || !elements[i, j - 1].Perfect) && (j + 1 >= h || !elements[i, j + 1].Perfect))

                    return true;

            }

        }

        return false;

    }
在这里游戏失败的原因可以有很多:
- 本就无解
- 超过了限制步数
- 超过时间
这些都可以自己写
然后获胜或失败的UI可以自己加
2-8、总结
游戏的大体框架就开发完成了,当然,你也可以添加一些元素让游戏更加有趣:
- 分成更多难度,比如简单、中等、困难
- 切换更加漂亮的UI
- 输赢界面以及重新开始
- 添加音效
2-9、源码
Grids:
using System.Collections;

using System.Collections.Generic;

using UnityEngine;

public class Grids : MonoBehaviour

{

    public static int w=4; // 网格的长

    public static int h=6; // 网格的高

    public static Element[,] elements = new Element[w, h];

    public static bool isPerfect(int x,int y)

    {

        if (x >= 0 && y >= 0 && x < w && y < h)

            return elements[x, y].Perfect;

        return false;

    }

    public static bool isBroken(int x, int y)

    {

        if (x >= 0 && y >= 0 && x < w && y < h)

            return elements[x, y].Broken;

        return false;

    }

    public static void brokeWin(int x,int y)

    {

        if (isPerfect(x , y)) { elements[x, y].loadTexture(2);elements[x, y].Broken = true; elements[x, y].Perfect = false; }

        else if (isBroken(x, y)) { elements[x, y].loadTexture(1); elements[x, y].Broken = false; elements[x, y].Perfect = true; }

    }

    public static bool isWin()

    {

        foreach (Element elem in elements)

            if (elem.Perfect)

                return false;

        return true;

    }

    public static bool GameOver()

    {

        for(int i = 0; i < w; i++)

        {

            for(int j = 0; j < h; j++)

            {

                if (elements[i, j].Perfect && (i - 1 < 0 || !elements[i - 1, j].Perfect) && (i + 1 >= w || !elements[i + 1, j].Perfect) && (j - 1 < 0 || !elements[i, j - 1].Perfect) && (j + 1 >= h || !elements[i, j + 1].Perfect))

                    return true;

            }

        }

        return false;

    }

}
Element:
using System.Collections;

using System.Collections.Generic;

using UnityEngine;

public class Element : MonoBehaviour

{

    public bool Lock;//判断是否是锁住

    public bool Perfect;//判断是否是完好

    public bool Broken;

    public Sprite LockTexture;

    public Sprite PerfectTexture;

    public Sprite BrokenTexture;

    void Start()

    {

        //随机锁住

        Lock = Random.value < 0.1;

        Perfect = !Lock;

        int x = (int)transform.position.x;

        int y = (int)transform.position.y;

        Grids.elements[x, y] = this;

        if (Lock) Grids.elements[x, y].loadTexture(0);

    }

    public void loadTexture(int adjacentCount)

    {

        if (adjacentCount==0)

            GetComponent<SpriteRenderer>().sprite = LockTexture;

        else if(adjacentCount==1)

            GetComponent<SpriteRenderer>().sprite = PerfectTexture;

        else GetComponent<SpriteRenderer>().sprite = BrokenTexture;

    }

    // 判断是否被点击

    public bool isCovered()

    {

        //判断当前纹理的名称是不是默认值

        return GetComponent<SpriteRenderer>().sprite.texture.name == "default";

    }

    // 鼠标点击

    void OnMouseUpAsButton()

    {

        if (!Lock)

        {

            //破坏周围的窗户

            int x = (int)transform.position.x;

            int y = (int)transform.position.y;

            Grids.brokeWin(x , y);

            Grids.brokeWin(x-1, y);

            Grids.brokeWin(x+ 1, y);

            Grids.brokeWin(x, y-1);

            Grids.brokeWin(x , y+1);

            //判断是否胜利

            if (Grids.isWin())

            {

                Debug.Log("Game Win");

            }

            if (Grids.GameOver())

            {

                Debug.Log("Game Over");

            }

        }

    }

}
CreateBg:
using System.Collections;

using System.Collections.Generic;

using UnityEngine;

public class CreateBg : MonoBehaviour

{

    public GameObject block;//默认方块

    void Start()

    {

        //创建默认方块

        CreateBlock();

    }

    public void CreateBlock()

    {

        //创建方块父物体

        GameObject blockParent = new GameObject("blockParent");

        //创建10行10列的默认方块

        for (int i = 0; i <Grids.w; i++)

        {

            for (int j = 0; j < Grids.h; j++)

            {

                //Instantiate参数为:预制体 位置 旋转 父物体

                Instantiate(block, new Vector2(i, j), Quaternion.identity, blockParent.transform);

            }

        }

    }

}
2-10、效果

Unity破窗游戏制作(简易版)的更多相关文章
- Unity 进度条3D制作(3D版)
昨天我们一起学习了2D进度跳的制作,那么趁着我们脑海中还残存昨日的记忆,今天继续学习另一种方法: 实现思路:当鼠标悬浮Start按钮->实例化物体并显示进度->100/100->进入 ...
- 简易2D横版RPG游戏制作
Unity学习笔记1 简易2D横版RPG游戏制作 http://m.blog.csdn.net/article/details?id=24601905
- html5 canvas简易版捕鱼达人游戏源码
插件描述:html5利用canvas写的一个js版本的捕鱼,有积分统计,鱼可以全方位移动,炮会跟着鼠标移动,第一次打开需要鼠标移出背景图,再移入的时候就可以控制炮的转动,因为是用的mouseover触 ...
- unity入门—五分钟制作一个理论上的游戏
unity入门 前言:这可不是标题党,虽然都是基础的操作,不过含括了基本的流程,比起脑海中的五花八门的画面,入门还是这个现实一点. 这里插两句,unity国外官网下载会推荐你看一个简短的视频,国内官网 ...
- 自定义View4-塔防小游戏第一篇:一个防御塔+多个野怪(简易版)*
塔防小游戏 第一篇:一个防御塔+多个野怪(简易版) 1.canvas画防御塔,妖怪大道,妖怪行走路线 2.防御塔攻击范围是按照妖怪与防御塔中心距离计算的,大于防御塔半径则不攻击,小于则攻击 ...
- 利用Unity3D制作简易2D计算器
利用Unity3D制作简易2D计算器 标签(空格分隔): uiniy3D 1. 操作流程 在unity3DD中创建一个新项目 注意选择是2D的(因为默认3D) 在Assets框右键新建C#脚本 在新建 ...
- MVC 验证码实现( 简易版)
现在网站上越来越多的验证码,使用场景也是越来越多,登陆.注册.上传.下载...等等地方,都有可能大量使用到验证码,那么制作验证码到底有多简单呢?我们一起来看下最简易版的验证码实现过程- 验证码的基本步 ...
- C+命令行+方向键=简易版扫雷
前言: 想起来做这个是因为那时候某天知道了原来黑框框里面的光标是可以控制的,而且又经常听人说起这个,就锻炼一下好了. 之前就完成了那1.0的版本,现在想放上来分享却发现有蛮多问题的,而且最重要的是没什 ...
- 游戏制作之路:一个对我来说可实现的High-end的Mac/iOS游戏制作大概计划
对于学习一些东西,我比较习惯任务驱动式的学习,也就是说,要事先订好一个目标,要做什么东西,达到什么效果,然后根据自己了解的知识作一个可以实现这个目标的计划. 现在要学的是游戏制作,而且是High-en ...
随机推荐
- 使用jmh框架进行benchmark测试
性能问题 最近在跑flink社区1.15版本使用json_value函数时,发现其性能很差,通过jstack查看堆栈经常在执行以下堆栈 可以看到这里的逻辑是在等锁,查看jsonpath的LRUCach ...
- Windows 11上Dev C++ 5.11 提示 Failed to execute xxx Error 0的一种解决方法
问题现象 在Windows 11上用Dev C++ 5.11编译运行程序,出现如下错误不能运行,且自己的程序没有问题. 可能的原因 Dev C++没有以管理员身份运行? 生成的程序所在的目录受到了访问 ...
- Blazor VS Vue
Vue--两分钟概述 Vue 是一个JavaScript 框架. 在其最简单的模式中,您可以简单地将核心 Vue 脚本包含在您的应用程序中,然后开始构建您的组件. 除此之外,对于更复杂的应用程序, ...
- 定语从句关系代词只能用 that 的情况
当先行词被形容词最高级.序数词,以及 the only.the very.the right 等修饰时,关系代词只能用 that. This is the most interesting movie ...
- YC-Framework版本更新:V1.0.9
分布式微服务框架:YC-Framework版本更新V1.0.9!!! 本文主要内容: 1.V1.0.9版本更新主要内容 2.YC-Framework新的征程 一.V1.0.9版本更新主要内容 (1)接 ...
- WPF开发快速入门【7】WPF的拖放功能(Drag and Drop)
概述 本文描述WPF的拖放功能(Drag and Drop). 拖放功能涉及到两个功能,一个就是拖,一个是放.拖放可以发生在两个控件之间,也可以在一个控件自己内部拖放.假设界面上有两个控件,一个Tre ...
- PHP实现服务器文件预览
PHP实现服务器里面的所有文件进行预览跟手机文件夹一样 服务器创建一个index.php文件 点我查看 <?php // errors ini_set('display_errors', 1); ...
- 【Java】学习路径62-枚举类型
public enum Role { TEACHER,STUDENT,CHEF } 使用: System.out.println(r1);//输出TEACHER System.out.println( ...
- Java 中HashMap 详解
本篇重点: 1.HashMap的存储结构 2.HashMap的put和get操作过程 3.HashMap的扩容 4.关于transient关键字 HashMap的存储结构 1. HashMap 总体是 ...
- 如何在Windows中查询证书颁发机构已颁发的证书
有时候需要看一下证书颁发机构已经颁发出去的证书,看看某个用户或者某个计算机获取过的证书有哪些.通常可以在证书颁发机构的MMC中查看.对于测试环境或者刚开始用的CA来说,这样查看挺简单的.但是对于用了一 ...