SpringBoot第五篇:整合Mybatis
作者:追梦1819
原文:https://www.cnblogs.com/yanfei1819/p/10869315.html
版权声明:本文为博主原创文章,转载请附上博文链接!
## 引言
ORM框架有很多,比如Mybatis、hibernate、JPA、JDBCTemplate等,各自有各自的优点。Mybatis作为一个半自动的框架,灵活易上手等特点,收到了很多人的青睐。
本文介绍springboot 集成 Mybatis框架。
Mybatis介绍
基本概念
什么是 Mybatis?
官方给的解释是:MyBatis 是一款优秀的持久层框架,它支持定制化 SQL、存储过程以及高级映射。MyBatis 避免了几乎所有的 JDBC 代码和手动设置参数以及获取结果集。MyBatis 可以使用简单的 XML 或注解来配置和映射原生类型、接口和 Java 的 POJO(Plain Old Java Objects,普通老式 Java 对象)为数据库中的记录。
优缺点
Mybatis 可能是用的最广泛的一个 ORM 框架了,下面简单列举其优缺点。
优点:
- 易上手;
- sql 灵活,与代码解耦;
- 支持对象与数据库映射;
- 半自动框架,灵活性较高;
缺点:
需要维护 sql ;
绑定了sql,移植性差;
二级缓存机制不佳;
开发模式
准备工作
在Mybatis 中,有两种方式开发方式:配置文件开发和注解开发,以下分别介绍两种模式。
我们先来做一下准备工作。不管是哪一种开发模式,下面几步都是相同的:
- 都需要对 Mybatis 代理接口进行扫描。在 SpringBoot 项目中,扫描方式有两种:
1) 在启动类上加 @MapperScan(value = {"com.sunwin.db.*","com.yanfei1819.mybatisdemo.db"}) 注解;
2) 分别在接口 mapper 上添加 @Mapper 注解;
上面扫描Mybatis 代理接口的两种方式的效果一样,只不过第一种方式是一次性扫描整个包,第二种方式是单独扫描每个接口。
初始化数据库:
SET NAMES utf8mb4;

SET FOREIGN_KEY_CHECKS = 0;

-- ----------------------------

-- Table structure for user

-- ----------------------------

DROP TABLE IF EXISTS `user`;

CREATE TABLE `user`  (

  `id` int(11) NOT NULL AUTO_INCREMENT,

  `name` varchar(40) CHARACTER SET utf8 COLLATE utf8_general_ci NOT NULL,

  `age` int(3) NOT NULL,

  PRIMARY KEY (`id`) USING BTREE

) ENGINE = InnoDB AUTO_INCREMENT = 50 CHARACTER SET = utf8 COLLATE = utf8_general_ci ROW_FORMAT = Dynamic;

-- ----------------------------

-- Records of user

-- ----------------------------

INSERT INTO `user` VALUES (14, 'admin', 21);

INSERT INTO `user` VALUES (48, 'teacher', 20);

INSERT INTO `user` VALUES (49, 'student', 22);

SET FOREIGN_KEY_CHECKS = 1;
引入maven 依赖:
<dependency>

    <groupId>org.mybatis.spring.boot</groupId>

    <artifactId>mybatis-spring-boot-starter</artifactId>

    <version>2.0.1</version>

</dependency>

<dependency>

    <groupId>org.springframework.boot</groupId>

    <artifactId>spring-boot-starter-web</artifactId>

</dependency>

<dependency>

    <groupId>mysql</groupId>

    <artifactId>mysql-connector-java</artifactId>

    <scope>runtime</scope>

</dependency>
配置数据库信息:
spring.datasource.driver-class-name=com.mysql.jdbc.Driver

spring.datasource.url=jdbc:mysql://192.168.1.88:3306/win_health?serverTimezone=GMT%2B8

spring.datasource.username=root

spring.datasource.password=pass123
注解开发
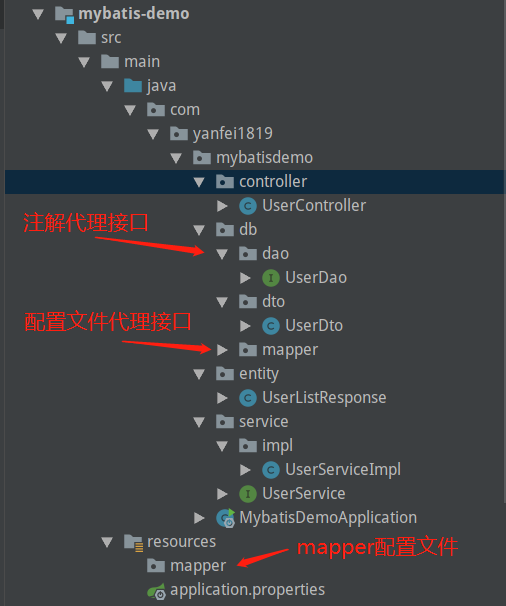
开发之前,先大体了解一下项目的结构(这个结构都是自定义的,这里只是为了演示方便):
首先,创建一个实体类:
package com.yanfei1819.mybatisdemo.db.dto;

/**

 * Created by 追梦1819 on 2019-05-05.

 */

public class UserDto {

    private Long id;

    private String name;

    private int age;

	// 	set/get 省略

}
创建以下实体类是为了试返回的值展示更加友好。
package com.yanfei1819.mybatisdemo.entity;

import com.yanfei1819.mybatisdemo.db.dto.UserDto;

import java.util.List;

/**

 * Created by 追梦1819 on 2019-05-05.

 */

public class UserListResponse {

    private int code;

    private String msg;

    private List<UserDto> users;

	// set/get 省略

}
其次,创建代理接口:
package com.yanfei1819.mybatisdemo.db.dao;

import com.yanfei1819.mybatisdemo.db.dto.UserDto;

import org.apache.ibatis.annotations.Select;

import java.util.List;

/**

 * Created by 追梦1819 on 2019-05-05.

 */

public interface UserDao {

    @Select("select * from user ")

    List<UserDto> queryList();

}
再者,创建service层:
package com.yanfei1819.mybatisdemo.service;

import com.yanfei1819.mybatisdemo.entity.UserListResponse;

/**

 * Created by 追梦1819 on 2019-05-05.

 */

public interface UserService {

    UserListResponse queryUsers();

}
package com.yanfei1819.mybatisdemo.service.impl;

import com.yanfei1819.mybatisdemo.db.dao.UserDao;

import com.yanfei1819.mybatisdemo.db.dto.UserDto;

import com.yanfei1819.mybatisdemo.entity.UserListResponse;

import com.yanfei1819.mybatisdemo.service.UserService;

import org.springframework.beans.factory.annotation.Autowired;

import org.springframework.stereotype.Service;

import java.util.List;

/**

 * Created by 追梦1819 on 2019-05-05.

 */

@Service

public class UserServiceImpl implements UserService {

    @Autowired

    private UserDao userDao;

    @Override

    public UserListResponse queryUsers() {

        List<UserDto> userDtos = userDao.queryList();

        UserListResponse response = new UserListResponse();

        response.setUsers(userDtos);

        response.setCode(0);

        response.setMsg("success");

        return response;

    }

}
然后,创建controller层:
package com.yanfei1819.mybatisdemo.controller;
import com.yanfei1819.mybatisdemo.entity.UserListResponse;
import com.yanfei1819.mybatisdemo.service.UserService;
import org.springframework.beans.factory.annotation.Autowired;
import org.springframework.stereotype.Controller;
import org.springframework.web.bind.annotation.GetMapping;
import org.springframework.web.bind.annotation.ResponseBody;
/**
* Created by 追梦1819 on 2019-05-05.
*/
@Controller
public class UserController {
@Autowired
private UserService userService;
@ResponseBody
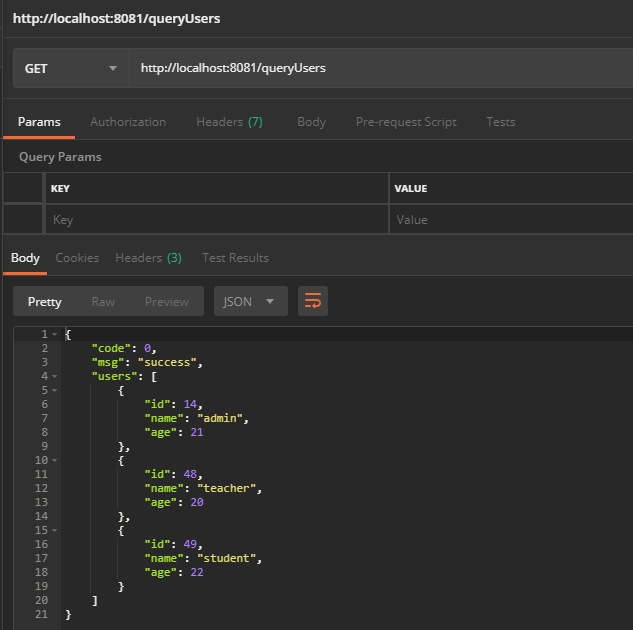
@GetMapping("/queryUsers")
public UserListResponse queryUsers(){
return userService.queryUsers();
}
}
最后,启动main 方法:
package com.yanfei1819.mybatisdemo;

import org.mybatis.spring.annotation.MapperScan;

import org.springframework.boot.SpringApplication;

import org.springframework.boot.autoconfigure.SpringBootApplication;

@SpringBootApplication

@MapperScan("com.yanfei1819.mybatisdemo.db") // 注意这个注解

public class MybatisDemoApplication {

    public static void main(String[] args) {

        SpringApplication.run(MybatisDemoApplication.class, args);

    }

}
用postman测试:
配置文件开发
配置文件模式开发比注解开发稍稍复杂一点。因为这种模式多了维护 sql 的 mapper.xml 文件。我将其归结为下面三步:
创建代理接口:
创建接口映射的 xxxMapper.xml 文件
在主配置文件 application.properties 中指定 xxxMapper.xml 的位置:
mybatis.mapper-locations=classpath:mapper/*.xml;
在以上项目的基础上,添加以下代码。
首先,新建实体类:
package com.yanfei1819.mybatisdemo.entity;

import com.yanfei1819.mybatisdemo.db.dto.UserDto;

/**

 * Created by 追梦1819 on 2019-05-05.

 */

public class UserResponse {

    private int code;

    private String msg;

    private UserDto user;

}
其次,创建mapper接口:
package com.yanfei1819.mybatisdemo.db.mapper;

import com.yanfei1819.mybatisdemo.db.dto.UserDto;

import org.apache.ibatis.annotations.Param;

/**

 * Created by 追梦1819 on 2019-05-05.

 */

public interface UserMapper {

    UserDto queryUserByName(@Param("name") String name);

}
然后,创建UserMapper文件:
<?xml version="1.0" encoding="UTF-8"?>

<!DOCTYPE mapper PUBLIC "-//mybatis.org//DTD Mapper 3.0//EN" "http://mybatis.org/dtd/mybatis-3-mapper.dtd">

<mapper namespace="com.yanfei1819.mybatisdemo.db.mapper.UserMapper">

  <select id="queryUserByName" resultType="com.yanfei1819.mybatisdemo.db.dto.UserDto" parameterType="java.lang.String">

    select * from user where `name` = #{name}

  </select>

</mapper>
下面,UserService 接口添加方法:
UserResponse queryUserByName(String name);
UserServiceImpl 类实现:
    @Override

    public UserResponse queryUserByName(String name){

        UserDto userDto = userMapper.queryUserByName(name);

        UserResponse response = new UserResponse();

        response.setUser(userDto);

        response.setCode(0);

        response.setMsg("success");

        return response;

    }
最后,在 controller 层添加方法:
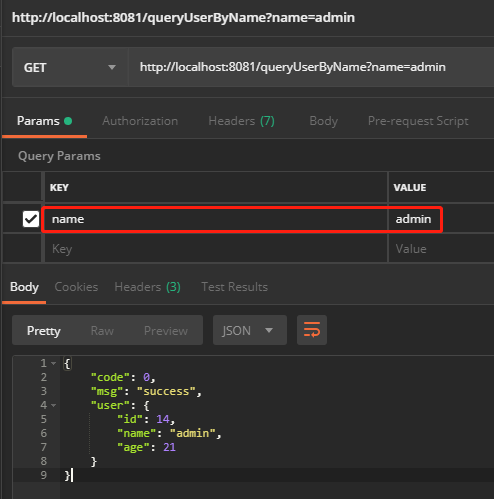
    @ResponseBody

    @GetMapping("/queryUserByName")

    public UserResponse queryUserByName(String name){

        return userService.queryUserByName(name);

    }
测试结果
总结
针对上面两种方式,各有优势。注解开发基本上只要@Insert 、@Select、@Update、 @Delete 四个注解就可以搞定。配置文件开发只需要在 xxxMapper.xml 维护 sql 即可。
我个人的喜好是,如果是单表操作,或者是工具包,就选择注解方式,因为比较简洁,没有配置文件;如果是多表操作,则选择配置文件的方式,对sql的操作更灵活,扩展性更好。
源码:我的GitHub
<全文完>
更多精彩,请关注公众号:【技术与人生】

SpringBoot第五篇:整合Mybatis的更多相关文章
- Springboot 2.0.4 整合Mybatis出现异常Property 'sqlSessionFactory' or 'sqlSessionTemplate' are required
在使用Springboot 2.0.4 整合Mybatis的时候出现异常Property 'sqlSessionFactory' or 'sqlSessionTemplate' are require ...
- SpringBoot数据访问之整合mybatis注解版
SpringBoot数据访问之整合mybatis注解版 mybatis注解版: 贴心链接:Github 在网页下方,找到快速开始文档 上述链接方便读者查找. 通过快速开始文档,搭建环境: 创建数据库: ...
- (入门SpringBoot)SpringBoot项目数据源以及整合mybatis(二)
1.配置tomcat数据源: # 数据源基本配置spring.datasource.url=jdbc:mysql://localhost:3306/shoptest?useUnicode=true ...
- SpringBoot学习- 3、整合MyBatis
SpringBoot学习足迹 1.下载安装一个Mysql数据库及管理工具,同类工具很多,随便找一个都可以,我在windows下做测试项目习惯使用的是haosql 它内部集成了MySql-Front管理 ...
- SpringBoot数据访问之整合Mybatis配置文件
环境搭建以及前置知识回顾 SpringBoot中有两种start的形式: 官方:spring-boot-starter-* 第三方:*-spring-boot-starter Mybatis属于第三方 ...
- SpringBoot入门篇--整合mybatis+generator自动生成代码+druid连接池+PageHelper分页插件
原文链接 我们这一篇博客讲的是如何整合Springboot和Mybatis框架,然后使用generator自动生成mapper,pojo等文件.然后再使用阿里巴巴提供的开源连接池druid,这个连接池 ...
- Springboot第五篇:结合myBatis进行SQL操作
前提:和之前同样的,本篇会从前端和后台一起讲述关于SQL的select操作(其他操作原理大致类似,不多做解释了). 大致流程:前端通过AJAX将数据发送到后台的路由,后台路由会根据发送的数据进行SQL ...
- Mybatis第五篇【Mybatis与Spring整合】
Mybatis与Spring整合 既然我们已经学了Mybatis的基本开发了,接下来就是Mybatis与Spring的整合了! 以下使用的是Oracle数据库来进行测试 导入jar包 aopallia ...
- SpringBoot Maven多模块整合MyBatis 打包jar
最近公司开始新的项目,框架选定为SpringBoot+Mybatis,本篇主要记录了在IDEA中搭建SpringBoot多模块项目的过程. 源码:https://github.com/12641561 ...
随机推荐
- 大数据日志分析产品——SaaS Cloud, e.g. Papertrail, Loggly, Sumo Logic;Open Source Frameworks, e.g. ELK stack, Graylog;Enterprise Products, e.g. TIBCO LogLogic, IBM QRadar, Splunk
Learn how you can maximize big data in the cloud with Apache Hadoop. Download this eBook now. Brough ...
- Linux-shell 练习题(一)
1.实现批量添加20个用户,用户名为user1-20,密码为user+123 #!/bin/bash count=$ if [ -n "$count" ] then ;i<= ...
- D. String Game 二分加字符串匹配
题目链接 题目大意:给出字符串str1,再第二行给出字符串str2,第三行给出删除str1中的字符的顺序,用数组a[]存,问最多按第三行的顺序删除str1中的字符剩下的字符串中str2 我们定义l为a ...
- 关于MFC消息的总结
一.MFC的消息类型 MFC的消息类型大致可以分为三种: 1.命令消息.由菜单和工具栏或快捷键产生,以WM_COMMAND形式发出(以WM_COMMAND发出的还有很多控件,如Button等,但它们产 ...
- android SDK manager 无法获取更新版本列表【转载】
http://mirrors.neusoft.edu.cn/eclipse/releases/luna/打开这个网址就可以看到adt的详细信息: http://developer.android.c ...
- 使用 py2exe 打包 Python 程序
上回在<使用 PyInstaller 打包 Python 程序>中,我们介绍了使用 PyInstaller 对 Python 程序进行打包,今天带大家认识一个新的工具:py2exe. 接下 ...
- Swift中数组和字典都是值类型
在 Swift 中,所有的基本类型:整数(Integer).浮点数(floating-point).布尔值(Boolean).字符串(string).数组(array)和字典(dictionary), ...
- Maven(3)-利用intellij idea创建maven web项目
本文通过一个例子来介绍利用maven来构建一个web项目.开发工具:intellij idea. 一.新建maven项目 此处选择:Create from archetype.表示从已有的maven模 ...
- POJ3784:Running Median
浅谈堆:https://www.cnblogs.com/AKMer/p/10284629.html 题目传送门:http://poj.org/problem?id=3784 用一个"对顶堆& ...
- 快速排序的JavaScript实现
思想 分治的思想,将原始数组分为较小的数组(但没有像归并排序一样将它们分隔开). 主元选择: 从数组中任意选择一项作为主元,通常为数组的第一项,即arr[i]:或数组的中间项, arr[Math.fl ...