
(转载)Android项目实战(二十七):数据交互(信息编辑)填写总结
Android项目实战(二十七):数据交互(信息编辑)填写总结
前言:
项目中必定用到的数据填写需求。比如修改用户名的文字编辑对话框,修改生日的日期选择对话框等等。现总结一下,方便以后使用。
注:
先写实现过程,想要学习的同学可以看看,不需要的同学可以直接拉到最下面复制代码使用。
------------------------------------------------------------------------------------------------------------------------------------
一、文字编辑对话框
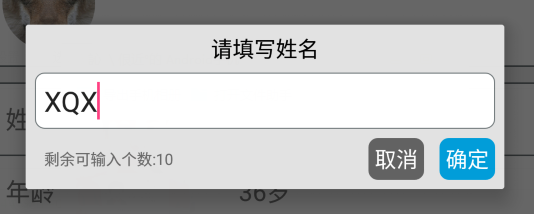
看下效果图(仿今日头条):
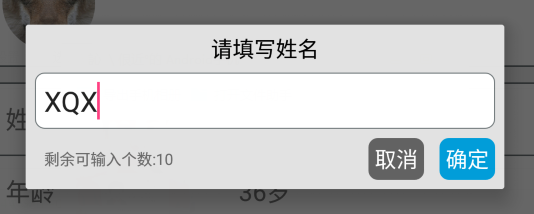
需求包括:
一个标题TextView
一个圆角白色背景EditText
一个可输入个数提示的TextView
两个按钮,‘确定’、‘取消’
对话框展现形式。
代码实现:
(1)编写布局文件
dialog_edit_txt
里面编辑框EditView涉及到了圆角白色背景 需要写一个drawable文件
bg_popup_edit
(2)、在activity或者fragment中使用
①、这里我把对话框写在一个方法里,方便使用

title 文本对话框的标题
isSingleLine EditText是否限制一行显示
maxSize EditText中文字的最大长度
textview 修改的TextView控件,首先要讲该控件的文本显示在EditText中,点击确定后需要将编辑文本显示在改控件中

private void showEditDialog(String title , boolean isSingleLine , final int maxSize, final TextView textview)
②、根据布局文件生成view 并 初始化控件
     View view = LayoutInflater.from(this).inflate(R.layout.dialog_edit_txt, null);

        TextView popup_edit_info_txt_title;//标题

        final TextView popup_edit_info_txt_tip;       //编辑框剩余个数提示

        TextView popup_edit_info_btn_cancel;    //取消按钮

        TextView popup_edit_info_btn_confirm;    //确定按钮

        final EditText popup_edit_info_edit_content;   //编辑框

        popup_edit_info_txt_title = (TextView) view.findViewById(R.id.popup_edit_info_txt_title);

        popup_edit_info_txt_tip = (TextView) view.findViewById(R.id.popup_edit_info_txt_tip);

        popup_edit_info_btn_cancel = (TextView) view.findViewById(R.id.popup_edit_info_btn_cancel);

        popup_edit_info_btn_confirm = (TextView) view.findViewById(R.id.popup_edit_info_btn_confirm);

        popup_edit_info_edit_content = (EditText) view.findViewById(R.id.popup_edit_info_edit_content);
③、进行控件的属性设置
     popup_edit_info_edit_content.setText(textview.getText().toString());            // 将参数textview的文本数据显示在EditText中

        popup_edit_info_edit_content.setSingleLine(isSingleLine);                       // 设置EditView是否单行,像用户名这种信息需要单行,像评价简介这种的不需要单行

        popup_edit_info_edit_content.setFilters(new InputFilter[]{new InputFilter.LengthFilter(maxSize)}); // 设置EditText的最大长度,当输入超过这个值的时候不在允许输入

        popup_edit_info_txt_tip.setText("剩余可输入个数:"+(maxSize-textview.getText().toString().length()));        // 设置 剩余文字个数提示
popup_edit_info_edit_content.setSelection(content.getText().length()); // 光标默认显示在最后
        final AlertDialog dialog = new AlertDialog.Builder(this)                        //创建对话框

                .setView(view)

                .create();

        popup_edit_info_txt_title.setText(title);                                       // 设置标题
dialog.setCanceledOnTouchOutside(false); // 设置点击屏幕Dialog不消失
④、进行EditText的设置 ,监听文字数据字数变化,改变提示文本的内容
      popup_edit_info_edit_content.addTextChangedListener(new TextWatcher() {

            @Override

            public void beforeTextChanged(CharSequence s, int start, int count, int after) {

            }

            @Override

            public void onTextChanged(CharSequence s, int start, int before, int count) {

            }

            @Override

            public void afterTextChanged(Editable s) {

                int length = s.length();

                popup_edit_info_txt_tip.setText("剩余可输入个数:"+(maxSize-length));

            }

        });
⑤、设置‘确定’、‘取消’点击事件
popup_edit_info_btn_cancel.setOnClickListener(new View.OnClickListener() {

            @Override

            public void onClick(View v) {

                dialog.dismiss();

            }

        });

        popup_edit_info_btn_confirm.setOnClickListener(new View.OnClickListener() {

            @Override

            public void onClick(View v) {

                textview.setText(popup_edit_info_edit_content.getText().toString());

                dialog.dismiss();

            }

        });
⑥、显示对话框
dialog.show();
------------------------------------------------------------------------------------------------------------------------------------
二、单个条件选择的自定义PopupWindow
效果图:
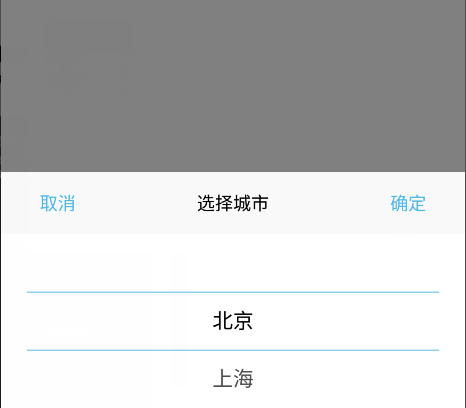
需求包括:
1、顶部两个按钮:“取消”、“确定”按钮
2、标题
3、滚动的wheelview选择器
代码实现:
1、选择一个WheelView控件,这个github上很多,我这里选用的是
https://github.com/xiangyunwan/WheelView-master/
在app目录下的 build.gradle文件中添加
compile 'com.wx.wheelview:wheelview:1.3.3'
2、构建PopupWindow布局文件
这个比较简单,按效果图来 两个按钮,一个标题文本,一个WheelView
对应的几个资源:
<color name="grey_6">#faf9f9</color>

<color name="blue_main">#4ab8e9</color>
3、写一个封装的继承PopupWindow的类,以后类似的直接拿来用即可,这里命名OneItemPopupWindow
①、参数分析
需要上下文 Context 用于构建View
需要点击事件,接口回调的方式 View.OnClickListener
需要标题文本,String
需要WheelView显示的数据源,ArrayList<String>
所以构造方法:
public OneItemPopupWindow(Context context, View.OnClickListener itemsOnClick, String t, ArrayList<String> datas) {

        super(context);

}
②、定义需要的数据
    private View mMenuView; //popupwindow布局生成的View

    private TextView title; //标题

    private Button cancel;  //取消按钮

    private Button submit;  //确定按钮

    private WheelView wheel;  //wheelview控件

    private int currentPosition;  // 当然的wheelview选择的item的位置

    ArrayList<String> datas = new ArrayList<>();    // wheelview的数据源
③、生成PopupWindow的View 并获取相应控件 初始化, 从这里开始都写在构造方法里
     LayoutInflater inflater = (LayoutInflater) context

                .getSystemService(Context.LAYOUT_INFLATER_SERVICE);

        mMenuView = inflater.inflate(R.layout.popup_one_item, null);

        cancel = (Button) mMenuView.findViewById(R.id.popup_one_item_btn_cancel);

        submit = (Button) mMenuView.findViewById(R.id.popup_one_item_btn_submit);

        wheel = (WheelView) mMenuView.findViewById(R.id.popup_one_item_wheel);

        title = (TextView) mMenuView.findViewById(R.id.popup_one_item_txt_title);

        this.datas = datas; //根据参数初始化数据源

        title.setText(t);   //设置标题
④、设置wheelview控件的相应属性方法
     wheel.setWheelAdapter(new ArrayWheelAdapter(context)); // 文本数据源

        wheel.setSkin(WheelView.Skin.Holo); // common皮肤

        wheel.setWheelData(datas);  // 数据集合

        wheel.setOnWheelItemSelectedListener(new WheelView.OnWheelItemSelectedListener() {

            @Override

            public void onItemSelected(int position, Object o) {

                currentPosition = wheel.getCurrentPosition();

            }

        });

        cancel.setOnClickListener(new View.OnClickListener() {

            @Override

            public void onClick(View v) {

                dismiss();

            }

        });

        submit.setOnClickListener(itemsOnClick);
⑤、设置PopupWindow的自身属性方法
     this.setContentView(mMenuView);

        this.setWidth(ViewGroup.LayoutParams.MATCH_PARENT);

        this.setHeight(ViewGroup.LayoutParams.WRAP_CONTENT);

        ColorDrawable dw = new ColorDrawable(0x000000);

        this.setBackgroundDrawable(dw);

        this.setFocusable(true);

        //点击popupWindow之外的部分  关闭popupWindow

        mMenuView.setOnTouchListener(new View.OnTouchListener() {

            public boolean onTouch(View v, MotionEvent event) {

                int height = mMenuView.findViewById(R.id.popup_one_item_ly).getTop();

                int y = (int) event.getY();

                if (event.getAction() == MotionEvent.ACTION_UP){

                    if(y<height){

                        dismiss();

                    }

                }

                return true;

            }

        });
到这里构造方法完成了,然后我们需要写一个方法,让new OneItemPopupWindow(...)的Activity能获取到数据源选中位置的数据
   public int getCurrentPosition() { // 获取到wheelview当前选中的位置

        return currentPosition;

    }

    public ArrayList<String> getDatas() { //获取wheelview的数据源

        return datas;

    }
自定义 OneItemPopupWindow 的全部代码
至此 封装好了一个 有一个筛选条件的 自定义PopupWindow
4、OneItemPopupWindow 的使用
          ArrayList<String> condition = new ArrayList<>();  //构建数据源

                condition.add("北京");

                condition.add("上海");

                condition.add("浙江");

                condition.add("江苏");

                condition.add("山东");

                condition.add("山西");

                condition.add("广东");

                condition.add("福建");

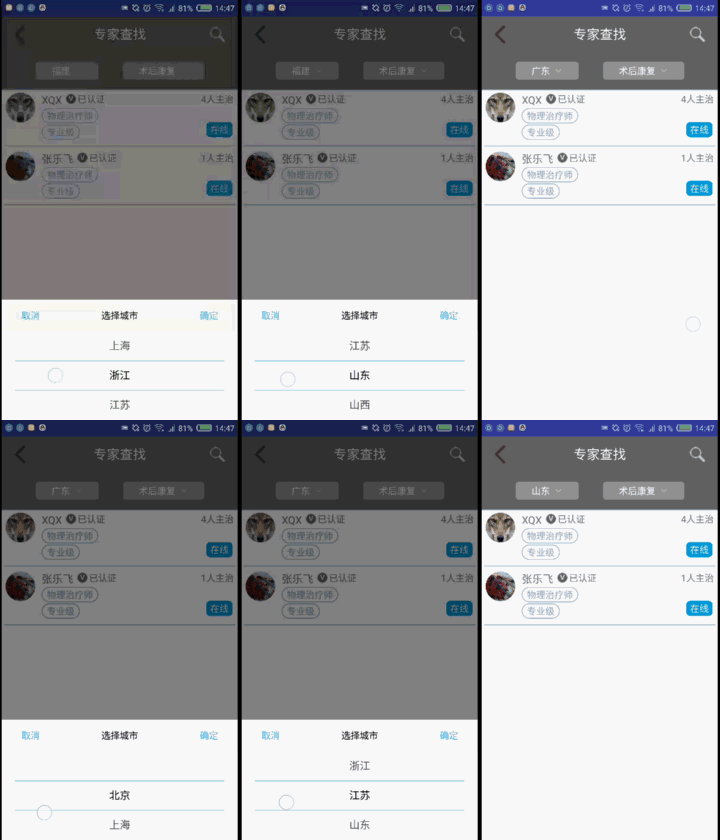
                popup = new OneItemPopupWindow(this, selectItemsOnClick,"选择城市",condition);  //创建自定义的popupwindow对象

                // 设置popupWindow显示的位置

                // 此时设在界面底部并且水平居中

                popup.showAtLocation(find_expert_ly,

                        Gravity.BOTTOM| Gravity.CENTER_HORIZONTAL, 0, 0);

                // 当popupWindow 出现的时候 屏幕的透明度  ,设为0.5 即半透明 灰色效果

                backgroundAlpha(0.5f);

                // 设置popupWindow取消的点击事件,即popupWindow消失后,屏幕的透明度,全透明,就回复原状态

                popup.setOnDismissListener(new PopupWindow.OnDismissListener() {

                    @Override

                    public void onDismiss() {

                        backgroundAlpha(1f);

                    }

                });
5、监听事件的接口回调,也是写在创建 OneItemPopupWindow 对象的Activity中
private View.OnClickListener selectItemsOnClick = new View.OnClickListener() {

        public void onClick(View v) {

            switch (v.getId()) {

                //根据popupWindow 布局文件中的id 来执行相应的点击事件

                case R.id.popup_one_item_btn_submit:

                    String s = popup.getDatas().get(popup.getCurrentPosition());

                    find_expert_btn_location.setText(s);

                    break;

                // ....

            }

            //每次点击popupWindow中的任意按钮,记得关闭此popupWindow,

            popup.dismiss();

        }

    };
6、界面半透明效果方法
  /**

     * 设置添加屏幕的背景透明度

     * @param bgAlpha

     */

    public void backgroundAlpha(float bgAlpha)

    {

        WindowManager.LayoutParams lp = getWindow().getAttributes();

        lp.alpha = bgAlpha; //0.0-1.0

        getWindow().setAttributes(lp);

    }
效果图:

------------------------------------------------------------------------------------------------------------------------------------
三、日期选择的自定义DatePopupWindow
需求同上,一个标题,一个确定按钮 ,一个时间按钮
三个水平排列的wheelview选择空间
效果图:

代码实现:
1、 和 “单个条件选择的自定义PopupWindow” 实现类似,只是多了两个wheelview ,代码直接贴在最下面了
---------------------------------------------------------------------------------------------------------------------
完整代码:
一、文字编辑对话框
布局文件:
drawable文件: 用于设置EditText圆角白色背景
java文件:
效果图:
二、单个条件选择PopupWindow
布局文件:
java文件:
color资源:
<color name="grey_6">#faf9f9</color>

<color name="blue_main">#4ab8e9</color>
使用代码:
点击事件接口回调:
弹出PopupWindow操作
效果图:
三、日期选择的自定义DatePopupWindow
1、布局文件:
2、DatePopupWindow.java
3、使用代码:
效果图:


(转载)Android项目实战(二十七):数据交互(信息编辑)填写总结的更多相关文章
- (转载)Android项目实战(十七):QQ空间实现(二)—— 分享功能 / 弹出PopupWindow
Android项目实战(十七):QQ空间实现(二)—— 分享功能 / 弹出PopupWindow 这是一张QQ空间说说详情的截图. 分析: 1.点击右上角三个点的图标,在界面底部弹出一个区域,这个 ...
- Android项目实战(十七):QQ空间实现(二)—— 分享功能 / 弹出PopupWindow
这是一张QQ空间说说详情的截图. 分析: .点击右上角三个点的图标,在界面底部弹出一个区域,这个区域有一些按钮提供给我们操作 .当该区域出现的时候,详情界面便灰了,也说成透明度变化了 .当任意选了一个 ...
- (转载)Android项目实战(二十八):Zxing二维码实现及优化
Android项目实战(二十八):Zxing二维码实现及优化 前言: 多年之前接触过zxing实现二维码,没想到今日项目中再此使用竟然使用的还是zxing,百度之,竟是如此牛的玩意. 当然,项目中 ...
- (转载)Android项目实战(二十八):使用Zxing实现二维码及优化实例
Android项目实战(二十八):使用Zxing实现二维码及优化实例 作者:听着music睡 字体:[增加 减小] 类型:转载 时间:2016-11-21我要评论 这篇文章主要介绍了Android项目 ...
- (转载)Android项目实战(三十二):圆角对话框Dialog
Android项目实战(三十二):圆角对话框Dialog 前言: 项目中多处用到对话框,用系统对话框太难看,就自己写一个自定义对话框. 对话框包括:1.圆角 2.app图标 , 提示文本,关闭对话 ...
- 【NFS项目实战二】NFS共享数据的时时同步推送备份
[NFS项目实战二]NFS共享数据的时时同步推送备份 标签(空格分隔): Linux服务搭建-陈思齐 ---本教学笔记是本人学习和工作生涯中的摘记整理而成,此为初稿(尚有诸多不完善之处),为原创作品, ...
- Android项目实战(四十四):Zxing二维码切换横屏扫描
原文:Android项目实战(四十四):Zxing二维码切换横屏扫描 Demo链接 默认是竖屏扫描,但是当我们在清单文件中配置横屏显示的时候: <activity android:name=&q ...
- Android项目实战(二十九):酒店预定日期选择
先看需求效果图: 几个需求点: 1.显示当月以及下个月的日历 (可自行拓展更多月份) 2.首次点击选择"开始日期",再次点击选择"结束日期" (1).如果&qu ...
- Android项目实战(三十二):圆角对话框Dialog
前言: 项目中多处用到对话框,用系统对话框太难看,就自己写一个自定义对话框. 对话框包括:1.圆角 2.app图标 , 提示文本,关闭对话框的"确定"按钮 难点:1.对话框边框圆角 ...
随机推荐
- 《SLIC Superpixels》阅读笔记
原始链接:http://blog.csdn.net/jkhere/article/details/16819285 或许有改动,请参考原文! SLIC 超像素(SLICSuperpixels) Rad ...
- 使用jQuery和CSS自定义HTML5 Video 控件 简单适用
Html5 Video是现在html5最流行的功能之一,得到了大多数最新版本的浏览器支持.包括IE9,也是如此.不同的浏览器提供了不同的原生态浏览器视频空间.我们制作自定义视频控件为了在所有的浏览器中 ...
- Select, Poll,Epoll
Date: 2019-06-19 Author: Sun 1. Select select最早于1983年出现在4.2BSD中,它通过一个select()系统调用来监视多个文件描述符的数组,当se ...
- virtualenv 虚拟环境依赖安装
虚拟环境依赖安装 开发要学会用 virtualenv 来管理多个开发环境 Ubuntu/Centos/MacOS 下 virtualenvwrapper 使得virtualenv变得更好用,所以我们一 ...
- PHP SPL 文件处理(SplFileInfo和SplFileObject)
SplFileInfo用来获取文件详细信息.SplFileObject遍历.查找指定行.写入csv文件等内容 SplFileInfo用来获取文件详细信息: $file = new SplFileInf ...
- 洛谷P1441 砝码称重 枚举 + 01背包
显然,n<=20, m<=4 的数据范围一眼爆搜. 直接搜索一下不用哪4个砝码,再做一遍01背包即可. 可能是本人太菜鸡,01背包部分调了半天QAQ-- #include<cstdi ...
- mysql出错ERROR 2003 (HY000): Can't connect to MySQL server on 'localhost' (10061)
其他的贴会教你 1.键盘上win+r 2.输入cmd 3.输入net start mysql 但是还是没用 你可以试试 1.右击开始菜单 2.点击windows PowerShell(i) 3.输入 ...
- Day 08 字符编码
字符编码 计算机基础 启动应用程序 1.双击QQ 2.操作系统接受指定然后把该操作转化为0和1发送给CPU 3.CPU接受指令然后把指令发给内存 4.内存接受指令把指令发送给硬盘获取数据 5.QQ在内 ...
- 网络是通的 yum用不了
Loaded plugins: fastestmirror, langpacks One of the configured repositories failed (Unknown),and yum ...
- mongodb 和 mongoose 初探
mongodb MongoDB 是一个介于关系数据库和非关系数据库之间的产品,是非关系数据库当中功能最丰富,最像关系数据库的. 1. 安装相关 1.1 下载 官网下载地址 :官网下载社区版 1.2 安 ...