.23-浅析webpack源码之事件流compilation(1)
正式开始跑编译,依次解析,首先是:
compiler.apply(

    new JsonpTemplatePlugin(options.output),

    // start

    new FunctionModulePlugin(options.output),

    new NodeSourcePlugin(options.node),

    new LoaderTargetPlugin(options.target)

);
流程图如下:
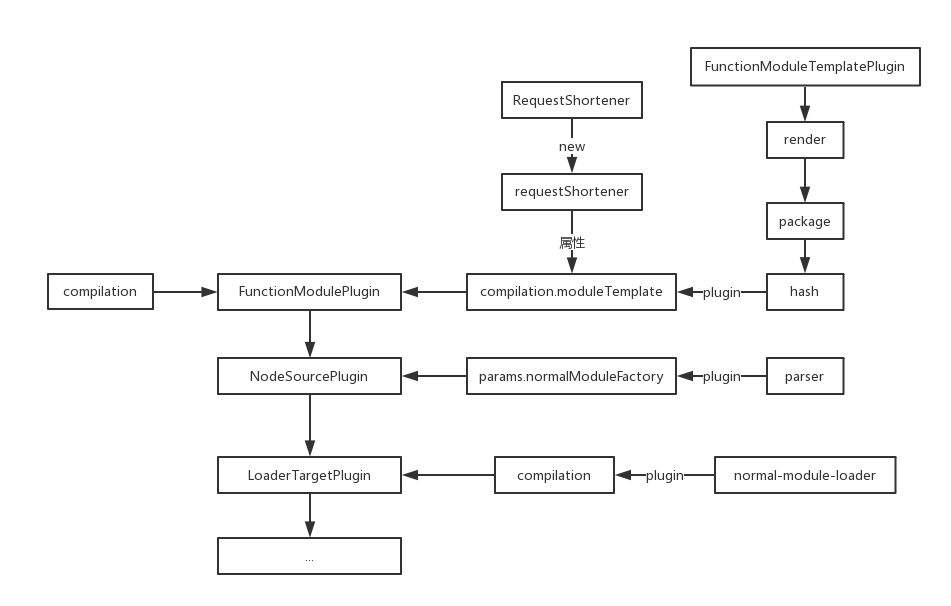
这里是第一个compilation事件注入的地方,注入代码如下:
compiler.plugin("compilation", (compilation) => {

    compilation.moduleTemplate.requestShortener = this.requestShortener || new RequestShortener(compiler.context);

    compilation.moduleTemplate.apply(new FunctionModuleTemplatePlugin());

});
这里的requestShortener为FunctionModulePlugin的第二个参数,没有传所以是undefined。
options.output为传入的output参数,但是这里并没有用到,而是传入了compiler.context,如果没有传默认为命令执行路径。
RequestShortener
首先看第一个,源码简化如下:
"use strict";

const path = require("path");

// 匹配反斜杠 => \

const NORMALIZE_SLASH_DIRECTION_REGEXP = /\\/g;

// 匹配特殊字符

const PATH_CHARS_REGEXP = /[-[\]{}()*+?.,\\^$|#\s]/g;

// 匹配正反斜杠 => /\

const SEPARATOR_REGEXP = /[/\\]$/;

// 匹配以'!'开头或结尾

const FRONT_OR_BACK_BANG_REGEXP = /^!|!$/g;

// 匹配 /index.js

const INDEX_JS_REGEXP = /\/index.js(!|\?|\(query\))/g;

// 将反斜杠替换为正斜杠

const normalizeBackSlashDirection = (request) => {

    return request.replace(NORMALIZE_SLASH_DIRECTION_REGEXP, "/");

};

// 将路径中特殊字符转义 例如 - => \-

// 返回一个正则

const createRegExpForPath = (path) => {

    const regexpTypePartial = path.replace(PATH_CHARS_REGEXP, "\\$&");

    return new RegExp(`(^|!)${regexpTypePartial}`, "g");

};

class RequestShortener {

    constructor(directory) { /**/ }

    shorten(request) { /**/ }

}

module.exports = RequestShortener;
可以看到都是对路径做处理,正则都比较简单,接下来看一下构造函数,其中传进来的directory为命令执行上下文。
class RequestShortener {

    constructor(directory) {

        // 斜杠转换

        directory = normalizeBackSlashDirection(directory);

        // 没看懂啥用

        if (SEPARATOR_REGEXP.test(directory)) directory = directory.substr(0, directory.length - 1);

        // 上下文路径正则

        // /(^|!)转义后的路径/g

        if (directory) {

            this.currentDirectoryRegExp = createRegExpForPath(directory);

        }

        // 返回目录名

        const dirname = path.dirname(directory);

        // 这里也不懂干啥用的

        const endsWithSeperator = SEPARATOR_REGEXP.test(dirname);

        const parentDirectory = endsWithSeperator ? dirname.substr(0, dirname.length - 1) : dirname;

        // 目录正则

        if (parentDirectory && parentDirectory !== directory) {

            this.parentDirectoryRegExp = createRegExpForPath(parentDirectory);

        }

        // .....\node_modules\webpack\lib

        if (__dirname.length >= 2) {

            // webpack的目录

            const buildins = normalizeBackSlashDirection(path.join(__dirname, ".."));

            // 目录检测

            const buildinsAsModule = this.currentDirectoryRegExp && this.currentDirectoryRegExp.test(buildins);

            // false

            this.buildinsAsModule = buildinsAsModule;

            // 生成webpack目录路径正则

            this.buildinsRegExp = createRegExpForPath(buildins);

        }

    }

    shorten(request) { /**/ }

}
主要是生成了3个目录匹配正则,上下文、上下文目录、webpack主目录三个。
这里上下文一般不会是webpack的目录,所以这个buildingsAsModule理论上都是flase。
再简单看一下原型方法shorten:
class RequestShortener {

    constructor(directory) { /**/ }

    shorten(request) {

        if (!request) return request;

        // 转化路径斜杠

        request = normalizeBackSlashDirection(request);

        // false

        if (this.buildinsAsModule && this.buildinsRegExp)

            request = request.replace(this.buildinsRegExp, "!(webpack)");

        // 将上下文转换为!.

        if (this.currentDirectoryRegExp)

            request = request.replace(this.currentDirectoryRegExp, "!.");

        // 将上下文目录转换为!..

        if (this.parentDirectoryRegExp)

            request = request.replace(this.parentDirectoryRegExp, "!..");

        // false

        if (!this.buildinsAsModule && this.buildinsRegExp)

            request = request.replace(this.buildinsRegExp, "!(webpack)");

        // 把路径中的index.js去了 留下参数

        // /index.js?a=1 => ?a=1

        request = request.replace(INDEX_JS_REGEXP, "$1");

        // 把头尾的!去了

        return request.replace(FRONT_OR_BACK_BANG_REGEXP, "");

    }

}
可以看出,这个方法将传入的路径根据上下文的目录进行简化,变成了相对路径,然后去掉了index.js。
FunctionModuleTemplatePlugin
这个模块没有实质性内容,主要是对compilation.moduleTemplate注入事件流,源码如下:
"use strict";

const ConcatSource = require("webpack-sources").ConcatSource;

class FunctionModuleTemplatePlugin {

    apply(moduleTemplate) {

        moduleTemplate.plugin("render", function(moduleSource, module) { /**/ });

        moduleTemplate.plugin("package", function(moduleSource, module) { /**/ });

        moduleTemplate.plugin("hash", function(hash) { /**/ });

    }

}

module.exports = FunctionModuleTemplatePlugin;
等触发的时候再回头看。
ConcatSource后面单独讲。
下面是第二个插件,源码整理如下:
class NodeSourcePlugin {

    constructor(options) {

        this.options = options;

    }

    apply(compiler) {

        const options = this.options;

        if (options === false) // allow single kill switch to turn off this plugin

            return;

        function getPathToModule(module, type) { /**/ }

        function addExpression(parser, name, module, type, suffix) { /**/ }

        compiler.plugin("compilation", function(compilation, params) {

            params.normalModuleFactory.plugin("parser", function(parser, parserOptions) { /**/ });

        });

        compiler.plugin("after-resolvers", (compiler) => { /**/ });

    }

};
可以看到,这里只是简单判断了是否关闭了node插件,然后在之前的params参数中的normalModuleFactory属性上注入了一个parser事件。
第三个插件就更简单了,如下:
class LoaderTargetPlugin {

    constructor(target) {

        this.target = target;

    }

    apply(compiler) {

        compiler.plugin("compilation", (compilation) => {

            // 这个完全不懂干啥的

            compilation.plugin("normal-module-loader", (loaderContext) => loaderContext.target = this.target);

        });

    }

}
这个plugin目前根本看不出来有什么用。
总之,前三个compilation比较水,没有什么内容。
.23-浅析webpack源码之事件流compilation(1)的更多相关文章
- .24-浅析webpack源码之事件流compilation(2)
下一个compilation来源于以下代码: compiler.apply(new EntryOptionPlugin()); compiler.applyPluginsBailResult(&quo ...
- .22-浅析webpack源码之事件流compilation总览
呃,终于到了这地方-- newCompilation(params) { // ... this.applyPlugins("this-compilation", compilat ...
- .25-浅析webpack源码之事件流compilation(3)
这一节跑下一批plugin. compiler.apply( new EnsureChunkConditionsPlugin(), new RemoveParentModulesPlugin(), n ...
- .21-浅析webpack源码之事件流this-compilation
上一节生成Compilation实例后,添加了一些属性,随后触发this-compilation事件流,如下: Compiler.prototype.newCompilation = (params) ...
- .34-浅析webpack源码之事件流make(3)
新年好呀~过个年光打游戏,function都写不顺溜了. 上一节的代码到这里了: // NormalModuleFactory的resolver事件流 this.plugin("resolv ...
- .27-浅析webpack源码之事件流make(2)
上一节跑到了NormalModuleFactory模块,调用了原型方法create后,依次触发了before-rsolve.factory.resolver事件流,这节从resolver事件流开始讲. ...
- .26-浅析webpack源码之事件流make(1)
compilation事件流中,依然只是针对细节步骤做事件流注入,代码流程如图: // apply => this-compilation // apply => compilation ...
- .37-浅析webpack源码之事件流make(4)
赶紧完结这个系列咯,webpack4都已经出正式版了. 之前的代码搜索到js文件的对应loader,并添加到了对象中返回,流程如下: this.plugin("factory", ...
- 浅析libuv源码-node事件轮询解析(3)
好像博客有观众,那每一篇都画个图吧! 本节简图如下. 上一篇其实啥也没讲,不过node本身就是这么复杂,走流程就要走全套.就像曾经看webpack源码,读了300行代码最后就为了取package.js ...
随机推荐
- ElasticSearch 学习记录之ES查询添加排序字段和使用missing或existing字段查询
ES添加排序 在默认的情况下,ES 是根据文档的得分score来进行文档额排序的.但是自己可以根据自己的针对一些字段进行排序.就像下面的查询脚本一样.下面的这个查询是根据productid这个值进行排 ...
- 为什么硬链接不能链接目录、文件inode 和目录 dentry 的区别联系
我们对任何一个目录用ls -l 命令都可以看到其连接数至少是2,这也说明了系统中是存在硬连接的,而且命令ln -d 也可以让超级用户对目录作硬连接,这些都说明了系统限制对目录进行硬连接只是一个硬性规定 ...
- ActiveMQ (一) 初识ActiveMQ
了解JMS JMS即Java消息服务(Java Message Service)应用程序接口是一个Java平台中关于面向消息中间件(MOM)的API,用于在两个应用程序之间,或分布式系统中发送消息,进 ...
- Golang丰富的I/O 二----cgo版Hello World
h1 { margin-top: 0.6cm; margin-bottom: 0.58cm; direction: ltr; color: #000000; line-height: 200%; te ...
- SecureCRT连接本地的Vmware虚拟机(CentOS)时提示连接超时“Connection timed out”
测试了一下,直接在Vmware的VM里面可以ping通宿主机. 但是宿主机无法ping通VM. 后面发现是本地的网络设置里面的vmware的NAT的网卡设置了手工填写地址和DNS. 修改为自动获取.问 ...
- Centos6.8防火墙配置
1.基本操作 # 查看防火墙状态 service iptables status # 停止防火墙 service iptables stop # 启动防火墙 service iptables star ...
- git 的回退
今天下午写了一下午的代码给合并没了 然后晚上觉得还是要好好学习一下git的使用 推荐几个git的教程 https://www.liaoxuefeng.com/wiki/0013739516305929 ...
- jQuery知识盲点
一.属性操作 元素的尺寸 width() height() innerWidth() innerHeight() outerWidth() outerHeight() $('div').width() ...
- SpiderMonkey js引擎的静态编译与使用
原文出处: http://yaolixing.oltag.com/gns-8ABFFE2D-EB1E-44FA-9118-217ED7959536.html 几百KB的跨平台js引擎,是不是您心之所想 ...
- 为什么树莓派不会受到 Spectre 和 Meltdown 攻击
最近爆出来的 Intel CPU 的底层漏洞可谓是影响巨大,过去20年的电脑都可能会受影响.前几天 Raspberry Pi 的官方 Twitter(@Raspberry_Pi) 转推了这篇文章,通过 ...