爬虫 1 requests 、beautifulsoup
1.requests
1.method
提交方式:post、get、put、delete、options、head、patch
2.url
访问地址
3.params
在url中传递的参数,GET
params = {'k1':'v1','k2':'v2'} params = ‘k1=v1&k2=v2’ params = [('k1','v1'),('k2,'v2')]
4.data
在请求体内传递的参数
data = {'k1':'v1','k2':'v2'} data = ‘k1=v1&k2=v2’ data = [('k1','v1'),('k2,'v2')] data = open('file','rb')
5.json
在请求体内传递的参数
JSON serializable Python object
参数经过序列化,意味着可以传递字典内嵌套字典等
6.headers
请求头
headers = { 'referer':上次浏览的页面
'user-agent':用户使用的客户端类型
...
}
7.cookies
即cookie
字典类型或CookieJar object类型,在请求头中传递
8.files
文件
files = {'file1':open('file','rb')} files = ('file1',open('file','rb')) === ('filename', fileobj, 'content_type') 或 ('filename', fileobj, 'content_type', custom_headers)
9.auth
用户名、密码加密 auth = HTTPBasicAuto(username,pwd)
10.timeout
请求和响应的超时
11.allow_redirects
是否允许重定向
.proxies
代理
13.verify
是否忽略证书
14.stream
下载方式 类型为布尔值 True,则下载能下多少下多少
15.cert
针对https,证书文件
16.session
requests.session 可以免去写cookies
2.beautifulsoup
1.markup
将一个字符串或者文件序列化(url,文件路径等)
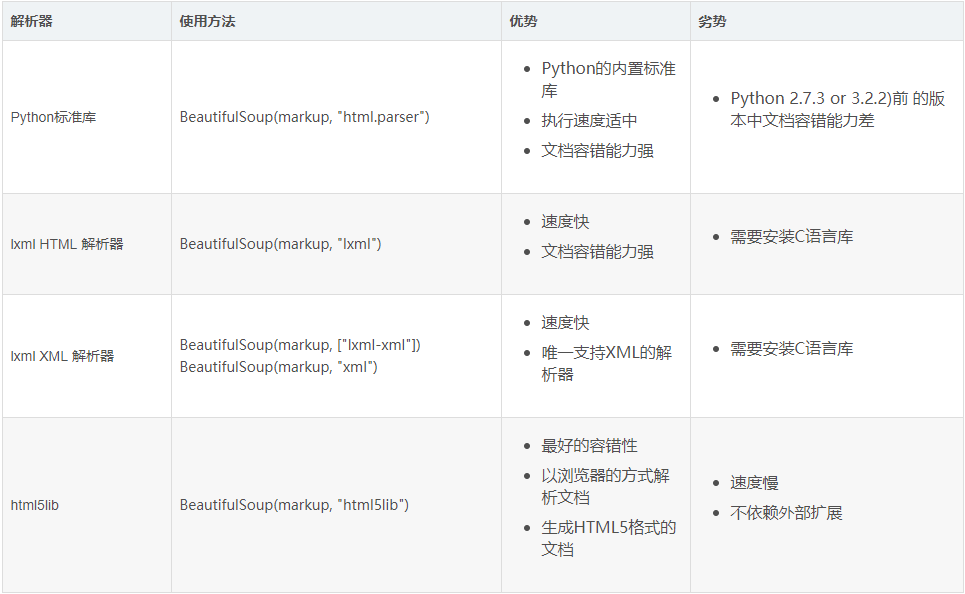
2.features
解析器类型
基本应用
.tag
1)name
from bs4 import BeautifulSoup

soup = BeautifulSoup('<b class="boldest">Extremely bold</b>')

tag = soup.b

print(tag.name)
通过可以通过该属性来修改标签,如果改变了tag的name,那将影响所有通过当前Beautiful Soup对象生成的HTML文档。
from bs4 import BeautifulSoup

soup = BeautifulSoup('<b class="boldest">Extremely bold</b>')

tag.name = 'a'

print(tag)
2)Attributes
一个tag可能有很多个属性. tag <b class="boldest"> 有一个 “class” 的属性,值为 “boldest” . tag的属性的操作方法与字典相同
from bs4 import BeautifulSoup

soup = BeautifulSoup('<b class="boldest">Extremely bold</b>')

print(tag['class'])
也可以使用attrs可以以字典形式返回标签的所有属性
from bs4 import BeautifulSoup

soup = BeautifulSoup('<b class="boldest">Extremely bold</b>')

print(tag.attrs)
tag的属性可以被添加,删除或修改.
tag['class'] = 'verybold'

tag['id'] = 1

del tag['class']

del tag['id']

tag['class']

print(tag.get('class'))
3)children
所有子标签
4)clear
将标签的所有子标签全部清空(保留标签名)
tag = soup.find('body')

tag.clear()

print(soup)
5)decompose
递归的删除所有的标签
body = soup.find('body')

body.decompose()

print(soup)
6)extract
递归的删除所有的标签,并获取删除的标签
body = soup.find('body')

v = body.extract()

print(soup)
7)decode 和 encode
decode转换为字符串(含当前标签);decode_contents(不含当前标签)
encode转换为字节(含当前标签);encode_contents(不含当前标签)
body = soup.find('body')

v = body.decode()

v = body.decode_contents()

print(v)
decode
body = soup.find('body')

v = body.encode()

v = body.encode_contents()

print(v)
encode
8)find 和 find_all
查找第一个和查找所有,源码中find的实现基于find_all,取[0]
tag = soup.find('a')

print(tag)

tag = soup.find(name='a', attrs={'class': 'sister'}, recursive=True, text='Lacie')

tag = soup.find(name='a', class_='sister', recursive=True, text='Lacie')

print(tag)
find
tags = soup.find_all('a')

print(tags)

tags = soup.find_all('a',limit=1)

print(tags)

tags = soup.find_all(name='a', attrs={'class': 'sister'}, recursive=True, text='Lacie')

tags = soup.find(name='a', class_='sister', recursive=True, text='Lacie')

print(tags)

####### 列表 #######

v = soup.find_all(name=['a','div'])

print(v)

v = soup.find_all(class_=['sister0', 'sister'])

print(v)

v = soup.find_all(text=['Tillie'])

print(v, type(v[0]))

v = soup.find_all(id=['link1','link2'])

print(v)

v = soup.find_all(href=['link1','link2'])

print(v)

####### 正则 #######

import re

rep = re.compile('p')

rep = re.compile('^p')

v = soup.find_all(name=rep)

print(v)

rep = re.compile('sister.*')

v = soup.find_all(class_=rep)

print(v)

rep = re.compile('http://www.oldboy.com/static/.*')

v = soup.find_all(href=rep)

print(v)

####### 方法筛选 #######

def func(tag):

return tag.has_attr('class') and tag.has_attr('id')

v = soup.find_all(name=func)

print(v)

## get,获取标签属性

tag = soup.find('a')

v = tag.get('id')

print(v)
find_all
9)has_attr
检查标签是否具有该属性
10)get_text
获取标签内部文本内容
11)index
检查标签在某标签中的索引位置
爬虫 1 requests 、beautifulsoup的更多相关文章
- 【Python】在Pycharm中安装爬虫库requests , BeautifulSoup , lxml 的解决方法
BeautifulSoup在学习Python过程中可能需要用到一些爬虫库 例如:requests BeautifulSoup和lxml库 前面的两个库,用Pychram都可以通过 File--> ...
- 爬虫之Requests&beautifulsoup
网络爬虫(又被称为网页蜘蛛,网络机器人,在FOAF社区中间,更经常的称为网页追逐者),是一种按照一定的规则,自动地抓取万维网信息的程序或者脚本.另外一些不常使用的名字还有蚂蚁.自动索引.模拟程序或者蠕 ...
- python 爬虫(一) requests+BeautifulSoup 爬取简单网页代码示例
以前搞偷偷摸摸的事,不对,是搞爬虫都是用urllib,不过真的是很麻烦,下面就使用requests + BeautifulSoup 爬爬简单的网页. 详细介绍都在代码中注释了,大家可以参阅. # -* ...
- 孤荷凌寒自学python第六十七天初步了解Python爬虫初识requests模块
孤荷凌寒自学python第六十七天初步了解Python爬虫初识requests模块 (完整学习过程屏幕记录视频地址在文末) 从今天起开始正式学习Python的爬虫. 今天已经初步了解了两个主要的模块: ...
- 利用requests, beautifulsoup包爬取股票信息网站
这是第一次用requests, beautifulsoup实现爬虫,此次爬取的是一个股票信息网站:http://www.gupiaozhishi.net.cn. 实现非常简单,只是为了demo使用的数 ...
- Python爬虫练习(requests模块)
Python爬虫练习(requests模块) 关注公众号"轻松学编程"了解更多. 一.使用正则表达式解析页面和提取数据 1.爬取动态数据(js格式) 爬取http://fund.e ...
- 爬虫入门二 beautifulsoup
title: 爬虫入门二 beautifulsoup date: 2020-03-12 14:43:00 categories: python tags: crawler 使用beautifulsou ...
- 【爬虫入门手记03】爬虫解析利器beautifulSoup模块的基本应用
[爬虫入门手记03]爬虫解析利器beautifulSoup模块的基本应用 1.引言 网络爬虫最终的目的就是过滤选取网络信息,因此最重要的就是解析器了,其性能的优劣直接决定这网络爬虫的速度和效率.Bea ...
- 【网络爬虫入门03】爬虫解析利器beautifulSoup模块的基本应用
[网络爬虫入门03]爬虫解析利器beautifulSoup模块的基本应用 1.引言 网络爬虫最终的目的就是过滤选取网络信息,因此最重要的就是解析器了,其性能的优劣直接决定这网络爬虫的速度和效率.B ...
- Python爬虫之requests
爬虫之requests 库的基本用法 基本请求: requests库提供了http所有的基本请求方式.例如 r = requests.post("http://httpbin.org/pos ...
随机推荐
- 获取真实ip三个方法
方法一: /** * 获取客户端IP地址 * * @return string */function get_client_ip(){ if (getenv("HTTP_CLIENT_IP& ...
- Windows下 安装Jenkins 并发布至docker 实战
网上的教程基本都是Linux系统下安装Jenkins,并且发布到Linux系统下的docker中, 于是打算在全部windows的环境中,完成Jenkins的持续集成功能. 环境: 服务器环境: wi ...
- [LeetCode&Python] Problem 925. Long Pressed Name
Your friend is typing his name into a keyboard. Sometimes, when typing a character c, the key might ...
- MySQL8.0 关闭二进制日志
Binary logging is enabled by default (the log_bin system variable is set to ON). The exception is if ...
- PythonStudy——集合 Set
# 空集合:不能用{},因为用来标示空字典 s = set() print(s, type(s)) # 概念:# 1.set为可变类型 - 可增可删# 2.set为去重存储 - set中不能存放重复数 ...
- java-启动和关闭.exe程序
链接: https://www.cnblogs.com/pengpengzhang/p/8675740.html https://blog.csdn.net/ZHANGHUI3239619/artic ...
- dapper List SqlBulkCopy
using System; using System.Collections.Generic; using System.Linq; using System.Text; using System.D ...
- inode引起的Linux无法创建新文件,磁盘空间不足
df -h,判断硬盘空间是否已经满了,占用率达100% ,就可以断定该分区满了. df -ia,占用率达100%,也会导致无法创建新文件.一般都是存在大量小文件引起的. inode包含文件的元信息,具 ...
- [UE4]Native Widget Host
一.Native Widget Host是一个容器,它可以包含一个Slate UI 二.Native Widget Host应该用在当你需要把一个Slate UI 放到UMG中的时候,只有这个时候才需 ...
- scala spark-streaming整合kafka (spark 2.3 kafka 0.10)
Maven组件如下: ) { System.err.println() } StreamingExamples.setStreamingLogLevels() )) ) { System.) } )) ...