CUDA 显存操作:CUDA支持的C++11
CUDA9的编译器和语言改进
使用CUDA 9,nvcc编译器增加了对C ++ 14的支持,其中包括新功能
通用的lambda表达式,其中使用auto关键字代替参数类型;
auto lambda = [](auto a,auto b){return a * b;};
功能的返回类型扣除(使用auto关键字作为返回类型,如上例所示)
对constexpr函数可以包含的更少的限制,包括变量声明,if,switch和循环。
CUDA 9中的NVCC也更快,与CUDA 8相比,编译时间平均减少了20%,达到了50%。
·扩大开发平台和主机编译器,包括Microsoft Visual Studio 2017, Clang 3.9, PGI17.1和GCC6.x
CUDER:用C++11封装的CUDA类
以前写cuda:初始化环境,申请显存,初始化显存,launch kernel,拷贝数据,释放显存。一个页面大部分都是这些繁杂但又必须的操作,有时还会忘掉释放部分显存。
今天用C++11封装了这些CUDA操作,然后就可以专注于写kernel代码了。.cu文件就像glsl shader文件一样简洁明了。
例如:./kernel.cu文件,里面只有一个fill函数用于填充数组A。
extern "C"  __global__ void fill(int * A, int cnt){

    const int gap = blockDim.x*gridDim.x;

    for (int id = blockDim.x*blockIdx.x + threadIdx.x; id < cnt; id += gap)

        A[id] = id * 2;

};
下面的main.cpp演示了Cuder类的使用。

#include "Cuder.h"

const int N = 65536;

std::string get_ptx_path(const char*);

int main(){

    int A[N];  for (int i = 0; i < N; ++i) A[i] = i;

    //为禁止随意创建CUcontext,将构造函数声明为private,安全起见禁用了拷贝构造函数和拷贝赋值运算符

    redips::Cuder cuder = redips::Cuder::getInstance();

    //添加并编译一个.cu文件[相当于glsl shader 文件],或者直接添加一个ptx文件。

    //std::string module_file = "kernel.cu";

    std::string module_file = get_ptx_path("kernel.cu");

    cuder.addModule(module_file);

    //显存上申请一个大小为[sizeof(int)*N]的数组,并将其命名为["a_dev"],用于后面操作中该数组的标识;

    //如果第三个参数不为null,还会执行cpu->gpu的数据拷贝

    cuder.applyArray("a_dev", sizeof(int)*N, A);

    //运行["./kernel.cu"]文件中指定的["fill"]函数, 前两个参数设定了gridSize和blockSize

    //{ "a_dev", N }是C++11中的initializer_list, 如果是字符串则对应前面申请的显存数组名,否则是变量类型

    cuder.launch(dim3(512, 1, 1), dim3(256, 1, 1), module_file, "fill", { "a_dev", N });

    //将["a_dev"]对应的显存数组拷贝回[A]

    cuder.fetchArray("a_dev", sizeof(int)*N, A);

    return 0;

}

std::string get_ptx_path(const char* cuFile){

    std::string path = "./ptx/";

#ifdef WIN32

    path += "Win32/";

#else

    path += "x64/";

#endif

#ifdef _DEBUG

    path += "Debug/";

#else

    path += "Release/";

#endif

    return path + cuFile + ".ptx";

}
cuder.addModule(...)函数的参数是一个.cu文件或者.ptx文件。
1. 如果是.cu文件,该函数负责将函数编译成ptx代码。然后封装到CUmodule里。
2. 如果是.ptx文件,该函数只是将ptx封装到CUmodule里。
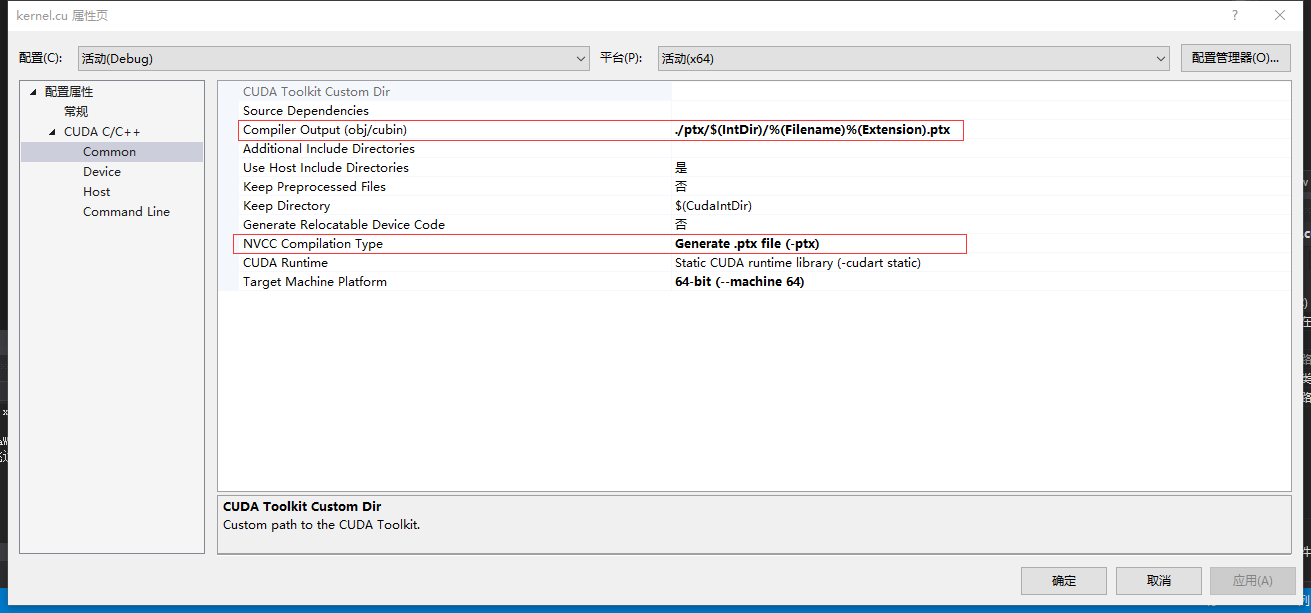
建议使用第二种方式,nvidia的optix就是这么做的。好处是在编译阶段编译总比运行时编译好,如果代码有错误编译时就会提示。这时需要两点配置:
2.a 在生成依赖项里添加cuda 编译器,然后相应的.cu文件设定为用该编译器编译。
2.b 设定将.cu文件生成到指定路径下的ptx文件,然后在程序中指定该ptx文件的路径。
下面贴上Cuder.h的代码
#pragma once

#include <map>

#include <string>

#include <vector>

#include <cuda.h>

#include <nvrtc.h>

#include <fstream>

#include <sstream>

#include <iostream>

#include <cudaProfiler.h>

#include <cuda_runtime.h>

#include <helper_cuda_drvapi.h>

namespace redips{

    class Cuder{

        CUcontext context;

        std::map <std::string, CUmodule> modules;

        std::map <std::string, CUdeviceptr> devptrs;

        Cuder(){

            checkCudaErrors(cuCtxCreate(&context, 0, cuDevice));

        }

        void release(){

            //for (auto module : modules) delete module.second;

            for (auto dptr : devptrs)    cuMemFree(dptr.second);

            devptrs.clear();

            modules.clear();

            cuCtxDestroy(context);

        }

    public:

        class ValueHolder{

        public:

            void * value = nullptr;

            bool is_string = false;

            ValueHolder(const char* str){

                value = (void*)str;

                is_string = true;

            }

            template <typename T>

            ValueHolder(const T& data){

                value = new T(data);

            }

        };

        static Cuder getInstance(){

            if (!cuda_enviroment_initialized) initialize();

            return Cuder();

        }

        //forbidden copy-constructor and assignment function

        Cuder(const Cuder&) = delete;

        Cuder& operator= (const Cuder& another) = delete;

        Cuder(Cuder&& another){

            this->context = another.context;

            another.context = nullptr;

            this->devptrs = std::map<std::string, CUdeviceptr>(std::move(another.devptrs));

            this->modules = std::map<std::string, CUmodule>(std::move(another.modules));

        }

        Cuder& operator= (Cuder&& another) {

            if (this->context == another.context) return *this;

            release();

            this->context = another.context;

            another.context = nullptr;

            this->devptrs = std::map<std::string, CUdeviceptr>(std::move(another.devptrs));

            this->modules = std::map<std::string, CUmodule>(std::move(another.modules));

            return *this;

        }

        virtual ~Cuder(){ release();    };

    public:

        bool launch(dim3 gridDim, dim3 blockDim, std::string module, std::string kernel_function, std::initializer_list<ValueHolder> params){

            //get kernel address

            if (!modules.count(module)){

                std::cerr << "[Cuder] : error: doesn't exists an module named " << module << std::endl; return false;

            }

            CUfunction kernel_addr;

            if (CUDA_SUCCESS != cuModuleGetFunction(&kernel_addr, modules[module], kernel_function.c_str())){

                std::cerr << "[Cuder] : error: doesn't exists an kernel named " << kernel_function << " in module " << module << std::endl; return false;

            }

            //setup params

            std::vector<void*> pamary;

            for (auto v : params){

                if (v.is_string){

                    if (devptrs.count((const char*)(v.value))) pamary.push_back((void*)(&(devptrs[(const char*)(v.value)])));

                    else{

                        std::cerr << "[Cuder] : error: launch failed. doesn't exists an array named " << (const char*)(v.value) << std::endl;;

                        return false;

                    }

                }

                else pamary.push_back(v.value);

            }

            cudaEvent_t start, stop;

            float elapsedTime = 0.0;

            cudaEventCreate(&start);

            cudaEventCreate(&stop);

            cudaEventRecord(start, 0);

            bool result = (CUDA_SUCCESS == cuLaunchKernel(kernel_addr,/* grid dim */gridDim.x, gridDim.y, gridDim.z, /* block dim */blockDim.x, blockDim.y, blockDim.z, /* shared mem, stream */ 0, 0, &pamary[0], /* arguments */0));

            cuCtxSynchronize();

            cudaEventRecord(stop, 0);

            cudaEventSynchronize(stop);

            cudaEventElapsedTime(&elapsedTime, start, stop);

            std::cout << "[Cuder] : launch finish. cost " << elapsedTime << "ms" << std::endl;

            return result;

        }

        bool addModule(std::string cufile){

            if (modules.count(cufile)){

                std::cerr << "[Cuder] : error: already has an modules named " << cufile << std::endl;;

                return false;

            }

            std::string ptx = get_ptx(cufile);

            if (ptx.length() > 0){

                CUmodule module;

                checkCudaErrors(cuModuleLoadDataEx(&module, ptx.c_str(), 0, 0, 0));

                modules[cufile] = module;

                return true;

            }

            else{

                std::cerr << "[Cuder] : error: add module " << cufile << " failed!\n";

                return false;

            }

        }

        void applyArray(const char* name, size_t size, void* h_ptr=nullptr){

            if (devptrs.count(name)){

                std::cerr << "[Cuder] : error: already has an array named " << name << std::endl;;

                return;

            }

            CUdeviceptr d_ptr;

            checkCudaErrors(cuMemAlloc(&d_ptr, size));

            if (h_ptr)

                checkCudaErrors(cuMemcpyHtoD(d_ptr, h_ptr, size));

            devptrs[name] = d_ptr;

        }

        void fetchArray(const char* name, size_t size,void * h_ptr){

            if (!devptrs.count(name)){

                std::cerr << "[Cuder] : error: doesn't exists an array named " << name << std::endl;;

                return;

            }

            checkCudaErrors(cuMemcpyDtoH(h_ptr, devptrs[name], size));

        }

    private:

        static int devID;

        static CUdevice cuDevice;

        static bool cuda_enviroment_initialized;

        static void initialize(){

            // picks the best CUDA device [with highest Gflops/s] available

            devID = gpuGetMaxGflopsDeviceIdDRV();

            checkCudaErrors(cuDeviceGet(&cuDevice, devID));

            // print device information

            {

                char name[100]; int major = 0, minor = 0;

                checkCudaErrors(cuDeviceGetName(name, 100, cuDevice));

                checkCudaErrors(cuDeviceComputeCapability(&major, &minor, cuDevice));

                printf("[Cuder] : Using CUDA Device [%d]: %s, %d.%d compute capability\n", devID, name, major, minor);

            }

            //initialize

            checkCudaErrors(cuInit(0));

            cuda_enviroment_initialized = true;

        }

        //如果是ptx文件则直接返回文件内容,如果是cu文件则编译后返回ptx

        std::string get_ptx(std::string filename){

            std::ifstream inputFile(filename, std::ios::in | std::ios::binary | std::ios::ate);

            if (!inputFile.is_open()) {

                std::cerr << "[Cuder] : error: unable to open " << filename << " for reading!\n";

                return "";

            }

            std::streampos pos = inputFile.tellg();

            size_t inputSize = (size_t)pos;

            char * memBlock = new char[inputSize + 1];

            inputFile.seekg(0, std::ios::beg);

            inputFile.read(memBlock, inputSize);

            inputFile.close();

            memBlock[inputSize] = '\x0';

            if (filename.find(".ptx") != std::string::npos)

                return std::string(std::move(memBlock));

            // compile

            nvrtcProgram prog;

            if (nvrtcCreateProgram(&prog, memBlock, filename.c_str(), 0, NULL, NULL) == NVRTC_SUCCESS){

                delete memBlock;

                if (nvrtcCompileProgram(prog, 0, nullptr) == NVRTC_SUCCESS){

                    // dump log

                    size_t logSize;

                    nvrtcGetProgramLogSize(prog, &logSize);

                    if (logSize>0){

                        char *log = new char[logSize + 1];

                        nvrtcGetProgramLog(prog, log);

                        log[logSize] = '\x0';

                        std::cout << "[Cuder] : compile [" << filename << "] " << log << std::endl;

                        delete(log);

                    }

                    else std::cout << "[Cuder] : compile [" << filename << "] finish" << std::endl;

                    // fetch PTX

                    size_t ptxSize;

                    nvrtcGetPTXSize(prog, &ptxSize);

                    char *ptx = new char[ptxSize+1];

                    nvrtcGetPTX(prog, ptx);

                    nvrtcDestroyProgram(&prog);

                    return std::string(std::move(ptx));

                }

            }

            delete memBlock;

            return "";

        }

    };

    bool Cuder::cuda_enviroment_initialized = false;

    int Cuder::devID = 0;

    CUdevice Cuder::cuDevice = 0;

};
下面贴一下VS里面需要的配置
//include

C:\Program Files\NVIDIA GPU Computing Toolkit\CUDA\v7.5\include

C:\ProgramData\NVIDIA Corporation\CUDA Samples\v7.5\common\inc

//lib

C:\Program Files\NVIDIA GPU Computing Toolkit\CUDA\v7.5\lib\x64

cuda.lib

cudart.lib

nvrtc.lib
CUDA 显存操作:CUDA支持的C++11的更多相关文章
- 显卡、显卡驱动、显存、GPU、CUDA、cuDNN
显卡 Video card,Graphics card,又叫显示接口卡,是一个硬件概念(相似的还有网卡),执行计算机到显示设备的数模信号转换任务,安装在计算机的主板上,将计算机的数字信号转换成模拟 ...
- 6G显卡显存不足出现CUDA Error:out of memory解决办法
从6月初开始,6G显存的显卡开始出现CUDA Error:out of memory的问题,这是因为dag文件一直在增加,不过要增加到6G还需要最少两年的时间. 现在出现问题的原因是1.内核太古老 ...
- 自制操作系统Antz(3)——进入保护模式 (中) 直接操作显存
Antz系统更新地址: https://www.cnblogs.com/LexMoon/category/1262287.html Linux内核源码分析地址:https://www.cnblogs. ...
- windows 10 上源码编译OpenCV并支持CUDA | compile opencv with CUDA support on windows 10
本文首发于个人博客https://kezunlin.me/post/6580691f/,欢迎阅读! compile opencv with CUDA support on windows 10 Ser ...
- AI换脸必备知识:如何查看显卡型号以及显存大小!
使用Deepfakes(AI换脸) 软件,拼的就是配置,耗的就是时间,考验的是耐心. 配置好了,时间就少了. 所以玩这种软件,硬核需求就是:配置,配置,配置. 我的电脑能跑这个软件么?也是很多新手的 ...
- 我的Keras使用总结(5)——Keras指定显卡且限制显存用量,常见函数的用法及其习题练习
Keras 是一个高层神经网络API,Keras是由纯Python编写而成并基于TensorFlow,Theano以及CNTK后端.Keras为支持快速实验而生,能够将我们的idea迅速转换为结果.好 ...
- [Pytorch]深度模型的显存计算以及优化
原文链接:https://oldpan.me/archives/how-to-calculate-gpu-memory 前言 亲,显存炸了,你的显卡快冒烟了! torch.FatalError: cu ...
- 深度学习中GPU和显存分析
刚入门深度学习时,没有显存的概念,后来在实验中才渐渐建立了这个意识. 下面这篇文章很好的对GPU和显存总结了一番,于是我转载了过来. 作者:陈云 链接:https://zhuanlan.zhihu. ...
- Tensorflow与Keras自适应使用显存
Tensorflow支持基于cuda内核与cudnn的GPU加速,Keras出现较晚,为Tensorflow的高层框架,由于Keras使用的方便性与很好的延展性,之后更是作为Tensorflow的官方 ...
随机推荐
- Samba.conf案例 Ubuntu
# Sample configuration file for the Samba suite for Debian GNU/Linux.## This is the main Samba confi ...
- 1072. Gas Station (30)【最短路dijkstra】——PAT (Advanced Level) Practise
题目信息 1072. Gas Station (30) 时间限制200 ms 内存限制65536 kB 代码长度限制16000 B A gas station has to be built at s ...
- [TypeScript] Use TypeScript’s never Type for Exhaustiveness Checking
TypeScript 2.0 introduced a new primitive type called never, the type of values that never occur. It ...
- oracle initialization or shutdown in progress 问题解决
今天登录oracle时遇到oracle initialization or shutdown in progress 这个错误提示,在网上搜了下,试了非常多方法,最后结合几种方法结合,成功攻克了问题! ...
- projecteuler---->problem=12----Highly divisible triangular number
title: The sequence of triangle numbers is generated by adding the natural numbers. So the 7th trian ...
- uclibc,eglibc,glibc之间的区别和联系【转】
本文转载自:https://www.crifan.com/relation_between_uclibc_glibc_eglibc/ [glibc,uclibc,eglibc的简介] 1.Glibc ...
- mybatis写当天 当月的数据 时间段数据
1 数据库字段pk_time(Varchar) 当天的数据 SELECT * FROM 表 WHERE date(fk_time) = curdate(); 当月的数据 SELECT *FROM 表 ...
- 洛谷 P1351 联合权值 —— 树形DP
题目:https://www.luogu.org/problemnew/show/P1351 树形DP,别忘了子树之间的情况(拐一下距离为2). 代码如下: #include<iostream& ...
- JeePlus:项目部署
ylbtech-JeePlus:项目部署 1.返回顶部 1. 项目部署 1 开发工具:idea/eclipse/myeclipse+ mysql/oracle+tomcat6/7/8. 下面以ecli ...
- Could not find modernizr-2.6.2 in any of the sources GitLab: API is not accessible
Could not find modernizr-2.6.2 in any of the sources GitLab: API is not accessible bundle exec rake ...