吴裕雄 python 神经网络——TensorFlow 花瓣分类与迁移学习(2)
import glob
import os.path
import numpy as np
import tensorflow as tf
from tensorflow.python.platform import gfile # 原始输入数据的目录,这个目录下有5个子目录,每个子目录底下保存这属于该
# 类别的所有图片。
INPUT_DATA = 'F:\\TensorFlowGoogle\\201806-github\\datasets\\flower_photos\\'
# 输出文件地址。我们将整理后的图片数据通过numpy的格式保存。
OUTPUT_FILE = 'F:\\shuju\\flower_processed_data.npy' # 测试数据和验证数据比例。
VALIDATION_PERCENTAGE = 10
TEST_PERCENTAGE = 10 # 读取数据并将数据分割成训练数据、验证数据和测试数据。
def create_image_lists(sess, testing_percentage, validation_percentage):
sub_dirs = [x[0] for x in os.walk(INPUT_DATA)]
is_root_dir = True
# 初始化各个数据集。
training_images = []
training_labels = []
testing_images = []
testing_labels = []
validation_images = []
validation_labels = []
current_label = 0 # 读取所有的子目录。
for sub_dir in sub_dirs:
if is_root_dir:
is_root_dir = False
continue
# 获取一个子目录中所有的图片文件。
extensions = ['jpg', 'jpeg', 'JPG', 'JPEG']
file_list = []
dir_name = os.path.basename(sub_dir)
for extension in extensions:
file_glob = os.path.join(INPUT_DATA, dir_name, '*.' + extension)
file_list.extend(glob.glob(file_glob))
if not file_list:
continue
print("processing:", dir_name)
i = 0
# 处理图片数据。
for file_name in file_list:
i += 1
# 读取并解析图片,将图片转化为299*299以方便inception-v3模型来处理。
image_raw_data = gfile.FastGFile(file_name, 'rb').read()
image = tf.image.decode_jpeg(image_raw_data)
if image.dtype != tf.float32:
image = tf.image.convert_image_dtype(image, dtype=tf.float32)
image = tf.image.resize_images(image, [299, 299])
image_value = sess.run(image)
# 随机划分数据聚。
chance = np.random.randint(100)
if chance < validation_percentage:
validation_images.append(image_value)
validation_labels.append(current_label)
elif chance < (testing_percentage + validation_percentage):
testing_images.append(image_value)
testing_labels.append(current_label)
else:
training_images.append(image_value)
training_labels.append(current_label)
if i % 200 == 0:
print(i, "images processed.")
current_label += 1
# 将训练数据随机打乱以获得更好的训练效果。
state = np.random.get_state()
np.random.shuffle(training_images)
np.random.set_state(state)
np.random.shuffle(training_labels) return np.asarray([training_images, training_labels,validation_images, validation_labels,testing_images, testing_labels]) with tf.Session() as sess:
processed_data = create_image_lists(sess, TEST_PERCENTAGE, VALIDATION_PERCENTAGE)
# 通过numpy格式保存处理后的数据。
np.save(OUTPUT_FILE, processed_data) import glob
import os.path
import numpy as np
import tensorflow as tf
from tensorflow.python.platform import gfile
import tensorflow.contrib.slim as slim # 加载通过TensorFlow-Slim定义好的inception_v3模型。
import tensorflow.contrib.slim.python.slim.nets.inception_v3 as inception_v3 # 处理好之后的数据文件。
INPUT_DATA = 'F:\\shuju\\flower_processed_data.npy'
# 保存训练好的模型的路径。
TRAIN_FILE = 'E:\\train_dir\\model'
# 谷歌提供的训练好的模型文件地址。因为GitHub无法保存大于100M的文件,所以
# 在运行时需要先自行从Google下载inception_v3.ckpt文件。
CKPT_FILE = 'E:\\inception_v3\\inception_v3.ckpt' # 定义训练中使用的参数。
LEARNING_RATE = 0.0001
STEPS = 300
BATCH = 32
N_CLASSES = 5 # 不需要从谷歌训练好的模型中加载的参数。
CHECKPOINT_EXCLUDE_SCOPES = 'InceptionV3/Logits,InceptionV3/AuxLogits'
# 需要训练的网络层参数明层,在fine-tuning的过程中就是最后的全联接层。
TRAINABLE_SCOPES='InceptionV3/Logits,InceptionV3/AuxLogit' def get_tuned_variables():
exclusions = [scope.strip() for scope in CHECKPOINT_EXCLUDE_SCOPES.split(',')]
variables_to_restore = []
# 枚举inception-v3模型中所有的参数,然后判断是否需要从加载列表中移除。
for var in slim.get_model_variables():
excluded = False
for exclusion in exclusions:
if var.op.name.startswith(exclusion):
excluded = True
break
if not excluded:
variables_to_restore.append(var)
return variables_to_restore def get_trainable_variables():
scopes = [scope.strip() for scope in TRAINABLE_SCOPES.split(',')]
variables_to_train = []
# 枚举所有需要训练的参数前缀,并通过这些前缀找到所有需要训练的参数。
for scope in scopes:
variables = tf.get_collection(tf.GraphKeys.TRAINABLE_VARIABLES, scope)
variables_to_train.extend(variables)
return variables_to_train def main():
# 加载预处理好的数据。
processed_data = np.load(INPUT_DATA)
training_images = processed_data[0]
n_training_example = len(training_images)
training_labels = processed_data[1] validation_images = processed_data[2]
validation_labels = processed_data[3] testing_images = processed_data[4]
testing_labels = processed_data[5]
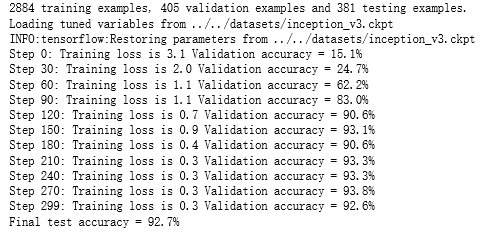
print("%d training examples, %d validation examples and %d testing examples." % (n_training_example, len(validation_labels), len(testing_labels))) # 定义inception-v3的输入,images为输入图片,labels为每一张图片对应的标签。
images = tf.placeholder(tf.float32, [None, 299, 299, 3], name='input_images')
labels = tf.placeholder(tf.int64, [None], name='labels') # 定义inception-v3模型。因为谷歌给出的只有模型参数取值,所以这里
# 需要在这个代码中定义inception-v3的模型结构。虽然理论上需要区分训练和
# 测试中使用到的模型,也就是说在测试时应该使用is_training=False,但是
# 因为预先训练好的inception-v3模型中使用的batch normalization参数与
# 新的数据会有出入,所以这里直接使用同一个模型来做测试。
with slim.arg_scope(inception_v3.inception_v3_arg_scope()):
logits, _ = inception_v3.inception_v3(images, num_classes=N_CLASSES, is_training=True) trainable_variables = get_trainable_variables()
# 定义损失函数和训练过程。
tf.losses.softmax_cross_entropy(tf.one_hot(labels, N_CLASSES), logits, weights=1.0)
total_loss = tf.losses.get_total_loss()
train_step = tf.train.RMSPropOptimizer(LEARNING_RATE).minimize(total_loss) # 计算正确率。
with tf.name_scope('evaluation'):
correct_prediction = tf.equal(tf.argmax(logits, 1), labels)
evaluation_step = tf.reduce_mean(tf.cast(correct_prediction, tf.float32)) # 定义加载Google训练好的Inception-v3模型的Saver。
load_fn = slim.assign_from_checkpoint_fn(
CKPT_FILE,
get_tuned_variables(),
ignore_missing_vars=True) # 定义保存新模型的Saver。
saver = tf.train.Saver() with tf.Session() as sess:
# 初始化没有加载进来的变量。
init = tf.global_variables_initializer()
sess.run(init) # 加载谷歌已经训练好的模型。
print('Loading tuned variables from %s' % CKPT_FILE)
load_fn(sess) start = 0
end = BATCH
for i in range(STEPS):
_, loss = sess.run([train_step, total_loss], feed_dict={
images: training_images[start:end],
labels: training_labels[start:end]}) if i % 30 == 0 or i + 1 == STEPS:
saver.save(sess, TRAIN_FILE, global_step=i)
validation_accuracy = sess.run(evaluation_step, feed_dict={images: validation_images, labels: validation_labels})
print('Step %d: Training loss is %.1f Validation accuracy = %.1f%%' % (i, loss, validation_accuracy * 100.0)) start = end
if start == n_training_example:
start = 0
end = start + BATCH
if end > n_training_example:
end = n_training_example
# 在最后的测试数据上测试正确率。
test_accuracy = sess.run(evaluation_step, feed_dict={
images: testing_images, labels: testing_labels})
print('Final test accuracy = %.1f%%' % (test_accuracy * 100)) if __name__ == '__main__':
main()

吴裕雄 python 神经网络——TensorFlow 花瓣分类与迁移学习(2)的更多相关文章
- 吴裕雄 python 神经网络——TensorFlow 花瓣分类与迁移学习(4)
# -*- coding: utf-8 -*- import glob import os.path import numpy as np import tensorflow as tf from t ...
- 吴裕雄 python 神经网络——TensorFlow 花瓣分类与迁移学习(3)
import glob import os.path import numpy as np import tensorflow as tf from tensorflow.python.platfor ...
- 吴裕雄 python 神经网络——TensorFlow 花瓣分类与迁移学习(1)
import glob import os.path import numpy as np import tensorflow as tf from tensorflow.python.platfor ...
- 吴裕雄 python 神经网络——TensorFlow 花瓣识别2
import glob import os.path import numpy as np import tensorflow as tf from tensorflow.python.platfor ...
- 吴裕雄 python 神经网络——TensorFlow训练神经网络:花瓣识别
import os import glob import os.path import numpy as np import tensorflow as tf from tensorflow.pyth ...
- 吴裕雄 python 神经网络——TensorFlow 循环神经网络处理MNIST手写数字数据集
#加载TF并导入数据集 import tensorflow as tf from tensorflow.contrib import rnn from tensorflow.examples.tuto ...
- 吴裕雄 python 神经网络TensorFlow实现LeNet模型处理手写数字识别MNIST数据集
import tensorflow as tf tf.reset_default_graph() # 配置神经网络的参数 INPUT_NODE = 784 OUTPUT_NODE = 10 IMAGE ...
- 吴裕雄 PYTHON 神经网络——TENSORFLOW 无监督学习处理MNIST手写数字数据集
# 导入模块 import numpy as np import tensorflow as tf import matplotlib.pyplot as plt # 加载数据 from tensor ...
- 吴裕雄 python 神经网络——TensorFlow 使用卷积神经网络训练和预测MNIST手写数据集
import tensorflow as tf import numpy as np from tensorflow.examples.tutorials.mnist import input_dat ...
随机推荐
- Windows下PHP安装 Imagick 扩展
1.下载拓展下载地址一: http://windows.php.net/downloads/pecl/releases/imagick/下载地址二: https://pecl.php.net/pack ...
- Go_json
package main import ( "encoding/json" "fmt" ) // 结构体与json // 1.序列化: 把Go语言中的结构体变量 ...
- GO111MODULE
GO111MODULE的功能: //为了解决项目不用放在go的src目录下,src应该放一些官方的包,而不应该放项目 //模块是相关Go包的集合.modules是源代码交换和版本控制的单元. go命令 ...
- 使用表单对象时,报错 form is undefine
先看例子 <!DOCTYPE html> <html> <head> <meta charset="utf-8" /> <ti ...
- leetcode78.子集➕90.子集2
78子集 dfs dfs1: 和全排列的区别就是对于当前考察的索引i,全排列如果不取i,之后还要取i,所以需要一个visited数组用来记录.对于子集问题如果不取i,之后也不必再取i. 单纯递归回溯 ...
- dw 快捷键
<html></html> 创建一个HTML文档<head></head> 设置文档标题和其它在网页中不显示的信息<title></t ...
- FreeRTOS学习笔记3:内核控制及开启调度器
内核控制函数API 应用层中不会用到taskYIELD() //任务切换.会自动切换当前就绪表里优先级最高的任务 临界区 //不能被打断的代码段任务中进入临界区任务中退出临界区中断服务进入临界区中断服 ...
- .h头文件 .lib库文件 .dll动态链接库文件关系
.h头文件是编译时必须的,lib是链接时需要的,dll是运行时需要的. 附加依赖项的是.lib不是.dll,若生成了DLL,则肯定也生成 LIB文件.如果要完成源代码的编译和链接,有头文件和lib就够 ...
- 解决安装mysql时出现的三种问题
MySQL v5.0.96 for windows 安装版 链接:http://pan.baidu.com/s/1slmE2k9 密码:tadp MySQLAdministratort ...
- SPI(Service Provider Interface)--通过接口获取服务
spi 现在已有实现 jdk 提供实现 dubbo里的spi实现 一.jdk实现 配置 定义接口 定义实现类 配置资源文件 classpath下创建(META-INF/services/接口全面:ME ...