
吴裕雄 python 神经网络——TensorFlow训练神经网络:花瓣识别
import os

import glob

import os.path

import numpy as np

import tensorflow as tf

from tensorflow.python.platform import gfile

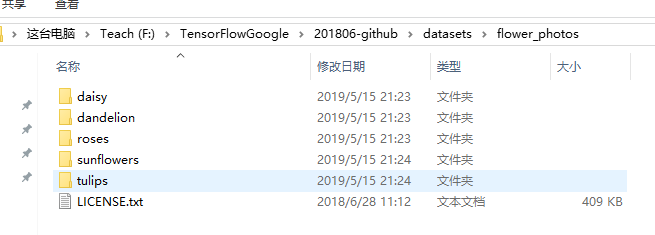
# 原始输入数据的目录,这个目录下有5个子目录,每个子目录底下保存这属于该

# 类别的所有图片。

INPUT_DATA = 'F:\\TensorFlowGoogle\\201806-github\\datasets\\flower_photos'

# 输出文件地址。我们将整理后的图片数据通过numpy的格式保存。

OUTPUT_FILE = 'F:\\flower_processed_data.npy'

# 测试数据和验证数据比例。

VALIDATION_PERCENTAGE = 10

TEST_PERCENTAGE = 10

# 读取数据并将数据分割成训练数据、验证数据和测试数据。

def create_image_lists(sess, testing_percentage, validation_percentage):

    sub_dirs = [x[0] for x in os.walk(INPUT_DATA)]

    is_root_dir = True

    # 初始化各个数据集。

    training_images = []

    training_labels = []

    testing_images = []

    testing_labels = []

    validation_images = []

    validation_labels = []

    current_label = 0

    # 读取所有的子目录。

    for sub_dir in sub_dirs:

        if is_root_dir:

            is_root_dir = False

            continue

        # 获取一个子目录中所有的图片文件。

        extensions = ['jpg', 'jpeg', 'JPG', 'JPEG']

        file_list = []

        dir_name = os.path.basename(sub_dir)

        for extension in extensions:

            file_glob = os.path.join(INPUT_DATA, dir_name, '*.' + extension)

            file_list.extend(glob.glob(file_glob))

        if not file_list: continue

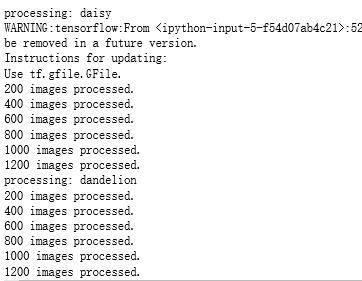
        print("processing:", dir_name)

        i = 0

        # 处理图片数据。

        for file_name in file_list:

            i += 1

            # 读取并解析图片,将图片转化为299*299以方便inception-v3模型来处理。

            image_raw_data = gfile.FastGFile(file_name, 'rb').read()

            image = tf.image.decode_jpeg(image_raw_data)

            if image.dtype != tf.float32:

                image = tf.image.convert_image_dtype(image, dtype=tf.float32)

            image = tf.image.resize_images(image, [299, 299])

            image_value = sess.run(image)

            # 随机划分数据聚。

            chance = np.random.randint(100)

            if chance < validation_percentage:

                validation_images.append(image_value)

                validation_labels.append(current_label)

            elif chance < (testing_percentage + validation_percentage):

                testing_images.append(image_value)

                testing_labels.append(current_label)

            else:

                training_images.append(image_value)

                training_labels.append(current_label)

            if i % 200 == 0:

                print(i, "images processed.")

        current_label += 1

    # 将训练数据随机打乱以获得更好的训练效果。

    state = np.random.get_state()

    np.random.shuffle(training_images)

    np.random.set_state(state)

    np.random.shuffle(training_labels)

    return np.asarray([training_images, training_labels,validation_images, validation_labels,testing_images, testing_labels])

with tf.Session() as sess:

    processed_data = create_image_lists(sess, TEST_PERCENTAGE, VALIDATION_PERCENTAGE)

    # 通过numpy格式保存处理后的数据。

    np.save(OUTPUT_FILE, processed_data)
吴裕雄 python 神经网络——TensorFlow训练神经网络:花瓣识别的更多相关文章
- 吴裕雄 python 神经网络——TensorFlow训练神经网络:不使用滑动平均
import tensorflow as tf from tensorflow.examples.tutorials.mnist import input_data INPUT_NODE = 784 ...
- 吴裕雄 python 神经网络——TensorFlow训练神经网络:不使用隐藏层
import tensorflow as tf from tensorflow.examples.tutorials.mnist import input_data INPUT_NODE = 784 ...
- 吴裕雄 python 神经网络——TensorFlow训练神经网络:不使用激活函数
import tensorflow as tf from tensorflow.examples.tutorials.mnist import input_data INPUT_NODE = 784 ...
- 吴裕雄 python 神经网络——TensorFlow训练神经网络:不使用指数衰减的学习率
import tensorflow as tf from tensorflow.examples.tutorials.mnist import input_data INPUT_NODE = 784 ...
- 吴裕雄 python 神经网络——TensorFlow训练神经网络:不使用正则化
import tensorflow as tf from tensorflow.examples.tutorials.mnist import input_data INPUT_NODE = 784 ...
- 吴裕雄 python 神经网络——TensorFlow训练神经网络:全模型
import tensorflow as tf from tensorflow.examples.tutorials.mnist import input_data INPUT_NODE = 784 ...
- 吴裕雄 python 神经网络——TensorFlow训练神经网络:MNIST最佳实践
import os import tensorflow as tf from tensorflow.examples.tutorials.mnist import input_data INPUT_N ...
- 吴裕雄 python 神经网络——TensorFlow训练神经网络:卷积层、池化层样例
import numpy as np import tensorflow as tf M = np.array([ [[1],[-1],[0]], [[-1],[2],[1]], [[0],[2],[ ...
- 吴裕雄--天生自然 Tensorflow卷积神经网络:花朵图片识别
import os import numpy as np import matplotlib.pyplot as plt from PIL import Image, ImageChops from ...
随机推荐
- HTML学习(13)区块元素和内联元素
HTML 区块元素 大多数 HTML 元素被定义为块级元素或内联元素. 块级元素在浏览器显示时,通常会以新行来开始(和结束). 实例: <h1>, <p>, <ul> ...
- kali 插上耳机没声音
这几天装kali装的真是心力憔悴,好不容易勉强可以使用了,插上耳机想要放松下,结果没有声音? excusu me? 在经历各种方法之后终于找到了解决方法,亲测可行. 1.先打开终端,输入systemc ...
- Java:不得不知的Object类
目录 一.equals 1.equals与==有啥区别? 2.equals方法的规范 3.instanceof 和getClass() 4.其他总结 二.hashCode 1.hashCode的规范 ...
- 8.10-Day2T2 吃喝大法好
题目大意 略... 题解 开始两个人一定是一个向右走一个向下走,向右走的人最终会走到(n-1,m),向下走的人一定会走到(n,m-1). 那么不考虑重复的话总的路径数就是从(1,2)到(n-1,m)的 ...
- 矩阵快速幂+概率DP poj 3744
题意:在一条不满地雷的路上,你现在的起点在1处.在N个点处布有地雷,1<=N<=10.地雷点的坐标范围:[1,100000000]. 每次前进p的概率前进一步,1-p的概率前进1-p步.问 ...
- HDU 2586(LCA欧拉序和st表)
什么是欧拉序,可以去这个大佬的博客(https://www.cnblogs.com/stxy-ferryman/p/7741970.html)巨详细 因为欧拉序中的两点之间,就是两点遍历的过程,所以只 ...
- 【Hibernate 懒加载】debug模式懒加载获取空数据
<many-to-one name="department" class="k.domain.Department" column="depar ...
- laravel Excel导入导出
1.简介 Laravel Excel 在 Laravel 5 中集成 PHPOffice 套件中的 PHPExcel,从而方便我们以优雅的.富有表现力的代码实现Excel/CSV文件的导入和导出. 该 ...
- 单机架设传奇服务器第47课:定时器OnTimer功能详解
传奇定时器OnTimer功能详解(泡点.时间触发.任务活动) 定时器功能,是服务端中非常常见的一种功能,常见如:泡点脚本.赌博脚本,任务活动指定时间刷怪,时间触发一些都需要用到OnTimer功能,定时 ...
- Validation failed for one or more entities. See ‘EntityValidationErrors
try{ context.SaveChanges(); } catch (DbEntityValidationException ex) { var errorMessages = ex.Entity ...