实验21:IPv6
九、IPv6
1、IPv6(RIP)
实验目的:熟悉IPv6的配置,并经过动态路由协议RIP,使三台路由器相互通讯
设备需求:3640三台
实验过程:
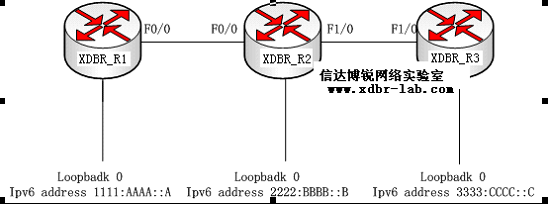
xdbr_R1#sh run
ipv6 unicast-routing \*开户路由器的IPv6功能
!
interface Loopback0
no ip address
ipv6 address 1111:AAAA::A/64 \*配置IPV6地址
ipv6 rip ccna enable \*在接口下调用RIP进程,其中调用的名字一定要和RIP进程下一样
!
interface FastEthernet0/0
no ip address
duplex auto
speed auto
ipv6 address 2009:12::C/64 \*配置IPv6地址
ipv6 rip ccna enable \*在接口下调用RIP进程,其中调用的名字一定要和RIP进程下一样
!
ipv6 router rip ccna \*全局模式下开户IPV6的RIP进程,后面的名字为任意,本地有效
xdbr_R2#sh run
hostname xdbr_R2
!
ipv6 unicast-routing
!
interface Loopback0
no ip address
ipv6 address 2222:BBBB::B/64
ipv6 rip ccnp enable \*所有路由器,只要起了IPV6的,都要调用RIP进程,才能通告接口
!
interface FastEthernet0/0
no ip address
duplex auto
speed auto
ipv6 address 2009:12::D/64
ipv6 rip ccnp enable
!
interface FastEthernet1/0
no ip address
duplex auto
speed auto
ipv6 address 2007:23::E/64
ipv6 rip ccnp enable
ipv6 router rip ccnp \*本地有效
xdbr_R3#sh run
ipv6 unicast-routing
!
interface Loopback0
no ip address
ipv6 address 3333:CCCC::C/64
ipv6 rip ccie enable
!
interface FastEthernet1/0
no ip address
duplex auto
speed auto
ipv6 address 2007:23::F/64
ipv6 rip ccie enable
!
ipv6 router rip ccie \*本地有效
查看路由学习情况:
xdbr_R3#sh ipv6 route
IPv6 Routing Table - 9 entries
Codes: C - Connected, L - Local, S - Static, R - RIP, B - BGP
U - Per-user Static route
I1 - ISIS L1, I2 - ISIS L2, IA - ISIS interarea, IS - ISIS summary
O - OSPF intra, OI - OSPF inter, OE1 - OSPF ext 1, OE2 - OSPF ext 2
ON1 - OSPF NSSA ext 1, ON2 - OSPF NSSA ext 2
R 1111:AAAA::/64 [120/3] \*经过f1/0 学到的R1环回口的地址
via FE80::CE01:8FF:FE64:10, FastEthernet1/0
C 2007:23::/64 [0/0] \*直连接口
via ::, FastEthernet1/0
L 2007:23::F/128 [0/0] \*本地链路
via ::, FastEthernet1/0
R 2009:12::/64 [120/2]
via FE80::CE01:8FF:FE64:10, FastEthernet1/0
R 2222:BBBB::/64 [120/2]
via FE80::CE01:8FF:FE64:10, FastEthernet1/0
C 3333:CCCC::/64 [0/0]
via ::, Loopback0
L 3333:CCCC::C/128 [0/0]
via ::, Loopback0
L FE80::/10 [0/0] \*link-local地址
via ::, Null0
L FF00::/8 [0/0]
via ::, Null0
xdbr_R3#ping ipv6 1111:AAAA::A \*ping测试到xdbr_R1的连通性
Type escape sequence to abort.
Sending 5, 100-byte ICMP Echos to 1111:AAAA::A, timeout is 2 seconds:
!!!!!
Success rate is 100 percent (5/5), round-trip min/avg/max = 8/34/96 ms
xdbr_R3#ping ipv6 2222:BBBB::B \*ping测试到xdbr_R2的连通性
Type escape sequence to abort.
Sending 5, 100-byte ICMP Echos to 2222:BBBB::B, timeout is 2 seconds:
!!!!!
Success rate is 100 percent (5/5), round-trip min/avg/max = 4/15/44 ms
2、IPv6(OSPF)
实验目的:熟悉IPv6的配置,并经过动态路由协议OSPF,使三台路由器相互通讯
设备需求:3640三台
实验过程:

注意:OSPF与RIP,调用方式不一样
xdbr_R1#sh run
ipv6 unicast-routing \*开户路由器的IPv6功能
!
interface Loopback0
no ip address
ipv6 address 1111:AAAA::A/64
ipv6 ospf 1 area 1 \*此接口运行OSPF并且在区域1
!
interface FastEthernet0/0
no ip address
duplex auto
speed auto
ipv6 address 2009:12::C/64
ipv6 ospf 1 area 0 \*此接口运行OSPF并且在区域0
!
ipv6 router ospf 1 \*开启IPV6的OSPF进程
router-id 1.1.1.1 \*手动配置Router-ID或者再起个环回口,随便配置个IPV4地址
log-adjacency-changes
!
xdbr_R2#sh run
Building configuration...
hostname xdbr_R2
!
ipv6 unicast-routing
!
interface Loopback0
no ip address
ipv6 address 2222:BBBB::B/64
ipv6 ospf 1 area 2 \*此接口运行OSPF并且在区域2
!
interface FastEthernet0/0
no ip address
duplex auto
speed auto
ipv6 address 2009:12::D/64
ipv6 ospf 1 area 0 \*此接口运行OSPF并且在区域0
!
interface FastEthernet1/0
no ip address
duplex auto
speed auto
ipv6 address 2007:23::E/64
ipv6 ospf 1 area 0
!
ipv6 router ospf 1
router-id 2.2.2.2 \*手动指定的Router-ID
log-adjacency-changes
!
xdbr_R3#sh run
!
hostname xdbr_R3
!
ipv6 unicast-routing\*开户路由器的IPv6功能
!
interface Loopback0
no ip address
ipv6 address 3333:CCCC::C/64
ipv6 ospf 1 area 3\*此接口运行OSPF并且在区域3
!!
interface FastEthernet1/0
no ip address
duplex auto
speed auto
ipv6 address 2007:23::F/64
ipv6 ospf 1 area 0\*此接口运行OSPF并且在区域0
!
ipv6 router ospf 1
router-id 3.3.3.3 \*手动配置的Router-ID
log-adjacency-changes
!
xdbr_R3#sh ipv6 route
IPv6 Routing Table - 9 entries
Codes: C - Connected, L - Local, S - Static, R - RIP, B - BGP
U - Per-user Static route
I1 - ISIS L1, I2 - ISIS L2, IA - ISIS interarea, IS - ISIS summary
O - OSPF intra, OI - OSPF inter, OE1 - OSPF ext 1, OE2 - OSPF ext 2
ON1 - OSPF NSSA ext 1, ON2 - OSPF NSSA ext 2
OI 1111:AAAA::A/128 [110/2] \*学来的域间路由
via FE80::CE01:8FF:FE64:10, FastEthernet1/0
C 2007:23::/64 [0/0]\*直连接口
via ::, FastEthernet1/0
L 2007:23::F/128 [0/0] \*本地链路
via ::, FastEthernet1/0
O 2009:12::/64 [110/2] \*学来的域内路由
via FE80::CE01:8FF:FE64:10, FastEthernet1/0
OI 2222:BBBB::B/128 [110/1] \*学来的域间路由
via FE80::CE01:8FF:FE64:10, FastEthernet1/0
C 3333:CCCC::/64 [0/0]
via ::, Loopback0
L 3333:CCCC::C/128 [0/0]
via ::, Loopback0
L FE80::/10 [0/0]
via ::, Null0
L FF00::/8 [0/0]
via ::, Null0
xdbr_R3#ping ipv6 1111:AAAA::A \*ping测试到xdbr_R1的连通性
Type escape sequence to abort.
Sending 5, 100-byte ICMP Echos to 1111:AAAA::A, timeout is 2 seconds:
!!!!!
Success rate is 100 percent (5/5), round-trip min/avg/max = 8/34/96 ms
xdbr_R3#ping ipv6 2222:BBBB::B \*ping测试到xdbr_R2的连通性
Type escape sequence to abort.
Sending 5, 100-byte ICMP Echos to 2222:BBBB::B, timeout is 2 seconds:
!!!!!
Success rate is 100 percent (5/5), round-trip min/avg/max = 4/15/44 ms
xdbr_R2#sh ipv6 ospf neighbor
Neighbor ID Pri State Dead Time Interface ID Interface
3.3.3.3 1 FULL/DR 00:00:34 5 FastEthernet1/0
1.1.1.1 1 FULL/DR 00:00:32 4 FastEthernet0/0
3、IPv6(6to4)
现在IPv6还没有普及,只有小部分地区在实施,那么就存在6与4通讯的问题,单纯的6to4可以用翻译,这就你举6-4-6的一种拓扑环境
实验目的:让两边的V6网络通过公网V4进行通讯
实验需求:5台C3640
实验过程:
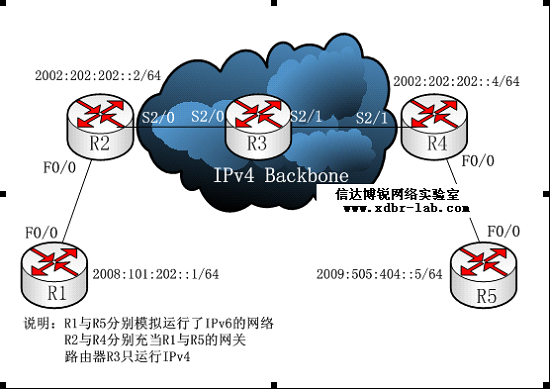
由于R1与R5最简单,先做它们
R1:
R1(config)#ipv6 unicast-routing
R1(config)#int f0/0
R1(config-if)#ipv6 address 2008:101:202::1/64 \*给此接口配置IPv6地址
R1(config-if)#no sh
R1(config)#ipv6 route ::/0 2008:101:202::2 \*设置IPv6的默认路由
R5:
R5(config)#ipv6 unicast-routing
R5(config)#int f0/0
R5(config-if)#ipv6 address 2009:505:404::5/64 \*给此接口配置IPv6地址
R5(config-if)#no sh
R5(config-if)#exit
R5(config)#ipv6 route ::/0 2009:505:404::4\*设置IPv6的默认路由
R2:
R2(config)#ipv6 unicast-routing
R2(config)#int f0/0
R2(config-if)#ipv6 address 2008:101:202::2/64
R2(config-if)#no sh
R2#int s2/0
R2(config-if)#ip add 23.1.1.2 255.255.255.0 \*再配置一个ipv4的地址,连接ipv4公网
R2(config-if)#no sh
R2(config-if)#int lo 0
R2(config-if)#ip add 2.2.2.2 255.255.255.0 \*给ospf做Router-ID
R2(config-if)#end
R2(config)#router os 1 \*开启IPv4的路由,让R2、R3、R4互通
R2(config-router)#net 23.1.1.0 0.0.0.255 a 0
R2(config-router)#net 2.2.2.0 0.0.0.255 a 0
*Mar 1 00:08:35.211: %OSPF-5-ADJCHG: Process 1, Nbr 3.3.3.3 on Serial2/0 from LOADING to FULL, Loading Done
R2(config)#interface tunnel 0 \*开启一个隧道口,用来给IPv6做下一跳
R2(config-if)#ipv6 address 2002:202:202::2/64 \*给它配置一个IPv6的地址,不能用IPv4
R2(config-if)#tunnel source s2/0 \*指定这个隧道从哪个口进(是IPv4地址)
R2(config-if)#tunnel destination 34.1.1.4\*指定这个隧道从哪个口出(是IPv4地址)
R2(config-if)#tunnel mode ipv6ip \*设置隧道的模式为:IPv6 Over IP
R2(config-if)#end
R2(config)#ipv6 router ospf 1 \*开启IPv6的OSPF 进程,此进程与IPv4毫不相干
R2(config)#int tunnel 0
R2(config-if)#ipv6 ospf 1 area 0 \*运行了IPv6的接口调用IPv6 OSPF进程
R2(config-if)#int f0/0
R2(config-if)#ipv6 ospf 1 area 0 \*运行了IPv6的接口调用IPv6 OSPF进程
R3:
R3(config)#int s2/0
R3(config-if)#ip add 23.1.1.3 255.255.255.0
R3(config-if)#no sh
R3(config)#int lo 0
R3(config-if)#ip add 3.3.3.3 255.255.255.0
R3(config-if)#int s2/1
R3(config-if)#ip add 34.1.1.3 255.255.255.0
R3(config-if)#no sh
R3(config)#router os 1
R3(config-router)#net 0.0.0.0 0.0.0.0 a 0
R3(config-router)#end \*R3最简单,两个WAN口配置好IPv4地址,全网发到ospf中
R4:
R4(config)#int lo 0 \*与R2批注基本上一样,只是tunnel源和目的正好相反
R4(config-if)#ip add 4.4.4.4 255.255.255.0
R4(config-if)#int s2/1
R4(config-if)#ip add 34.1.1.4 255.255.255.0
R4(config-if)#no sh
R4(config)#router ospf 1
R4(config-router)#network 34.1.1.0 0.0.0.255 a 0
R4(config-router)#network 4.4.4.0 0.0.0.255 a 0
R4(config)#interface tunnel 0
R4(config-if)#ipv6 address 2002:202:202::4/64
R4(config-if)#tunnel source s2/1
R4(config-if)#tunnel destination 23.1.1.2
R4(config-if)#tunnel mode ipv6ip
R4(config-if)#exi
R4(config)#ipv6 router ospf 1 \*因为没有开启路由器的IPv6功能,所以报错
% IPv6 routing not enabled
R4(config)#ipv6 unicast-routing
R4(config)#ipv6 router ospf 1
R4(config-rtr)#exi
R4(config)#int f0/0
R4(config-if)#ipv6 ospf 1 area 0
OSPFv3: No IPV6 enabled on this interface \*报错的原因是没有给此接口配置IPv6地址
R4(config-if)#int tu 0
R4(config-if)#ipv6 ospf 1 area 0
R4(config-if)#int f0/0
R4(config-if)#ipv6 address 2009:505:404::4/64
R4(config-if)#no sh
R4(config-if)#ipv6 ospf 1 area 0
R2#sh ip route \*查看IPv4的路由表R2与R4通讯没有问题
34.0.0.0/24 is subnetted, 1 subnets
O 34.1.1.0 [110/128] via 23.1.1.3, 00:34:33, Serial2/0 \*R2到R4的路由已经学到
2.0.0.0/24 is subnetted, 1 subnets
C 2.2.2.0 is directly connected, Loopback0
3.0.0.0/32 is subnetted, 1 subnets
O 3.3.3.3 [110/65] via 23.1.1.3, 00:34:33, Serial2/0
4.0.0.0/32 is subnetted, 1 subnets
O 4.4.4.4 [110/129] via 23.1.1.3, 00:34:33, Serial2/0
23.0.0.0/24 is subnetted, 1 subnets
C 23.1.1.0 is directly connected, Serial2/0
R2#sh ipv6 route
IPv6 Routing Table - 7 entries
Codes: C - Connected, L - Local, S - Static, R - RIP, B - BGP
U - Per-user Static route
I1 - ISIS L1, I2 - ISIS L2, IA - ISIS interarea, IS - ISIS summary
O - OSPF intra, OI - OSPF inter, OE1 - OSPF ext 1, OE2 - OSPF ext 2
ON1 - OSPF NSSA ext 1, ON2 - OSPF NSSA ext 2
C 2002:202:202::/64 [0/0]
via ::, Tunnel0
L 2002:202:202::2/128 [0/0]
via ::, Tunnel0
C 2008:101:202::/64 [0/0]
via ::, FastEthernet0/0
L 2008:101:202::2/128 [0/0]
via ::, FastEthernet0/0
O 2009:505:404::/64 [110/11112] \*到R5的路由也学到,并且是IPV6的路由
via FE80::2201:104, Tunnel0 \*tunnel 是用来做下一跳的
L FE80::/10 [0/0]
via ::, Null0
L FF00::/8 [0/0]
via ::, Null0
R1#p 2009:505:404::5 \*从R5到R1做测试
Type escape sequence to abort.
Sending 5, 100-byte ICMP Echos to 2009:505:404::5, timeout is 2 seconds:
!!!!!
Success rate is 100 percent (5/5), round-trip min/avg/max = 28/52/84 ms
R5#ping ipv6 2008:101:202::1\*从R1到R5做测试
Type escape sequence to abort.
Sending 5, 100-byte ICMP Echos to 2008:101:202::1, timeout is 2 seconds:
!!!!!
Success rate is 100 percent (5/5), round-trip min/avg/max = 8/32/72 ms
批注:此问题最终可以简化为R2与R4是直连的,然后后面各带一个IPv6的网段,在R2与R4上各运行一个IPv6的路由协议(动态或静态),使其能相互通讯,在此例子中,使它们感觉是”直连”的就靠那个“tunnel”来实现了,中间的R3代表IPv4的公网,即很多台运行了IPv4的路由器.
实验21:IPv6的更多相关文章
- CCIE路由实验(9) -- IPv6
1.IPv6地址的各种情况2.配置通过DHCP-PD方式分配前缀信息3.IPv6路由基本配置4.IPv6路由--RIPng5.IPv6路由--EIGRPv66.IPv6路由--OSPFv37.IPv6 ...
- 【Python】【demo实验21】【练习实例】【求球反弹高度】
原题: 一球从100米高度自由落下,每次落地后反跳回原高度的一半:再落下,求它在第10次落地时,共经过多少米?第10次反弹多高? 我的源码: #!/usr/bin/python # encoding= ...
- 实验20:IPv6
实验17-1: IPv6 静态路由 Ø 实验目的通过本实验可以掌握(1)启用IPv6 流量转发(2)配置IPv6 地址(3)IPv6 静态路由配置和调试(4)IPv6 默认路由配置和调试 Ø ...
- CCNA CCNP CCIE所有实验名称完整版
实验1:通过Console端口访问Cisco路由器 实验2:通过Telnet访问Cisco路由器 实验3:配置终端服务器 实验4:通过浏览器访问路由器 实验5:模式切换.上下文帮助及查看有关信 ...
- IPv6原理、应用与实践
欢迎大家前往腾讯云+社区,获取更多腾讯海量技术实践干货哦~ 作者:腾讯微信技术架构部团队 2017年11月26日,中共中央办公厅和国务院办公厅印发了<推荐互联网协议第六版(IPv6)规模部署行动 ...
- IPv6技术详解:基本概念、应用现状、技术实践(下篇)
本文来自微信技术架构部的原创技术分享. 1.前言 在上篇<IPv6技术详解:基本概念.应用现状.技术实践(上篇)>,我们讲解了IPV6的基本概念. 本篇将继续从以下方面展开对IPV6的讲解 ...
- 160809208沈昊辰c语言程序设计实验选择结构设计
<C语言程序设计>实验报告 学 号 160809208 姓 名 沈昊辰 专业.班 计科16-2班 学 期 2016-2017 第1学期 指导教师 黄俊莲 吴喆 实验地点 C区二层机房 ...
- 160809209_李梦鑫_C语言程序设计实验2 选择结构程序设计
实验2-1 输入3个数,并按由大到小的顺序输出. 实验要求: 编写一个C程序,输入3个数,并按由大到小的顺序输出. 源码:#include <stdio.h> int main() { i ...
- 学号160809224姓名黄家帅c语言程序设计实验2 选择结构程序设计
实验2-1 输入3个数,并按由大到小的顺序输出. 实验要求: 编写一个C程序,输入3个数,并按由大到小的顺序输出. 源码: #include <stdio.h>void main(){ i ...
随机推荐
- 使用Theia——创建插件
上一篇:使用Theia——创建扩展包 创建Theia插件 下面我们来看看如何创建Theia插件.作为示例,我们将注册一个Hello World命令,该命令显示一个“Hello World”通知.本文将 ...
- Git 合并多次提交
在合并分支的时候,希望将多次提交合并成一个,然后再 cherry-pick 到主分支. 合并分支 develop 分支做开发,可能会进行多次提交,但是在发布或者进行 PR 的时候,我们只希望看到一次提 ...
- 【Springboot】注解@ConfigurationProperties让配置整齐而简单
1 简介 前面我们用一篇文章<[Spring]只想用一篇文章记录@Value的使用,不想再找其它了(附思维导图)> 详细讲解了在Spring中如何使用@Value来实现我们对配置的需求,它 ...
- .Net Core Web Api实践(四)填坑连接Redis时Timeout performing EVAL
前言:前两篇文章.net core+Redis+IIS+nginx实现Session共享中,介绍了使用Microsoft.Extensions.Caching.Redis实现Session共享的方法, ...
- Burpsuite设置拦截response
一.Burpsuite设置拦截HTTP/HTTPS代理 1, .拦截修改request 首先进入Proxy-Options-Intercept Client Requests设置request拦截的规 ...
- Webpack实战(六):如何优雅地运用样式CSS预处理
上一篇文章中,我主要分享了<Webpack如何分离样式文件>CSS 预处理器是一个能让你通过预处理器自己独有的语法来生成CSS的程序,css预处理指的是在开发中我们经常会使用一些样式预编译 ...
- Activiti 启动事件(Start Event)
Activiti 启动事件(Start Event) 作者:Jesai 生活里,没有容易二字,忧伤是一种本能,而微笑是一种能力 版权所有,未经允许,禁止引用.如需引用,请注明出处. 前言: 启动事件是 ...
- Linux.vim.多行复制、删除、剪切
复制: //单行复制+粘贴 yy + p:复制光标所处当前行, 敲p粘贴在光标处. //多行复制+粘贴 n + yy + p:复制光标所在行起以下n行(含当前行), 敲yy复制光标所处当前行, 敲p粘 ...
- 【java基础】妙记进制转换
一.二进制与十进制 1.正整数十进制转二进制 口诀:除二取余,倒序排列 解释:将一个十进制数除以二,得到的商再除以二,依此类推直到商等于一或零时为止,倒取将除得的余数,即换算为二进制数的结果 例如把5 ...
- 博客与微信小程序的同步
在此之前,先说说自己最近的打算,才购买了阿里云的服务器,想做一个网站和图床网盘之类的方便自己使用. 考虑到小程序,又打算将自己的博客内容放到小程序中.从零开发实属困难,应该还要一段时间才能完成. 目前 ...