PopupWindow的使用
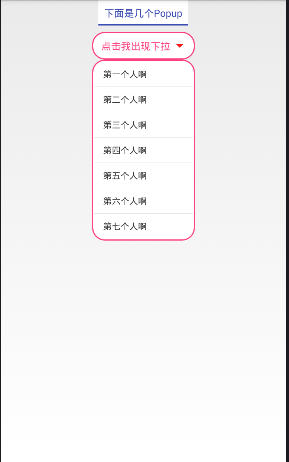
如图是效果图

2种常用PopupWindow的使用
下载地址:http://download.csdn.net/detail/qq_29774291/9683258
第一个展示一个下拉的ListView
    /**

     * 展示第一个弹窗

     */

    private ListView mListView;

    private String[] itemStrings = {"第一个人啊","第二个人啊","第三个人啊","第四个人啊","第五个人啊","第六个人啊","第七个人啊"};

    protected void setOnePoP() {

        // TODO Auto-generated method stub

        View contentView = View.inflate(this, R.layout.pop_list, null);

        if(popup_one == null){

            popup_one = new PopupWindow(contentView,btn_one.getWidth(),LayoutParams.WRAP_CONTENT,true);

        }

        mListView = (ListView)contentView.findViewById(R.id.lv_pop_listview);

        mListView.setAdapter(new MyAdapter(MainActivity.this, itemStrings));

        popup_one.setFocusable(true);

        popup_one.setBackgroundDrawable(new ColorDrawable(Color.TRANSPARENT));

        popup_one.setOutsideTouchable(true);

        popup_one.showAsDropDown(btn_one);

    }

    /**

     * ListView的适配器

     * @author Administrator

     *

     */

    private class MyAdapter extends BaseAdapter{

        private Context mContext;

        private String [] item ;

        public MyAdapter(Context mContext, String[] item) {

            this.mContext = mContext;

            this.item = item;

        }

        @Override

        public int getCount() {

            // TODO Auto-generated method stub

            return item.length;

        }

        @Override

        public Object getItem(int arg0) {

            // TODO Auto-generated method stub

            return null;

        }

        @Override

        public long getItemId(int arg0) {

            // TODO Auto-generated method stub

            return 0;

        }

        @Override

        public View getView(int arg0, View arg1, ViewGroup arg2) {

            // TODO Auto-generated method stub

            ViewHolder holder = null;

            if(arg1 == null){

                holder = new ViewHolder();

                arg1 = View.inflate(mContext, R.layout.item_list, null);

                holder.tv_name = (TextView)arg1.findViewById(R.id.item_tv_formname);

                arg1.setTag(holder);

            }else {

                holder = (ViewHolder)arg1.getTag();

            }

            holder.tv_name.setText(item[arg0] + "");

            return arg1;

        }

    }

    static class ViewHolder{

        private TextView tv_name;

    }
第二个展示在下方展示一个弹窗,并设置屏幕透明度屏幕变暗的效果
代码如下
    /**

     * 在底部展示一个弹窗,并把界面的颜色变暗

     */

    protected void setTwoPoP() {

        View view = View.inflate(MainActivity.this, R.layout.pop_two, null);

        if(popup_two == null){

            popup_two = new PopupWindow(view,LayoutParams.MATCH_PARENT,LayoutParams.WRAP_CONTENT,true);

        }

        Button btn_dis = (Button)view.findViewById(R.id.btn_dis);

        btn_dis.setOnClickListener(new View.OnClickListener() {

            @Override

            public void onClick(View arg0) {

                // TODO Auto-generated method stub

                if(popup_two !=null && popup_two.isShowing()){

                    popup_two.dismiss();

                    backgroundAlpha(1f);

                }

            }

        });

        popup_two.setBackgroundDrawable(new ColorDrawable(Color.TRANSPARENT));

        //展示一个动画

        popup_two.setAnimationStyle(R.style.popWindow_anim_style);

        popup_two.setFocusable(true);

        popup_two.setOutsideTouchable(true);

        backgroundAlpha(0.5f);

        popup_two.showAtLocation(MainActivity.this.getWindow().getDecorView(), Gravity.BOTTOM, 0, 0);

        popup_two.setOnDismissListener(new PopupWindow.OnDismissListener() {

            @Override

            public void onDismiss() {

                // TODO Auto-generated method stub

                backgroundAlpha(1f);

            }

        });

    }

    /**

     * 设置添加屏幕的背景透明度

     * @param bgAlpha

     */

    public void backgroundAlpha(float bgAlpha)

    {

        this.getWindow().addFlags(WindowManager.LayoutParams.FLAG_DIM_BEHIND);

        WindowManager.LayoutParams lp = this.getWindow().getAttributes();

        lp.alpha = bgAlpha;

        this.getWindow().setAttributes(lp);

    }
第三对于第2中效过,用Dialog也可以实现,需要设置Dialog在屏幕的位置,不过用Dialog实现时,屏幕有渐变的效果不是一下变暗
    /**

     * 显示一个弹窗

     */

    @SuppressWarnings("deprecation")

    private void showDialog(){

        View view = View.inflate(PhotoActivity.this, R.layout.choose_photo_dialog, null);

        final Dialog dialog = new Dialog(this, R.style.Dialog);

        dialog.setContentView(view,new LayoutParams(LayoutParams.MATCH_PARENT, LayoutParams.WRAP_CONTENT));

        Window window = dialog.getWindow();

        window.setWindowAnimations(R.style.main_menu_animstyle);

        WindowManager.LayoutParams wl = window.getAttributes();

        wl.x = 0;

        wl.y = getWindowManager().getDefaultDisplay().getHeight();

        wl.width = ViewGroup.LayoutParams.MATCH_PARENT;

        wl.height = ViewGroup.LayoutParams.WRAP_CONTENT;

        dialog.onWindowAttributesChanged(wl);

        dialog.setCanceledOnTouchOutside(true);

        dialog.show();

}
其中在TextView下展示添加一个下划线
这个效果是使用图层来实现的
<?xml version="1.0" encoding="utf-8"?>

<layer-list xmlns:android="http://schemas.android.com/apk/res/android">

    <!-- 边框颜色值 -->

    <item>

        <shape>

            <solid android:color="#3547B1"/>

        </shape>

    </item>

    <!-- 主体背景颜色值 -->

    <item android:bottom="2dp">

        <shape>

            <solid android:color="#ffffff"/>

            <padding

                android:bottom="10dp"

                android:left="10dp"

                android:right="10dp"

                android:top="10dp"/>

        </shape>

    </item>

</layer-list>
补充:
在一个TextView展示2种颜色,大小不同的文本也可以用富文本控间
SpannableString test = new SpannableString("我的评语:这个不是的发生的发生的发生的冯绍峰sdfsdf是打发斯蒂芬谁发的");

        test.setSpan(new TextAppearanceSpan(this, R.style.textone), 0, 4, Spanned.SPAN_EXCLUSIVE_EXCLUSIVE);

        test.setSpan(new TextAppearanceSpan(this, R.style.texttwo), 5, test.length(), Spanned.SPAN_EXCLUSIVE_EXCLUSIVE);

        tv_text.setText(test);
     <style name="textone">

         <item name="android:textSize">16sp</item>

         <item name="android:textColor">#000</item>

     </style>

     <style name="texttwo">

         <item name="android:textSize">14sp</item>

         <item name="android:textColor">#f00</item>

     </style>
PopupWindow的使用的更多相关文章
- Android PopupWindow Dialog 关于 is your activity running 崩溃详解
Android PopupWindow Dialog 关于 is your activity running 崩溃详解 [TOC] 起因 对于 PopupWindow Dialog 需要 Activi ...
- Android popupwindow使用心得(一)
最近项目中好多地方用到popupwindow,感觉这个控件还是非常重要的.所以把使用心得总结下,废话不多说,直接上代码. public class MainActivity extends Activ ...
- 不得不吐槽的Android PopupWindow的几个痛点(实现带箭头的上下文菜单遇到的坑)
说到PopupWindow,我个人感觉是又爱又恨,没有深入使用之前总觉得这个东西应该很简单,很好用,但是真正使用PopupWindow实现一些效果的时候总会遇到一些问题,但是即便是人家的api有问题, ...
- 仿QQ空间根据位置弹出PopupWindow显示更多操作效果
我们打开QQ空间的时候有个箭头按钮点击之后弹出PopupWindow会根据位置的变化显示在箭头的上方还是下方,比普通的PopupWindow弹在屏幕中间显示好看的多. 先看QQ空间效果图: ...
- 自定义PopupWindow
PopupWindow,一个弹出窗口控件,可以用来显示任意View,而且会浮动在当前activity的顶部 自定义PopupWindow. 1.extends PopupWindow 2.构造方法中可 ...
- PopupWindow 使用
昨天马失前蹄,为了做一个小键盘,耽误了两个小时,记录一下心路历程 1.关于需求与选择 需求: 点击一个按钮,弹出一个小键盘(类似于输入法键盘) 选择: (1)方案一:KeyboardView 这是百度 ...
- popupwindow的基本使用以及基本动画效果
1.创建一个popupwindow view的布局文件自己写一个就好了,这里就不说了 View view= LayoutInflater.from(context).inflate(R.layout. ...
- Android -- PopupWindow(其中嵌套ListView 可以被点击)
1. 效果图
- Android开发学习之路-PopupWindow和仿QQ左滑删除
这周作业,要做一个类似QQ的左滑删除效果的ListView,因为不想给每个item都放一个按钮,所以决定用PopupWindow,这里记录一下 先放一下效果图: 先说明一下这里面的问题: ①没有做到像 ...
- android标题栏上面弹出提示框(二) PopupWindow实现,带动画效果
需求:上次用TextView写了一个从标题栏下面弹出的提示框.android标题栏下面弹出提示框(一) TextView实现,带动画效果, 总在找事情做的产品经理又提出了奇葩的需求.之前在通知栏显示 ...
随机推荐
- rewrite规则写法及nginx配置location总结
rewrite只能放在server{},location{},if{}中,并且只能对域名后边的除去传递的参数外的字符串起作用. 例如http://seanlook.com/a/we/index.php ...
- Atitit 常用比较复杂的图像滤镜 attilax大总结
Atitit 常用比较复杂的图像滤镜 attilax大总结 像素画滤镜 水彩油画滤镜 素描滤镜 梦幻镜 特点是中央集焦,周围景物朦化微带光晕,使人产生如入梦境的感觉.常用于拍摄婚纱.明星照,也用于其它 ...
- 获取当前请求的URL的地址、参数、参数值、各种属性
//URL: http://localhost:1897/User/Press/UserContent.aspx/9878?id=1#toc Request.ApplicationPath; //结果 ...
- SQL server 临时表
创建临时表,#代表局部临时表,##代表全局临时表.局部临时表和全局临时表的具体含义是什么呢? 举例说明一下比较清晰些,先来看下局部临时表,[新建查询],在里面输入如下文本: 运行后,我们在此文件执行输 ...
- 使用Spring的Validator接口进行校验
你可以使用Spring提供的validator接口进行对象的校验.Validator接口与Errors协同工作,在Spring做校验的时候,它会将所有的校验错误汇总到Errors对象中去. 来看这个简 ...
- OpenCascade Shape Representation in OpenSceneGraph
OpenCascade Shape Representation in OpenSceneGraph eryar@163.com 摘要Abstract:本文通过程序实例,将OpenCascade中的拓 ...
- 浅谈servlet版本
说白话,eclipseJ2EE版本新建一个web项目后,在IDE中的项目根目录下会看到2.3,2.4,2.5,3.0,3.1....据说最新的4.0在路上,已经有草案了,很期待ing. 360百科是这 ...
- CSS命名
CSS命名规范 CSS样式命名整理 页面结构 容器: container/wrap 整体宽度:wrapper 页头:header 内容:content 页面主体:main 页尾:footer 导航:n ...
- [Node.js] Node.js项目的持续集成
原文地址:http://www.moye.me/2016/03/03/nodejs_ci_by_jenkins 引子 持续集成 (Continuous Integration,简称CI)是一种软件工程 ...
- [Node.js] 闭包和高阶函数
原文地址:http://www.moye.me/2014/12/29/closure_higher-order-function/ 引子 最近发现一个问题:一部分写JS的人,其实对于函数式编程的概念并 ...