
LNMP分离式部署
#### LNMP组合工作流程
在LNMP组合工作时,首先是用户通过浏览器输入域名请求Nginx Web服务,如果请求是静态资源,则由Nginx解析返回给用户;如果是动态请求(.php结尾),那么Nginx就会把它通过FastCGI接口(快速接口规则,生产常用方法)发送FastCGI数据包给PHP引擎服务(FastCGI进程php-fpm)进行解析,如果这个动态请求要读取数据库数据,那么PHP就会继续向后请求MySQL数据库,以读取需要的数据,并最终通过Nginx服务把获取的数据返回给用户,这就是LNMP环境的基本请求顺序流程。这个请求流程是企业使用LNMP环境的常用流程。
用户通过浏览器将请求发到nginx
(1)若请求为静态请求,location/{
静态
}
nginx就会去网页目录根据URL的URI部分取得网页,并将网页返回给用户。(磁盘IO读写),图片、视频在存储(NFS)中(代码不放在存储中),此时NFS需要挂载Nginx
(2) 若请求为动态请求,location ~* \.(php|php5)${
fastcgi_pass 127.0.0.1:9000
}
,加快了PHP解析速度),PHP激活JS代码
动态网页由实体文件index.php(放在内存中),通过JS语言到数据库取得数据,并写回index.php文件,再打包给用户(代码不放在存储中)
2. nginx和Apache一样,若没有PHP支持,都处理不了所谓的动态请求,他们自身其实都只能出路静态,只是Apache转发动态数据包的速度快,但是只是单个包速度,Apache并发低。
3. 读取网页时无需挂载存储NFS,但是动态(如上传图片)需要挂载存储NFS
4. fastcgi快速接口有两端:
(1)作为客户端的fastcgi_pass(Nginx安装包包含)
(2)作为服务端的PHP-fpm(PHP安装包包含)
fastcgi数据包格式非常严谨,PHP解析速度非常快,但是越严谨的数据包越大,所以fsatcgi数据包大小 要绝对大于http数据包
#### LNMP的部署方式:
(1)全都部署在一台服务器上
(2)全都不部署在一台服务器上(N+P+M)
(3)只分离MySQL(NP+M)
### 部署LNMP
将nginx和PHP的程序用户设为同一个
1. 安装nginx
```
[root@localhost ~]# tar xf nginx-1.10.2.tar.gz -C /usr/src/
[root@localhost ~]# cd /usr/src/nginx-1.10.2/
[root@localhost ~]# mount /dev/sr0 /media/cdrom
[root@localhost nginx-1.10.2]# yum -y install pcre-devel openssl-devel
[root@localhost nginx-1.10.2]# useradd -s /sbin/nologin -M www
[root@localhost nginx-1.10.2]# ./configure --user=www --group=www --prefix=/usr/local/nginx --with-http_stub_status_module --with-http_ssl_module
[root@localhost nginx-1.10.2]# make && make install
[root@localhost nginx-1.10.2]# ln -s /usr/local/nginx/sbin/* /usr/local/sbin/
[root@localhost conf]# cd /usr/local/nginx/conf/
[root@localhost conf]# egrep -v "#|^$" nginx.conf.default > nginx.conf
[root@localhost conf]# vim nginx.conf
worker_processes 1;
events {
worker_connections 1024;
}
http {
include mime.types;
default_type application/octet-stream;
sendfile on;
keepalive_timeout 65;
server {
listen 80;
server_name localhost;
location / {
root html;
index index.html index.htm;
}
}
}
# nginx编译完毕
```
2. 安装MySQL(PHP需要MySQL的支持环境)
```
[root@localhost ~]# tar xf mysql-5.5.32-linux2.6-x86_64.tar.gz -C /usr/local/
# 创建mysql程序用户
[root@localhost ~]# useradd -s /sbin/nologin -M mysql
[root@localhost mysql-5.5.32-linux2.6-x86_64]# echo "192.168.81.163 LNMP" >> /etc/hosts
[root@localhost mysql-5.5.32-linux2.6-x86_64]# ln -s /usr/local/mysql-5.5.32-linux2.6-x86_64/ /usr/local/mysql
# 初始化MySQL配置文件my.conf
[root@localhost ~]# cd /usr/local/mysql-5.5.32-linux2.6-x86_64/
[root@localhost mysql-5.5.32-linux2.6-x86_64]# /bin/cp support-files/my-small.cnf /etc/my.cnf
# 初始化mysql
[root@localhost mysql]# chown -R mysql.mysql /usr/local/mysql
[root@localhost mysql]# yum -y install libaio
[root@localhost mysql]# /usr/local/mysql/scripts/mysql_install_db --basedir=/usr/local/mysql --datadir=/usr/local/mysql/data/ --user=mysql
Installing MySQL system tables...
OK
Filling help tables...
OK
To start mysqld at boot time you have to copy
support-files/mysql.server to the right place for your system
PLEASE REMEMBER TO SET A PASSWORD FOR THE MySQL root USER !
To do so, start the server, then issue the following commands:
/usr/local/mysql/bin/mysqladmin -u root password 'new-password'
/usr/local/mysql/bin/mysqladmin -u root -h localhost.localdomain password 'new-password'
Alternatively you can run:
/usr/local/mysql/bin/mysql_secure_installation
which will also give you the option of removing the test
databases and anonymous user created by default. This is
strongly recommended for production servers.
See the manual for more instructions.
You can start the MySQL daemon with:
cd /usr/local/mysql ; /usr/local/mysql/bin/mysqld_safe &
You can test the MySQL daemon with mysql-test-run.pl
cd /usr/local/mysql/mysql-test ; perl mysql-test-run.pl
Please report any problems with the /usr/local/mysql/scripts/mysqlbug script!
```
初始化故障排错集锦
错误示例1:
```
usr/local/mysql/bin/mysqld: error while loading shared libraries: libaio.so.1: cannot open shared ob
#错误原因是没有libaio函数库的支持。需要
yum -y install libaio
```
错误示例2:
```
WARNING:The host'mysql'could not be looked up with resolveip
#需要修改主机名解析,使其和uname -n一样,修改后的结果如下:
[root@localhost ~] # grep `uname -n` /etc/hosts
```
错误示例3:
```
ERROR:1004Can't create file '/tmp/#sql300e_1_o.frm'(errno:13)
#原因是/tmp目录的权限有问题。
解决办法为处理/tmp目录,如下:
[root@localhost ~]# ls -ld /tmp
drwxrwxrwt. 3 root root 4096 Jul 14 07:56 /tmp
[root@localhost ~]# chmod -R 1777 /tmp/
```
此故障必须解除,否则,后面会出现登陆不了数据库等问题。
3. 配置并启动MySQL数据库
```
[root@localhost mysql]# cp support-files/mysql.server /etc/init.d/mysqld
[root@localhost mysql]# chmod +x /etc/init.d/mysqld
[root@localhost mysql]# /etc/init.d/mysqld start
Starting MySQL.. SUCCESS!
[root@localhost mysql]# netstat -antup | grep mysql
tcp 0 0 0.0.0.0:3306 0.0.0.0:* LISTEN 4688/mysqld
# 设置MySQL开机自启动
[root@localhost mysql]# chkconfig --add mysqld
[root@localhost mysql]# chkconfig mysqld on
[root@localhost mysql]# chkconfig --list mysqld
mysqld 0:off 1:off 2:on 3:on 4:on 5:on 6:off
[root@localhost mysql]# ln -s /usr/local/mysql/bin/* /usr/local/bin/
[root@localhost mysql]# which mysqladmin
/usr/local/bin/mysqladmin
[root@localhost mysql]# mysqladmin -uroot password '123456'
[root@localhost mysql]# mysql -uroot -p123456
Welcome to the MySQL monitor. Commands end with ; or \g.
Your MySQL connection id is 2
Server version: 5.5.32 MySQL Community Server (GPL)
Copyright (c) 2000, 2013, Oracle and/or its affiliates. All rights reserved.
Oracle is a registered trademark of Oracle Corporation and/or its
affiliates. Other names may be trademarks of their respective
owners.
Type 'help;' or '\h' for help. Type '\c' to clear the current input statement.
mysql>
```
4. PHP(fastcgi方式)服务的安装和准备
```
[root@localhost mysql]# yum -y install zlib-devel libxml2-devel libjpeg-devel libjpeg-turbo-devel libiconv-devel
[root@localhost mysql]# yum -y install freetype-devel libpng-devel gd libcurl-devel libxslt-devel
[root@localhost ~]# rpm -qa zlib-devel libxml2-devel libjpeg-devel libjpeg-turbo-devel libiconv-devel
zlib-devel-1.2.3-29.el6.x86_64
libxml2-devel-2.7.6-14.el6.x86_64
libjpeg-turbo-devel-1.2.1-1.el6.x86_64
#这里仅缺少libiconv-devel包
[root@localhost ~]# rpm -qa freetype-devel libpng-devel gd libcurl-devel libxslt-devel
freetype-devel-2.3.11-14.el6_3.1.x86_64
libpng-devel-1.2.49-1.el6_2.x86_64
libcurl-devel-7.19.7-37.el6_4.x86_64
libxslt-devel-1.1.26-2.el6_3.1.x86_64
gd-2.0.35-11.el6.x86_64
[root@localhost ~]# tar xf libiconv-1.14.tar.gz -C /usr/src/
[root@localhost ~]# cd /usr/src/libiconv-1.14/
[root@localhost libiconv-1.14]# ./configure --prefix=/usr/local/libiconv && make && make install
[root@localhost ~]# rpm -ivh mhash-0.9.9.9-3.el6.x86_64.rpm
warning: mhash-0.9.9.9-3.el6.x86_64.rpm: Header V3 RSA/SHA256 Signature, key ID 0608b895: NOKEY
Preparing... ########################################### [100%]
1:mhash ########################################### [100%]
[root@localhost ~]# rpm -ivh libmcrypt-2.5.8-9.el6.x86_64.rpm
warning: libmcrypt-2.5.8-9.el6.x86_64.rpm: Header V3 RSA/SHA256 Signature, key ID 0608b895: NOKEY
Preparing... ########################################### [100%]
1:libmcrypt ########################################### [100%]
[root@localhost ~]# rpm -ivh libmcrypt-devel-2.5.8-9.el6.x86_64.rpm
warning: libmcrypt-devel-2.5.8-9.el6.x86_64.rpm: Header V3 RSA/SHA256 Signature, key ID 0608b895: NOKEY
Preparing... ########################################### [100%]
1:libmcrypt-devel ########################################### [100%]
[root@localhost ~]# rpm -ivh mcrypt-2.6.8-10.el6.x86_64.rpm
warning: mcrypt-2.6.8-10.el6.x86_64.rpm: Header V3 RSA/SHA256 Signature, key ID 0608b895: NOKEY
Preparing... ########################################### [100%]
1:mcrypt ########################################### [100%]
```
5. 开始安装PHP(fastcgi方式)服务
(1)解压配置PHP
```
[root@localhost ~]# tar xf php-5.3.28.tar.gz -C /usr/src/
[root@localhost ~]# cd /usr/src/php-5.3.28/
[root@localhost php-5.3.28]#
./configure --prefix=/usr/local/php5.3.28 --with-mysql=mysqlnd --with-iconv-dir=/usr/local/libiconv --with-freetype-dir --with-jpeg-dir --with-png-dir --with-zlib --with-libxml-dir=/usr --enable-xml --disable-rpath --enable-safe-mode --enable-bcmath --enable-shmop --enable-sysvsem --enable-inline-optimization --with-curl --with-curlwrappers --enable-mbregex --enable-fpm --enable-mbstring --with-mcrypt --with-gd --enable-gd-native-ttf --with-openssl --with-mhash --enable-pcntl --enable-sockets --with-xmlrpc --enable-zip --enable-soap --enable-short-tags --enable-zend-multibyte --enable-static --with-xsl--with-fpm-user=www --with-fpm-group=www --enable-ftp

(2)编译安装PHP
```
[root@localhost php-5.3.28]# ln -s /usr/local/mysql/lib/libmysqlclient.
libmysqlclient.a libmysqlclient.so.18
libmysqlclient.so libmysqlclient.so.18.0.0
[root@localhost php-5.3.28]# ln -s /usr/local/mysql/lib/libmysqlclient.so.18 /usr/lib64/
[root@localhost php-5.3.28]# touch ext/phar/phar.phar
[root@localhost php-5.3.28]# make
[root@localhost php-5.3.28]# make install
[root@localhost php-5.3.28]# ln -s /usr/local/php5.3.28/ /usr/local/php
[root@localhost php-5.3.28]# cd /usr/local/php
[root@localhost php]# cd /usr/src/php-5.3.28/
[root@localhost php-5.3.28]# ls php.ini*
php.ini-development php.ini-production
[root@localhost php-5.3.28]# cp php.ini-production /usr/local/php/lib/php.ini
[root@localhost php-5.3.28]# cd /usr/local/php/etc/
[root@localhost etc]# ls
pear.conf php-fpm.conf.default
[root@localhost etc]# cp php-fpm.conf.default php-fpm.conf
[root@localhost etc]# /usr/local/php/sbin/php-fpm
[root@localhost etc]# netstat -antup | grep 9000
tcp 0 0 127.0.0.1:9000 0.0.0.0:* LISTEN 129604/php-fpm
[root@localhost etc]# vim php-fpm.conf
151 listen = 127.0.0.1:9000 #若设为分布式部署,需要将IP地址改为对方IP地址
```
6. 配置nginx支持PHP程序请求访问
```
[root@localhost etc]# cd /usr/local/nginx/conf/
[root@localhost conf]# cp nginx.conf nginx.conf.bak
[root@localhost conf]# vim nginx.conf
worker_processes 1;
error_log logs/error.log;
events {
worker_connections 1024;
}
http {
include mime.types;
default_type application/octet-stream;
sendfile on;
keepalive_timeout 65;
server {
listen 80;
server_name blog.yunjisuan.com;
location / {
root html/blog;
index index.html index.htm;
}
location ~ .*\.(php|php5)?$ {
root html/blog;
fastcgi_pass 127.0.0.1:9000;
fastcgi_index index.php;
include fastcgi.conf;
}
}
}
# 启动nginx
[root@localhost nginx]# cd html/
[root@localhost html]# ls
50x.html index.html
[root@localhost html]# mkdir blog
[root@localhost html]# ls
50x.html blog index.html
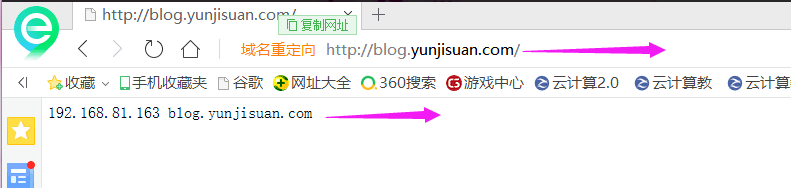
[root@localhost html]# echo "`hostname -I` blog.yunjisuan.com" > blog/index.html
[root@localhost blog]# vim /etc/hosts
127.0.0.1 localhost localhost.localdomain localhost4 localhost4.localdomain4
::1 localhost localhost.localdomain localhost6 localhost6.localdomain6
192.168.214.163 LNMP blog.yunjisuan.com
[root@localhost html]# /usr/local/nginx/sbin/nginx
[root@localhost html]# netstat -antup | grep 80
tcp 0 0 0.0.0.0:80 0.0.0.0:* LISTEN 129672/nginx
tcp 0 0 0.0.0.0:22 0.0.0.0:* LISTEN 1380/sshd
tcp 0 0 :::22 :::* LISTEN 1380/sshd
[root@localhost blog]# curl blog.yunjisuan.com
192.168.214.163 blog.yunjisuan.com
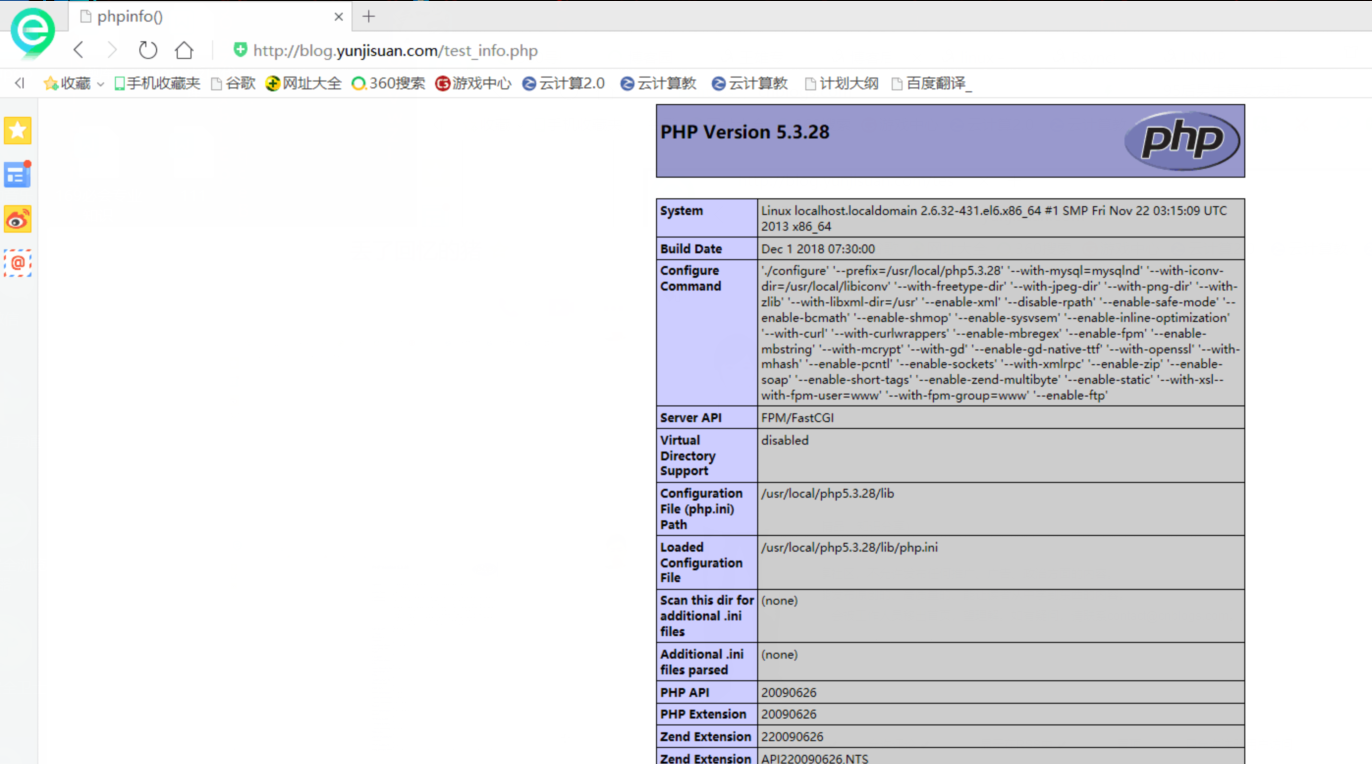
[root@localhost blog]# vim test_info.php
<?php phpinfo(); ?>
#本机/我的电脑/磁盘C/Windows/system32/drivers/etc/hosts
192.168.214.163 blog.yunjisuan.com
```
到浏览器查看静态网页内容

LNMP分离式部署的更多相关文章
- Linux系统——LNMP分离式部署
#### 安装nginx ```[root@localhost ~]# tar xf nginx-1.10.2.tar.gz -C /usr/src/[root@localhost ~]# cd /u ...
- 企业级LNMP分离式部署
安装MySQL数据库 安装步骤介绍 本例采用MySQL二进制安装包进行安装演示 (1) 创建mysql用户的账号 [root@mysql ~]# groupadd mysql [root@my ...
- LNMP分离式部署实例[转]
很多人在练习部署LNMP环境的时候,大都数是部署在同一个虚拟机上面的.但是实际工作中,我们一般都是分离部署的. 今天我就用3台虚拟机,部署下LNMP环境.以供参考! 网络拓扑图: 首先准备3台虚拟机: ...
- LNMP架构部署
第1章 部署LNMP架构步骤 1.1 ①部署Linux系统(OK) 基本优化完成(ip地址设置 yum源更新 字符集设置) 安全优化完成(iptables关闭 selinux关闭 /tmp/ 1777 ...
- Puppet基于Master/Agent模式实现LNMP平台部署
前言 随着IT行业的迅猛发展,传统的运维方式靠大量人力比较吃力,运维人员面对日益增长的服务器和运维工作,不得不把很多重复的.繁琐的工作利用自动化处理.前期我们介绍了运维自动化工具ansible的简单应 ...
- 用lnmp架构部署wordpress网站详细步骤
用lnmp架构部署wordpress网站 ①.下载和上传网站代码 用winscp或者xftp, 或者xshell下执行rz命令进行上传网站的包文件. ②.解压程序代码,并将程序代码保存到站点目录,并进 ...
- 《Linux就该这么学》培训笔记_ch20使用LNMP架构部署动态网站环境
<Linux就该这么学>培训笔记_ch20使用LNMP架构部署动态网站环境 文章最后会post上书本的笔记照片. 文章主要内容: 源码包程序 LNMP动态网站架构 配置Mysql服务 配置 ...
- linux运维、架构之路-Lnmp架构部署
一.Lnmp架构原理 二. Lnmp架构软件安装 1.Nginx安装脚本 #!/bin/bash useradd -s /sbin/nologin -M www mkdir -p /server/to ...
- WordPress安装篇(5):源码编译安装LNMP并部署WordPress
与YUM方式安装相比,源码编译安装方式更灵活,安装过程中能自定义功能和参数,特别是在批量部署服务器又要求软件版本及配置一致时,源码编译安装的优势很明显.本文介绍如何通过源码编译方式安装Nginx1.1 ...
随机推荐
- 格式时间转UTC时间
public void dateChange() throws ParseException { String str="2010-5-27 12:10:12"; SimpleDa ...
- ISP PIPLINE (五) Denoise
what is the Denoise? Denoise就是图像去噪,平滑图像,并保留图像细节. why does Denoise? 图像在采集并转换为数字信号的过程会引入一些噪声,这些噪声会让图片看 ...
- 最优装载—dp
最优装载—dp 动态规划 一 问题描述 二 问题分析 三 代码实现 package dp_Loading; import java.io.BufferedWriter; import java.io. ...
- linux(debian) arm-linux-g++ v4.5.1交叉编译 embedded arm 版本的QtWebkit (browser) 使用qt 4.8.6 版本 以及x64上编译qt
最近需要做一个项目 在arm 架构的linux下 没有桌面环境的情况下拉起 有界面的浏览器使用. 考虑用qt 的界面和 qtwebikt 的库去实现这一系列操作. 本文参考: Qt移植到ARM Lin ...
- Android第四次作业
一.团队成员 成员1:刘宇莹 学号:1600802122 班级:计算机164 博客链接:刘宇莹 成员2:孟鑫菲 学号:1600802092 班级:计算机163 博客链接:孟鑫菲 二.团队项目apk 拍 ...
- __x__(23)0907第四天__浏览器默认样式
浏览器默认样式: 为了美观,浏览器为了在页面没有样式时,也可以有一个较好的显示效果,默认设置若干 margin,padding. 作为开发人员,在CSS编写最初,一般都会清除默认样式, ...
- Selenium 3----鼠标、键盘操作常用方法
[鼠标] 在 WebDriver 中, 关于鼠标操作的方法封装在 ActionChains 类中. ActionChains 类提供了鼠标操作的常用方法: perform(): 执行所有 Action ...
- 弄懂JDK、JRE和JVM到底是什么
首先是JDK JDK(Java Development Kit) 是 Java 语言的软件开发工具包(SDK).在JDK的安装目录下有一个jre目录,里面有两个文件夹bin和lib,在这里可以认为bi ...
- jmeter 入门学习-通过代理录制测试脚本
通过jmeter代理录制脚本后,会产生大量的无用的请求,尽管在代理中已经过滤了一部分图片或者CSS.JS文件. 手动查看主要的请求:这里主要关注登陆请求,要确定有效的URL请求 删除除/Login.a ...
- [dev]typeof, offsetof 和container_of
转一篇文章.写的比较好,浅显易懂,还画了图. https://www.cnblogs.com/idorax/p/6796897.html 概况一下: container_of用到了typeof和off ...