
Linux系统——LNMP分离式部署
#### 安装nginx
```
[root@localhost ~]# tar xf nginx-1.10.2.tar.gz -C /usr/src/
[root@localhost ~]# cd /usr/src/nginx-1.10.2/
[root@localhost ~]# mount /dev/sr0 /media/cdrom
[root@localhost nginx-1.10.2]# yum -y install pcre-devel openssl-devel
[root@localhost nginx-1.10.2]# useradd -s /sbin/nologin -M www
[root@localhost nginx-1.10.2]# ./configure --user=www --group=www --prefix=/usr/local/nginx --with-http_stub_status_module --with-http_ssl_module
[root@localhost nginx-1.10.2]# make && make install
[root@localhost nginx-1.10.2]# ln -s /usr/local/nginx/sbin/* /usr/local/sbin/
[root@localhost conf]# cd /usr/local/nginx/conf/
[root@localhost conf]# egrep -v "#|^$" nginx.conf.default > nginx.conf
[root@localhost conf]# vim nginx.conf
worker_processes 1;
events {
worker_connections 1024;
}
http {
include mime.types;
default_type application/octet-stream;
sendfile on;
keepalive_timeout 65;
server {
listen 80;
server_name localhost;
location / {
root html;
index index.html index.htm;
}
}
}
[root@localhost conf]# /usr/local/nginx/sbin/nginx
[root@localhost conf]# netstat -antup | grep 80
tcp 0 0 0.0.0.0:80 0.0.0.0:* LISTEN 4187/nginx
# nginx编译完毕
```
#### 安装MySQL
```
[root@localhost ~]# ls
anaconda-ks.cfg install.log.syslog
install.log mysql-5.5.32-linux2.6-x86_64.tar.gz
[root@localhost ~]# tar xf mysql-5.5.32-linux2.6-x86_64.tar.gz -C /usr/local/
[root@localhost ~]# useradd -s /sbin/nologin -M mysql
[root@localhost ~]# echo "192.168.214.168 LNMP" >> /etc/hosts #MySQL服务器IP地址
[root@localhost ~]# ln -s /usr/local/mysql-5.5.32-linux2.6-x86_64/ /usr/local/mysql
# 初始化MySQL配置文件my.conf
[root@localhost ~]# cd /usr/local/mysql-5.5.32-linux2.6-x86_64/
[root@localhost mysql-5.5.32-linux2.6-x86_64]# /bin/cp support-files/my-small.cnf /etc/my.cnf
# 初始化mysql
[root@localhost mysql]# chown -R mysql.mysql /usr/local/mysql
[root@localhost mysql]# mount /dev/sr0 /media/cdrom
[root@localhost mysql]# yum -y install libaio
[root@localhost mysql]# /usr/local/mysql/scripts/mysql_install_db --basedir=/usr/local/mysql --datadir=/usr/local/mysql/data/ --user=mysql
Installing MySQL system tables...
OK
Filling help tables...
OK
To start mysqld at boot time you have to copy
support-files/mysql.server to the right place for your system
PLEASE REMEMBER TO SET A PASSWORD FOR THE MySQL root USER !
To do so, start the server, then issue the following commands:
/usr/local/mysql/bin/mysqladmin -u root password 'new-password'
/usr/local/mysql/bin/mysqladmin -u root -h localhost.localdomain password 'new-password'
Alternatively you can run:
/usr/local/mysql/bin/mysql_secure_installation
which will also give you the option of removing the test
databases and anonymous user created by default. This is
strongly recommended for production servers.
See the manual for more instructions.
You can start the MySQL daemon with:
cd /usr/local/mysql ; /usr/local/mysql/bin/mysqld_safe &
You can test the MySQL daemon with mysql-test-run.pl
cd /usr/local/mysql/mysql-test ; perl mysql-test-run.pl
Please report any problems with the /usr/local/mysql/scripts/mysqlbug script!
```
#### 配置并启动MySQL数据库
```
[root@localhost mysql]# cp support-files/mysql.server /etc/init.d/mysqld
[root@localhost mysql]# chmod +x /etc/init.d/mysqld
[root@localhost mysql]# /etc/init.d/mysqld start
Starting MySQL.. SUCCESS!
[root@localhost mysql]# netstat -antup | grep mysql
tcp 0 0 0.0.0.0:3306 0.0.0.0:* LISTEN 4688/mysqld
# 设置MySQL开机自启动
[root@localhost mysql]# chkconfig --add mysqld
[root@localhost mysql]# chkconfig mysqld on
[root@localhost mysql]# chkconfig --list mysqld
mysqld 0:off 1:off 2:on 3:on 4:on 5:on 6:off
[root@localhost mysql]# ln -s /usr/local/mysql/bin/* /usr/local/bin/
[root@localhost mysql]# which mysqladmin
/usr/local/bin/mysqladmin
[root@localhost mysql]# mysqladmin -uroot password '123456'
[root@localhost mysql]# mysql -uroot -p123456
Welcome to the MySQL monitor. Commands end with ; or \g.
Your MySQL connection id is 2
Server version: 5.5.32 MySQL Community Server (GPL)
Copyright (c) 2000, 2013, Oracle and/or its affiliates. All rights reserved.
Oracle is a registered trademark of Oracle Corporation and/or its
affiliates. Other names may be trademarks of their respective
owners.
Type 'help;' or '\h' for help. Type '\c' to clear the current input statement.
mysql>
```
#### PHP(fastcgi方式)服务的安装和准备
```
[root@localhost ~]# mount /dev/sr0 /media/cdrom
mount: block device /dev/sr0 is write-protected, mounting read-only
[root@localhost mysql]# yum -y install openssl-devel openssl
[root@localhost mysql]# yum -y install zlib-devel libxml2-devel libjpeg-devel libjpeg-turbo-devel libiconv-devel
[root@localhost mysql]# yum -y install freetype-devel libpng-devel gd libcurl-devel libxslt-devel
[root@localhost ~]# rpm -qa zlib-devel libxml2-devel libjpeg-devel libjpeg-turbo-devel libiconv-devel
zlib-devel-1.2.3-29.el6.x86_64
libxml2-devel-2.7.6-14.el6.x86_64
libjpeg-turbo-devel-1.2.1-1.el6.x86_64
#这里仅缺少libiconv-devel包
[root@localhost ~]# rpm -qa freetype-devel libpng-devel gd libcurl-devel libxslt-devel
freetype-devel-2.3.11-14.el6_3.1.x86_64
libpng-devel-1.2.49-1.el6_2.x86_64
libcurl-devel-7.19.7-37.el6_4.x86_64
libxslt-devel-1.1.26-2.el6_3.1.x86_64
gd-2.0.35-11.el6.x86_64
[root@localhost ~]# tar xf libiconv-1.14.tar.gz -C /usr/src/
[root@localhost ~]# cd /usr/src/libiconv-1.14/
[root@localhost libiconv-1.14]# ./configure --prefix=/usr/local/libiconv && make && make install
[root@localhost ~]# rpm -ivh mhash-0.9.9.9-3.el6.x86_64.rpm
warning: mhash-0.9.9.9-3.el6.x86_64.rpm: Header V3 RSA/SHA256 Signature, key ID 0608b895: NOKEY
Preparing... ########################################### [100%]
1:mhash ########################################### [100%]
[root@localhost ~]# rpm -ivh libmcrypt-2.5.8-9.el6.x86_64.rpm
warning: libmcrypt-2.5.8-9.el6.x86_64.rpm: Header V3 RSA/SHA256 Signature, key ID 0608b895: NOKEY
Preparing... ########################################### [100%]
1:libmcrypt ########################################### [100%]
[root@localhost ~]# rpm -ivh libmcrypt-devel-2.5.8-9.el6.x86_64.rpm
warning: libmcrypt-devel-2.5.8-9.el6.x86_64.rpm: Header V3 RSA/SHA256 Signature, key ID 0608b895: NOKEY
Preparing... ########################################### [100%]
1:libmcrypt-devel ########################################### [100%]
[root@localhost ~]# rpm -ivh mcrypt-2.6.8-10.el6.x86_64.rpm
warning: mcrypt-2.6.8-10.el6.x86_64.rpm: Header V3 RSA/SHA256 Signature, key ID 0608b895: NOKEY
Preparing... ########################################### [100%]
1:mcrypt ########################################### [100%]
```
5. 开始安装PHP(fastcgi方式)服务
(1)解压配置PHP
```
[root@localhost ~]# tar xf php-5.3.28.tar.gz -C /usr/src/
[root@localhost ~]# cd /usr/src/php-5.3.28/
[root@localhost php-5.3.28]# ./configure \
> --prefix=/usr/local/php5.3.28 \
> --with-mysql=mysqlnd \
> --with-iconv-dir=/usr/local/libiconv \
> --with-freetype-dir \
> --with-jpeg-dir \
> --with-png-dir \
> --with-zlib \
> --with-libxml-dir=/usr \
> --enable-xml \
> --disable-rpath \
> --enable-safe-mode \
> --enable-bcmath \
> --enable-shmop \
> --enable-sysvsem \
> --enable-inline-optimization \
> --with-curl \
> --with-curlwrappers \
> --enable-mbregex \
> --enable-fpm \
> --enable-mbstring \
> --with-mcrypt \
> --with-gd \
> --enable-gd-native-ttf \
> --with-openssl \
> --with-mhash \
> --enable-pcntl \
> --enable-sockets \
> --with-xmlrpc \
> --enable-zip \
> --enable-soap \
> --enable-short-tags \
> --enable-zend-multibyte \
> --enable-static \
> --with-xsl \
> --with-fpm-user=www \
> --with-fpm-group=www \
> --enable-ftp
+--------------------------------------------------------------------+
| License: |
| This software is subject to the PHP License, available in this |
| distribution in the file LICENSE. By continuing this installation |
| process, you are bound by the terms of this license agreement. |
| If you do not agree with the terms of this license, you must abort |
| the installation process at this point. |
+--------------------------------------------------------------------+
Thank you for using PHP.
--------------------------------------------------------------
快捷方式:
[root@localhost php-5.3.28]# ./configure --prefix=/usr/local/php5.3.28 --with-mysql=mysqlnd --with-iconv-dir=/usr/local/libiconv --with-freetype-dir --with-jpeg-dir --with-png-dir --with-zlib --with-libxml-dir=/usr --enable-xml --disable-rpath --enable-safe-mode --enable-bcmath --enable-shmop --enable-sysvsem --enable-inline-optimization --with-curl --with-curlwrappers --enable-mbregex --enable-fpm --enable-mbstring --with-mcrypt --with-gd --enable-gd-native-ttf --with-openssl --with-mhash --enable-pcntl --enable-sockets --with-xmlrpc --enable-zip --enable-soap --enable-short-tags --enable-zend-multibyte --enable-static --with-xsl --with-fpm-user=www --with-fpm-group=www --enable-ftp
```
(2)编译安装PHP
```
[root@localhost php-5.3.28]# touch ext/phar/phar.phar
[root@localhost php-5.3.28]# make
[root@localhost php-5.3.28]# make install
[root@localhost php-5.3.28]# ln -s /usr/local/php5.3.28/ /usr/local/php
[root@localhost php-5.3.28]# cd /usr/local/php
[root@localhost php]# cd /usr/src/php-5.3.28/
[root@localhost php-5.3.28]# ls php.ini*
php.ini-development php.ini-production
[root@localhost php-5.3.28]# cp php.ini-production /usr/local/php/lib/php.ini
[root@localhost php-5.3.28]# cd /usr/local/php/etc/
[root@localhost etc]# ls
pear.conf php-fpm.conf.default
[root@localhost etc]# cp php-fpm.conf.default php-fpm.conf
[root@localhost etc]# /usr/local/php/sbin/php-fpm
[root@localhost etc]# netstat -antup | grep 9000
tcp 0 0 127.0.0.1:9000 0.0.0.0:* LISTEN 129604/php-fpm
[root@localhost etc]# vim php-fpm.conf
151 listen = 192.168.214.167:9000 #分离式部署,改为PHP服务器IP地址
```
#### 配置nginx支持PHP程序请求访问
```
[root@localhost etc]# cd /usr/local/nginx/conf/
[root@localhost conf]# cp nginx.conf nginx.conf.bak
[root@localhost conf]# vim nginx.conf
worker_processes 1;
error_log logs/error.log;
events {
worker_connections 1024;
}
http {
include mime.types;
default_type application/octet-stream;
sendfile on;
keepalive_timeout 65;
server {
listen 80;
server_name www.yunjisuan.com;
root /www;
location / {
index index.php index.html index.htm;
}
location ~ .*\.(php|php5)?$ {
fastcgi_pass192.168.214.167:9000;
fastcgi_index index.php;
include fastcgi.conf;
}
}
}
# 配置nginx.conf配置文件并启动nginx
[root@localhost ~]# vim /usr/local/nginx/conf/nginx.conf
worker_processes 1;
events {
worker_connections 1024;
}
http {
include mime.types;
default_type application/octet-stream;
sendfile on;
keepalive_timeout 65;
server {
listen 80;
server_name www.yunjisuan.com;
root /www;
location / {
index index.php index.html index.htm; #添加一个动态文件
}
location ~ .*\.(php|php5)?$ {
fastcgi_pass 192.168.214.167:9000; #PHPIP地址
fastcgi_index index.php;
include fastcgi.conf;
}
}
}
[root@localhost ~]# /usr/local/nginx/sbin/nginx -s reload
[root@localhost ~]# vim /etc/hosts
127.0.0.1 localhost localhost.localdomain localhost4 localhost4.localdomain4
::1 localhost localhost.localdomain localhost6 localhost6.localdomain6
192.168.214.169 www.yunjisuan.com
[root@localhost /]# mkdir -p www
[root@localhost /]# chown -R www.www /www/
[root@localhost /]# echo "123456" > index.php # index.php文件的位置必须与PHP服务器的一致,同时存在
#本机/我的电脑/磁盘C/Windows/system32/drivers/etc/hosts
192.168.214.169 www.yunjisuan.com
```
配置PHP服务器的配置文件
```
[root@localhost ~]# vim /usr/local/php/etc/php-fpm.conf
; will be used.
user = www
group = www
; The address on which to accept FastCGI requests.
; Valid syntaxes are:
; 'ip.add.re.ss:port' - to listen on a TCP socket to a specific address on
; a specific port;
; 'port' - to listen on a TCP socket to all addresses on a
; specific port;
; '/path/to/unix/socket' - to listen on a unix socket.
; Note: This value is mandatory.
listen = 192.168.214.167:9000
; Set listen(2) backlog. A value of '-1' means unlimited.
; Default Value: 128 (-1 on FreeBSD and OpenBSD)
;listen.backlog = -1
[root@localhost ~]# mkdir -p /www
[root@localhost ~]# cd /www/
[root@localhost www]# chown -R www.www /www/
[root@localhost www]# echo "daisy" > index.php
[root@localhost www]# vim test_mysql.php
<?php
//$link_id=mysql_connect('主机名','用户','密码');
$link_id=mysql_connect('192.168.214.168','yunjisuan','123456'); # IP地址为MySQLIP地址
if($link_id){
echo "mysql successful by daisy\n";
}else{
echo mysql_error();
}
?>
```
配置MySQL基本数据
```
[root@lnmp ~]# mysql -uroot -p123456
mysql> grant all on *.* to 'yunjisuan'@'%' identified by '123456';
Query OK, 0 rows affected (0.00 sec)
mysql> flush privileges;
Query OK, 0 rows affected (0.00 sec)
mysql> select user,host from mysql.user;
+-----------+-----------------------+
| user | host |
+-----------+-----------------------+
| yunjisuan | % |
| root | 127.0.0.1 |
| root | ::1 |
| | localhost |
| root | localhost |
| | localhost.localdomain |
| root | localhost.localdomain |
+-----------+-----------------------+
7 rows in set (0.00 sec)
mysql> exit
Bye
```
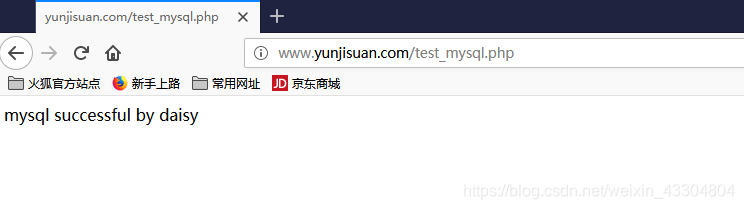
查看nginx与PHP的动态数据连接情况

查看mysql与PHP连接情况
用fastcgi方式实现负载均衡
1. 克隆服务器PHP2(用PHP服务器克隆)
(PHP2端)
```
[root@localhost ~]# vim /usr/local/php/etc/php-fpm.conf
; will be used.
user = www
group = www
; The address on which to accept FastCGI requests.
; Valid syntaxes are:
; 'ip.add.re.ss:port' - to listen on a TCP socket to a specific address on
; a specific port;
; 'port' - to listen on a TCP socket to all addresses on a
; specific port;
; '/path/to/unix/socket' - to listen on a unix socket.
; Note: This value is mandatory.
listen = 192.168.214.170:9000 #修改为本服务器IP地址
; Set listen(2) backlog. A value of '-1' means unlimited.
; Default Value: 128 (-1 on FreeBSD and OpenBSD)
;listen.backlog = -1
[root@localhost ~]# /usr/local/php/sbin/php-fpm
[root@localhost ~]# ss -antup | grep 9000
tcp LISTEN 0 128 192.168.214.170:9000 *:* users:(("php-fpm",1518,7),("php-fpm",1519,0),("php-fpm",1520,0))
[root@localhost www]# vim index.php
daisy 2
```
(nginx端)
```
[root@blog ~]# vim /usr/local/nginx/conf/nginx.conf
worker_processes 1;
events {
worker_connections 1024;
}
http {
include mime.types;
default_type application/octet-stream;
sendfile on;
keepalive_timeout 65;
upstream www{
server 192.168.214.167:9000; #反向代理的IP地址
server 192.168.214.170:9000;
}
server {
listen 80;
server_name www.yunjisuan.com;
root /www;
location / {
index index.php index.html index.htm;
}
location ~ .*\.(php|php5)?$ {
fastcgi_pass www; # 目录名
fastcgi_index index.php;
include fastcgi.conf;
}
}
}
[root@blog ~]# /usr/local/nginx/sbin/nginx -s reload
```
测试PHP访问MySQL
(PHP端)
```
[root@localhost www]# vim test_mysql.php
<?php
//$link_id=mysql_connect('主机名','用户','密码');
$link_id=mysql_connect('192.168.214.168','yunjisuan','123456'); # IP地址为MySQLIP地址
if($link_id){
echo "mysql successful by daisy\n";
}else{
echo mysql_error();
}
?>
```
(PHP2端)
```
[root@localhost www]# vim test_mysql.php
<?php
//$link_id=mysql_connect('主机名','用户','密码');
$link_id=mysql_connect('192.168.214.168','yunjisuan','123456'); # IP地址为MySQLIP地址
if($link_id){
echo "mysql successful by daisy\n";
}else{
echo mysql_error();
}
?>
```
Linux系统——LNMP分离式部署的更多相关文章
- linux系统LNMP环境部署
源码安装 nginx# yum -y install gcc openssl-devel# useradd -s /sbin/nologin nginx# tar xf nginx-1.14.0.ta ...
- linux系统tomcat项目部署和tomcat访问日志
一.只用ip地址访问 先把端口号改成80,然后用 <Host name="localhost" appBase="webapps" 137 ...
- Windows环境安装Linux系统及JDK部署
前言 由于我的笔记本有点问题,所以这周系统包括所有硬盘全部重装了,原来的Linux虚拟机都没了,因此才有了这篇文章和各位朋友们分享. 由于Linux环境的优越性(开源.低成本.安全性好.网络功能强大) ...
- Linux系统批量化安装部署之Cobbler
说明: Cobbler服务器系统:CentOS 5.10 64位 IP地址:192.168.21.128 需要安装部署的Linux系统: eth0(第一块网卡,用于外网)IP地址段:192.168.2 ...
- Django项目在linux系统中虚拟环境部署
1.在linux系统下,安装virtualenv 命令:pip install virtualenv 2.项目部署前的准备 1. Django web project deployment 1.1. ...
- 学习神器!本机安装虚拟机,并安装Linux系统,并部署整套web系统手册(包含自动部署应用脚本,JDK,tomcat,TortoiseSVN,Mysql,maven等软件)
1. 引言 编写目的 本文档的编写目的主要是在Linux系统上部署mis_v3员工管理系统,方便测试,并为以后开发人员进行项目部署提供参考 准备工作 软件部分 软件项 版本 备注 Mysql 5. ...
- 使用URLOS在linux系统中极速部署NFS共享存储服务
如何在linux系统里搭建NFS服务?其实我们只需要安装一个URLOS面板,然后就能在3分钟内将NFS服务部署完成.近日,URLOS在应用市场中上架了一款NFS应用,它可以让我们的节点主机在3分钟内极 ...
- Linux系统(控制节点)部署环境
环境部署 重点说明:安装ansible时去控制Windows机器,由于需要在Linux系统上安装pywinrm插件,而使用yum安装锝ansible是无法调用pywinrm插件,所以整体使用pip工具 ...
- LNMP分离式部署
#### LNMP组合工作流程 在LNMP组合工作时,首先是用户通过浏览器输入域名请求Nginx Web服务,如果请求是静态资源,则由Nginx解析返回给用户:如果是动态请求(.php结尾),那么Ng ...
随机推荐
- Android.mk(4) 依赖:目标编程的模式
https://www.jianshu.com/p/3777a585a8d0 另一种范式 我一直觉得,Makefile确实是C/C++程序员的良配,因为Makefile所使用的两种范式都是C/C++程 ...
- mybatis generator如何定制JavaTypeResolver,使smallint类型的数据库字段在po中的类型为Integer?
一.问题概述 忙了一段时间的jenkins持续集成,又要开始开发任务了.这两天在用mybatis generator来逆向生成dao层工程. 其中一个问题在于,组长在设计表的时候,不少枚举使用了sma ...
- 危险的浮点数float
今天写程序又以为我见鬼了!最后查出来发现原来又是浮点数搞的鬼! 情况大致是这样的,我想要测试向量运算的速度,所以要对一个浮点数向量进行求和运算,代码如下: int vect_size=10000000 ...
- tomcat+redis会话共享
1.基础环境: jdk1. tomcat7 redis nginx 2.添加依赖的jar包到tomcat的lib目录(http://pan.baidu.com/s/1eRAwN0Q) 3.配置tomc ...
- R的any和all
> x<-1:10 > any(x>8) [1] TRUE > all(x>8) [1] FALSE
- Java与JS判断请求来是否来自移动端
Java public boolean JudgeIsMoblie(HttpServletRequest request) { boolean isMoblie = false; //String[] ...
- 寻找 IBatisNet 批量插入(批量复制) 的心路历程
1.IBatisNet本身就是一个比较早的ORM框架,再加上是从java iBatis移值过来的,其流行程度不是特别高资料也不是很多(一年前),不过最近好像搜索比较多了一些(可能是训练的结果吧) 2. ...
- 0005python中的静态方法和类方法
#!/usr/bin/env python# coding=utf-8 __metaclass__ = type class StaticMethod: @staticmethod def foo() ...
- ip相关问题解答
用路由器上网时电脑的设置: ===================== 路由器如何设置另外讨论,现只讲电脑的设置.在Windows XP下: 1.确定桌面上有没有“网上邻居”图标,如果没有,在桌面空白 ...
- MySQL在linux上的source code安装方法(configure)
1.建立操作系统用户和组 [root@faspdev ~]# groupadd mysql [root@faspdev ~]# useradd -g mysql mysql 2.解压安装文件,进入解压 ...