拖拽编写SVG图形化工具(二)
getAttributesNs/setAttributesNs
element.setAttributeNS(namespace,name,value)
namespace是指定属性的命名空间的一个字符串。name是标识要设置的属性的一个字符串。value是新属性的所需字符串值。
添加/或者查询一个新属性或更改具有给定命名空间和名称的一个属性的值。
setAttribute()是DOM 1函数。setAttributeNS()是DOM 2函数
果属性没有定义的名称空间前缀,则第一个参数必须为null。您可以使用setAttribute(),但是为了保持一致性,建议坚持使用setAttributeNS()
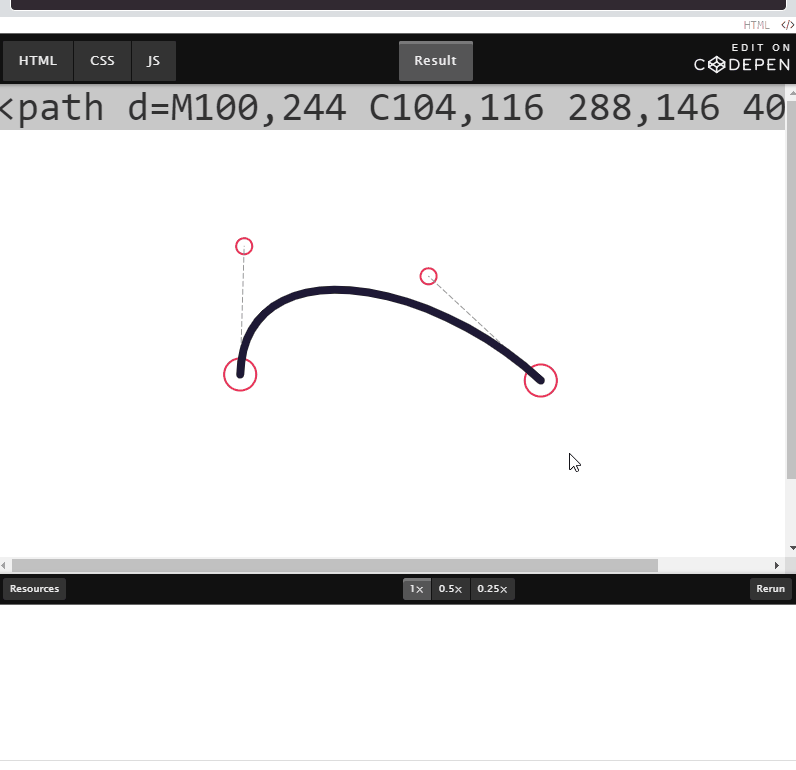
应用demo
程序思路
首先我们看看代码映射
 // 按下

  box.onmousedown = function (event) {

    console.log(1);

    // 移动

    box.onmousemove=function () {

      console.log(2);

    }

    // 抬起

    box.onmouseup=function () {

      console.log(3);

    }

  }
通过point拿到所有
circle图形的原点line拿到直线的dom和path的dom
限制坐标的范围, 由于
circle的半径有一定长度,所以减去5做一定的限制maxX = container.offsetWidth - 5
maxY = container.offsetHeight - 5,
// 鼠标范围限制
function PointM(x, y) {
return {
x: Math.max(0, Math.min(maxX, x)),
y: Math.max(0, Math.min(maxY, y))
}
}
m = PointM(e.pageX, e.pageY);
当鼠标点在path上可以通过fill 进行切换背景颜色
+circle[i].getAttributeNS(null, 'cx')
要知道我们通过
getAttributeNS拿到的是字符串所以要进行转化
['p1', 'p2', 'c1', 'c2'].includes(id)
是为了保证按在是个点上面,然后后面的id容易报错
整体的逻辑就是
鼠标按下开始的时候,记录当前的坐标,拿到点击的那个dom
后续鼠标移动的时候, 当前的坐标-开始的坐标的差值=本来应该指向的坐标
并且移动的时候要设置一定的范围,以便更新点不能离开当前的范围
鼠标离开的时候,关闭移动/松开的事件
<!doctype html>

<html lang="en">

<head>

  <meta charset="UTF-8">

  <meta name="viewport"

        content="width=device-width, user-scalable=no, initial-scale=1.0, maximum-scale=1.0, minimum-scale=1.0">

  <meta http-equiv="X-UA-Compatible" content="ie=edge">

  <title>Document</title>

  <style>

    * {

      margin: 0;

      padding: 0;

    }

    #container {

      width: 100%;

      height: 500px;

      background-color: #fff;

      margin: 0 auto;

      text-align: center;

    }

    path {

      stroke-width: 8;

      stroke: #1E1935;

      stroke-linecap: round;

      fill: none;

    }

    circle {

      stroke-width: 2;

      stroke: #ef2d56;

      fill: #fff;

    }

    circle:hover {

      fill: #ef2d56;

      cursor: move;

    }

    line {

      stroke-width: 1;

      stroke: #999;

      stroke-linecap: round;

      stroke-dasharray: 5, 3;

    }

    path {

      stroke-width: 2;

      stroke: #1E1935;

      stroke-linecap: round;

      /* fill: none; */

    }

    path.fill {

      fill: #1E1935

    }

  </style>

</head>

<body>

<div style="text-align: center">

  <pre id="code" style="font-size: 40px;font-family: Consolas;">code</pre>

</div>

<div id="container" class="C">

  <svg id="svg" viewBox="0 0 499 499" width="500" height="500"

       preserveAspectRatio="xMidYMid meet">

    <g id="main">

      <circle id="p1" cx="100" cy="250" r="16"/>

      <circle id="p2" cx="400" cy="250" r="16"/>

      <circle id="c1" cx="100" cy="100" r="8"/>

      <circle id="c2" cx="400" cy="100" r="8"/>

      <line id="l1" x1="100" y1="250" x2="100" y2="100"/>

      <line id="l2" x1="400" y1="250" x2="400" y2="100"/>

      <path id="path" d="M100,250 C100,100 400,100 400,250"/>

    </g>

  </svg>

</div>

<script>

  let svg = document.getElementById('svg'),

    container = document.getElementById('container')

  let point = {}, line = {}

    , maxX = container.offsetWidth - 5

    , maxY = container.offsetHeight - 5,

    fill = false,

    code = document.getElementById('code'),

    // 状态

    drap = null,

    dPonit;

  function init() {

    let circle = svg.getElementsByTagName('circle');

    for (let i = 0; i < circle.length; i++) {

      point[circle[i].getAttributeNS(null, 'id')] = {

        x: +circle[i].getAttributeNS(null, 'cx'),

        y: +circle[i].getAttributeNS(null, 'cy'),

      }

    }

    line.l1 = svg.getElementById('l1')

    line.l2 = svg.getElementById('l2')

    line.path = svg.getElementById('path')

    svg.onmousedown = document.onmousemove = document.onmouseup = Drag

    svg.ontouchstart = document.ontouchmove = document.ontouchend = Drag

  }

  // 鼠标范围限制

  function PointM(x, y) {

    return {

      x: Math.max(0, Math.min(maxX, x)),

      y: Math.max(0, Math.min(maxY, y))

    }

  }

  function Drag(e) {

    e.stopPropagation()

    let t = e.target, id = t.id, et = e.type, m = PointM(e.pageX, e.pageY);

    // 鼠标按在path区域

    if (!drap && id === 'path' && et === 'mousedown') {

      fill = !fill;

      t.setAttributeNS(null, 'class', (fill ? 'fill' : ''))

      DragGet();

    }

    // 鼠标按在开始

    // typeof(point[id]!==undefined) 意思就是要按在这几个点上

    if (!drap && ['p1', 'p2', 'c1', 'c2'].includes(id) && (et === 'mousedown' || et === 'touchstart')) {

      drap = t;

      dPonit = m

    }

    // 移动的时候

    if (drap && ['p1', 'p2', 'c1', 'c2'].includes(id) && (et === 'mousemove' || et === 'touchmove')) {

      console.log(id);

      // 当前的坐标-开始的坐标等于差值

      point[id].x += m.x - dPonit.x;

      point[id].y += m.y - dPonit.y;

      if (point[id].x < maxX && point[id].y < maxY) {

        id = drap.id;

        dPonit = m;

        drap.setAttributeNS(null, "cx", point[id].x);

        drap.setAttributeNS(null, "cy", point[id].y);

      }

      DragGet()

    }

    // 松开的时候

    if (drap && (et === "mouseup" || et === "touchend")) {

      drap = null;

    }

  }

  // 更新数据

  function DragGet() {

    // line1

    line.l1.setAttributeNS(null, 'x1', point.p1.x);

    line.l1.setAttributeNS(null, 'y1', point.p1.y);

    line.l1.setAttributeNS(null, 'x2', point.c1.x);

    line.l1.setAttributeNS(null, 'y2', point.c1.y);

    // line2

    line.l2.setAttributeNS(null, 'x1', point.p2.x)

    line.l2.setAttributeNS(null, 'y1', point.p2.y)

    line.l2.setAttributeNS(null, 'x2', point.c2.x)

    line.l2.setAttributeNS(null, 'y2', point.c2.y)

    let d = `M ${point.p1.x},${point.p1.y} C ${point.c1.x},${point.c1.y} ${point.c2.x},${point.c2.y} ${point.p2.x},${point.p2.y}${fill ? 'Z' : ''}`

    line.path.setAttributeNS(null, 'd', d)

    code.textContent = d;

  }

  init()

</script>

</body>

</html>
See the Pen SVG Cubic Bézier Curve Generator by 973782523
(@973782523) on CodePen.
拖拽编写SVG图形化工具(二)的更多相关文章
- 6.MySQL图形化工具的使用
6.图形化工具的使用6.1 Mysql Workbench Mysql Workbench是Mysql官方推出的集成图形化工具,替代了之前的图形化管理工具Mysql Administrator和图形化 ...
- 通过图形化工具来画shape
前两天一个哥们分享了十分好用的图形化工具,这样我们就能实时的看到自己用代码写出来的shape是怎么样的了,更牛的是它可以让我们自己去设定值,最后生成代码,这样我们为什么要去自己写shape呢?如果一个 ...
- Git的图形化工具使用教程
虽然感觉并没有什么暖用,但姑且还是写出来留作纪念好了 Git这种分布式版本控制系统最适合的就是单枪匹马搞开发的选手,不需要服务器,下载个git和图形工具,网速快十分钟就能搞定开始愉快的开发工作.我在搭 ...
- Docker图形化工具——Portainer
目标搭建docker-ui 一.Docker图形化工具 docker 图形页面管理工具常用的有三种,DockerUI ,Portainer ,Shipyard .DockerUI 是 Portaine ...
- Python音视频开发:消除抖音短视频Logo的图形化工具实现
☞ ░ 前往老猿Python博文目录 ░ 一.引言 在<Python音视频开发:消除抖音短视频Logo和去电视台标的实现详解>节介绍了怎么通过Python+Moviepy+OpenCV实现 ...
- Moviepy音视频开发:视频转gif动画或jpg图片exe图形化工具开发案例
☞ ░ 前往老猿Python博文目录 ░ 一.引言 老猿之所以学习和研究Moviepy的使用,是因为需要一个将视频转成动画的工具,当时在网上到处搜索查找免费使用工具,结果找了很多自称免费的工具,但转完 ...
- Moviepy音视频开发:开发视频转gif动画或jpg图片exe图形化工具的案例
☞ ░ 前往老猿Python博文目录 ░ 一.引言 老猿之所以学习和研究Moviepy的使用,是因为需要一个将视频转成动画的工具,当时在网上到处搜索查找免费使用工具,结果找了很多自称免费的工具,但转完 ...
- 树莓派安装docker并使用docker图形化工具portainer
配置环境 系统:Raspbian 11(64位) 设备:树莓派4B 一.安装docker 1.安装 curl -fsSL https://get.docker.com -o get-docker.sh ...
- js正则表达式图形化工具-rline
github地址:https://github.com/finance-sh/rline 在线demo: http://lihuazhai.com/demo/test.html 这是一个js正则表达式 ...
随机推荐
- 刷题[安洵杯 2019]easy_web
前置知识 md5碰撞: %4d%c9%68%ff%0e%e3%5c%20%95%72%d4%77%7b%72%15%87%d3%6f%a7%b2%1b%dc%56%b7%4a%3d%c0%78%3e% ...
- Depthwise Separable Convolution(深度可分离卷积)的实现方式
按照普通卷积-深度卷积-深度可分离卷积的思路总结. depthwise_conv2d来源于深度可分离卷积,如下论文: Xception: Deep Learning with Depthwise Se ...
- ISCC2018 writeup(web)
比较数字大小 F12 修改maxlength为4 web01 strcmp()函数遇到数组会返回NULL 而PHP是弱类型语言 在==比较的时候,如果有数值的话会先将字符串转换为数值在进行比较,而N ...
- Hadoop框架:集群模式下分布式环境搭建
本文源码:GitHub·点这里 || GitEE·点这里 一.基础环境配置 1.三台服务 准备三台Centos7服务,基础环境从伪分布式环境克隆过来. 133 hop01,134 hop02,136 ...
- spring-boot autoConfiguration
一, 第一个待注入类 public class CacheService { } public class LoggerService { } 方法一, 实现接口ImportSelectort pub ...
- 实验 4:Open vSwitch 实验——Mininet 中使用 OVS 命令
一.安装目的 Mininet 安装之后,会连带安装 Open vSwitch,可以直接通过 Python 脚本调用Open vSwitch 命令,从而直接控制 Open vSwitch,通过实验了解调 ...
- 006 01 Android 零基础入门 01 Java基础语法 01 Java初识 06 使用Eclipse开发Java程序
006 01 Android 零基础入门 01 Java基础语法 01 Java初识 06 使用Eclipse开发Java程序 Eclipse下创建程序 创建程序分为以下几个步骤: 1.首先是创建一个 ...
- 温故知新——C++--封装
参考: 1.https://blog.csdn.net/cherrydreamsover/article/details/81942293 2.https://www.cnblogs.com/ji ...
- JVM 常见线上问题 → CPU 100%、内存泄露 问题排查
开心一刻 明明是个小 bug,但就是死活修不好,我特么心态崩了...... 前言 后文会从 Windows.Linux 两个系统来做示例展示,有人会有疑问了:为什么要说 Windows 版的 ? 目前 ...
- 最全153道Spring全家桶面试题,你都碰到过哪些?(含答案解析)
前言 Spring 框架自诞生以来一直备受开发者青睐,有人亲切的称之为:Spring 全家桶. 毋庸置疑,Spring 早已成为 Java 后端开发的行业标准,无数的公司选择 Spring 作为基础的 ...