
[Phalcon-framework]2016-04-13_安装使用 Phalcon 框架
1. 获取你的 PHP Version,操作系统是 x86 还是 64bit的,以及 Compiler 是什么 VC, 你可以直接同时 phpinfo() 函数获取到,如下截图:

2. 下载对应的 Phalcon package,需要注意的就是红框中的东西, 链接: https://phalconphp.com/en/download/windows
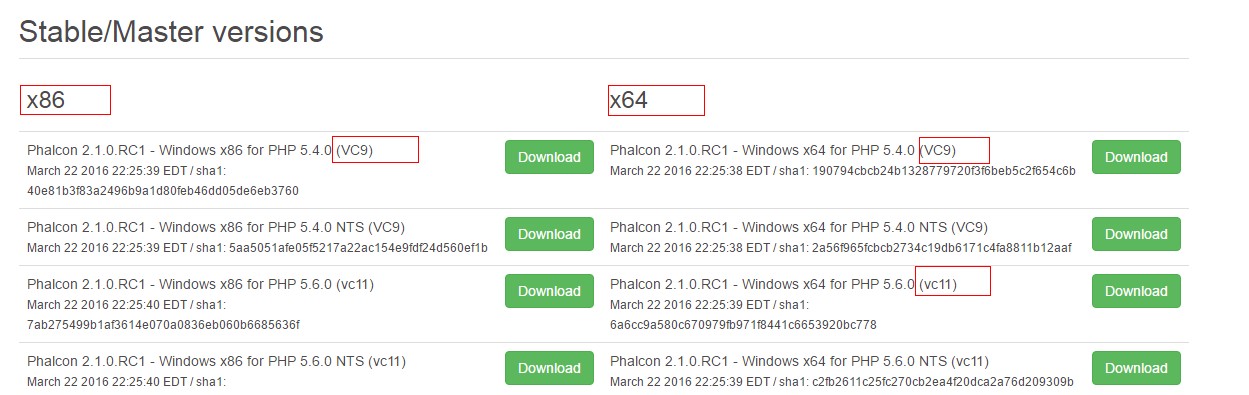
3. 请参考安装教程,链接: https://docs.phalconphp.com/en/latest/reference/wamp.html
主要是需要在两个 php.ini 文件中添加: extension=php_phalcon.dll;
一个是 php 自己的 php.ini ,另一个是 apache 目录 bin 下的 php.ini;
参考文章链接:
1. 如何在 wamp 中安装使用 Phalcon, https://docs.phalconphp.com/en/latest/reference/wamp.html
2. 简单介绍 Phalcon Framework, http://www.sitepoint.com/phalconphp-yet-another-php-framework/
Phalcon
1. a full-stack framework
2. it promotes the MVC architecture and offers features like an ORM, a Request object library, a ttemplating engine, caching,pagination...
3. Phalcon is somewhat unique because you don't just download an archive and extract it to a directory like you do with most other frameworks. Instead, you download and install Phalcon as a PHP module. Installation instructions here - https://docs.phalconphp.com/en/latest/reference/install.html
4. One major brawback for PHP is that on every request, all files are read from the hard drive, translated into bytecode, and then executed. This cause some major performance loss when compared to other languages like Ruby(Rails) or Python(Django, Flask)
5. Phalcon over 2300+ requests per second, less than 1 second time per request
6. Phalcon offers the classic features of a modern PHP MVC-framework(routing, controllers, view template, ORM, Caching, etc.), so there is nothing special whem compared to other frameworks except for its speed. Still, let's tak a look at what a typical project using Phalcon looks like.
First, there's usually a bootstrap file which will be called on every request. The requests are sent to the bootstrap via directives stored in an .htaccess file.
<IfModule mod_rewrite.c>
RewriteEngine On
RewriteCond %{REQUESR_FILENAME} !-d
RewriteCond %{REQUEST_FILENAME} !-f
RewriteRule ^(.*)$ index.php?_url=/$1 [QSA,L]
</IfModule>
7. The Phalcon documentation suggests using the following directory structure:
app/
controllers/
models/
views/
pulic/
css/
img/
js/
But the directory layout can be modified if you really want since everything will be accessed via the bootstrap file which exists as public/index.php.
<?php
try {
// register an autoloader
$loader = new PhalconLoader();
$loader->registerDirs(array(
'../app/controllers/',
'../app/models/'
))->register();
// create a dependency injection container
$di = new PhalconDIFactoryDefault();
// set up the view component
$di->set('view', function() {
$view = new PhalconMvcView();
$view->setViewDir('../app/views/');
return $view;
});
// handler the request
$application = new PhalconMvcApplication();
$application->setDI($di);
echo $application->handle()->getContent();
}
catch (PhalconException $e) {
echo "PhalconException:", $e->getMessage();
}
Model-Controller
The controllers and models are autoloaded, so you can create files and use them from any where in the project. Controllers should be extend PhalconMvcController and models extend PhalconMvcModel.
Controller actions are defined like so:
public function indexAction() {
echo "welcome to idnex";
}
Models too are pretty straight-forward:
class Users extends PhalconMvcModel
{
}
By extending the PhalconMvcModel class you immediately have access to some handy methods, like find(), save(), and validate(). And you can use relationships like:
class Users extends PhalconMvcModel
{
public function initialize() {
$this->hasMany('id', 'comments', 'comments_id');
}
}
Views
views offer basic functionality like being abot to pass data to your views and working with layouts. Phalcon views doesn't use special syntax though like Twig or Blade, though. They use pure PHP.
<html>
<head>
<title>Blog's title</title>
</head>
<body>
<?php echo $this->getContent();?>
</body>
</html>
Phalcon does however has a flash messaging system built-in:
$this->flashSession->success('Successfully logged in!');
Phalcon Query Language
Phalcon has its own ORM, Phalcon Query Language(PHQL), which can be used to make database interaction more expressive and clean. PHQL can be intergrated with models to easily define and use relationships between your tables.
You can use PHQL by extending the PhalconMvcModelQuery class and then create a new query like:
$query = new PhalconMvcModelQuery("SELECT * FROM users", $di);
$users = $query->execute();
And instead of such raw SQL, you can use the query builder like this:
$users = $this->modelsManager->createBuilder()->from("users")->orderBy("username")->getQuery()->execute();
[Phalcon-framework]2016-04-13_安装使用 Phalcon 框架的更多相关文章
- Phalcon Framework的MVC结构及启动流程分析
目前的项目中选择了Phalcon Framework作为未来一段时间的核心框架.技术选型的原因会单开一篇Blog另说,本次优先对Phalcon的MVC架构与启动流程进行分析说明,如有遗漏还望指出. P ...
- Phalcon Framework的Mvc结构及启动流程(部分源码分析)
创建项目 Phalcon环境配置安装后,可以通过命令行生成一个标准的Phalcon多模块应用 phalcon project eva --type modules入口文件为public/index.p ...
- PHP7 学习笔记(一)Ubuntu 16.04 编译安装Nginx-1.10.3、 PHP7.0.9、Redis3.0 扩展、Phalcon3.1 扩展、Swoole1.9.8 扩展、ssh2扩展(全程编译安装)
==================== PHP 7.0 编译安装================== wget http://cn2.php.net/get/php-7.0.9.tar.bz2/fr ...
- 二、Ubuntu14.04下安装Hadoop2.4.0 (伪分布模式)
在Ubuntu14.04下安装Hadoop2.4.0 (单机模式)基础上配置 一.配置core-site.xml /usr/local/hadoop/etc/hadoop/core-site.xml ...
- Ubuntu16.04下安装Hadoop
一.记录理由 刚开始只是想要学习怎么使用Hive的.想着安装应该很简单,没想到花了整整一天的时间来安装,为了避免下次犯同样的错误,特此记录. 二.安装Hadoop 网上教你怎么安装Hadoop的文章有 ...
- Ubuntn16.04.3安装Hadoop3.0+scale2.12+spark2.2
Ubuntn16.04.3安装Hadoop3.0+scale2.12+spark2.2 对比参照此博文.bovenson 前言:因为安装的Hadoop.Scale是基于JAVA的应用程序,所以必须先安 ...
- Ubuntu 12.04上安装Hadoop并运行
Ubuntu 12.04上安装Hadoop并运行 作者:凯鲁嘎吉 - 博客园 http://www.cnblogs.com/kailugaji/ 在官网上下载好四个文件 在Ubuntu的/home/w ...
- 通过Anaconda在Ubuntu16.04上安装 TensorFlow(GPU版本)
一. 安装环境 Ubuntu16.04.3 LST GPU: GeForce GTX1070 Python: 3.5 CUDA Toolkit 8.0 GA1 (Sept 2016) cuDNN v6 ...
- ubuntu16.04下安装TensorFlow(GPU加速)----详细图文教程【转】
本文转载自:https://blog.csdn.net/zhaoyu106/article/details/52793183 le/details/52793183 写在前面 一些废话 接触深度学习已 ...
随机推荐
- 单细胞测序技术(single cell sequencing)
单细胞测序技术(single cell sequencing) 2018-03-02 11:02 来源: 一呼百诺 点击次数:6587关键词: 前言 单细胞生物学最近几年是非常热门的研究方向 ...
- Scrapy-Redis分布式策略
Scrapy-Redis分布式策略 原理图: 假设有四台电脑:Windows 10.Mac OS X.Ubuntu 16.04.CentOS 7.2,任意一台电脑都可以作为 Master端 或 Sla ...
- codeforces round#510
蒟蒻和以前一样还是只能做 $4$ 题, 希望有一天可以 水到 $5$ 题!! 不过也终于上了蓝了... A. Benches Description 给出$N$个座位, 每个座位上初始有$a_i$ ...
- go语言字符串练习
package main import "fmt" import s"strings" var p = fmt.Println func main() { p( ...
- from collections import namedtuple 使用
from collections import namedtuple Point = namedtuple('Point', ['x', 'y'])#本质就是等价于 class Point(): # ...
- barcode(index)
在很多情况下,我们需要把多个样本混合在一起,在同一个通道(lane)里完成测序.像转录组测序.miRNA测序.lncRNA测序.ChIP测序等等,通常每个样本所需要的数据量都比较少,远少于HiSeq一 ...
- 常见CSS
.login_top_bg { background-image: url(/pcssc/images/login/login-top-bg.gif); background-repeat: repe ...
- SPOJ - NSUBSTR(长度为1-len的字串出现的最大次数
题意:给你一个字符串,要你输出1-len的字串出现的最大次数. /** @xigua */ #include <stdio.h> #include <cmath> #inclu ...
- dfs序理解-hdu3887
dfs序就是相当于把树转化成了一个区间,在区间上进行操作. void dfs(int u, int fa) { l[u]=++key; ; i=e[i].next) { int v=e[i].v; i ...
- linux中命令突然不能用
先用:echo $PATH 发现path丢失:/usr/local/sbin:/usr/local/bin:/sbin:/bin:/usr/sbin:/usr/bin 于是用临时环境变量 export ...