gloo基本知识
Architechture(架构)
Gloo通过Envoy XDS gRPC API来动态更新Envoy配置, 更方便的控制Envoy Proxy, 并保留扩展性..本质是一个Envoy xDS配置翻译引擎, 为Envoy提供高级配置(及定制的Envoy过滤器).它监控各种配置源的更新,并立即响应通过gRPC更新给Envoy.
Component Architechture
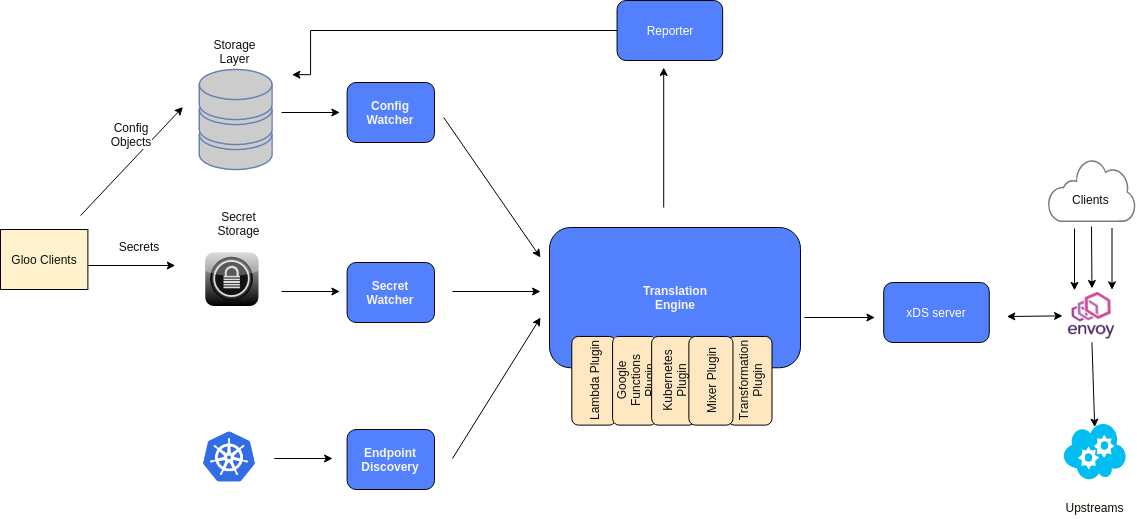
Config Watcher: 监控Upstreams和Virtual Services配置变化.
Secret Watcher: 监控敏感信息的配置变化,比如SSL配置信息.
Endpoint Discovery: 服务注册和自动发现.
如上图kubenetes的Upstream自动发现机制: 通过自己的插件把注册信息写到Endpoint Discovery中,然后Gloo监控它变化,并把这些信息通过自己翻译引擎(Translation Engine)成一个完整的xDS Server快照,传给Envoy,让他构建这个服务的路由规则及过滤器设置.
Reporter:会收集翻译引擎处理的所有Upstream及Vritual service验证报告.任何无效的配置对象都会反馈给用户.无效的对象会被标记为"Rejected",并在用户配置中给出详细的错误信息.
Discovery Architechture
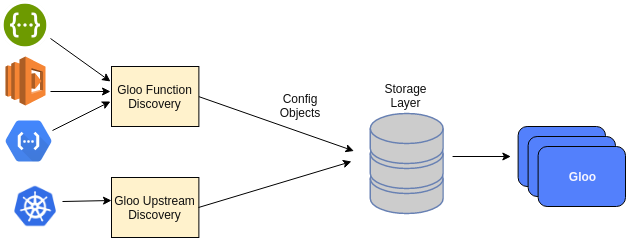
Gloo支持k8s, consul的Upstream discovery, 还要以自己开发自定义的组件.
Deployment Architecture
Gloo可以在各种基础设施上以多种方式部署, 推荐是使用kubernets,它可以简化操作.但并不一定要部署在kubernets上.

点击查看更多的部署方式.
Concepts(核心概念)
通过下面这个简单的vritual services来理解gloo的核心概念:
apiVersion: gateway.solo.io/v1

kind: VirtualService

metadata:

  name: default

  namespace: gloo-system

spec:

  virtualHost:

    domains:

    - '*'

    routes:

    - matchers:

      - prefix: /

      routeAction:

        single:

          upstream:

            name: my-upstream

            namespace: gloo-system
Virtual Services
- 将一组路由规则规范在某个或多个域(domains)下面.
- Gloo会建一个默认的virtualService是
default, 它会和*域名匹配.这会把header中没有Host(:authority)字段的请求,及那些不会找不到路由的请求都路由到这个域下面. - VirtualService都在同一个Gloo必须是唯一的,否则找不到路由.
- 绝大多数实例使用中,让所有路由都放在一个VirtualService下就足够了,Gloo也会使用同一套路由规则来处理请求.如果只有一个VirtualServics时,会忽略header中的Host或:authority头部信息.
Routes
Routes是VritualServices的核心组成.如果请求与路由上的matcher匹配了,那么它就把请求路由到对应的目的地上.路由由一系列的匹配规则(a list of matchers)及各种目的地组成.
- a single destination 一个目地的.
- a list of weighted destinations 一组有权重的目地的.
- **an upstream group ** 一组upstream.
因为多个matcher可以匹配一个请求,所以路由的先后顺序很重要.Gloo会选择第一个与请求匹配的路由.所以必须把匹配任何路径(像自定义的404页面)请求,放在路由列表的最后面.
Matchers
Matchers支持2种请求类型
- HTTP requests中的请求属性: 对HTTP 来说就是:
path, method, header, query parameters, 对应的HTTP2.0 就是header中的:path, :method属性. - HTTP events根据CloudEvents规范匹配HTTP事件属性.但CloudEvents 规范还处于 0.2 版本,将来会有更改。Event Matcher目前唯一匹配的属性是事件的事件类型(由
x-event-type请求头指定)
Destinations
- 匹配路由后,要将请求转发到Destinations,它可指向单一的目的地,也可以将路由流量分成到一系列加权的目地的上(a series of weighted destinations).
- Desinations可以是
Upstream destination也可以是Function destination. - Upstream destination类似于Evnoy集群.
- Function destination: Gloo支持将请求路由到各种Upstream中的函数中.函数可以是无服务器的函数调用(Lambda, Google Cloud Function)也可以是REST API OPENAPI, XML/SOAP请求.还可以发布到消息队列中.
Upstreams
Upstreams定义了路由规则最终去向(Destinations).一般是通过服务发现(services discovery)自动加入,最基本的Upstream类型就是静态的Upstream: 它只需要告诉Gloo一个静态主机或dns名列表.复杂的Upstream有kubernets及AWS lambda upstream.
一个简单的Upsteams例子
apiVersion: gloo.solo.io/v1

kind: Upstream

metadata:

  labels:

    discovered_by: kubernetesplugin

  name: default-redis-6379

  namespace: gloo-system

spec:

  discoveryMetadata: {}

  kube:

    selector:

      gloo: redis

    serviceName: redis

    serviceNamespace: gloo-system

    servicePort: 6379

status:

  reported_by: gloo

  state: 1 # Accepted
- name: 如何在Gloo中找到这个upstream.是一个标识符.
- spec: kubernetes插件的
serviceName,serviceNamespaces,Gloo路由时需要用到.
Functions
有些Upstream支持函数destinations, 比如: 我们可以在Upstream中添加一些HTTP函数.让Gloo根据这些函数把检验请求参数,然后将传入的请求格式化为Upstream服务所期望的参数.一个简单的示例:
apiVersion: gateway.solo.io/v1

kind: VirtualService

metadata:

  name: default

  namespace: default

spec:

  virtualHost:

    domains:

    - '*'

    routes:

    - matchers:

       - prefix: /petstore/findWithId

      routeAction:

        single:

          destinationSpec:

            rest:

              functionName: findPetById

              parameters:

                headers:

                  :path: /petstore/findWithId/{id}

          upstream:

            name: petstore

            namespace: gloo-system

      options:

        prefixRewrite: /api/pets
调用curl http://url/petstore/findWithId/100会路由到函数findPetById(id)中,其中Id的是通过parameters中的规则赋值的.
Secrets
- 某些插件(如AWS Lambda Plugin)需要使用secrets来进行身份验证,配置SSL证书和其它不应该存储在明文配置的数据.
- Gloo运行一个独立的(gorutine)控制器来保护Secrets.它有自己的storage layer.
Traffic Management
Gloo核心是一个强大的路由引擎.可以处理API到API的简单路由.也可以处理HTTP到gRPC协议转换.
Request -> Router -> Destinations(Upstream)
得益于envoy proxy灵活的扩展性,gloo中在上面每一个环节中支持的类型都非常多样.
下面以HTTP REST API为例子,演示一下基础路由功能.
Gloo Configuration
Gloo配置布局分3层: Gateway listeners, Virtual Services, Upstreams.大多数情况,我们只与VirtualServices进行交互.可以通过它配置暴露给Gateway的API细节,还可以配置具体的路由规则.

Upstream代表后端服务, Gateway控制监听端口,请求的入口.
PetStore精确匹配
部署一个完整的PetStore应用.路由规则matcher使用Path精确匹配.
- 根据官方指引安装kubernetes与gloo.
apiVersion: apps/v1

kind: Deployment

metadata:

  labels:

    app: petstore

  name: petstore

  namespace: default

spec:

  selector:

    matchLabels:

      app: petstore

  replicas: 1

  template:

    metadata:

      labels:

        app: petstore

    spec:

      containers:

      - image: soloio/petstore-example:latest

        name: petstore

        ports:

        - containerPort: 8080

          name: http

---

apiVersion: v1

kind: Service

metadata:

  name: petstore

  namespace: default

  labels:

    service: petstore

spec:

  ports:

  - port: 8080

    protocol: TCP

  selector:

    app: petstore
YAML中定义了使用soloio/petstore-example:latest镜像创建一个app,并以8080端口对集群内服务.使用kubectl执行.
$ kubect apply -f ./petstore.ymal

deployment.extensions/petstore created

service/petstore created
检查服务是否正常启动:
$ kubectl -n default get pods

NAME                        READY   STATUS    RESTARTS   AGE

petstore-6f67bbbb74-tg872   1/1     Running   0          20h

$ kubectl -n default get svc petstore

NAME       TYPE        CLUSTER-IP       EXTERNAL-IP   PORT(S)    AGE

petstore   ClusterIP   10.105.234.177   <none>        8080/TCP   20h
因为是k8s服务,所以会通过服务发现自动注册到gloo中.使用gloo查看Upsteam.
$ glooctl get upstreams
这个可以看到所有运行中的upstreams.有一些是系统,比如gloo-system-gateway-443,你也可以在里面找到
default-petstore-8080 Kubernetes | Accepted | svc name: petstore |
查看upstream的详细情况:
$ glooctl get upstream default-petstore-8080 --output yaml
默认情况下,Upstream非常简单。它代表了一个特定的kubernetes服务, 但petstore应用是一个swagger服务。Gloo可以发现这个swagger规范,但默认情况下,为了提高性能,Gloo的函数发现功能被关闭了。为了在我们的petstore上启用函数发现服务(fds),我们需要给命名空间打上function_discovery标签。
$ kubectl label namespace default discovery.solo.io/function_discovery=enabled
apiVersion: gloo.solo.io/v1

kind: Upstream

metadata:

  annotations:

    kubectl.kubernetes.io/last-applied-configuration: |

      {"apiVersion":"v1","kind":"Service","metadata":{"annotations":{},"labels":{"service":"petstore"},"name":"petstore","namespace":"default"},"spec":{"ports":[{"port":8080,"protocol":"TCP"}],"selector":{"app":"petstore"}}}

  creationTimestamp: null

  generation: 4

  labels:

    discovered_by: kubernetesplugin

    service: petstore

  name: default-petstore-8080

  namespace: gloo-system

  resourceVersion: "5488"

spec:

  discoveryMetadata: {}

  kube:

    selector:

      app: petstore

    serviceName: petstore

    serviceNamespace: default

    servicePort: 8080

    serviceSpec:

      rest:

        swaggerInfo:

          url: http://petstore.default.svc.cluster.local:8080/swagger.json

        transformations:

          addPet:

            body:

              text: '{"id": {{ default(id, "") }},"name": "{{ default(name, "")}}","tag":

                "{{ default(tag, "")}}"}'

            headers:

              :method:

                text: POST

              :path:

                text: /api/pets

              content-type:

                text: application/json

          deletePet:

            headers:

              :method:

                text: DELETE

              :path:

                text: /api/pets/{{ default(id, "") }}

              content-type:

                text: application/json

          findPetById:

            body: {}

            headers:

              :method:

                text: GET

              :path:

                text: /api/pets/{{ default(id, "") }}

              content-length:

                text: "0"

              content-type: {}

              transfer-encoding: {}

          findPets:

            body: {}

            headers:

              :method:

                text: GET

              :path:

                text: /api/pets?tags={{default(tags, "")}}&limit={{default(limit,

                  "")}}

              content-length:

                text: "0"

              content-type: {}

              transfer-encoding: {}

status:

  reported_by: gloo

  state: 1
Endpoints是由Gloo的Function Discovery(fds)服务发现的。之所以能够做到这一点,是因为petstore实现了OpenAPI(在petstore-svc/swagger.json处发现了一个Swagger JSON文档).
增加精确路由规则
glooctl add route \

  --path-exact /all-pets \

  --dest-name default-petstore-8080 \

  --prefix-rewrite /api/pets
精确匹配path
/all-pets->default-petstore-8080/api/petsglooctl get vs可查看到对应路由.这里面用了精确匹配path及transformation的prefix-rewrite.把path重写了.
测试路由中是否生效,得到所有pets列表.
$ curl $(glooctl proxy url)/all-pets

[{"id":1,"name":"Dog","status":"available"},{"id":2,"name":"Cat","status":"pending"}]
其中
glooctl proxy url这个是用于测试或查bug时,可以在集群外到达代理集群内的HTTP URL,你可以用同一个网络中的主机连接到这个地址上.简单来说这个就是gateway对外的URL.
Prefix前置匹配
新增路由/find-pet/{id} -> default-petstore-8080/api/pets/{id}, 把Id传到对应HTTP rest API中函数入参.
glooctl add route \

  --path-prefix /find-pet \

  --dest-name default-petstore-8080 \

  --prefix-rewrite /api/pets
这就是把/find-pet/{id} -> default-petstore-8080/api/pets/{id}
使用glooctl 查看virtual service的对应的配置
    - matchers:

      - prefix: /find-pet

      options:

        prefixRewrite: /api/pets

      routeAction:

        single:

          upstream:

            name: default-petstore-8080

            namespace: gloo-system
同时因为这个是提供的是OPENAPI方式,上面的destination也可以指定函数来确定(达到一样的路由效果):
glooctl add route \

  --path-prefix /pets \

  --dest-name default-petstore-8080 \

  --rest-function-name findPetById \

  --rest-parameters :path='/pets/{id}'
这就是把/pets/{id} -> default-petstore-8080中的findPetByIdrest函数中.函数的入参id通过--rest-parameters中取.
使用glooctl 查看virtual service的具体配置.
$ glooctl get vs default --output yaml

...

  - matchers:

    - prefix: /pets

    routeAction:

      single:

        destinationSpec:

          rest:

            functionName: findPetById

            parameters:

              headers:

                :path: /pets/{id}

        upstream:

          name: default-petstore-8080

          namespace: gloo-system

...
$ glooctl get upstream --name default-petstore-8080 --output yaml

---

....

  serviceSpec:

    rest:

      swaggerInfo:

        url: http://petstore.default.svc.cluster.local:8080/swagger.json

      transformations:

        addPet:

          body:

            text: '{"id": {{ default(id, "") }},"name": "{{ default(name, "")}}","tag":

              "{{ default(tag, "")}}"}'

          headers:

            :method:

              text: POST

            :path:

              text: /api/pets

            content-type:

              text: application/json

        deletePet:

          headers:

            :method:

              text: DELETE

            :path:

              text: /api/pets/{{ default(id, "") }}

            content-type:

              text: application/json

        findPetById:

          body: {}

          headers:

            :method:

              text: GET

            :path:

              text: /api/pets/{{ default(id, "") }}

            content-length:

              text: "0"

            content-type: {}

            transfer-encoding: {}

        findPets:

          body: {}

          headers:

            :method:

              text: GET

            :path:

              text: /api/pets?tags={{default(tags, "")}}&limit={{default(limit, "")}}

            content-length:

              text: "0"

            content-type: {}

            transfer-encoding: {}

....
可以看到Virtual Service中的destinationSpec 与Upstream中serviceSpec对应上了.都是findPetById(Id),所以路由才能通.
$ curl "$(glooctl proxy url)/pets/1"

{"id":1,"name":"Dog","status":"available"}
注意: paramters中的:path是精确匹配的.如果你把url最后多写一个/, 变成/pets/1/,那就会
curl "$(glooctl proxy url)/pets/1/"

[{"id":1,"name":"Dog","status":"available"},{"id":2,"name":"Cat","status":"pending"}]
这里返回了所有pets,因为多了/后rest-parameters里面的:path是/pets/{id},多了/后变得无法匹配,所以相当于没有传Id,导致请求的是findPetById(""),此函数返回的是所有pets.
regex正则匹配
由于find-pet路由没有增加对查询Id的范围限制,所以我们可以把它使用regex作限制.
glooctl add route \

  --path-regex '/find-pet-1/[1-9]' \

  --dest-name default-petstore-8080 \

  --rest-function-name findPetById \

  --rest-parameters :path='/find-pet-1/{id}'
$ curl http://localhost:80/find-pet-1/1

{"id":1,"name":"Dog","status":"available"}

$ curl http://localhost:80/find-pet-1/11

{"code":404,"message":"path /api/pets-1/11 was not found"}%
可以看到参数已经被限制在1-10之间了.
前面增加Router都是通过glooctl add route 命令行来完成的..下面我们再通过YAML配置文本来做管理.
误区: 由于PetStore是k8s中的一个services, 他可以直接通过命令
kubectl edit service -n default petstore
打开编辑器直接编辑, 但是这个打开的内容是没有Gloo附加在上面的路由信息的.路由信息存在vritual service里面,所以也不能在这里编辑.你通过 kubectl get service -n default petstore --output yaml
apiVersion: v1

kind: Service

metadata:

  annotations:

    kubectl.kubernetes.io/last-applied-configuration: |

      {"apiVersion":"v1","kind":"Service","metadata":{"annotations":{},"labels":{"service":"petstore"},"name":"petstore","namespace":"default"},"spec":{"ports":[{"port":8080,"protocol":"TCP"}],"selector":{"app":"petstore"}}}

  creationTimestamp: "2020-04-22T14:32:09Z"

  labels:

    service: petstore

  name: petstore

  namespace: default

  resourceVersion: "729"

  selfLink: /api/v1/namespaces/default/services/petstore

  uid: f55adfc3-7181-414f-809d-b29cf5e163b7

spec:

  clusterIP: 10.105.234.177

  ports:

  - port: 8080

    protocol: TCP

    targetPort: 8080

  selector:

    app: petstore

  sessionAffinity: None

  type: ClusterIP

status:

  loadBalancer: {}
可以看到在这个k8s的service中根本没有我们刚加入的gloo中的routers.
所以我们只能在gloo中的virtual service中找到routers编辑.
得到virtual service配置:glooctl get vs default --output kube-yaml
apiVersion: gateway.solo.io/v1

kind: VirtualService

metadata:

  annotations:

    kubectl.kubernetes.io/last-applied-configuration: |

      {"apiVersion":"gateway.solo.io/v1","kind":"VirtualService","metadata":{"annotations":{},"creationTimestamp":null,"generation":48,"name":"default","namespace":"gloo-system","resourceVersion":"93283"},"spec":{"virtualHost":{"domains":["*"],"routes":[{"matchers":[{"prefix":"/pets"}],"routeAction":{"single":{"destinationSpec":{"rest":{"functionName":"findPetById","parameters":{"headers":{":path":"/pets/{id}"}}}},"upstream":{"name":"default-petstore-8080","namespace":"gloo-system"}}}},{"matchers":[{"exact":"/all-pets"}],"options":{"prefixRewrite":"/api/pets"},"routeAction":{"single":{"upstream":{"name":"default-petstore-8080","namespace":"gloo-system"}}}},{"matchers":[{"regex":"/add-pet/[1-9]/[a-z]{2,10}/(pending|available)"},{"methods":["GET"]}],"routeAction":{"single":{"destinationSpec":{"rest":{"functionName":"addPet","parameters":{"headers":{":path":"/add-pet/{id}/{name}/{tag}"}}}},"upstream":{"name":"default-petstore-8080","namespace":"gloo-system"}}}}]}},"status":{"reported_by":"gateway","state":1,"subresource_statuses":{"*v1.Proxy.gloo-system.gateway-proxy":{"reported_by":"gloo","state":1}}}}

  creationTimestamp: null

  generation: 73

  name: default

  namespace: gloo-system

  resourceVersion: "99511"

spec:

  virtualHost:

    domains:

    - '*'

    routes:

    - matchers:

      - regex: /find-pet-1/[1-9]

      routeAction:

        single:

          destinationSpec:

            rest:

              functionName: findPetById

              parameters:

                headers:

                  :path: /find-pet-1/{id}

          upstream:

            name: default-petstore-8080

            namespace: gloo-system

    - matchers:

      - prefix: /pets

      routeAction:

        single:

          destinationSpec:

            rest:

              functionName: findPetById

              parameters:

                headers:

                  :path: /pets/{id}

          upstream:

            name: default-petstore-8080

            namespace: gloo-system

    - matchers:

      - prefix: /find-pet

      options:

        prefixRewrite: /api/pets

      routeAction:

        single:

          upstream:

            name: default-petstore-8080

            namespace: gloo-system

    - matchers:

      - exact: /all-pets

      options:

        prefixRewrite: /api/pets

      routeAction:

        single:

          upstream:

            name: default-petstore-8080

            namespace: gloo-system

status:

  reported_by: gateway

  state: 1

  subresource_statuses:

    '*v1.Proxy.gloo-system.gateway-proxy':

      reported_by: gloo

      state: 1
复制后保存为yaml文件,并在router结尾中增加路由规则.
- matchers:

      - regex: /add-pet/[1-9]/[a-z]{2,10}/(pending|available)

      routeAction:

        single:

          destinationSpec:

            rest:

              functionName: addPet

              parameters:

                headers:

                  :path: /add-pet/{id}/{name}/{tag}

          upstream:

            name: default-petstore-8080

            namespace: gloo-system
这个命令会直接通过编辑器打开它的YAML配置文件.我们直接加入新路由配置后保存.
这个命令把path上的参数匹配后传到了destination中的addPet的body中,完成了路由regx及body transformation.
Tips:为了做好版管理,所以用get得到的YAML格式中有一个字段resourceVersion.如果你apply同一个文件2次,第二次会出错.你必须重新get最新的YAML文件以获取新的resourceVersion.
删除route
你可以使用glooctl删除不需要的路由规则.
glooctl rm route -i
-i即----interactive模式,一步步通过提示删除路由
Matcher陈了上面说过的对Path进行匹配外,还可以对Header, Query Parameter, Method也作同样的匹配.
Header路由示例
- matchers:

         - headers:

            - name: version

              value: "v1"

            - name: os_type

            - name: type

              regex: true

              value: "[a-z]{1}"

            - name: Istest

              invertMatch: true

            - name: Istrace

              value: 0

              invertMatch: true

           prefix: /
各个条件之间是与(and)的关系.上面就是:
version=v1 and 必须有os_type字段 and type在小写的a-z之间and 没有Istest字段andIstrace必须有且不等于0
Query Parameter路由示例
- matchers:

   - queryParameters:

      - name: os

        value: ios

      - name: location

      - name: userno

        regex: true

        value: "a[a-z]{9}"

      prefix: /
os是ios and 必须有location字段 and userno 是以a开头,全小写,共10位的用户.
Method路由示例
- matchers:

   - methods:

      - GET

     prefix: /
限制HTTP Method,可以指定一个列表.
Transformations
Gloo可以在请求到达到指定的Service前把请求进行任意修改(requestTransformation),也可以在应答返回给Client之前把应答进行任意修改(responseTransformation).
Transformations属性定义在Virtual Services, 你可以在它的VritualHosts, Routes, WeightedDestionations的属性下定义Transformations, 它们的格式都是一样的.唯一的区别是作用的范围大小不一样.所有的子属性都会受到对应的transformations影响.如果你要同时在VritualHosts和Routes都定义了2个transformations,那Routers不会合并VritualHosts,两者各不影响.
transformations:

  clearRouteCache: bool

  requestTransformation: {}

  responseTransformation: {}
- clearRouterCache: 有时transformation会改变路由比如改了path后不应该再到这个路由条件下)后,如果设置为true,则在改变后会重新(根据新的path)找路由,如果是false,则还是走转换前的路由.默认为false.
- requestTransformation和responseTransformation一样的格式,处理方法也是一样的.他有两种形式
- headerBodyTransform: 把所有的header内容json的形式都写到body里面.分成headers及body字段.
- transformationTemplate: 使用转换模板.这是最灵活的.下面会详细介绍属性.
transformationTemplate
transformationTemplate:

  parseBodyBehavior: {}

  ignoreErrorOnParse: bool

  extractors:  {}

  headers: {}

  # Only one of body, passthrough, and mergeExtractorsToBody can be specified

  body: {}

  passthrough: {}

  mergeExtractorsToBody: {}

  dynamicMetadataValues: []

  advancedTemplates: bool
Templates是Transformation的核心,本质就是利用上面这几个关键字对Request/Response的所有内容进行任意转换,写出一个你想要的转换函数API.
parseBodyBehavior: 默认为**ParseAsJson, **json的方式解析body , DontParse: 以`plain text的方式处理.
ignoreErrorOnParse: 解析body为json时出错是否抛出异常, 默认为false.即抛出异常.
extractors: 可以提出header及body里面的值作为变量,相当于定义变量,然后变量赋值.
extractors:

  myFooHeader:  #这个变是变量名

    header: 'foo' # 这个就是从头里面取值,然后放到变量中,还可以写在body: {},这样就是取body的内容
- header 提取header里面为
foo的值. - 你也可以在Extractors中使用正则来提取.
- 两种方式取到这值:默认下
{{myFooHeader}}, 如果设置中advancedTemplates是true,则需要像函数一样调用它:{{ extraction(myFooHeader) }}
- header 提取header里面为
headers : 注意这里的headers不是extractors中的header, extractors是取值给变量,这里是把变量转换到请求/应答中的头中.
transformationTemplate:

  headers:

    bar:

      text: '{{ extration("myFooHeader") }}'
流程是提取的值放到
myFooHeader然后再把myFooHeader的值放到头中为bar的字段中.这种简单的转换你也不使用中间变量达到一样的效果, 直接使用
{{ header("foo") }}, 替换text内容. header("foo")函数是一个和extraction一样的内置函数,等下面会列出所有的内置函数.body: 注意这里的body不是extractors中的body, extractors是取值给变量,这里是把变量转换到请求/应答中的body中.
transformationTemplate:

  # ...

  body:

    text: '{% if header(":status") == "404" %}{ "error": "Not found!" }{% else %}{{ body() }}{% endif %}'

  # ...
前面已经说过了
header(":status")是内置函数,这里面的body()也同样是. 如果status是404,则把body内容重写.否则保持不变.passthrough: 完全不想处理body,则设置它为true,这和parseBodyBehavior里面的DontParse有区别.如果完全不想管body,则设置为true, DontParse是以
plain text处理.mergeExtractorsToBody: 他会把所有extrations得到的变量都合并到body里面.比如:
transformationTemplate:

  mergeExtractorsToBody: {}

  extractors:

  path:

    header: ':path'

    regex: '.*'

  # The name of this attribute determines where the value will be nested in the body

  host.name:

    header: 'host'

    regex: '.*'
转换后的body为:
{

  "path": "/the/request/path",

  "host": {

    "name": "value of the 'host' header"

  }

}
dynamicMetadataValues: 动态设置metadata值.因为内置的这些函数和extractor值只能在TransformationTemplate中使用,有时我们需要其它的地方使用,这时间就要需要把在template中得到值赋值到动态的metadata中, 动态的metadata是可以全局使用的.比如:
options:

      transformations:

        responseTransformation:

          transformationTemplate:

            dynamicMetadataValues:

            # 设置dynamic metadata entry 叫"pod_name"

            - key: 'pod_name'

              value:

                # The POD_NAME env is set by default on the gateway-proxy pods

                text: '{{ env("POD_NAME") }}'

            # Set a dynamic metadata entry using an request body attribute

            - key: 'endpoint_url'

              value:

                # The "url" attribute in the JSON response body

                text: '{{ url }}'
比如我们在设置全局log里需要使用到这个pod_name和endpoint_url时,就可以配置为:
apiVersion: gateway.solo.io/v1

kind: Gateway

metadata:

  labels:

    app: gloo

  name: gateway-proxy

  namespace: gloo-system

proxyNames:

- gateway-proxy

spec:

  bindAddress: '::'

  bindPort: 8080

  httpGateway: {}

  options:

    accessLoggingService:

      accessLog:

      - fileSink:

          jsonFormat:

            httpMethod: '%REQ(:METHOD)%'

            pod_name: '%DYNAMIC_METADATA(io.solo.transformation:pod_name)%'

            endpoint_url: '%DYNAMIC_METADATA(io.solo.transformation:endpoint_url)%'

          path: /dev/stdout
这样看到的log就可以是:
kubectl logs -n gloo-system deployment/gateway-proxy | grep '^{' | jq

{

  "pod_name": "\"gateway-proxy-f46b58f89-5fkmd\"",

  "httpMethod": "GET",

  "endpoint_url": "\"https://postman-echo.com/get\""

}
内置函数
除了支持https://pantor.github.io/inja/里面的模板函数,可以写循环,if,math计算.还有gloo自定义函数:
header(header_name):返回header中叫header_name的值.extraction(extraction_name):返回extraction中叫extraction_name的值.env(env_var_name): 返回环境变量值body(): 返回body.context():以json的方式返回所有的上下文(几乎是所有信息了,你打出来一看就知道了).
Update Response Code
很多Rest API的设计会把Response请求都返回200 ok, 业务出错的情况则在body里面规定一个ret返回码,和err_msg字段.比如:腾讯公开的API都是这样设计的:https://wiki.open.qq.com/wiki/v3/user/get_info
如果我们不希望把具体的业务错返回用户,则可以写一个transformations只有body里面有ret不为0,则返回400.
options:

  transformations:

    responseTransformation:

      transformationTemplate:

        headers:

          ":status":

           text: '{% if default(ret, 0) != 0 %}400{% else %}{{ header(":status") }}{% endif %}'
这里可以直接使用ret变量,是因为前面默认是以json解析body,然后inja template支持这样的语法取json body.
Extrac Query Parameters
把QueryString变成header里面的kv.
options:

  transformations:

    requestTransformation:

      transformationTemplate:

        extractors:

          foo: #extractors的名字,相当于变量名

            # The :path pseudo-header contains the URI

            header: ':path'

            # Use a nested capturing group to extract the query param

            regex: '(.*foo=([^&]*).*)'

            subgroup: 2

          bar: #extractors的名字,相当于变量名

            header: ':path'

            regex: '(.*bar=([^&]*).*)'

            subgroup: 2

        headers:

          foo:

            text: '{{ foo }}'

          bar:

            text: '{{ bar }}'
header中使用:path是因为envoy使用的是http2的协议来做transformat,所以如果你使用的是http1.1的话,就需要使用 :path. http2的path就是header中的:path字段.
curl "http:xxxxx/get?foo=foo-value&bar=bar=bar-value"

#转换后效果相当于

curl -H foo=foo-value -H bar=bar-value "http:xxxxx/get"
Update Request Path
options:

  transformations:

    requestTransformation:

      transformationTemplate:

        headers:

          # By updating the :path pseudo-header, we update the request URI

          ":path":

            text: '{% if header("foo") == "bar" %}/post{% else %}{{ header(":path") }}{% endif %}'

          ":method":

            text: '{% if header("foo") == "bar" %}POST{% else %}{{ header(":method") }}{% endif %}'
这个比较简单,都没有用到extractor.效果相当于: 如果header有字段foo=bar则无把path改成/post.并把http方法也改成POST.

gloo基本知识的更多相关文章
- [源码解析] 深度学习分布式训练框架 horovod (11) --- on spark --- GLOO 方案
[源码解析] 深度学习分布式训练框架 horovod (11) --- on spark --- GLOO 方案 目录 [源码解析] 深度学习分布式训练框架 horovod (11) --- on s ...
- 你必须知道的EF知识和经验
注意:以下内容如果没有特别申明,默认使用的EF6.0版本,code first模式. 推荐MiniProfiler插件 工欲善其事,必先利其器. 我们使用EF和在很大程度提高了开发速度,不过随之带来的 ...
- MySQL高级知识- MySQL的架构介绍
[TOC] 1.MySQL 简介 概述 MySQL是一个关系型数据库管理系统,由瑞典MySQL AB公司开发,目前属于Oracle公司. MySQL是一种关联数据库管理系统,将数据保存在不同的表中,而 ...
- 学点HTTP知识
不学无术 又一次感觉到不学无术,被人一问Http知识尽然一点也没答上来,丢人丢到家了啊.平时也看许多的技术文章,为什么到了关键时刻就答不上来呢? 确实发现一个问题,光看是没有用的,需要实践.看别人说的 ...
- java中的字符串相关知识整理
字符串为什么这么重要 写了多年java的开发应该对String不陌生,但是我却越发觉得它陌生.每学一门编程语言就会与字符串这个关键词打不少交道.看来它真的很重要. 字符串就是一系列的字符组合的串,如果 ...
- [C#] C# 知识回顾 - 你真的懂异常(Exception)吗?
你真的懂异常(Exception)吗? 目录 异常介绍 异常的特点 怎样使用异常 处理异常的 try-catch-finally 捕获异常的 Catch 块 释放资源的 Finally 块 一.异常介 ...
- [C#] C# 知识回顾 - 学会处理异常
学会处理异常 你可以使用 try 块来对你觉得可能会出现异常的代码进行分区. 其中,与之关联的 catch 块可用于处理任何异常情况. 一个包含代码的 finally 块,无论 try 块中是否在运行 ...
- [C#] C# 知识回顾 - 学会使用异常
学会使用异常 在 C# 中,程序中在运行时出现的错误,会不断在程序中进行传播,这种机制称为“异常”. 异常通常由错误的代码引发,并由能够更正错误的代码进行 catch. 异常可由 .NET 的 CLR ...
- [C#] C# 知识回顾 - 异常介绍
异常介绍 我们平时在写程序时,无意中(或技术不够),而导致程序运行时出现意外(或异常),对于这个问题, C# 有专门的异常处理程序. 异常处理所涉及到的关键字有 try.catch 和 finally ...
随机推荐
- 《 OO第一作业周期(前四周)总结 》
作为一名软件工程的大学生,很高兴能够以这样一种方式,实现对博客编写零的突破.专业课老师也介绍了编写博客给我们带来的帮助,听了以后,我感觉到了培养出写博客的习惯,是一件多么有意义的事! 话不多说,让我们 ...
- 数据库SQL实战(一)
一. 1. 查找最晚入职员工的所有信息CREATE TABLE `employees` (`emp_no` int(11) NOT NULL,`birth_date` date NOT NULL,`f ...
- cut-trailing-bytes:二进制尾部去0小工具
背景 之前的文章 二进制文件处理之尾部补0和尾部去0 中介绍了一种使用 sed 去除二进制文件尾部的 NULL(十六进制0x00)字节的方法. 最近发现这种方法有局限性,无法处理较大的文件.因为 se ...
- 微服务架构盛行的时代,你需要了解点 Spring Boot
随着互联网的高速发展,庞大的用户群体和快速的需求变化已经成为了传统架构的痛点. 在这种情况下,如何从系统架构的角度出发,构建出灵活.易扩展的系统来快速响应需求的变化,同时,随着用户量的增加,如何保证系 ...
- 1005 Spell It Right (20 分)
Given a non-negative integer N, your task is to compute the sum of all the digits of N, and output e ...
- window部署ftp服务器
...
- PyJWT 详解
1.首先,我们需要先了解 JWT 的概念,所以我们先看pyjwt的官网 https://jwt.io/ 2.对于官方 JWT 有两篇博文写的不错分别如下: https://blog.csdn.net/ ...
- Array(数组)对象-->sort() 方法
1.定义和用法 sort() 方法用于对数组的元素进行排序. 默认排序顺序为按字母升序. 语法: array.sort(sortfunction) 参数: sortfunction:规定排序顺序.必须 ...
- Js异步机制的实现
Js异步机制 JavaScript是一门单线程语言,所谓单线程,就是指一次只能完成一件任务,如果有多个任务,就必须排队,前面一个任务完成,再执行后面一个任务,以此类推.这种模式的好处是实现起来比较简单 ...
- HBase Shell 十大花式玩儿法
前言:工欲善其事必先利其器,今天给大家介绍一下HBase Shell十大花式利器,在日常运维工作中,可以试着用起来. 1. 交互模式 也就是我们最常用到的Shell命令行的方式. $ hbase sh ...