Java进阶知识07 Hibernate一对一双向外键关联(Annotation+XML实现)
1、Annotation 注解版
1.1、创建Husband类和Wife类
 package com.shore.model;

 import javax.persistence.Entity;

 import javax.persistence.GeneratedValue;

 import javax.persistence.GenerationType;

 import javax.persistence.Id;

 import javax.persistence.OneToOne;

 import org.hibernate.annotations.Type;

 /**

  * @author DSHORE/2019-9-18

  * 一对一,双向关联(注解版)

  */

 @Entity

 public class Husband {//主表 类

     private Integer id;

     private String name;

     private Boolean sex;

     private Wife wife;

     @Id

     @GeneratedValue(strategy = GenerationType.AUTO) //主键生成策略(使用test()测试时,必须加上这个,否会报错:id生成错误)

     public Integer getId() {

         return id;

     }

     public void setId(Integer id) {

         this.id = id;

     }

     public String getName() {

         return name;

     }

     public void setName(String name) {

         this.name = name;

     }

     @Type(type = "yes_no") //数据库中,会以Y/N的形式插入到sex字段中

     public Boolean getSex() {

         return sex;

     }

     public void setSex(Boolean sex) {

         this.sex = sex;

     }

     @OneToOne(mappedBy="husband")//映射:从表wife映射主表husband。如果不要(mappedBy="husband"),主表husband将会多一个没必要的字段wife_id(外键)

     public Wife getWife() {

         return wife;

     }

     public void setWife(Wife wife) {

         this.wife = wife;

     }

 }
Wife类
 package com.shore.model;

 import javax.persistence.Entity;

 import javax.persistence.GeneratedValue;

 import javax.persistence.GenerationType;

 import javax.persistence.Id;

 import javax.persistence.JoinColumn;

 import javax.persistence.OneToOne;

 import org.hibernate.annotations.Type;

 /**

  * @author DSHORE/2019-9-18

  * 一对一,双向关联(注解版)

  */

 @Entity

 public class Wife {//从表

     private Integer id;

     private String name;

     private Boolean sex;

     private Husband husband;

     @Id

     @GeneratedValue(strategy = GenerationType.AUTO) //主键生成策略(使用test1测试时,必须加上这个,否会报错:id生成错误)

     public Integer getId() {

         return id;

     }

     public void setId(Integer id) {

         this.id = id;

     }

     public String getName() {

         return name;

     }

     public void setName(String name) {

         this.name = name;

     }

     @Type(type = "yes_no") //数据库中,会以Y/N的形式插入到sex字段中

     public Boolean getSex() {

         return sex;

     }

     public void setSex(Boolean sex) {

         this.sex = sex;

     }

     @OneToOne  //默认创建的外键名称:husband_id

     @JoinColumn(name="husbandId") //创建表时,指定该外键名:husbandId

     public Husband getHusband() {

         return husband;

     }

     public void setHusband(Husband husband) {

         this.husband = husband;

     }

 }
1.2、创建hibernate.cfg.xml核心配置文件
 <?xml version='1.0' encoding='utf-8'?>

 <!DOCTYPE hibernate-configuration PUBLIC

         "-//Hibernate/Hibernate Configuration DTD 3.0//EN"

         "http://www.hibernate.org/dtd/hibernate-configuration-3.0.dtd">

 <hibernate-configuration>

     <session-factory>

         <!-- Database connection settings -->

         <property name="connection.driver_class">com.mysql.jdbc.Driver</property>

         <property name="connection.url">jdbc:mysql://localhost:3306/hibernate</property>

         <property name="connection.username">root</property>

         <property name="connection.password">123456</property>

         <property name="dialect">org.hibernate.dialect.MySQLDialect</property>

         <property name="cache.provider_class">org.hibernate.cache.NoCacheProvider</property>

         <property name="show_sql">true</property>

         <property name="hbm2ddl.auto">create</property>

         <mapping class="com.shore.model.Husband" />

         <mapping class="com.shore.model.Wife" />

     </session-factory>

 </hibernate-configuration>
1.3、开始测试
 package com.shore.test;

 import org.hibernate.Session;

 import org.hibernate.SessionFactory;

 import org.hibernate.Transaction;

 import org.hibernate.cfg.AnnotationConfiguration;

 import org.junit.AfterClass;

 import org.junit.BeforeClass;

 import org.junit.Test;

 import com.shore.model.Husband;

 import com.shore.model.Wife;

 /**

  * @author DSHORE/2019-9-18

  *

  */

 public class AnnotationTest {

     public static SessionFactory sessionFactory = null;

     public static Session session = null;

     @BeforeClass

     public static void buildSessionFactory() {

         sessionFactory = new AnnotationConfiguration().configure().buildSessionFactory();

     }

     @AfterClass

     public static void close() {

         session.close();

         sessionFactory.close();

     }

     @Test

     public void test(){//数据库表创建完后,插入数据

         session = sessionFactory.openSession(); //打开一个session

         Transaction transaction = session.beginTransaction(); //开启一个事务

         Husband husband = new Husband();

         husband.setName("黄晓明");

         husband.setSex(true);//男

         session.save(husband);

         Wife wife = new Wife();

         wife.setName("AnglaBaby");

         wife.setSex(false);//女

         wife.setHusband(husband);

         session.save(wife);

         transaction.commit(); //事务提交

     }

 }
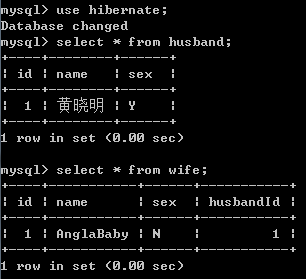
测试结果图:

2、XML实现 版
2.1、创建husband类和wife类
 package com.shore.model;

 /**

  * @author DSHORE/2019-9-18

  * 一对一,双向关联(xml版)

  */

 public class Husband {//主表 类

     private Integer id;

     private String name;

     private Boolean sex;

     private Wife wife;

     public Integer getId() {

         return id;

     }

     public void setId(Integer id) {

         this.id = id;

     }

     public String getName() {

         return name;

     }

     public void setName(String name) {

         this.name = name;

     }

     public Boolean getSex() {

         return sex;

     }

     public void setSex(Boolean sex) {

         this.sex = sex;

     }

     public Wife getWife() {

         return wife;

     }

     public void setWife(Wife wife) {

         this.wife = wife;

     }

 }
wife类
 package com.shore.model;

 /**

  * @author DSHORE/2019-9-18

  * 一对一,双向关联(xml版)

  */

 public class Wife {//从表 类

     private Integer id;

     private String name;

     private Boolean sex;

     private Husband husband;

     public Integer getId() {

         return id;

     }

     public void setId(Integer id) {

         this.id = id;

     }

     public String getName() {

         return name;

     }

     public void setName(String name) {

         this.name = name;

     }

     public Boolean getSex() {

         return sex;

     }

     public void setSex(Boolean sex) {

         this.sex = sex;

     }

     public Husband getHusband() {

         return husband;

     }

     public void setHusband(Husband husband) {

         this.husband = husband;

     }

 }
2.2、创建 Husband.hbm.xml 配置文件和 Wife.hbm.xml 配置文件
 <?xml version="1.0"?>

 <!DOCTYPE hibernate-mapping PUBLIC

         "-//Hibernate/Hibernate Mapping DTD 3.0//EN"

         "http://www.hibernate.org/dtd/hibernate-mapping-3.0.dtd">

 <hibernate-mapping package="com.shore.model">

     <class name="Husband" table="husband_xml">

         <id name="id">

             <generator class="native"/>

         </id>

         <property name="name" type="java.lang.String"/>

         <property name="sex" type="yes_no"/>

        <!-- 这里不能这么配置,否则主表husband里面会多一个没必要的外键wife_id

         <many-to-one name="wife" column="wife_id" unique="true"/> -->

         <!-- 应该这样配置 -->

         <one-to-one name="wife" property-ref="husband"/>

     </class>

 </hibernate-mapping>
Wife.hbm.xml 配置文件
 <?xml version="1.0"?>

 <!DOCTYPE hibernate-mapping PUBLIC

         "-//Hibernate/Hibernate Mapping DTD 3.0//EN"

         "http://www.hibernate.org/dtd/hibernate-mapping-3.0.dtd">

 <hibernate-mapping package="com.shore.model">

     <class name="Wife" table="wife_xml">

         <id name="id">

             <generator class="native"/>

         </id>

         <property name="name" type="java.lang.String"/>

         <property name="sex" type="yes_no" />

         <!-- many-to-one:多对一,但加了个unique="true",就变成了一对一 -->

         <many-to-one name="husband" column="husband_id" unique="true"/>

     </class>

 </hibernate-mapping>
2.3、创建hibernate.cfg.xml 核心配置文件
 <?xml version='1.0' encoding='utf-8'?>

 <!DOCTYPE hibernate-configuration PUBLIC

         "-//Hibernate/Hibernate Configuration DTD 3.0//EN"

         "http://www.hibernate.org/dtd/hibernate-configuration-3.0.dtd">

 <hibernate-configuration>

     <session-factory>

         <!-- Database connection settings -->

         <property name="connection.driver_class">com.mysql.jdbc.Driver</property>

         <property name="connection.url">jdbc:mysql://localhost:3306/hibernate</property>

         <property name="connection.username">root</property>

         <property name="connection.password">123456</property>

         <property name="dialect">org.hibernate.dialect.MySQLDialect</property>

         <property name="cache.provider_class">org.hibernate.cache.NoCacheProvider</property>

         <property name="show_sql">true</property>

         <property name="hbm2ddl.auto">create</property>

         <!-- <mapping class="com.shore.model.Husband" />

         <mapping class="com.shore.model.Wife" /> -->

         <mapping resource="com/shore/model/Husband.hbm.xml" />

         <mapping resource="com/shore/model/Wife.hbm.xml" />

     </session-factory>

 </hibernate-configuration>
2.4、开始测试
 package com.shore.test;

 import org.hibernate.Session;

 import org.hibernate.SessionFactory;

 import org.hibernate.Transaction;

 import org.hibernate.cfg.Configuration;

 import org.junit.AfterClass;

 import org.junit.BeforeClass;

 import org.junit.Test;

 import com.shore.model.Husband;

 import com.shore.model.Wife;

 /**

  * @author DSHORE/2019-9-19

  *

  */

 public class XMLTest {

     public static SessionFactory sessionFactory = null;

     public static Session session = null;

     @BeforeClass

     public static void buildSessionFactory() {

                 //用注解版的话,Configuration()方法,得改用AnnotationConfiguration()方法

         sessionFactory = new Configuration().configure().buildSessionFactory();

     }

     @AfterClass

     public static void close() {

         session.close();

         sessionFactory.close();

     }

     @Test

     public void test(){//数据库表创建完后,插入数据

         session = sessionFactory.openSession();

         Transaction transaction = session.beginTransaction();

         Husband husband = new Husband();

         husband.setName("黄晓明");

         husband.setSex(true);//男

         session.save(husband);

         Wife wife = new Wife();

         wife.setName("AnglaBaby");

         wife.setSex(false);//女

         wife.setHusband(husband);

         session.save(wife);

         transaction.commit();//事务提交

     }

 }
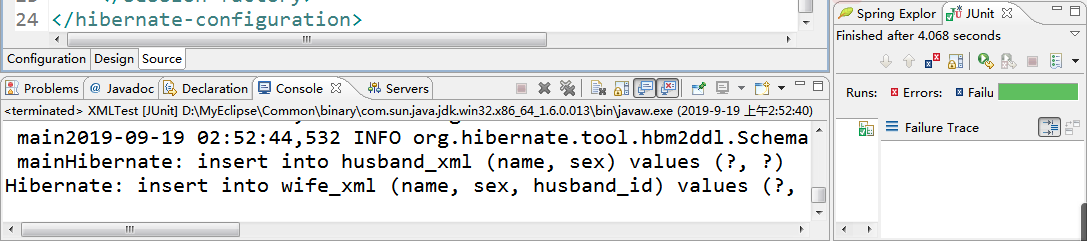
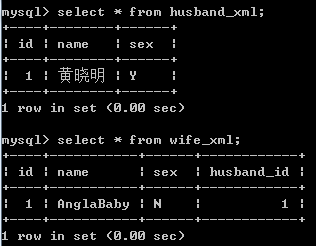
测试结果图:
Hibernate一对一单向关联映射(Annotation+XML实现):https://www.cnblogs.com/dshore123/p/11545058.html
Hibernate一对一双向关联映射(Annotation+XML实现):https://www.cnblogs.com/dshore123/p/11545077.html
Hibernate多对一单向关联映射(Annotation+XML实现):https://www.cnblogs.com/dshore123/p/11553213.html
Hibernate一对多单向关联映射(Annotation+XML实现):https://www.cnblogs.com/dshore123/p/11553215.html
Hibernate一对多和多对一双向关联映射(Annotation+XML实现):https://www.cnblogs.com/dshore123/p/11560433.html
Hibernate多对多单向关联映射(Annotation+XML实现):https://www.cnblogs.com/dshore123/p/11568536.html
Hibernate多对多双向关联映射(Annotation+XML实现):https://www.cnblogs.com/dshore123/p/11568963.html
|
原创作者:DSHORE 作者主页:http://www.cnblogs.com/dshore123/ 原文出自:https://www.cnblogs.com/dshore123/p/11545077.html 版权声明:欢迎转载,转载务必说明出处。(如果本文对您有帮助,可以点击一下右下角的 推荐,或评论,谢谢!) |
Java进阶知识07 Hibernate一对一双向外键关联(Annotation+XML实现)的更多相关文章
- Java进阶知识06 Hibernate一对一单向外键关联(Annotation+XML实现)
1.Annotation 注解版 1.1.创建Husband类和Wife类 package com.shore.model; import javax.persistence.Entity; impo ...
- hibernate一对一双向外键关联
一对一双向外键关联:双方都持有对方的外键关联关系. 主控方和一对一单向外键关联的情况是一样的,主要的差异表现为,被空方需要添加: @OneToOne(mappedBy="card" ...
- HIBERNATE一对一双向外键联合主键关联
HIBERNATE一对一双向外键联合主键关联: 一. 创建主键类:这个主键必须实现serializedable接口和重写其中的hashCode方法和equals方法:为主键类添加一个叫做@Embedd ...
- 04-hibernate注解-一对一双向外键关联
一对一双向外键 1,主控方的配置同一对一单向外键关联. 2,@OneToOne(mappedBy="card") //被控方 @OneToOne(mappedBy="ca ...
- Hibernate一对一单向外键关联
一.一对一单向外键关联: 一对一单向外键关联主要用到了以下两个注解: 1.OneToOne(cascade=CasecadeTYPE.ALL); cascade=CasecadeTYPE.ALL:表示 ...
- Hibernate 再接触 关系映射 一对一双向外键关联
凡是双向关联必设mapped by 由对方主导 wifi.java package com.bjsxt.hibernate; import javax.persistence.Entity; imp ...
- Hibernate关系映射 一对一双向外键关联@OneToOne Annotation方式 双向关联和单向关联的区别
首先还是来构造一个实际应用的场景,比如实体类车辆(Car),它具有以下属性:Id,品牌(brand),车牌(lisencePlate):实体类车牌(LisencePlate),它具有以下属性:Id,号 ...
- Hibernate关系映射 一对一双向外键关联@OneToOne Annotation方式
首先还是来构造一个实际应用的场景,比如实体类车辆(Car),它具有以下属性:Id,品牌(brand),车牌(lisencePlate):实体类车牌(LisencePlate),它具有以下属性:Id,号 ...
- 012一对一 唯一外键关联映射_双向(one-to-one)
² 两个对象之间是一对一的关系,如Person-IdCard(人—身份证号) ² 有两种策略可以实现一对一的关联映射 主键关联:即让两个对象具有相同的主键值,以表明它们之间的一一对应的关系:数据库 ...
随机推荐
- Sentinal LDK 加密狗的使用
公司的软件用了第三方的加密key,在代码里只是用了其中的一个功能:GetKeyInfo()判断电脑是否有插入u盾.现做简单的说明如下: 第一步.插入master key 到电脑,下载正式的hvc 授权 ...
- 一键部署etcd集群
这里使用三个节点,系统版本为CentOS7 # vim deploy-etcd.sh #!/bin/bash set -x set -e #更改这里的IP, 只支持部署3个节点etcd集群 decla ...
- Extjs中,Vo对象中的属性无法在data中获取的解决方法
store.getById(data.data.id).raw.redpackid
- tensorflow-解决3个问题
问题一:对特征归一化 Min-Max Scaling: X′=a+(X−Xmin)(b−a)/(Xmax−Xmin) # Problem 1 - Implement Min-Max scaling f ...
- dubbo和zookeeper结合使用
1.相关依赖引入 阿里的dubbo包含了spring相关内容,引入依赖时,需要排除,使用我们自己项目中的spring依赖 <!-- start..............dubbo....... ...
- 【TCP】拥塞控制
TCP拥塞控制 出现拥塞 ∑对资源的需求 > ∑可用资源 拥塞控制是防止过多的数据注入到网络中,使网络中的路由器或链路不过载,这是一个全局性的. 流量控制是点对点的通信量的控 ...
- three.js之元素周期表
<html><head> <title>three.js css3d - periodic table</title> <meta charset ...
- java开发技巧
1,IDEA辅助功能Shift +F2去到有错误的地方Alt+Enter,会给出解决错误的建议: 2,调试,没问题的步骤,直接跳过,不要跳入细节: 调试时,要明确要跟踪的变量,不要陷入混乱: 3,调试 ...
- Python Module模块
模块 https://docs.python.org/zh-cn/3/tutorial/modules.html 模块的概念被高级语言广泛使用. Python的定义 一个包括Python定义和语句的文 ...
- mybatis整合Spring编码
mybatis整合Spring的核心代码 spring-dao.xml <?xml version="1.0" encoding="UTF-8"?> ...