Xmemcached集群与SpringBoot整合
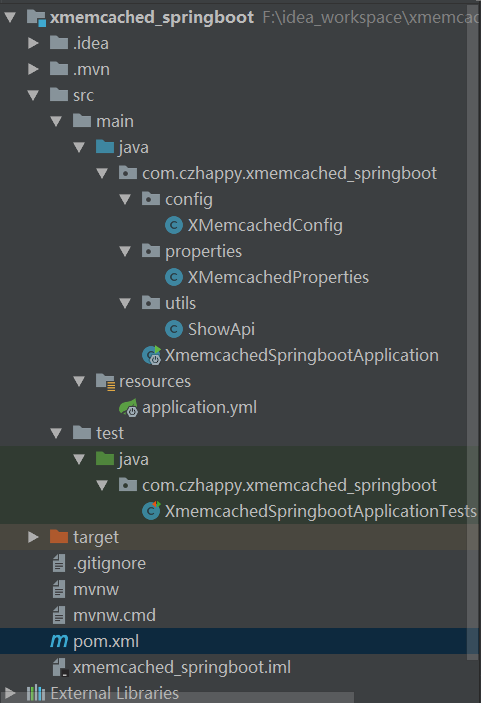
创建SpringBoot项目xmemcached_springboot,添加开发需要的包名和类名,项目的目录结构如下:
添加XMemcached依赖:
<dependency>

            <groupId>com.googlecode.xmemcached</groupId>

            <artifactId>xmemcached</artifactId>

            <version>2.4.0</version>

        </dependency>
添加XMemcached相关配置到属性文件application.yml
###################  memcached配置  ###################

memcached:

  servers: 192.168.84.128:2222 192.168.84.128:6666

  poolSize: 10

  sanitizeKeys: false

  openCache: true # true为启动缓存 false为标准实现
编写读取上述属性的读取类:XMemcachedProperties.java
package com.czhappy.xmemcached_springboot.properties;

import org.springframework.boot.context.properties.ConfigurationProperties;

import org.springframework.stereotype.Component;

@Component

@ConfigurationProperties(prefix = "memcached")

public class XMemcachedProperties {

    private String servers;

    private int poolSize;

    private boolean sanitizeKeys;

    private boolean openCache;

    public boolean isOpenCache() {

        return openCache;

    }

    public void setOpenCache(boolean openCache) {

        this.openCache = openCache;

    }

    public String getServers() {

        return servers;

    }

    public void setServers(String servers) {

        this.servers = servers;

    }

    public int getPoolSize() {

        return poolSize;

    }

    public void setPoolSize(int poolSize) {

        this.poolSize = poolSize;

    }

    public boolean isSanitizeKeys() {

        return sanitizeKeys;

    }

    public void setSanitizeKeys(boolean sanitizeKeys) {

        this.sanitizeKeys = sanitizeKeys;

    }

}
编写XMemcachedConfig.java,构建builder和client
package com.czhappy.xmemcached_springboot.config;

import com.czhappy.xmemcached_springboot.properties.XMemcachedProperties;

import net.rubyeye.xmemcached.MemcachedClient;

import net.rubyeye.xmemcached.MemcachedClientBuilder;

import net.rubyeye.xmemcached.XMemcachedClientBuilder;

import net.rubyeye.xmemcached.command.BinaryCommandFactory;

import net.rubyeye.xmemcached.impl.KetamaMemcachedSessionLocator;

import org.springframework.beans.factory.annotation.Autowired;

import org.springframework.context.annotation.Bean;

import org.springframework.context.annotation.Configuration;

@Configuration

public class XMemcachedConfig {

    @Autowired

    private XMemcachedProperties xMemcachedProperties;

    // 构建builder

    @Bean

    public MemcachedClientBuilder getXMBuilder(){

        MemcachedClientBuilder memcachedClientBuilder = null;

        try{

            String servers = xMemcachedProperties.getServers();

            System.out.println("servers="+servers);

            memcachedClientBuilder = new XMemcachedClientBuilder(servers);

            // 开启/关闭failure模式

            memcachedClientBuilder.setFailureMode(false);

            memcachedClientBuilder.setSanitizeKeys(xMemcachedProperties.isSanitizeKeys());

            memcachedClientBuilder.setConnectionPoolSize(xMemcachedProperties.getPoolSize());

            memcachedClientBuilder.setCommandFactory(new BinaryCommandFactory());

            memcachedClientBuilder.setOpTimeout(3000);

            memcachedClientBuilder.setSessionLocator(new KetamaMemcachedSessionLocator());

            // 诸多XMemcached配置

            return memcachedClientBuilder;

        }catch(Exception e){

            e.printStackTrace();

        }

        return null;

    }

    // client

    @Bean

    public MemcachedClient getXMClient(MemcachedClientBuilder memcachedClientBuilder){

        MemcachedClient memcachedClient = null;

        try{

            memcachedClient = memcachedClientBuilder.build();

            return memcachedClient;

        }catch(Exception e){

            e.printStackTrace();

        }

        return null;

    }

}
编写ShowApi.java文件,此处仅实现新增和查询方法,其他方法可参考添加
package com.czhappy.xmemcached_springboot.utils;

import net.rubyeye.xmemcached.MemcachedClient;

import org.springframework.beans.factory.annotation.Autowired;

import org.springframework.stereotype.Service;

@Service

public class ShowApi {

    @Autowired

    private MemcachedClient memcachedClient;

    /**

     * 新增

     * @param key

     * @param value

     */

    public void showAdd(String key, String value){

        try {

            memcachedClient.set(key, 0, value);

        }catch (Exception e){

            e.printStackTrace();

        }

    }

    public String showQuery(String key){

        try {

            return memcachedClient.get(key);

        }catch (Exception e){

            e.printStackTrace();

        }

        return "";

    }

}
编写测试类,添加数据并打印查询的结果:
package com.czhappy.xmemcached_springboot;

import com.czhappy.xmemcached_springboot.utils.ShowApi;

import org.junit.Test;

import org.junit.runner.RunWith;

import org.springframework.beans.factory.annotation.Autowired;

import org.springframework.boot.test.context.SpringBootTest;

import org.springframework.test.context.junit4.SpringRunner;

@RunWith(SpringRunner.class)

@SpringBootTest

public class XmemcachedSpringbootApplicationTests {

    @Autowired

    private ShowApi showApi;

    @Test

    public void contextLoads() {

        String key = "goods_name";

        String value = "apple";

        showApi.showAdd(key, value);

        System.out.println(showApi.showQuery(key));

    }

}
为了测试memcached集群和数据存储,我们分别启动端口为2222和6666的memcached服务端


运行测试类,可以看到后台打印出存储的结果

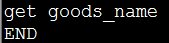
说明数据保存成功,我们也可以去服务端直接查询
2222端口:
6666端口:
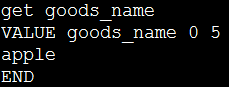
数据具体存储在哪个memcached上我们是无法预知的,它是由客户端XMemcached内部hash算法判断实现,此处我们可以知道数据是存储成功了,通过查询最终结果能知道存在端口为6666的服务端上。
Xmemcached集群与SpringBoot整合的更多相关文章
- springboot和Redis集群版的整合
此篇接上一个文章springboot和Redis单机版的整合 https://www.cnblogs.com/lin530/p/12019023.html 下面接着介绍和Redis集群版的整合. 1. ...
- RabbitMQ 3.9.7 镜像模式集群与Springboot 2.5.5 整合
1. 概述 老话说的好:做人要懂得变通,善于思考,有时稍微转个弯,也许问题就解决了. 言归正传,之前我们聊了 RabbitMQ 3.9.7 镜像模式集群的搭建,今天我们来聊聊 RabbitMQ 3.9 ...
- docker搭建redis主从集群和sentinel哨兵集群,springboot客户端连接
花了两天搭建redis主从集群和sentinel哨兵集群,讲一下springboot客户端连接测试情况 redis主从集群 从网上查看说是有两种方式:一种是指定配置文件,一种是不指定配置文件 引用地址 ...
- springboot+shiro+redis(集群redis版)整合教程
相关教程: 1. springboot+shiro整合教程 2. springboot+shiro+redis(单机redis版)整合教程 3.springboot+shiro+redis(单机red ...
- 如何在Windows上部署Redis集群和SpringBoot进行整合
一.安装Redis的Windows版本并进行配置 (1)下载链接 https://github.com/microsoftarchive/redis/releases (2)将下载后的Redis复制成 ...
- RocketMQ 4.7.1 环境搭建、集群、MQ整合SpringBoot
导读 之前学过ActiveMQ但是并发量不是很大点我直达,所以又学阿里开源的RocketMQ,据说队列可以堆积亿级别.下面是网上找的消息队列对比图,仅供参考 部署 官网 点我直达 前置条件 推荐使用6 ...
- Elasticsearch 分片集群原理、搭建、与SpringBoot整合
单机es可以用,没毛病,但是有一点我们需要去注意,就是高可用是需要关注的,一般我们可以把es搭建成集群,2台以上就能成为es集群了.集群不仅可以实现高可用,也能实现海量数据存储的横向扩展. 新的阅读体 ...
- 04.redis集群+SSM整合使用
redis集群+SSM整合使用 首先是创建redis-cluster文件夹: 因为redis最少需要6个节点(三主三从),为了更好的理解,我这里创建了两台虚拟机(192.168.0.109 192.1 ...
- jedis集群版应用
1.pom文件添加依赖: 2.创建配置文件 <!-- jedis集群版配置(JedisCluster通过构造传参(2个参数)) --> <bean id="redisCli ...
随机推荐
- 001_软件安装之《MATLAB2016安装》
测试电脑:win7 64位操作系统 下载地址: 链接:https://pan.baidu.com/s/1xkyhF6pdkx_kZiNjFireZw 密码:mvpp 链接:https://pa ...
- Laradock Laravel database connection refused
Laradock Laravel database connection refused SHARE Laradock is a PHP development environment which ...
- web+页面支持批量下载吗
一.此方法火狐有些版本是不支持的 window.location.href = 'https://*****.oss-cn-**.aliyuncs.com/*********';二.为了解决火狐有些版 ...
- js判断当前时区【TimeZone】是否是夏令时
var d1 = new Date(2009, 0, 1); var d2 = new Date(2009, 6, 1); if (d1.getTimezoneOffset() != d2.getTi ...
- bzoj 5206
$n$ 点 $m$ 边图的有限制三元环个数 首先将所有左右端点并且属性相同的边的权值相加,合并为一条边 在这只之前得先排序排序之前得先判断是否需要交换左右端点的位置 T_T 然后统计三元环 补充说明按 ...
- ZOJ2314 Reactor Cooling(无源汇上下界可行流)
The terrorist group leaded by a well known international terrorist Ben Bladen is buliding a nuclear ...
- tesonflow实现word2Vec
word2Vec 是实现从原始语料中学习字词空间向量的预测模型 使用word2Vec的skip_Gram模型 import collections import math import os impo ...
- 从ServerSwitch到SONiC Chassis:数据中心交换机技术的十年探索历程
从ServerSwitch到SONiC Chassis:数据中心交换机技术的十年探索历程 2019-07-09 | 作者:白巍 编者按:微软交换机操作系统开源项目SONiC (Software f ...
- ST表(模板)「 查询区间最值 」
The Water Problem HDU - 5443 「 第一部分nlogn预处理 第二部分O(1)询问 」 #include <iostream> #include <bi ...
- <frame>、<iframe>、<embed>、<object> 和 <applet>
frame frame 必须在 frameset 里,而 frameset 又不能和 body 共存(就是一旦存在 frame,就不能存在 body 了,因此这个基本每人使用) 推荐阅读:https: ...