安卓开发笔记——自定义HorizontalScrollView控件(实现QQ5.0侧滑效果)
对于滑动菜单栏SlidingMenu,大家应该都不陌生,在市场上的一些APP应用里经常可以见到,比如人人网,FaceBook等。
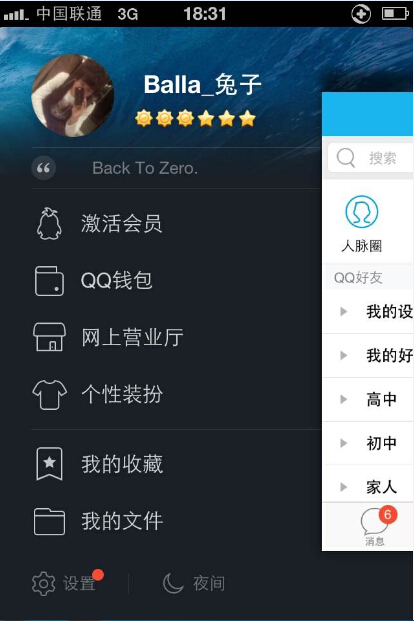
前段时间QQ5.0版本出来后也采用了这种设计风格:(下面是效果图)
之前在GitHub上看到过关于此设计风格的开源项目,它只需要引入对应的类库,就可以定制灵活、各种阴影和渐变以及动画的滑动效果的侧滑菜单。
这里是关于开源组件的介绍网址:https://github.com/jfeinstein10/SlidingMenu
但作为开发人员,在学习阶段还是建议尽可能的去自己实现,所以今天我不讲此开源项目的使用方式,我们用自定义HorizontalScrollView来实现此效果。
下面先看下实现效果图:
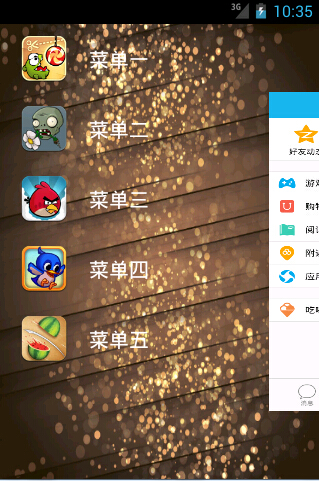

上图的效果是用自定义HorizontalScrollView来实现的,在HorizontalScrollView里潜入一个横向排列的线性布局,然后在线性布局里分别加入菜单布局和内容布局,在我们初始化的时候把HorizontalScrollView的滚动条向左拉至左边菜单距离即可实现菜单布局的隐藏,关于缩放,移动效果我们可以使用开源动画库nineoldandroids来实现,只需要几行代码。
好了,接着直接上代码吧:
首先,先看下布局文件:
1、菜单栏布局文件:
 <?xml version="1.0" encoding="utf-8"?>

 <RelativeLayout xmlns:android="http://schemas.android.com/apk/res/android"

     android:layout_width="match_parent"

     android:layout_height="match_parent">

     <LinearLayout

         android:layout_width="match_parent"

         android:layout_height="match_parent"

         android:orientation="vertical" >

         <RelativeLayout

             android:layout_width="match_parent"

             android:layout_height="wrap_content"

             android:layout_centerInParent="true" >

             <ImageView

                 android:id="@+id/menuimage1"

                 android:layout_width="50dp"

                 android:layout_height="50dp"

                 android:layout_centerVertical="true"

                 android:layout_marginLeft="20dp"

                 android:layout_marginTop="20dp"

                 android:src="@drawable/img_1" />

             <TextView

                 android:id="@+id/menutext1"

                 android:layout_width="wrap_content"

                 android:layout_height="wrap_content"

                 android:layout_centerVertical="true"

                 android:layout_marginLeft="20dp"

                 android:layout_marginTop="20dp"

                 android:layout_toRightOf="@id/menuimage1"

                 android:text="菜单一"

                 android:textColor="@android:color/white"

                 android:textSize="20dp" />

         </RelativeLayout>

                 <RelativeLayout

             android:layout_width="match_parent"

             android:layout_height="wrap_content"

             android:layout_centerInParent="true" >

             <ImageView

                 android:id="@+id/menuimage2"

                 android:layout_width="50dp"

                 android:layout_height="50dp"

                 android:layout_centerVertical="true"

                 android:layout_marginLeft="20dp"

                 android:layout_marginTop="20dp"

                 android:src="@drawable/img_2" />

             <TextView

                 android:id="@+id/menutext2"

                 android:layout_width="wrap_content"

                 android:layout_height="wrap_content"

                 android:layout_centerVertical="true"

                 android:layout_marginLeft="20dp"

                 android:layout_marginTop="20dp"

                 android:layout_toRightOf="@id/menuimage2"

                 android:text="菜单二"

                 android:textColor="@android:color/white"

                 android:textSize="20dp" />

         </RelativeLayout>

                         <RelativeLayout

             android:layout_width="match_parent"

             android:layout_height="wrap_content"

             android:layout_centerInParent="true" >

             <ImageView

                 android:id="@+id/menuimage3"

                 android:layout_width="50dp"

                 android:layout_height="50dp"

                 android:layout_centerVertical="true"

                 android:layout_marginLeft="20dp"

                 android:layout_marginTop="20dp"

                 android:src="@drawable/img_3" />

             <TextView

                 android:id="@+id/menutext3"

                 android:layout_width="wrap_content"

                 android:layout_height="wrap_content"

                 android:layout_centerVertical="true"

                 android:layout_marginLeft="20dp"

                 android:layout_marginTop="20dp"

                 android:layout_toRightOf="@id/menuimage3"

                 android:text="菜单三"

                 android:textColor="@android:color/white"

                 android:textSize="20dp" />

         </RelativeLayout>

                                 <RelativeLayout

             android:layout_width="match_parent"

             android:layout_height="wrap_content"

             android:layout_centerInParent="true" >

             <ImageView

                 android:id="@+id/menuimage4"

                 android:layout_width="50dp"

                 android:layout_height="50dp"

                 android:layout_centerVertical="true"

                 android:layout_marginLeft="20dp"

                 android:layout_marginTop="20dp"

                 android:src="@drawable/img_4" />

             <TextView

                 android:id="@+id/menutext4"

                 android:layout_width="wrap_content"

                 android:layout_height="wrap_content"

                 android:layout_centerVertical="true"

                 android:layout_marginLeft="20dp"

                 android:layout_marginTop="20dp"

                 android:layout_toRightOf="@id/menuimage4"

                 android:text="菜单四"

                 android:textColor="@android:color/white"

                 android:textSize="20dp" />

         </RelativeLayout>

                                         <RelativeLayout

             android:layout_width="match_parent"

             android:layout_height="wrap_content"

             android:layout_centerInParent="true" >

             <ImageView

                 android:id="@+id/menuimage5"

                 android:layout_width="50dp"

                 android:layout_height="50dp"

                 android:layout_centerVertical="true"

                 android:layout_marginLeft="20dp"

                 android:layout_marginTop="20dp"

                 android:src="@drawable/img_5" />

             <TextView

                 android:id="@+id/menutext5"

                 android:layout_width="wrap_content"

                 android:layout_height="wrap_content"

                 android:layout_centerVertical="true"

                 android:layout_marginLeft="20dp"

                 android:layout_marginTop="20dp"

                 android:layout_toRightOf="@id/menuimage5"

                 android:text="菜单五"

                 android:textColor="@android:color/white"

                 android:textSize="20dp" />

         </RelativeLayout>

     </LinearLayout>

 </RelativeLayout>
2、主内容布局文件:
 <RelativeLayout xmlns:android="http://schemas.android.com/apk/res/android"

     xmlns:tools="http://schemas.android.com/tools"

     android:layout_width="match_parent"

     android:layout_height="match_parent"

         android:background="@drawable/img_frame_background" >

 <com.example.sidesliptest.MyHorizontalScrollView

     android:layout_height="match_parent"

     android:layout_width="match_parent"

     android:scrollbars="none"

     >

     <LinearLayout

         android:layout_height="match_parent"

         android:layout_width="match_parent"

         android:orientation="horizontal"

         >

         <include layout="@layout/left_menu"/>

         <LinearLayout

             android:layout_width="match_parent"

             android:layout_height="match_parent"

             android:background="@drawable/qq"

             ></LinearLayout>

     </LinearLayout>

 </com.example.sidesliptest.MyHorizontalScrollView>

 </RelativeLayout>
3、自定义View(HorizontalScrollView)类:
自定义Viewi实现步骤:
1、继承要自定义View的类,并实现带有参数的构造方法
2、重写onMeasure(确定自定义View的大小)和onLayout(确定自定义View的位置)方法
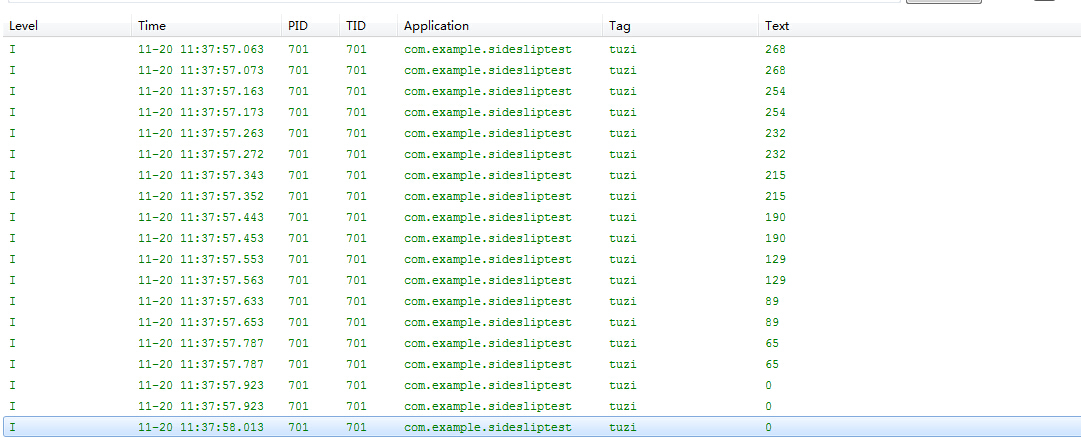
关于HorizontalScrollView的滑动,我们可以用onScrollChanged来监听参数L:
打印日志:可以发现,当滚动条向左(画面向右滑动)的时候,L的值是逐渐增大的,所以我们可以通过它来作为动画的变化梯度值。
注释很全,具体看注释吧。
 package com.example.sidesliptest;

 import android.content.Context;

 import android.util.AttributeSet;

 import android.util.DisplayMetrics;

 import android.util.Log;

 import android.util.TypedValue;

 import android.view.MotionEvent;

 import android.view.ViewGroup;

 import android.view.WindowManager;

 import android.widget.HorizontalScrollView;

 import android.widget.LinearLayout;

 import com.nineoldandroids.view.ViewHelper;

 public class MyHorizontalScrollView extends HorizontalScrollView {

     // 在HorizontalScrollView有个LinearLayout

     private LinearLayout linearLayout;

     // 菜单,内容页

     private ViewGroup myMenu;

     private ViewGroup myContent;

     //菜单宽度

     private int myMenuWidth;

     // 屏幕宽度

     private int screenWidth;

     // 菜单与屏幕右侧的距离(dp)

     private int myMenuPaddingRight = 50;

     // 避免多次调用onMeasure的标志

     private boolean once = false;

     /**

      * 自定义View需要实现带有Context、AttributeSet这2个参数的构造方法,否则自定义参数会出错

      * 当使用了自定义属性时,会调用此构造方法

      *

      * @param context

      * @param attrs

      */

     public MyHorizontalScrollView(Context context, AttributeSet attrs) {

         super(context, attrs);

         // 获取屏幕宽度

         WindowManager windowManager = (WindowManager) context

                 .getSystemService(Context.WINDOW_SERVICE);

         DisplayMetrics outMetrics = new DisplayMetrics();

         windowManager.getDefaultDisplay().getMetrics(outMetrics);

         screenWidth = outMetrics.widthPixels;// 屏幕宽度

         // 将dp转换px

         myMenuPaddingRight = (int) TypedValue.applyDimension(

                 TypedValue.COMPLEX_UNIT_DIP, 50, context.getResources()

                         .getDisplayMetrics());

     }

     /**

      * 设置子View的宽高,决定自身View的宽高,每次启动都会调用此方法

      */

     @Override

     protected void onMeasure(int widthMeasureSpec, int heightMeasureSpec) {

         super.onMeasure(widthMeasureSpec, heightMeasureSpec);

         if (!once) {//使其只调用一次

             // this指的是HorizontalScrollView,获取各个元素

             linearLayout = (LinearLayout) this.getChildAt(0);// 第一个子元素

             myMenu = (ViewGroup) linearLayout.getChildAt(0);// HorizontalScrollView下LinearLayout的第一个子元素

             myContent = (ViewGroup) linearLayout.getChildAt(1);// HorizontalScrollView下LinearLayout的第二个子元素

             // 设置子View的宽高,高于屏幕一致

             myMenuWidth=myMenu.getLayoutParams().width = screenWidth - myMenuPaddingRight;// 菜单的宽度=屏幕宽度-右边距

             myContent.getLayoutParams().width = screenWidth;// 内容宽度=屏幕宽度

             // 决定自身View的宽高,高于屏幕一致

             // 由于这里的LinearLayout里只包含了Menu和Content所以就不需要额外的去指定自身的宽

             once = true;

         }

     }

     //设置View的位置,首先,先将Menu隐藏(在eclipse中ScrollView的画面内容(非滚动条)正数表示向左移,向上移)

     @Override

     protected void onLayout(boolean changed, int l, int t, int r, int b) {

         super.onLayout(changed, l, t, r, b);

         //刚载入界面的时候隐藏Menu菜单也就是ScrollView向左滑动菜单自身的大小

         if(changed){

             this.scrollTo(myMenuWidth, 0);//向左滑动,相当于把右边的内容页拖到正中央,菜单隐藏

         }

     }

     @Override

     public boolean onTouchEvent(MotionEvent ev) {

         int action=ev.getAction();

         switch (action) {

         case MotionEvent.ACTION_UP:

             int scrollX=this.getScrollX();//滑动的距离scrollTo方法里,也就是onMeasure方法里的向左滑动那部分

             if(scrollX>=myMenuWidth/2){

                 this.smoothScrollTo(myMenuWidth,0);//向左滑动展示内容

             }else{

                 this.smoothScrollTo(0, 0);

             }

             return true;

         }

         return super.onTouchEvent(ev);

     }

     @Override

     protected void onScrollChanged(int l, int t, int oldl, int oldt) {

         super.onScrollChanged(l, t, oldl, oldt);

         Log.i("tuzi",l+"");

         float scale = l * 1.0f / myMenuWidth; // 1 ~ 0


         float rightScale = 0.7f + 0.3f * scale;

         float leftScale = 1.0f - scale * 0.3f;

         float leftAlpha = 0.6f + 0.4f * (1 - scale);

         // 调用属性动画,设置TranslationX

         ViewHelper.setTranslationX(myMenu, myMenuWidth * scale * 0.8f);

         ViewHelper.setScaleX(myMenu, leftScale);

         ViewHelper.setScaleY(myMenu, leftScale);

         ViewHelper.setAlpha(myMenu, leftAlpha);

         // 设置内容缩放的中心点

         ViewHelper.setPivotX(myContent, 0);

         ViewHelper.setPivotY(myContent, myContent.getHeight() / 2);

         ViewHelper.setScaleX(myContent, rightScale);

         ViewHelper.setScaleY(myContent, rightScale);

     }

 }
4、主程序类:
package com.example.sidesliptest;

import android.app.Activity;

import android.os.Bundle;

public class MainActivity extends Activity {

    @Override

    protected void onCreate(Bundle savedInstanceState) {

        super.onCreate(savedInstanceState);

        //requestWindowFeature(Window.FEATURE_NO_TITLE);

        setContentView(R.layout.activity_main);

    }

}
图片素材:http://pan.baidu.com/s/1kTkjmAj
作者:Balla_兔子
出处:http://www.cnblogs.com/lichenwei/
本文版权归作者和博客园共有,欢迎转载,但未经作者同意必须保留此段声明,且在文章页面明显位置给出原文链接。
正在看本人博客的这位童鞋,我看你气度不凡,谈吐间隐隐有王者之气,日后必有一番作为!旁边有“推荐”二字,你就顺手把它点了吧,相得准,我分文不收;相不准,你也好回来找我!
安卓开发笔记——自定义HorizontalScrollView控件(实现QQ5.0侧滑效果)的更多相关文章
- Android开发学习笔记-自定义组合控件的过程
自定义组合控件的过程 1.自定义一个View 一般来说,继承相对布局,或者线性布局 ViewGroup:2.实现父类的构造方法.一般来说,需要在构造方法里初始化自定义的布局文件:3.根据一些需要或者需 ...
- 安卓开发笔记——自定义广告轮播Banner(实现无限循环)
关于广告轮播,大家肯定不会陌生,它在现手机市场各大APP出现的频率极高,它的优点在于"不占屏",可以仅用小小的固定空位来展示几个甚至几十个广告条,而且动态效果很好,具有很好的用户& ...
- Android开发之自定义组合控件
自定义组合控件的步骤1.自定义一个View,继承ViewGroup,比如RelativeLayout2.编写组合控件的布局文件,在自定义的view中加载(使用View.inflate())3.自定义属 ...
- Android开发学习笔记-自定义组合控件
为了能让代码能够更多的复用,故使用组合控件.下面是我正在写的项目中用到的方法. 1.先写要组合的一些需要的控件,将其封装到一个布局xml布局文件中. <?xml version="1. ...
- iOS开发之自定义日历控件
前言 日常开发中经常会遇到日期选择,为了方便使用,简单封装了一个日历控件,在此抛砖引玉供大家参考. 效果 功能 支持单选.区间 支持默认选中日期 支持限制月份 支持过去.当前.未来模式 支持frame ...
- 安卓开发笔记——关于开源项目SlidingMenu的使用介绍(仿QQ5.0侧滑菜单)
记得去年年末的时候写过这个侧滑效果,当时是利用自定义HorizontalScrollView来实现的,效果如下: 有兴趣的朋友可以看看这篇文件<安卓开发笔记——自定义HorizontalScro ...
- 安卓自定义组合控件--toolbar
最近在学习安卓APP的开发,用到了toolbar这个控件, 最开始使用时include layout这种方法,不过感觉封装性不好,就又改成了自定义组合控件的方式. 使用的工具为android stud ...
- iOS开发UI篇—Quartz2D(自定义UIImageView控件)
iOS开发UI篇—Quartz2D(自定义UIImageView控件) 一.实现思路 Quartz2D最大的用途在于自定义View(自定义UI控件),当系统的View不能满足我们使用需求的时候,自定义 ...
- 安卓自定义日期控件(仿QQ,IOS7)
还记得上篇:高大上的安卓日期时间选择器,本篇是根据上篇修改而来,先看下qq中日期选择的效果: 鉴于目前还没有相似的开源日期控件,因此本人花费了一些时间修改了下之前的日期控件,效果如图: 虽说相似度不是 ...
随机推荐
- ios 项目里常用的宏
NSLog(@"__func__ : %s", __func__);//oc测试环境,打印文件名,方法名 NSLog(@"__FUNCTION__ : %s" ...
- iOS开发---集成百度地图完善版
一.成为百度的开发者.创建应用 http://developer.baidu.com/map/index.php?title=首页 (鼠标移向 然后选择你的项目需要的功能 你可以在里面了解到你想要使用 ...
- 测量行业(RTK)相关的小知识总结
RTK测量系统,一般需要先架设基准站(参考站),数据链模式外挂大电台(有天线大功率模式,理想范围方圆18公里以内).基准站通过收到卫星(多星)进行计算出当前的位置. 其中涉及到频率的设置,波特率,以及 ...
- SAP大数据为"海上F1"提供技术支持
“海上F1”的2014极限帆船赛在青岛开赛,这场大赛是技术与体育高度融合的盛会.比赛中,每一个船员将使用各种高新技术,应尽所能,战胜对手.很多人之所以喜欢这样的比赛,是因为帆船比赛是世界上最复杂的一项 ...
- android: 实现跨程序数据共享
简单起见,我们还是在上一章中 DatabaseTest 项目的基础上继续开发,通过内容提供器 来给它加入外部访问接口. 打开 DatabaseTest 项目,首先将 MyDatabaseHelper ...
- static成员函数
1.static成员函数不能定义为const的,这是因为static成员函数只是全局函数的一个形式上的封装,而且static成员函数不能访问类的非静态成员(没有this)指针,修改非静态数据成员又从何 ...
- C#与C++之间类型的对应
Windows Data Type .NET Data Type BOOL, BOOLEAN Boolean or Int32 BSTR String BYTE Byte CHAR Char DOUB ...
- rocketmq总结
1:角色关系 2:顺序消息 消费消息的顺序要同収送消息的顺序一致,在 RocketMQ 中,主要挃的是尿部顺序,即一类消息为满足顺序性,必须 Producer 单线程顺序収送,丏収送到同一个队列,返样 ...
- 分享一些无特征PHP一句话
分享些不需要动态函数.不用eval.不含敏感函数.免杀免拦截的一句话.(少部分一句话需要php5.4.8+.或sqlite/pdo/yaml/memcached扩展等) 原理:https://www. ...
- ubuntu 16.04 samba 文件共享
生成samba用户名密码修改配置文件重启samba服务使之生效 以前在ubuntu 14.04的时候,很方便的通过几行命令和一个GUI界面就可以配置好samba共享文件给windows了: Ubunt ...