Cocos2d-x 3.x 学习笔记(6):Sprite SpriteFrameCache Texture2D TextureCache
1. 概述
TextureCache是对Texture2D纹理的缓存,对图片文件的缓存。SpriteFrameCache是对SpriteFrame的缓存,是对纹理大图的矩形块的缓存,每个SpriteFrame是对Texture2D的封装,每个精灵帧都在同一个纹理大图中。
Sprite是对Texture2D和SpriteFrame的封装,可以实现一张图片在屏幕上的显示和变换。
2. Sprite
2.1 概述
Sprite是2d图像,是在屏幕上可变化的对象,受到控制。
通过对Sprite的操作,实现了一张图片在游戏屏幕上的各种变化。
Sprite继承自父类Node,属性包括位置、旋转、缩放、斜放、大小等。
2.2 创建方法
直接创建精灵,可选图片文件、矩形大小、多边形:
static Sprite* create();

static Sprite* create(const std::string& filename);

static Sprite* create(const PolygonInfo& info);

static Sprite* create(const std::string& filename, const Rect& rect);
从精灵帧创建精灵:
static Sprite* createWithSpriteFrame(SpriteFrame *spriteFrame);

static Sprite* createWithSpriteFrameName(const std::string& spriteFrameName);
从Texture创建精灵:
TextureCache::getInstance()->addImage("pic.png");

auto texture=TextureCache::getInstance()->getTextureForKey("pic.png");

auto sprite = Sprite::createWithTexture(texture,Rect(,,,),true);
3. SpriteFrame SpriteFrameCache
3.1 概念
一张大图包含很多小图,一个精灵帧SpriteFrame对应一张小图,小图在大图中的位置大小等,在精灵帧中定义好。
很多的精灵帧封装成一个plist文件,和一张对应的大图。
精灵帧缓存SpriteFrameCache是对很多精灵帧的缓存,通过plist文件和大图获取每个帧的内容,进行缓存。
SpriteFrameCache类有Map类型成员_spriteFrames,key为帧名,value为精灵帧:
Map<std::string, SpriteFrame*> _spriteFrames;
plist文件对应了一张包含多个精灵图像的大图,plist文件包括了每个精灵在大图中的位置大小等信息。
plist内部包括:
- frames:精灵帧的字典,key是sprite name,value是精灵帧;
- 每一个精灵帧的数据,定位了一个精灵帧:offset、sourceize、rotated等;
- metadata:精灵图集的其他信息,包括纹理图像文件名、大小等。
3.2 方法
把精灵帧通过plist文件添加到精灵帧缓存中:
auto spriteFrameCache = SpriteFrameCache::getInstance();

spriteFrameCache->addSpriteFramesWithFile("sprites.plist");
addSpriteFramesWithFile(...) 方法的实现大致过程:
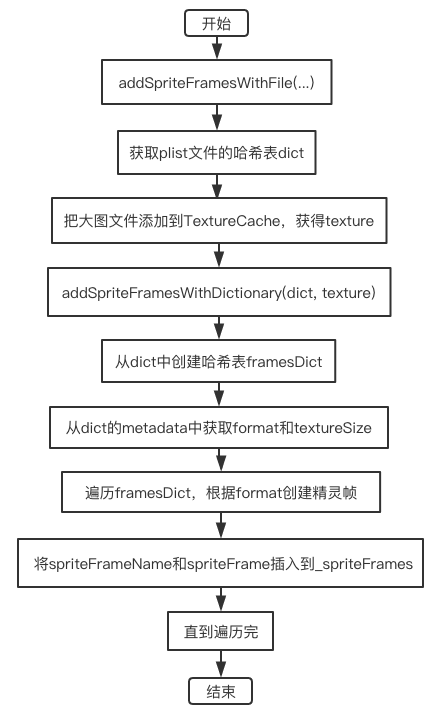
从plist添加精灵帧到精灵帧缓存最终调用的方法:
addSpriteFramesWithFile(const std::string& plist, Texture2D *texture)
从精灵帧缓存获取精灵帧:
getSpriteFrameByName(const std::string& name)
用帧创建sprite:
auto sprite2 = Sprite::createWithSpriteFrame(spriteFrame);
删除精灵帧:
通过遍历,从_spriteFrames中用指定的key删除精灵帧。
removeSpriteFrames()

removeUnusedSpriteFrames()
removeSpriteFramesFromTexture(Texture2D* texture)
removeSpriteFramesFromDictionary(ValueMap& dictionary)
4. TextureCache
4.1 概念
纹理缓存TextureCache是最基本的图片缓存,将纹理缓存在内存中,SpriteFrameCache以它为基础。
纹理缓存类存储Texture2D有Map类型成员_textures,key为纹理文件名,value为纹理Texture2D:
std::unordered_map<std::string, Texture2D*> _textures;
Texture2D类可从图像等数据创建OpenGL二维纹理。
4.2 纹理加入到纹理缓存
回顾Sprite从图片路径创建过程:
- create(...)方法:
Sprite* Sprite::create(const std::string& filename, const Rect& rect)

{

    Sprite *sprite = new (std::nothrow) Sprite();

    if (sprite && sprite->initWithFile(filename, rect))

    // ......

} - initWithFile(...) 方法:
bool Sprite::initWithFile(const std::string &filename, const Rect& rect)

{

    // ......

    Texture2D *texture = _director->getTextureCache()->addImage(filename);

    if (texture)

    {

        return initWithTexture(texture, rect);

    }

    // ......

}
从Director单例中获取TextureCache对象,添加图片文件,获得texture指针。
- addImage(...) 方法
如果文件路径名对应的纹理之前没有加载,则新建Texture2D对象并返回指针,否则返回先前加载的指针。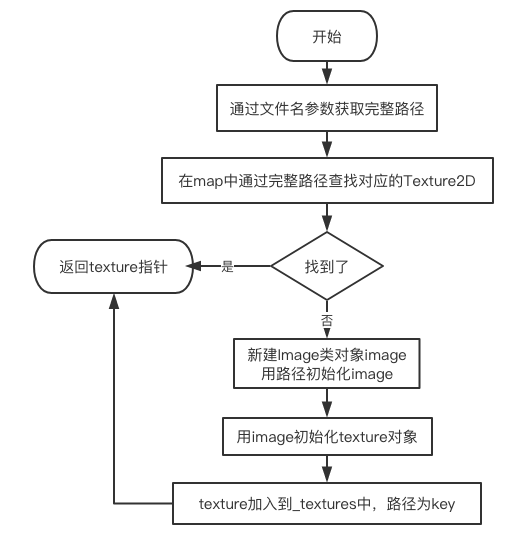
- initWithTexture(...) 方法:对Sprite对象初始化。
纹理加入到纹理缓存:
addImage(const std::string &path)

addImageAsync(const std::string &path, const std::function<void(Texture2D*)>& callback, const std::string& callbackKey)
4.3 获取纹理
通过key在_textures中搜索对应的纹理。
Texture2D* TextureCache::getTextureForKey(const std::string &textureKeyName) const;
4.4 清理纹理
清理没有被使用的纹理:
_textures中所有其引用计数为1的对象执行release()方法。
void TextureCache::removeUnusedTextures();
通过指定key清理指定纹理:
void TextureCache::removeTextureForKey(const std::string &textureKeyName)
清理所有纹理缓存
_textures中所有texture对象执行release(),再对_textures执行clear()。
void TextureCache::removeAllTextures();
5. Texture2D
5.1 概念
Texture2D是一张二维图片,一个个像素拼接而成,存储了每个像素的信息。
5.2 成员属性
像素格式 enum PixelFormat
PixelFormat _pixelFormat
像素格式信息 struct PixelFormatInfo
map<PixelFormat, const PixelFormatInfo> PixelFormatInfoMap
struct _TexParams
    /** pixel format of the texture */

    Texture2D::PixelFormat _pixelFormat;

    /** width in pixels */

    int _pixelsWide;

    /** height in pixels */

    int _pixelsHigh;

    /** texture name */

    GLuint _name;

    /** texture max S */

    GLfloat _maxS;

    /** texture max T */

    GLfloat _maxT;

    /** content size */

    Size _contentSize;

    /** whether or not the texture has their Alpha premultiplied */

    bool _hasPremultipliedAlpha;

    /** whether or not the texture has mip maps*/

    bool _hasMipmaps;

    /** shader program used by drawAtPoint and drawInRect */

    GLProgram* _shaderProgram;\
5.3 应用
从精灵得到纹理:
auto sp = Sprite::create("pic.png");

auto texture=sp->getTexture();

auto sprite = Sprite::createWithTexture(texture);
用纹理创建精灵:
auto sprite = Sprite::createWithTexture(texture);
从精灵帧缓冲中得到纹理:
SpriteFrameCache::getInstance()->addSpriteFramesWithFile("sps.plist");

auto frame = SpriteFrameCache::getInstance()->getSpriteFrameByName("01.png");

auto texture = frame->getTexture();
用纹理创建精灵帧:
auto sf=SpriteFrame::createWithTexture(Texture2D*,const Rect&);
从纹理缓冲中得到纹理:
 //第一种方式

auto texture = TextureCache::getInstance()->addImage("01.png");

//第二种方式

auto texture = TextureCache::getInstance()->getTextureForKey("01.png");
Cocos2d-x 3.x 学习笔记(6):Sprite SpriteFrameCache Texture2D TextureCache的更多相关文章
- 【Cocos2d-x】学习笔记目录
从2019年7月开始学习游戏引擎Cocos2dx,版本3.17. 学习笔记尽量以白话的形式表达自己对源码的理解,而不是大篇幅复制粘贴源码. 本人水平有限,欢迎批评指正! Cocos2d-x 学习笔记 ...
- Cocos2d-x 学习笔记(7) 内存管理 Sprite SpriteFrame Texture2D
1. 总结 Sprite和SpriteFrame和Texture2D关系紧密,三个类都继承了Ref类.精灵有成员精灵帧和纹理,精灵帧有成员纹理.精灵帧和纹理被精灵帧引用时,引用计数增加,不再被引用时, ...
- cocos2dx游戏开发——微信打飞机学习笔记(三)——WelcomeScene的搭建
一.场景与层的关系: cocos2dx的框架可以说主要由导演,场景,层,精灵来构成: 1.其中导演,意如其名,就是操控整个游戏的一个单例,管理着整个游戏. 2.场景就像电影的一幕剧情,所以说,懂得如何 ...
- 【cocos2d-x 3.x 学习笔记】对象内存管理
内存管理 内存管理一直是一个不易处理的问题.开发人员必须考虑分配回收的方式和时机,针对堆和栈做不同的优化处理,等等.内存管理的核心是动态分配的对象必须保证在使用完成后有效地释放内存,即管理对象的生命周 ...
- Cocos2d-x 学习笔记(20) ControlButton
[Cocos2d-x 学习笔记 目录链接] 1. 简介 ControlButton实现了按钮功能,根据触摸的位置和移动的过程可识别9中EventType类型,执行对应的回调函数. 直接继承了Contr ...
- CSS3与页面布局学习笔记(八)——浏览器兼容性问题与前端性能优化方案
一.浏览器兼容 1.1.概要 世界上没有任何一个浏览器是一样的,同样的代码在不一样的浏览器上运行就存在兼容性问题.不同浏览器其内核亦不尽相同,相同内核的版本不同,相同版本的内核浏览器品牌不一样,各种运 ...
- ActionScript学习笔记
ActionScript学习笔记 ActionScript中预定义的数据类型:Boolean.int.Number.String.uint 其中,int.Number.uint是处理数字的.int用来 ...
- android cocos2d-x for Android安装和学习笔记(请用adt-bundle21.1或以上导入)
引用:http://weimingtom.iteye.com/blog/1483566 (20121108)注意:这篇文章用cdt编译ndk工程的内容已过时(现在可以用adt-bundle,避免配置繁 ...
- NGUI学习笔记汇总
NGUI学习笔记汇总,适用于NGUI2.x,NGUI3.x 一.NGUI的直接用法 1. Attach a Collider:表示为NGUI的某些物体添加碰撞器,如果界面是用NGUI做的,只能这样添加 ...
随机推荐
- 星星的模块封装类 IDSStarsScoreView
1 IDSStarsScoreView 的实现效果 2 类的封装方法: <声明文件> // // IDSStarsScoreView.h // Near // // ...
- fullpage.js使用方法
了解: [1]之所以叫做fullpage,是因为它可以全屏滚动,拥有强大的功能. [2]它依赖于jQuery库,所以在使用fullpage之前先引入jQuery库. 使用: [1]<link r ...
- 很多程序员都没搞明白的时间与时区知识 - 24时区/GMT/UTC/DST/CST/ISO8601
全球24个时区的划分 相较于两地时间表,可以显示世界各时区时间和地名的世界时区表(World Time),就显得精密与复杂多了,通常世界时区表的表盘上会标示着全球24个时区的城市名称,但究竟 ...
- hgoi#20190517
T1-Mike and gcd problem Mike给定一个n个元素的整数序列,A=[a1,a2,...,an],每次操作可以选择一个i(1≤i<n),将a[i],a[i+1]变成a[i]- ...
- Spring cloud stream【消息分区】
在上篇文章中我们给大家介绍了Stream的消息分组,可以实现消息的重复消费的问题,但在某些场景下分组还不能满足我们的需求,比如,同时有多条同一个用户的数据,发送过来,我们需要根据用户统计,但是消息 ...
- Verilog写一个对数计算模块Log2(x)
网上一个能用的也没有,自己写一个把. 1.计算原理: 整数部分 网上找到了一个c语言的计算方法如下: int flog2(float x) { return ((unsigned&)x> ...
- C# 简单TCP协议
namespace TCPServer { class Program { static void Main(string[] args) { ;//端口 TcpClient tcpClient;// ...
- POJ 3680:Intervals(最小费用最大流)***
http://poj.org/problem?id=3680 题意:给出n个区间[Li,Ri],每个区间有一个权值wi,要使得每个点都不被超过k个区间覆盖(最多能被k个区间覆盖),如果选取了第i个区间 ...
- 小代学Spring Boot之开篇
想要获取更多文章可以访问我的博客 - 代码无止境. 前情提要 小代是一名入职不久的程序员,公司同事都亲切的称他小代.有一天小代的老大陈BOSS和小代说,公司后端最近准备换技术框架了. 小代: 换成啥? ...
- scrapy基础知识之制作 Scrapy 爬虫 一共需要4步:
1.新建项目 (scrapy startproject xxx):新建一个新的爬虫项目 2.明确目标 (编写items.py):明确你想要抓取的目标 3.制作爬虫 (spiders/xxspider. ...