Openvswitch手册(4): Mirror


这一节我们来分析Mirror
Mirror就是配置一个bridge,将某些包发给指定的mirrored ports
对于包的选择:
- select_all,所有的包
- select_dst_port
- select_src_port
- select_vlan
对于指定的目的:
- output_port (SPAN)
- output_vlan (RSPAN)
Port mirroring on a Cisco Systems switch is generally referred to as Switched Port ANalyzer (SPAN) or Remote Switched Port ANalyzer (RSPAN)
(1) Configure Mirroring
root@XorPlus# ovs-vsctl --db=tcp:10.10.50.215:6633 -- set bridge br0 mirrors=@m -- --id=@te-1/1/1 get Port te-1/1/1 -- --id=@te-1/1/2 get Port te-1/1/2 -- --id=@te-1/1/3 get Port te-1/1/3 -- --id=@m create Mirror name=mymirror select-dst-port=@te-1/1/1,@te-1/1/2 select-src-port=@te-1/1/1,@te-1/1/2 output-port=@te-1/1/3 root@XorPlus#
In above configuration, user configure the te-1/1/1, te-1/1/2 and te-1/1/3 in the mirroring, in which the source port are te-1/1/1 and te-1/1/2 (including the ingress and egress), the output port (monitor port) is te-1/1/3.
The “select-dst-port” means some packet (in switch chip) will go-out from the specified port (egress).
The “select-src-port” means some packet enter the specified port (ingress).
(2) Delete the Mirroring
root@XorPlus# ovs-vsctl --db=tcp:10.10.50.215:6633 -- remove bridge br0 mirrors mymirror
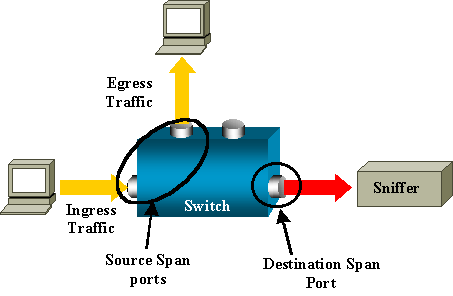
- Ingress traffic-Traffic that enters the switch.
- Egress traffic-Traffic that leaves the switch.
- Source (SPAN) port -A port that is monitored with use of the SPAN feature.
- Source (SPAN) VLAN -A VLAN whose traffic is monitored with use of the SPAN feature.
- Destination (SPAN) port -A port that monitors source ports, usually where a network analyzer is connected.
- Reflector Port -A port that copies packets onto an RSPAN VLAN.
- Local SPAN-The SPAN feature is local when the monitored ports are all located on the same switch as the destination port.
- Remote SPAN (RSPAN)-Some source ports are not located on the same switch as the destination port. RSPAN is an advanced feature that requires a special VLAN to carry the traffic that is monitored by SPAN between switches.
- Port-based SPAN (PSPAN)-The user specifies one or several source ports on the switch and one destination port.
- VLAN-based SPAN (VSPAN)-On a particular switch, the user can choose to monitor all the ports that belong to a particular VLAN in a single command.
RSPAN allows you to monitor source ports that are spread all over a switched network, not only locally on a switch with SPAN.
The functionality works exactly as a regular SPAN session. The traffic that is monitored by SPAN is not directly copied to the destination port, but flooded into a special RSPAN VLAN. The destination port can then be located anywhere in this RSPAN VLAN. There can even be several destination ports.
These are a few remarks on this design:
- S1 is called a source switch. Packets only enter the RSPAN VLAN in switches that are configured as RSPAN source. Currently, a switch can only be the source for one RSPAN session, which means that a source switch can only feed one RSPAN VLAN at a time.
- S2 and S3 are intermediate switches. They are not RSPAN sources and do not have destination ports. A switch can be intermediate for any number of RSPAN sessions.
- S4 and S5 are destination switches. Some of their ports are configured to be destination for an RSPAN session.
- You can see that RSPAN packets are flooded into the RSPAN VLAN. Even switches that are not on the path to a destination port, such as S2, receive the traffic for the RSPAN VLAN. You can find it useful to prune this VLAN on such S1-S2 links.
- In order to achieve the flooding, learning is disabled on the RSPAN VLAN.
- In order to prevent loops, the STP has been maintained on the RSPAN VLAN. Therefore, RSPAN cannot monitor Bridge Protocol Data Units (BPDUs).
我们先来测试SPAN
我们按照下面的拓扑结构创建vswitch

$ sudo ovs-vsctl add-port helloworld first_br
$ sudo ovs-vsctl add-port helloworld second_br -- set Port second_br tag=110
$ sudo ovs-vsctl add-br helloworld1
$ sudo ovs-vsctl add-port helloworld1 second_if -- set Port second_if tag=110
$ sudo ovs-vsctl add-port helloworld1 third_br -- set Port third_br tag=110
$ sudo ovs-vsctl show
c24322e6-8453-402a-afaf-64757ef231e9
Bridge helloworld
Controller "tcp:16.158.165.102:6633"
is_connected: true
Port "vnet8"
Interface "vnet8"
Port first_br
Interface first_br
Port second_br
tag: 110
Interface second_br
Port "vnet10"
Interface "vnet10"
Port helloworld
Interface helloworld
type: internal
Port "vnet9"
Interface "vnet9"
Bridge "helloworld1"
Port second_if
tag: 110
Interface second_if
Port "helloworld1"
Interface "helloworld1"
type: internal
Port third_br
tag: 110
Interface third_br
ovs_version: "2.0.1"
然后我们在first_br上面mirror所有进出vnet8的包
$ sudo ovs-vsctl -- set bridge helloworld mirrors=@m -- --id=@vnet8 get Port vnet8 -- --id=@first_br get Port first_br -- --id=@m create Mirror name=mirrorvnet8 select-dst-port=@vnet8 select-src-port=@vnet8 output-port=@first_br
19ed2f51-3245-4d5b-8e6c-67ccbb7c7ebd
这时候我们监听first_if,并且从instance01里面ping 10.10.10.3,可以看到下面的效果
$ sudo tcpdump -n -i first_if icmp
tcpdump: WARNING: first_if: no IPv4 address assigned
tcpdump: verbose output suppressed, use -v or -vv for full protocol decode
listening on first_if, link-type EN10MB (Ethernet), capture size 65535 bytes
23:58:02.310198 IP 10.10.10.1 > 10.10.10.3: ICMP echo request, id 3200, seq 1, length 64
23:58:02.312447 IP 10.10.10.1 > 10.10.10.3: ICMP echo request, id 3200, seq 1, length 64
23:58:02.314314 IP 10.10.10.3 > 10.10.10.1: ICMP echo reply, id 3200, seq 1, length 64
23:58:03.311894 IP 10.10.10.1 > 10.10.10.3: ICMP echo request, id 3200, seq 2, length 64
23:58:03.312266 IP 10.10.10.3 > 10.10.10.1: ICMP echo reply, id 3200, seq 2, length 64
23:58:04.313522 IP 10.10.10.1 > 10.10.10.3: ICMP echo request, id 3200, seq 3, length 64
23:58:04.313739 IP 10.10.10.3 > 10.10.10.1: ICMP echo reply, id 3200, seq 3, length 64
23:58:05.314827 IP 10.10.10.1 > 10.10.10.3: ICMP echo request, id 3200, seq 4, length 64
23:58:05.314979 IP 10.10.10.3 > 10.10.10.1: ICMP echo reply, id 3200, seq 4, length 64
23:58:06.316870 IP 10.10.10.1 > 10.10.10.3: ICMP echo request, id 3200, seq 5, length 64
23:58:06.317156 IP 10.10.10.3 > 10.10.10.1: ICMP echo reply, id 3200, seq 5, length 64
23:58:07.318242 IP 10.10.10.1 > 10.10.10.3: ICMP echo request, id 3200, seq 6, length 64
23:58:07.318481 IP 10.10.10.3 > 10.10.10.1: ICMP echo reply, id 3200, seq 6, length 64
23:58:08.319579 IP 10.10.10.1 > 10.10.10.3: ICMP echo request, id 3200, seq 7, length 64
23:58:08.319802 IP 10.10.10.3 > 10.10.10.1: ICMP echo reply, id 3200, seq 7, length 64
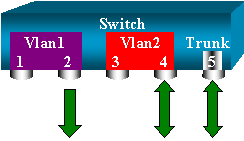
然后我们来配置RSPAN
我们对进入vnet9的所有进出包,然而ouput到一个vlan 110
$ sudo ovs-vsctl -- set bridge helloworld mirrors=@m -- --id=@vnet9 get Port vnet9 -- --id=@m create Mirror name=mirrorvnet9 select-dst-port=@vnet9 select-src-port=@vnet9 output-vlan=110
cb361fa2-914d-494b-94ef-c625d194247c
在helloworld1中也要配置从110来的,都output到vlan 110
$ sudo ovs-vsctl -- set bridge helloworld1 mirrors=@m -- --id=@m create Mirror name=mirrorvlan select-vlan=110 output-vlan=110
cef13445-c6ea-45e7-bb9d-1a267b24c91c
disable mac address learning for vlan 110
$ sudo ovs-vsctl set bridge helloworld flood-vlans=110
$ sudo ovs-vsctl set bridge helloworld1 flood-vlans=110
这时候我们监听third_if,并且从instance02里面ping 10.10.10.3,可以看到下面的效果
$ sudo tcpdump -n -i third_if icmp
tcpdump: WARNING: third_if: no IPv4 address assigned
tcpdump: verbose output suppressed, use -v or -vv for full protocol decode
listening on third_if, link-type EN10MB (Ethernet), capture size 65535 bytes
00:24:38.089192 IP 10.10.10.2 > 10.10.10.3: ICMP echo request, id 2999, seq 1, length 64
00:24:38.090844 IP 10.10.10.2 > 10.10.10.3: ICMP echo request, id 2999, seq 1, length 64
00:24:38.093228 IP 10.10.10.3 > 10.10.10.2: ICMP echo reply, id 2999, seq 1, length 64
00:24:39.090506 IP 10.10.10.2 > 10.10.10.3: ICMP echo request, id 2999, seq 2, length 64
00:24:39.091024 IP 10.10.10.3 > 10.10.10.2: ICMP echo reply, id 2999, seq 2, length 64
00:24:40.091945 IP 10.10.10.2 > 10.10.10.3: ICMP echo request, id 2999, seq 3, length 64
00:24:40.092202 IP 10.10.10.3 > 10.10.10.2: ICMP echo reply, id 2999, seq 3, length 64
00:24:41.093826 IP 10.10.10.2 > 10.10.10.3: ICMP echo request, id 2999, seq 4, length 64
00:24:41.093917 IP 10.10.10.3 > 10.10.10.2: ICMP echo reply, id 2999, seq 4, length 64
00:24:42.095681 IP 10.10.10.2 > 10.10.10.3: ICMP echo request, id 2999, seq 5, length 64
00:24:42.095915 IP 10.10.10.3 > 10.10.10.2: ICMP echo reply, id 2999, seq 5, length 64
00:24:43.097414 IP 10.10.10.2 > 10.10.10.3: ICMP echo request, id 2999, seq 6, length 64
00:24:43.097586 IP 10.10.10.3 > 10.10.10.2: ICMP echo reply, id 2999, seq 6, length 64
Openvswitch手册(4): Mirror的更多相关文章
- Openvswitch手册(1): 架构,SSL, Manager, Bridge
Openvswitch是一个virutal swtich, 支持Open Flow协议,当然也有一些硬件Switch也支持Open Flow协议,他们都可以被统一的Controller管理,从而实现物 ...
- Openvswitch手册(2): OpenFlow Controller
我们这一节主要来看Controller Controller有两种: Primary Controller: 真正控制vswitch的flow table,vswitch会保持和contro ...
- Openvswitch手册(5): VLAN and Bonding
我们这一节来看Port 一般来说一个Port就是一个Interface,当然也有一个Port对应多个Interface的情况,成为Bond VLAN Configuration Port的一个重要的方 ...
- Openvswitch手册(3): sFlow, netFlow
这一节,我们重点看sFlow 采样流sFlow(Sampled Flow)是一种基于报文采样的网络流量监控技术,主要用于对网络流量进行统计分析. sFlow系统包含一个嵌入在设备中的sFlow Age ...
- Openvswitch手册(6): QoS
这一节我们看QoS,Qos的设置往往是和flow中的policy一起使用的 Open vSwitch QoS capabilities 1 Interface rate limiting 2 Port ...
- Openvswitch手册(7): Interfaces
我们来看Interfaces ofport: OpenFlow port number for this interface. type: system: An ordinary network de ...
- Openvswitch手册(8): ovs-vsctl的DB的操作
ovs-vsctl的DB的操作 如果你在命令行里面找不到相应的命令创建和删除对象,则可以直接删除数据库 [−−if−exists] [−−columns=column[,column]...] lis ...
- Openvswitch手册(9): Flow
这一节我们将flow table flow table主要由ovs-ofctl命令操作 ovs-ofctl可以走和openflow controller一样的协议: ssl:ip[:port]: Th ...
- Ceph相关博客、网站(256篇OpenStack博客)
官网文档: http://docs.ceph.com/docs/master/cephfs/ http://docs.ceph.com/docs/master/cephfs/createfs/ ( ...
随机推荐
- layabox typescript 安装固定版本
安装最新版本方法: https://blog.csdn.net/adelais__/article/details/79181474 固定版本(比如2.1.5): C:\Users\Administr ...
- canvas 的HTML属性
(一) width/height 默认值与单位 Canvas 标签只有两个属性—— width\height,作为一种替换元素,它默认大小为300×150像素. canvas的单位只能是是px,值只 ...
- VirtualBox 桥接模式,虚拟机ping不通宿主机
虚拟机为window server 2012 参考链接:https://blog.csdn.net/Leon_190/article/details/84937045#commentBox 该做的都做 ...
- IDEA 开发环境中设置Subversion,遇到svn安装路径包含空格无法使用版本控制的解决办法
假如你的svn.exe的安装位置是:C:\Program Files\TortoiseSVN\bin\svn.exe,路径中包含空格. 1.File->Settings->Version ...
- jQuery的1.x版本的$(element).css()设置元素字体颜色时出现的问题(在IE8以下)
最近赶项目,自己写了个基于jQuery的弹出层插件,中间遇到一个问题,怎么也找不到解决方法,最后发现就是空格的问题...欲哭无泪啊... 在给函数传参时,因为写css代码时习惯在:后面加个空格在写样式 ...
- mysql 数据库导入导出方法总结
一般形式:mysqldump -h IP -u 用户名 -p 数据库名 > 导出的文件名 (1)-p 后面不能加password,只能单独输入如1中那样 (2)mysqldump是在cmd下的命 ...
- Electorn(桌面应用)自动化测试之Java+selenium实战例子
基于electorn的桌面应用,网上相关资料较少.所有记录一下.使用java+selenium+testng对该类型应用的自动化测试方法. 代码样例 package com.contract.web. ...
- 搭建一个webpack微服务器
[前言]:因为最近在vue2.0的时候用到了webpack的externals,才发现我之前都只是用webpack做一些搭建完项目后的“收尾工作”——即打包,而没有把它纳入到项目开发的“主体过程”中来 ...
- Filter的介绍及使用
转:http://blog.csdn.net/zhaozheng7758/article/details/6105749 一.Filter的介绍及使用 什么是过滤器? 与Servlet相似,过滤器是一 ...
- LOL新版符文 怎么查看队友的符文配置?
LOL怎么看其他玩家符文? 像我这种名字都懒的打的, 直接去WeGame复制昵称. 然后在LOL主界面点生涯, 之后搜索 光头强xian生