【Spark-core学习之三】 Spark集群搭建 & spark-shell & Master HA
环境
虚拟机:VMware 10
Linux版本:CentOS-6.5-x86_64
客户端:Xshell4
FTP:Xftp4
jdk1.8
scala-2.10.4(依赖jdk1.8)
spark-1.6
一、搭建集群
组建方案:
master:PCS101,slave:PCS102、PCS103
搭建方式一:Standalone
步骤一:解压文件 改名
[root@PCS101 src]# tar -zxvf spark-1.6.-bin-hadoop2..tgz -C /usr/local

[root@PCS101 local]# mv spark-1.6.-bin-hadoop2. spark-1.6.
步骤二:修改配置文件
1、slaves.template 设置从节点
[root@PCS101 conf]# cd /usr/local/spark-1.6./conf && mv slaves.template slaves && vi slaves

PCS102

PCS103
2、spark-config.sh 设置java_home
export JAVA_HOME=/usr/local/jdk1..0_65
3、spark-env.sh
[root@PCS101 conf]# mv spark-env.sh.template spark-env.sh && vi spark-env.sh

#SPARK_MASTER_IP:master的ip

export SPARK_MASTER_IP=PCS101

#SPARK_MASTER_PORT:提交任务的端口,默认是7077

export SPARK_MASTER_PORT=

#SPARK_WORKER_CORES:每个worker从节点能够支配的core的个数

export SPARK_WORKER_CORES=

#SPARK_WORKER_MEMORY:每个worker从节点能够支配的内存数

export SPARK_WORKER_MEMORY=3g

#SPARK_MASTER_WEBUI_PORT:sparkwebUI端口 默认8080 或者修改spark-master.sh

export SPARK_MASTER_WEBUI_PORT=
步骤三、分发spark到另外两个节点
[root@PCS101 local]# scp -r /usr/local/spark-1.6. root@PCS102:`pwd`

[root@PCS101 local]# scp -r /usr/local/spark-1.6. root@PCS103:`pwd`
步骤四:启动集群
[root@PCS101 sbin]# /usr/local/spark-1.6./sbin/start-all.sh
步骤五:关闭集群
[root@PCS101 sbin]# /usr/local/spark-1.6./sbin/stop-all.sh
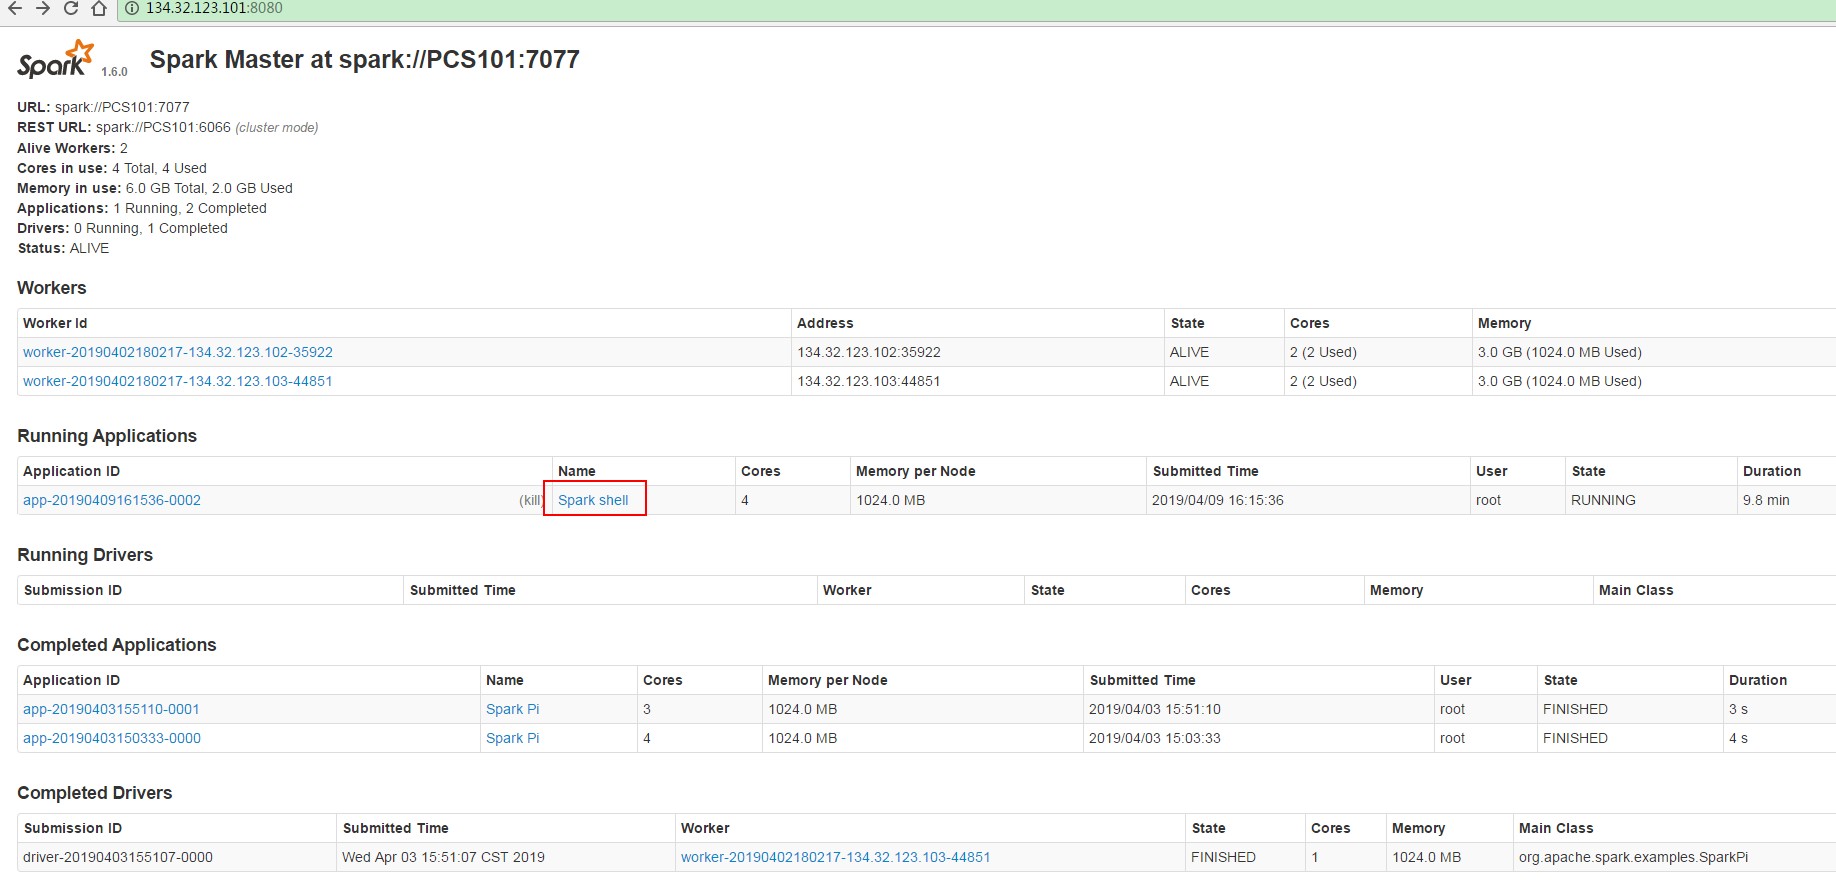
master界面:端口默认8080
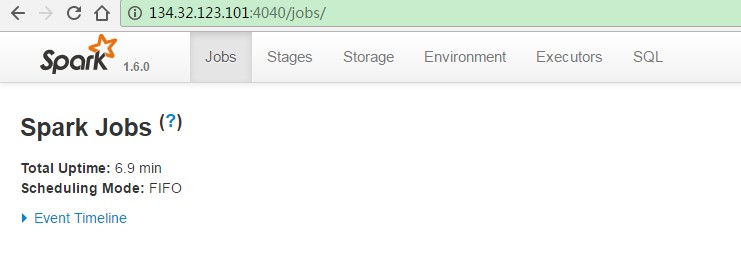
job界面,端口是4040:
步骤六:搭建客户端
将spark安装包原封不动的拷贝到一个新的节点上,然后,在新的节点上提交任务即可
提交任务测试:
[root@PCS101 bin]# ./spark-submit

Usage: spark-submit [options] <app jar | python file> [app arguments]

Usage: spark-submit --kill [submission ID] --master [spark://...]

Usage: spark-submit --status [submission ID] --master [spark://...]

Options:

  --master MASTER_URL         spark://host:port, mesos://host:port, yarn, or local.

  --deploy-mode DEPLOY_MODE   Whether to launch the driver program locally ("client") or

                              on one of the worker machines inside the cluster ("cluster")

                              (Default: client).

  --class CLASS_NAME          Your application's main class (for Java / Scala apps).

  --name NAME                 A name of your application.

  --jars JARS                 Comma-separated list of local jars to include on the driver

                              and executor classpaths.

  --packages                  Comma-separated list of maven coordinates of jars to include

                              on the driver and executor classpaths. Will search the local

                              maven repo, then maven central and any additional remote

                              repositories given by --repositories. The format for the

                              coordinates should be groupId:artifactId:version.

  --exclude-packages          Comma-separated list of groupId:artifactId, to exclude while

                              resolving the dependencies provided in --packages to avoid

                              dependency conflicts.

  --repositories              Comma-separated list of additional remote repositories to

                              search for the maven coordinates given with --packages.

  --py-files PY_FILES         Comma-separated list of .zip, .egg, or .py files to place

                              on the PYTHONPATH for Python apps.

  --files FILES               Comma-separated list of files to be placed in the working

                              directory of each executor.

  --conf PROP=VALUE           Arbitrary Spark configuration property.

  --properties-file FILE      Path to a file from which to load extra properties. If not

                              specified, this will look for conf/spark-defaults.conf.

  --driver-memory MEM         Memory for driver (e.g. 1000M, 2G) (Default: 1024M).

  --driver-java-options       Extra Java options to pass to the driver.

  --driver-library-path       Extra library path entries to pass to the driver.

  --driver-class-path         Extra class path entries to pass to the driver. Note that

                              jars added with --jars are automatically included in the

                              classpath.

  --executor-memory MEM       Memory per executor (e.g. 1000M, 2G) (Default: 1G).

  --proxy-user NAME           User to impersonate when submitting the application.

  --help, -h                  Show this help message and exit

  --verbose, -v               Print additional debug output

  --version,                  Print the version of current Spark

 Spark standalone with cluster deploy mode only:

  --driver-cores NUM          Cores for driver (Default: ).

 Spark standalone or Mesos with cluster deploy mode only:

  --supervise                 If given, restarts the driver on failure.

  --kill SUBMISSION_ID        If given, kills the driver specified.

  --status SUBMISSION_ID      If given, requests the status of the driver specified.

 Spark standalone and Mesos only:

  --total-executor-cores NUM  Total cores for all executors.

 Spark standalone and YARN only:

  --executor-cores NUM        Number of cores per executor. (Default:  in YARN mode,

                              or all available cores on the worker in standalone mode)

 YARN-only:

  --driver-cores NUM          Number of cores used by the driver, only in cluster mode

                              (Default: ).

  --queue QUEUE_NAME          The YARN queue to submit to (Default: "default").

  --num-executors NUM         Number of executors to launch (Default: ).

  --archives ARCHIVES         Comma separated list of archives to be extracted into the

                              working directory of each executor.

  --principal PRINCIPAL       Principal to be used to login to KDC, while running on

                              secure HDFS.

  --keytab KEYTAB             The full path to the file that contains the keytab for the

                              principal specified above. This keytab will be copied to

                              the node running the Application Master via the Secure

                              Distributed Cache, for renewing the login tickets and the

                              delegation tokens periodically.
(1)三台节点选择任意一个节点提交:
#--master指定master 四种方式:
standlone方式:spark://host:port;
mesos方式:mesos://host:port;
yarn方式:yarn
local方式:local
#--class指定任务类名以及所在的jar包路径
#--deploy-mode 提交任务模式:client客户端模式 cluster 集群模式
示例:SparkPi:后面的10000是SparkPi的参数
[root@PCS101 bin]# /usr/local/spark-1.6./bin/spark-submit --master spark://PCS101:7077 --class org.apache.spark.examples.SparkPi ../lib/spark-examples-1.6.0-hadoop2.6.0.jar 10000
(2)使用单独节点作为客户端提交任务:
将PCS101上spark-1.6.0安装目录整个拷贝到新节点PCS104上,然后在PCS104上提交任务,效果是一样的;
PCS104与spark集群无关的,仅仅是上面有spark的提交任务脚本,可以将PCS104当作spark客户端。
搭建方式二:Yarn
注意:如果数据来源于HDFS或者需要使用YARN提交任务,那么spark需要依赖HDFS,否则两者没有联系
(1)步骤一、二、三、六同standalone
(2)在客户端中配置:
export HADOOP_CONF_DIR=$HADOOP_HOME/etc/hadoop
提交任务:
[root@PCS101 bin]# /usr/local/spark-1.6./bin/spark-submit --master yarn --class org.apache.spark.examples.SparkPi ../lib/spark-examples-1.6.-hadoop2.6.0.jar
二、spark-shell
SparkShell是Spark自带的一个快速原型开发工具,也可以说是Spark的scala REPL(Read-Eval-Print-Loop),即交互式shell。支持使用scala语言来进行Spark的交互式编程。

1、运行
步骤一:启动standalone集群和HDFS集群(PCS102上HDFS伪分布),之后启动spark-shell
[root@PCS101 bin]# /usr/local/spark-1.6./bin/spark-shell --master spark://PCS101:7077
步骤二:运行wordcount
scala>sc.textFile("hdfs://PCS102:9820/spark/test/wc.txt").flatMap(_.split(" ")).map((_,1)).reduceByKey(_+_).foreach(println)
2、配置historyServer
2、配置historyServer
(2.1)临时配置,对本次提交的应用程序起作用
[root@PCS101 bin]# /usr/local/spark-1.6./bin/spark-shell --master spark://PCS101:7077 --name myapp1 --conf spark.eventLog.enabled=true --conf spark.eventLog.dir=hdfs://PCS102:9820/spark/test
停止程序,在Web UI中Completed Applications对应的ApplicationID中能查看history。
(2.2)spark-default.conf配置文件中配置HistoryServer,对所有提交的Application都起作用
如果想看历史事件日志,可以新搭建一个HistoryServer专门用来看历史应用日志,跟当前的集群没有关系,
这里我们新启动客户端PCS104节点,进入../spark-1.6.0/conf/spark-defaults.conf最后加入:
//开启记录事件日志的功能

spark.eventLog.enabled true

//设置事件日志存储的目录

spark.eventLog.dir hdfs://PCS102:9820/spark/test

//设置HistoryServer加载事件日志的位置  恢复查看

spark.history.fs.logDirectory hdfs://PCS102:9820/spark/test

//日志优化选项,压缩日志

spark.eventLog.compress true
启动HistoryServer:
[root@PCS104 sbin]# /usr/local/spark-1.6./sbin/start-history-server.sh
访问HistoryServer:PCS104:18080,之后所有提交的应用程序运行状况都会被记录。这里的HistoryServer和当前spark集群无关的
三、Master HA
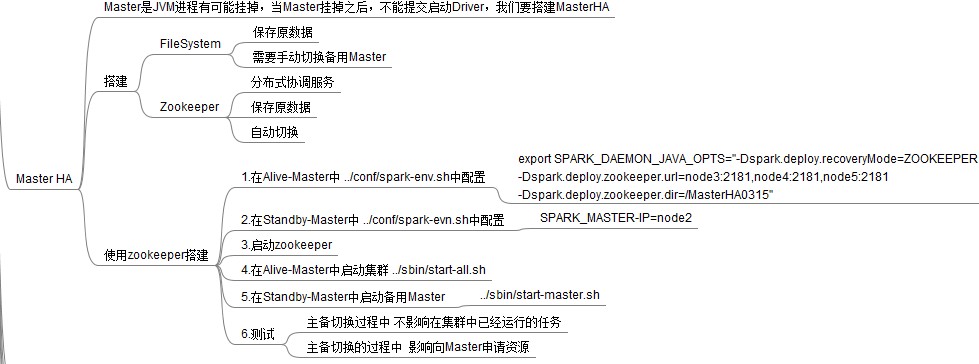
1、Master的高可用可以使用fileSystem(文件系统)和zookeeper(分布式协调服务),一般使用zookeeper方式

2、Master高可用搭建
搭建方案:
Spark集群:PCS101、PCS102、PCS103
主master:PCS101
备master:PCS102
1)在Spark Master节点上配置主Master,配置/usr/local/spark-1.6.0/conf/spark-env.sh
export SPARK_DAEMON_JAVA_OPTS="-Dspark.deploy.recoveryMode=ZOOKEEPER -Dspark.deploy.zookeeper.url=PCS101:2181,PCS102:2181,PCS103:2181 -Dspark.deploy.zookeeper.dir=/sparkmaster0409"
2)发送到其他worker节点上
[root@PCS101 conf]# scp spark-env.sh root@PCS102:`pwd`

[root@PCS101 conf]# scp spark-env.sh root@PCS103:`pwd`
3)PCS102配置备用 Master,修改spark-env.sh配置节点上的MasterIP
export SPARK_MASTER_IP=PCS102
4)启动集群之前启动zookeeper集群:
../zkServer.sh start
5)启动spark Standalone集群,启动备用Master
[root@PCS101 sbin]# /usr/local/spark-1.6./sbin/start-all.sh

[root@PCS102 sbin]# /usr/local/spark-1.6./sbin/start-master.sh
6) 打开主Master和备用Master WebUI页面,观察状态。
PCS101:Status:ALIVE
PCS102:Status:STANDBY
kill掉PCS101的master,PCS102的Status:STANDBY变为ALIVE
3. 注意点
(1)主备切换过程中不能提交Application。
(2)主备切换过程中不影响已经在集群中运行的Application。因为Spark是粗粒度资源调度。
4. 测试验证
提交SparkPi程序,kill主Master观察现象。
./spark-submit

--master spark://PCS101:7077,PCS102:7077

--class org.apache.spark.examples.SparkPi

../lib/spark-examples-1.6.-hadoop2.6.0.jar
【Spark-core学习之三】 Spark集群搭建 & spark-shell & Master HA的更多相关文章
- kafka学习(三)-kafka集群搭建
kafka集群搭建 下面简单的介绍一下kafka的集群搭建,单个kafka的安装更简单,下面以集群搭建为例子. 我们设置并部署有三个节点的 kafka 集合体,必须在每个节点上遵循下面的步骤来启动 k ...
- kafka学习(二)-zookeeper集群搭建
zookeeper概念 ZooKeeper是一个分布式的,开放源码的分布式应用程序协调服务,它包含一个简单的原语集,分布式应用程序可以基于它实现同步服务,配置维护和命名 服务等.Zookeeper是h ...
- 【转载】MQTT的学习之Mosquitto集群搭建
本文出自:http://www.cnblogs.com/yinyi521/p/6087215.html 文章钢要: 1.进行双服务器搭建 2.进行多服务器搭建 一.Mosquitto的分布式集群部署 ...
- 大数据平台搭建 - cdh5.11.1 - spark源码编译及集群搭建
一.spark简介 Apache Spark 是专为大规模数据处理而设计的快速通用的计算引擎,Spark 是一种与 hadoop 相似的开源集群计算环境,但是两者之间还存在一些不同之处,这些有用的不同 ...
- 基于Hadoop伪分布式集群搭建Spark
一.前置安装 1)JDK 2)Hadoop伪分布式集群 二.Scala安装 1)解压Scala安装包 2)环境变量 SCALA_HOME = C:\ProgramData\scala-2.10.6 P ...
- SpringCloud学习之—Eureka集群搭建
Eureka集群的搭建 上次说过了在SpringCloud应用中使用Eureka注册中心,用来对服务提供者进行服务注册与发现,但同时,它也是一个"微服务",单个应用使用空间有限,因 ...
- redis 学习笔记-cluster集群搭建
一.下载最新版redis 编译 目前最新版是3.0.7,下载地址:http://www.redis.io/download 编译很简单,一个make命令即可,不清楚的同学,可参考我之前的笔记: red ...
- Hadoop学习之Hadoop集群搭建
1.检查网络状况 Dos命令:ping ip地址,同时,在Linux下通过命令:ifconfig可以查看ip信息2.修改虚拟机的ip地址 打开linux网络连接,在桌面右上角,然后编辑ip地址, ...
- 大数据学习——hadoop2.x集群搭建
1.准备Linux环境 1.0先将虚拟机的网络模式选为NAT 1.1修改主机名 vi /etc/sysconfig/network NETWORKING=yes HOSTNAME=itcast ### ...
- Spark集群搭建简要
Spark集群搭建 1 Spark编译 1.1 下载源代码 git clone git://github.com/apache/spark.git -b branch-1.6 1.2 修改pom文件 ...
随机推荐
- Cannot create a session after the response has been committed
有时候在操作Session时,系统会抛出如下异常 java.lang.IllegalStateException: Cannot create a session after the response ...
- eclipse 查看变量或方法在什么地方被调用的快捷键和快速显示方法入参提示信息
为了用eclipse写代码的时候,不用方向键移动光标,可以设置如下快捷键, Line Up:Alt+i 光标向上 Line Down:Alt+k 光标向下 Line Start:Alt+u 移到 ...
- Thread线程中断相关方法
public class Demo { /* * 线程中断相关方法 * ---------------------------------------------------------------- ...
- greenplum 安装笔记
折腾两天了,终于把greenplum装成功了.记录下遇到的问题. 环境变量一点要配置准确. greenplum安装,按照这里一步步走: http://www.cnblogs.com/liuyungao ...
- 用SUMIF对超15位的代码进行条件求和,出错了,原因是....
用SUMIF对超15位的代码进行条件求和,出错了,原因是.... 2017-10-29 23:01 一.问题 有读者朋友问: 用SUMIF进行条件求和时,如果统计的条件是超15位的代码,就会出错,比如 ...
- ASP.NET Core MVC+EF Core从开发到部署
笔记本电脑装了双系统(Windows 10和Ubuntu16.04)快半年了,平时有时间就喜欢切换到Ubuntu系统下耍耍Linux,熟悉熟悉Linux命令.Shell脚本以及Linux下的各种应用的 ...
- PHP实现今天是星期几
echo "今天是星期" . mb_substr( "日一二三四五六",date("w"),1,"utf-8" );
- 阿里云 ECS 迁移到七牛 QVM 记
操作 下载脚本 curl -O http://p70nwjoid.bkt.clouddn.com/go2qvm_client1.5_linux_x86_64.zip 解压填写配置 unzip go2q ...
- 补充:ajax PHP html js 实现 三级联动(省 市 区)
html + js 在一个页面 php
- PHP(数据类型、水仙花数(重点)运算符)
<!--三个弹窗 alert():打开页面只是提示一下,告警框 仅仅提示,关了就关了 confirm():选择框 有返回值 prompt():输入框 控制台输出console.log() 字符串 ...