完美解决ListView中子项焦点不可被Touch的BUG.
1.在Eclipse中新建一个Android项目,项目名就叫做SlideMenuTest.
public class SlidingLayout extends RelativeLayout implements OnTouchListener {
/**
* 滚动显示和隐藏左侧布局时,手指滑动需要达到的速度。
*/
public static final int SNAP_VELOCITY = 200;
/**
* 屏幕宽度值。
*/
private int screenWidth;
/**
* 右侧布局最多可以滑动到的左边缘。
*/
private int leftEdge = 0;
/**
* 右侧布局最多可以滑动到的右边缘。
*/
private int rightEdge = 0;
/**
* 在被判定为滚动之前用户手指可以移动的最大值。
*/
private int touchSlop;
/**
* 记录手指按下时的横坐标。
*/
private float xDown;
/**
* 记录手指按下时的纵坐标。
*/
private float yDown;
/**
* 记录手指移动时的横坐标。
*/
private float xMove;
/**
* 记录手指移动时的纵坐标。
*/
private float yMove;
/**
* 记录手机抬起时的横坐标。
*/
private float xUp;
/**
* 左侧布局当前是显示还是隐藏。只有完全显示或隐藏时才会更改此值,滑动过程中此值无效。
*/
private boolean isLeftLayoutVisible;
/**
* 是否正在滑动。
*/
private boolean isSliding;
/**
* 左侧布局对象。
*/
private View leftLayout;
/**
* 右侧布局对象。
*/
private View rightLayout;
/**
* 用于监听侧滑事件的View。
*/
private View mBindView;
/**
* 左侧布局的参数,通过此参数来重新确定左侧布局的宽度,以及更改leftMargin的值。
*/
private MarginLayoutParams leftLayoutParams;
/**
* 右侧布局的参数,通过此参数来重新确定右侧布局的宽度。
*/
private MarginLayoutParams rightLayoutParams;
/**
* 用于计算手指滑动的速度。
*/
private VelocityTracker mVelocityTracker;
/**
* 重写SlidingLayout的构造函数,其中获取了屏幕的宽度。
*
* @param context
* @param attrs
*/
public SlidingLayout(Context context, AttributeSet attrs) {
super(context, attrs);
WindowManager wm = (WindowManager) context.getSystemService(Context.WINDOW_SERVICE);
screenWidth = wm.getDefaultDisplay().getWidth();
touchSlop = ViewConfiguration.get(context).getScaledTouchSlop();//获得触发控件的最短距离
}
/**
* 绑定监听侧滑事件的View,即在绑定的View进行滑动才可以显示和隐藏左侧布局。
*
* @param bindView
* 需要绑定的View对象。
*/
public void setScrollEvent(View bindView) {
mBindView = bindView;
mBindView.setOnTouchListener(this); //绑定监听事件
}
/**
* 将屏幕滚动到左侧布局界面,滚动速度设定为30.
*/
public void scrollToLeftLayout() {
if (leftLayout.getVisibility() != View.VISIBLE) { //leftLayout如果不是可见
leftLayout.setVisibility(View.VISIBLE);//设置可见状态
}
new ScrollTask().execute(-30);
}
/**
* 将屏幕滚动到右侧布局界面,滚动速度设定为-30.
*/
public void scrollToRightLayout() {
new ScrollTask().execute(30);
}
/**
* 左侧布局是否完全显示出来,或完全隐藏,滑动过程中此值无效。
*
* @return 左侧布局完全显示返回true,完全隐藏返回false。
*/
public boolean isLeftLayoutVisible() {
return isLeftLayoutVisible;
}
/**
* 在onLayout中重新设定左侧布局和右侧布局的参数。
*/
@Override
protected void onLayout(boolean changed, int l, int t, int r, int b) {
super.onLayout(changed, l, t, r, b);
if (changed) {
// 获取左侧布局对象
leftLayout = getChildAt(0);
leftLayoutParams = (MarginLayoutParams) leftLayout.getLayoutParams();
rightEdge = -leftLayoutParams.width;
// 获取右侧布局对象
rightLayout = getChildAt(1);
rightLayoutParams = (MarginLayoutParams) rightLayout.getLayoutParams();
rightLayoutParams.width = screenWidth;
rightLayout.setLayoutParams(rightLayoutParams);
}
}
@Override
public boolean onTouch(View v, MotionEvent event) {
createVelocityTracker(event);
if (leftLayout.getVisibility() != View.VISIBLE) {
leftLayout.setVisibility(View.VISIBLE);
}
switch (event.getAction()) {
case MotionEvent.ACTION_DOWN:
// 手指按下时,记录按下时的横坐标
xDown = event.getRawX();
yDown = event.getRawY();
break;
case MotionEvent.ACTION_MOVE:
// 手指移动时,对比按下时的横坐标,计算出移动的距离,来调整右侧布局的leftMargin值,从而显示和隐藏左侧布局
xMove = event.getRawX();
yMove = event.getRawY();
int moveDistanceX = (int) (xMove - xDown);
int distanceY = (int) (yMove - yDown);
if (!isLeftLayoutVisible && moveDistanceX >= touchSlop
&& (isSliding || Math.abs(distanceY) <= touchSlop)) {
isSliding = true;
rightLayoutParams.rightMargin = -moveDistanceX;
if (rightLayoutParams.rightMargin > leftEdge) {
rightLayoutParams.rightMargin = leftEdge;
}
rightLayout.setLayoutParams(rightLayoutParams);
}
if (isLeftLayoutVisible && -moveDistanceX >= touchSlop) {
isSliding = true;
rightLayoutParams.rightMargin = rightEdge - moveDistanceX;
if (rightLayoutParams.rightMargin < rightEdge) {
rightLayoutParams.rightMargin = rightEdge;
}
rightLayout.setLayoutParams(rightLayoutParams);
}
break;
case MotionEvent.ACTION_UP:
xUp = event.getRawX();
int upDistanceX = (int) (xUp - xDown);
if (isSliding) {
// 手指抬起时,进行判断当前手势的意图,从而决定是滚动到左侧布局,还是滚动到右侧布局
if (wantToShowLeftLayout()) {
if (shouldScrollToLeftLayout()) {
scrollToLeftLayout();
} else {
scrollToRightLayout();
}
} else if (wantToShowRightLayout()) {
if (shouldScrollToRightLayout()) {
scrollToRightLayout();
} else {
scrollToLeftLayout();
}
}
} else if (upDistanceX < touchSlop && isLeftLayoutVisible){
scrollToRightLayout();
}
recycleVelocityTracker();
break;
}
if (v.isEnabled()) {
if (isSliding) {
unFocusBindView();
return true;
}
if (isLeftLayoutVisible) {
return true;
}
return false;
}
return true;
}
/**
* 判断当前手势的意图是不是想显示右侧布局。如果手指移动的距离是负数,且当前左侧布局是可见的,则认为当前手势是想要显示右侧布局。
*
* @return 当前手势想显示右侧布局返回true,否则返回false。
*/
private boolean wantToShowRightLayout() {
return xUp - xDown < 0 && isLeftLayoutVisible;
}
/**
* 判断当前手势的意图是不是想显示左侧布局。如果手指移动的距离是正数,且当前左侧布局是不可见的,则认为当前手势是想要显示左侧布局。
*
* @return 当前手势想显示左侧布局返回true,否则返回false。
*/
private boolean wantToShowLeftLayout() {
return xUp - xDown > 0 && !isLeftLayoutVisible;
}
/**
* 判断是否应该滚动将左侧布局展示出来。如果手指移动距离大于屏幕的1/2,或者手指移动速度大于SNAP_VELOCITY,
* 就认为应该滚动将左侧布局展示出来。
*
* @return 如果应该滚动将左侧布局展示出来返回true,否则返回false。
*/
private boolean shouldScrollToLeftLayout() {
return xUp - xDown > leftLayoutParams.width / 2 || getScrollVelocity() > SNAP_VELOCITY;
}
/**
* 判断是否应该滚动将右侧布局展示出来。如果手指移动距离加上leftLayoutPadding大于屏幕的1/2,
* 或者手指移动速度大于SNAP_VELOCITY, 就认为应该滚动将右侧布局展示出来。
*
* @return 如果应该滚动将右侧布局展示出来返回true,否则返回false。
*/
private boolean shouldScrollToRightLayout() {
return xDown - xUp > leftLayoutParams.width / 2 || getScrollVelocity() > SNAP_VELOCITY;
}
/**
* 创建VelocityTracker对象,并将触摸事件加入到VelocityTracker当中。
*
* @param event
* 右侧布局监听控件的滑动事件
*/
private void createVelocityTracker(MotionEvent event) {
if (mVelocityTracker == null) {
mVelocityTracker = VelocityTracker.obtain();
}
mVelocityTracker.addMovement(event);
}
/**
* 获取手指在右侧布局的监听View上的滑动速度。
*
* @return 滑动速度,以每秒钟移动了多少像素值为单位。
*/
private int getScrollVelocity() {
mVelocityTracker.computeCurrentVelocity(1000);
int velocity = (int) mVelocityTracker.getXVelocity();
return Math.abs(velocity);
}
/**
* 回收VelocityTracker对象。
*/
private void recycleVelocityTracker() {
mVelocityTracker.recycle();
mVelocityTracker = null;
}
/**
* 使用可以获得焦点的控件在滑动的时候失去焦点。
*/
private void unFocusBindView() {
if (mBindView != null) {
mBindView.setPressed(false);
mBindView.setFocusable(false);
mBindView.setFocusableInTouchMode(false);
}
}
class ScrollTask extends AsyncTask<Integer, Integer, Integer> {
@Override
protected Integer doInBackground(Integer... speed) {
int rightMargin = rightLayoutParams.rightMargin;
// 根据传入的速度来滚动界面,当滚动到达左边界或右边界时,跳出循环。
while (true) {
rightMargin = rightMargin + speed[0];
if (rightMargin < rightEdge) {
rightMargin = rightEdge;
break;
}
if (rightMargin > leftEdge) {
rightMargin = leftEdge;
break;
}
publishProgress(rightMargin);
// 为了要有滚动效果产生,每次循环使线程睡眠20毫秒,这样肉眼才能够看到滚动动画。
sleep(15);
}
if (speed[0] > 0) {
isLeftLayoutVisible = false;
} else {
isLeftLayoutVisible = true;
}
isSliding = false;
return rightMargin;
}
@Override
protected void onProgressUpdate(Integer... rightMargin) {
rightLayoutParams.rightMargin = rightMargin[0];
rightLayout.setLayoutParams(rightLayoutParams);
unFocusBindView();
}
@Override
protected void onPostExecute(Integer rightMargin) {
rightLayoutParams.rightMargin = rightMargin;
rightLayout.setLayoutParams(rightLayoutParams);
}
}
/**
* 使当前线程睡眠指定的毫秒数。
*
* @param millis
* 指定当前线程睡眠多久,以毫秒为单位
*/
private void sleep(long millis) {
try {
Thread.sleep(millis);
} catch (InterruptedException e) {
e.printStackTrace();
}
}
}
<com.example.slidinglayout.SlidingLayout xmlns:android="http://schemas.android.com/apk/res/android"
xmlns:tools="http://schemas.android.com/tools"
android:id="@+id/slidingLayout"
android:layout_width="fill_parent"
android:layout_height="fill_parent" >
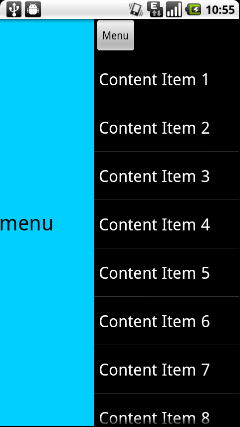
<RelativeLayout
android:id="@+id/menu"
android:layout_width="270dip"
android:layout_height="fill_parent"
android:layout_alignParentLeft="true"
android:background="#00ccff"
android:visibility="invisible" >
<TextView
android:layout_width="wrap_content"
android:layout_height="wrap_content"
android:layout_centerInParent="true"
android:text="This is menu"
android:textColor="#000000"
android:textSize="28sp" />
</RelativeLayout>
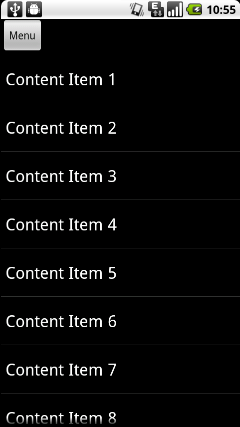
<LinearLayout
android:id="@+id/content"
android:layout_width="320dip"
android:layout_height="fill_parent"
android:layout_alignParentRight="true"
android:background="#e9e9e9"
android:orientation="vertical"
android:visibility="visible" >
<Button
android:id="@+id/menuButton"
android:layout_width="wrap_content"
android:layout_height="wrap_content"
android:text="Menu" />
<ListView
android:id="@+id/contentList"
android:layout_width="fill_parent"
android:layout_height="fill_parent"
android:cacheColorHint="#00000000" >
</ListView>
</LinearLayout>
</com.example.slidinglayout.SlidingLayout>
private String[] contentItems = { "Content Item 1", "Content Item 2", "Content Item 3",
"Content Item 4", "Content Item 5", "Content Item 6", "Content Item 7",
"Content Item 8", "Content Item 9", "Content Item 10", "Content Item 11",
"Content Item 12", "Content Item 13", "Content Item 14", "Content Item 15",
contentListAdapter = new ArrayAdapter<String>(this, android.R.layout.simple_list_item_1,
public void onItemClick(AdapterView<?> parent, View view, int position, long id) {
Toast.makeText(MainActivity.this, text, Toast.LENGTH_SHORT).show();
