springboot+swagger2
springboot+swagger2
小序
新公司的第二个项目,是一个配置管理终端机(比如:自动售卖机,银行取款机)的web项目,之前写过一个分模块的springboot框架,就在那个框架基础上进行了改造。改造后的框架可以说能满足普通项目的所有需求,大家可以循环利用哈。后续我会附上摘出来的框架源码,和大家一起学习进步。今天主要是说一下springboot配置在线接口文档swagger2。
添加jar
在你的maven管理的项目的pom.xml中添加
 <dependency>

             <groupId>io.springfox</groupId>

             <artifactId>springfox-swagger2</artifactId>

             <version>2.2.2</version>

         </dependency>

         <dependency>

             <groupId>io.springfox</groupId>

             <artifactId>springfox-swagger-ui</artifactId>

             <version>2.2.2</version>

         </dependency>
添加swagger2的配置类
 import org.springframework.context.annotation.Bean;

 import org.springframework.context.annotation.Configuration;

 import springfox.documentation.builders.ApiInfoBuilder;

 import springfox.documentation.builders.PathSelectors;

 import springfox.documentation.builders.RequestHandlerSelectors;

 import springfox.documentation.service.ApiInfo;

 import springfox.documentation.spi.DocumentationType;

 import springfox.documentation.spring.web.plugins.Docket;

 import springfox.documentation.swagger2.annotations.EnableSwagger2;

 /**

  * Swagger2配置类 在与spring boot集成时,放在与Application.java同级的目录下。

  * 通过@Configuration注解,让Spring来加载该类配置。 再通过@EnableSwagger2注解来启用Swagger2。

  */

 @Configuration

 @EnableSwagger2

 public class Swagger2 {

     /**

      * 创建API应用 apiInfo() 增加API相关信息

      * 通过select()函数返回一个ApiSelectorBuilder实例,用来控制哪些接口暴露给Swagger来展现,

      * 本例采用指定扫描的包路径来定义指定要建立API的目录。

      *

      * @return

      */

     @Bean

     public Docket createRestApi() {

         return new Docket(DocumentationType.SWAGGER_2).apiInfo(apiInfo()).select()

                 .apis(RequestHandlerSelectors.basePackage("com.11.22.33.controller"))//此处改为你的接口所在的包路径

                 .paths(PathSelectors.any()).build();

     }

     /**

      * 创建该API的基本信息(这些基本信息会展现在文档页面中) 访问地址:http://项目实际地址/swagger-ui.html

      *

      * @return

      */

     private ApiInfo apiInfo() {

         return new ApiInfoBuilder().title("title").description("description").contact("作者")

                 .version("1.0").build();//此处改为你自己的项目名称,描述,作者,版本

     }

 }
controller添加swagger2注解
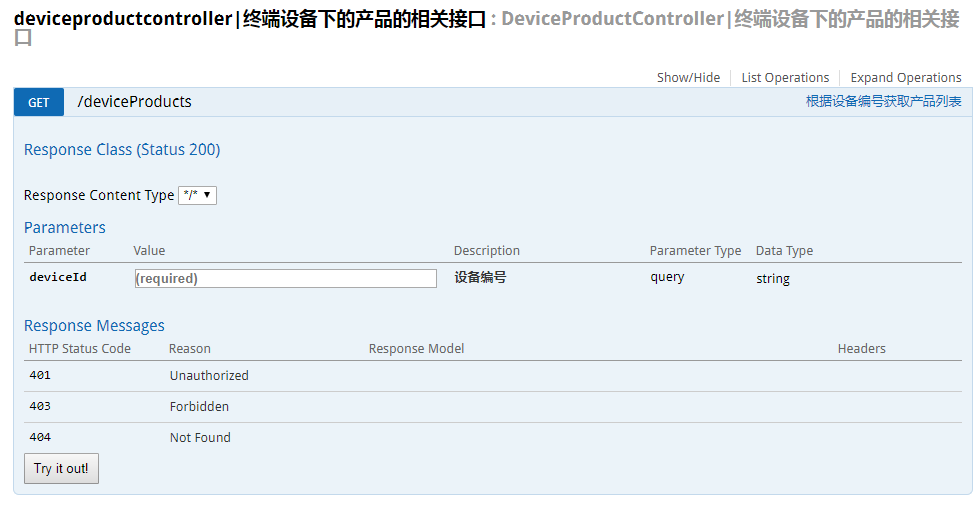
例一
多个参数的话,添加多个@ApiImplicitParam即可,逗号分隔。
import io.swagger.annotations.Api;

import io.swagger.annotations.ApiImplicitParam;

import io.swagger.annotations.ApiImplicitParams;

import io.swagger.annotations.ApiOperation;

@Api(value = "DeviceProductController|终端设备下的产品的相关接口")

@RequestMapping(RequestUrl.DEVEICE_PRODUCT_LIST)

@RestController

public class DeviceProductController {

    @Autowired

    private DeviceProductService deviceProductService;

    @ApiOperation(value="根据设备编号获取产品列表")

    @ApiImplicitParams({

        @ApiImplicitParam(paramType="query", name = "deviceId", value = "设备编号", required = true, dataType = "String")

    })

    @RequestMapping(method = RequestMethod.GET)

    String deveiceInfos(String  deviceId, HttpServletRequest request) {

        String result = deviceProductService.getDeviceProductList(deviceId);

        return result;

    }

}
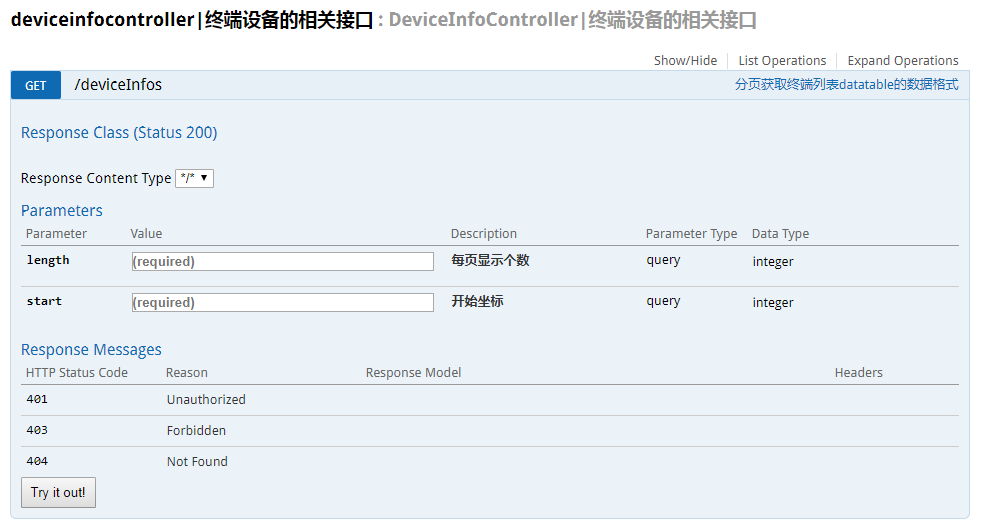
例二
import io.swagger.annotations.Api;

import io.swagger.annotations.ApiImplicitParam;

import io.swagger.annotations.ApiImplicitParams;

import io.swagger.annotations.ApiOperation;

@Api(value = "DeviceInfoController|终端设备的相关接口")

@RequestMapping(RequestUrl.DEVEICE_INFO_LIST)

@RestController

public class DeviceInfoController {

    @Autowired

    private DeviceInfoService deveiceInfoService;

    @ApiOperation(value="分页获取终端列表datatable的数据格式")

    @RequestMapping(method = RequestMethod.GET)

    String deveiceInfos(@ModelAttribute Gpage page, HttpServletRequest request) {

        String result = deveiceInfoService.deveiceInfos(page, request);

        return result;

    }

}
import io.swagger.annotations.ApiModel;

import io.swagger.annotations.ApiModelProperty;

import lombok.Data;

@ApiModel(value="分页对象类型")

@Data

public class Gpage{

    @ApiModelProperty(value="每页显示个数" ,required=true)

    private int length = 10;

    @ApiModelProperty(value="开始坐标" ,required=true)

    private int start;

}
在线接口文档访问路径
我本地启用的是8081端口,所以访问路径是http://localhost:8081/swagger-ui.html
遇到的坑
- 如果你配置了spring.resources.static-locations,那你就需要把swagger-ui.html也要加进去
解决办法:新建类MyWebAppConfigurer,添加如下代码即可
 import org.springframework.context.annotation.Configuration;

 import org.springframework.web.servlet.config.annotation.ResourceHandlerRegistry;

 import org.springframework.web.servlet.config.annotation.WebMvcConfigurerAdapter;

 @Configuration

 public class MyWebAppConfigurer extends WebMvcConfigurerAdapter {

     /**

      * 添加swagger-ui.html

      */

     @Override

     public void addResourceHandlers(ResourceHandlerRegistry registry) {

          registry.addResourceHandler("swagger-ui.html")

          .addResourceLocations("classpath:/META-INF/resources/");

          registry.addResourceHandler("/webjars*")

          .addResourceLocations("classpath:/META-INF/resources/webjars/");

         super.addResourceHandlers(registry);

     }

 }
- 如果你配置了拦截器或者过滤器,也要过滤掉swagger的相关路径
springboot+swagger2的更多相关文章
- SpringBoot+Swagger2 整合
SpringBoot+Swagger2四步整合 第一步:添加相关依赖 <parent> <groupId>org.springframework.boot</groupI ...
- Springboot+swagger2.7集成开发
Springboot+swagger2.7集成开发 本篇文章是介绍最新的springboot和swagger2.7集成开发和2.0稍微有一些出入: Springboot集成环境配置 Swagger2. ...
- MP实战系列(八)之SpringBoot+Swagger2
SpringBoot一个原则,爱好编程的朋友们都知道,那就是"习惯优于配置". 今天一上来主要说的还是代码,个人比较喜欢来的实战系列的,不过有的时候还是比较偏重于理论,理论是造轮子 ...
- springboot+swagger2案例
1.pom.xml <project xmlns="http://maven.apache.org/POM/4.0.0" xmlns:xsi="http://www ...
- Springboot+swagger2的接口文档开发
一.创建一个SpringBoot项目 1. 2. 3. 4. 把web里的web选中,SQL里选择自己需要的,点击next 二.创建各项所需的controller,configure等 1. 项目布局 ...
- SpringBoot + Swagger2 自动生成API接口文档
spring-boot作为当前最为流行的Java web开发脚手架,相信越来越多的开发者会使用其来构建企业级的RESTFul API接口.这些接口不但会服务于传统的web端(b/s),也会服务于移动端 ...
- Springboot swagger2 导出api文档
具体导出的代码,参考了:http://www.spring4all.com/article/699 导出前,首先需要配置好swagger2,参见 https://www.cnblogs.com/yan ...
- springboot + swagger2 生成api文档
直接贴代码: <dependency> <groupId>io.springfox</groupId> <artifactId>springfox-sw ...
- springboot + swagger2 学习笔记
引入步骤 1.添加依赖 <dependency> <groupId>io.springfox</groupId> <artifactId>springf ...
随机推荐
- iOS 工程自动化 - 思路整理
4 月份参加 2017@Swift 大会的时候有幸听到了 @zesming 大佬关于美团组件化的 Topic,有一张图印象特别深刻. 来自 @zesming 大佬 后来跟 @zesming 大佬沟通怎 ...
- JVM 调优总结
避免FullGC: 1.通过调整堆中新生代和幸存代大小,避免因为幸存代不足而让Minor GC后的对象进入老年代.每次Minor GC都有对象进入老年代会造成数次MinorGC后FullGC. 2.减 ...
- 安装zsh后出现命令行无法识别已安装的node
安装zsh之后,在命令行输入 node -v,会出现 command not found: node. 出现原因是:使用bash输入终端指令识别得是~/.bash_profile,而安装zsh则无法识 ...
- Kotlin代理属性--官方文档翻译
代理属性 Delegated Properties 本文为个人翻译的Kotlin官方文档, 原文连接: Delegated Properties 一些特定的常见类型的属性, 尽管我们可以在每次需要的时 ...
- Hibernate注解-类级别注解
- java private修饰的类和变量
private主要用来修饰变量和方法,一般不会用来修饰类,除非是内部类. 1.new对象 被private修饰的变量和方法,只能在自己对象内部使用,其他对象即使是new你这个对象也是获取不到被priv ...
- 论述Redis和Memcached的差异
原文 https://yq.aliyun.com/articles/60981?utm_campaign=wenzhang&utm_medium=article&utm_source= ...
- jmeter 非gui 模式跑jmx
D:\study\apache-jmeter-3.0\bin>jmeter -n -t D:\study\apache-jmeter-3.0\基金排行.jmx -l D:\study\apach ...
- dispatch emit broadcast
1.broadcast 事件广播 遍历寻找所有子孙组件,假如子孙组件和componentName组件名称相同的话,则触发$emit的事件方法,数据为 params. 如果没有找到 则使用递归的方式 继 ...
- 解决:"不再sudoers文件中,此事将不做被报告”的问题
使用sudo出现问题:不再sudoers文件中,此事将不做被报告 系统:win8.1 +cents 7 问题:在虚拟机中,默认不是root账号,在使用sudo命令时候收到下面警告: sudo命令含义: ...