
Django+Bootstrap+Mysql 搭建个人博客(五)
5.1.自定义403,404和500页面
(1)website/urls.py
from blog import views as blog_views

handler403 = blog_views.permission_denied

handler404 = blog_views.page_not_found

handler500 = blog_views.page_error
(2)views.py
def permission_denied(request):

    ''''''

    return render(request, 'blog/403.html', locals())

def page_not_found(request):

    ''''''

    return render(request, 'blog/404.html', locals())

def page_error(request):

    ''''''

    return render(request, 'blog/500.html', locals())
还要改detail的view
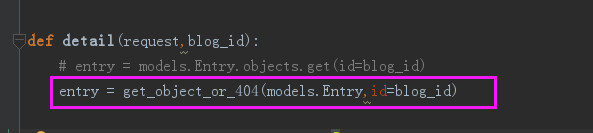
(3)403,404,500页面
{% extends 'blog/base.html' %}

{% block title %}403{% endblock %}

{% block content %}

    <section class="container text-center" style="min-height:600px;">

        <h1>403, Forbidden!</h1>

        <p>你没有权限访问该页面</p>

        <a class="btn btn-primary" href="{% url 'blog:blog_index' %}">返回主页</a>

    </section>

{% endblock %}
blog/403.html
{% extends 'blog/base.html' %}

{% block title %}404{% endblock %}

{% block content %}

    <div class="container text-center" style="min-height:600px;">

        <h1>404, Page not Found!</h1>

        <h2>页面不存在!</h2>

        <a class="btn btn-primary" href="{% url 'blog:blog_index' %}">返回主页</a>

    </div>

{% endblock %}
404
{% extends 'blog/base.html' %}

{% block title %}500{% endblock %}

{% block content %}

    <section class="container text-center" style="min-height:600px;">

        <h1>500, Page Error!</h1>

        <p>服务器错误!</p>

        <a class="btn btn-primary" href="{% url 'blog:blog_index' %}">返回主页</a>

    </section>

{% endblock %}
500
生成环境下才有效:DEBUG = False
5.2.sitemap(站点地图)
(1)settings.py
INSTALLED_APPS = [

        'django.contrib.sitemaps',

]
(2)web/urls.py
from django.contrib.sitemaps import GenericSitemap

from django.contrib.sitemaps.views import sitemap

from blog.models import Entry

info_dict = {

    'queryset': Entry.objects.all(),

    'date_field': 'modifyed_time'

}

url(r'^sitemap\.xml$', sitemap, {'sitemaps': {'blog': GenericSitemap(info_dict, priority=0.6)}},

      name='django.contrib.sitemaps.views.sitemap'),       #站点地图
from django.conf.urls import url,include

from django.contrib import admin

from django.conf import settings

from django.conf.urls.static import static

from blog.feed import LatestEntriesFeed

from blog import views as blog_views

from django.contrib.sitemaps import GenericSitemap

from django.contrib.sitemaps.views import sitemap

from blog.models import Entry

info_dict = {

    'queryset': Entry.objects.all(),

    'date_field': 'modifyed_time'

}

urlpatterns = [

    url(r'^admin/', admin.site.urls),

    url(r'^blog/',include('blog.urls') ),

    url(r'^latest/feed/$', LatestEntriesFeed()),    #RSS订阅

    url(r'^sitemap\.xml$', sitemap, {'sitemaps': {'blog': GenericSitemap(info_dict, priority=0.6)}},

      name='django.contrib.sitemaps.views.sitemap'),       #站点地图

] + static(settings.MEDIA_URL,document_root=settings.MEDIA_ROOT )        #添加图片的url

handler403 = blog_views.permission_denied

handler404 = blog_views.page_not_found

handler500 = blog_views.page_error
web/urls.py
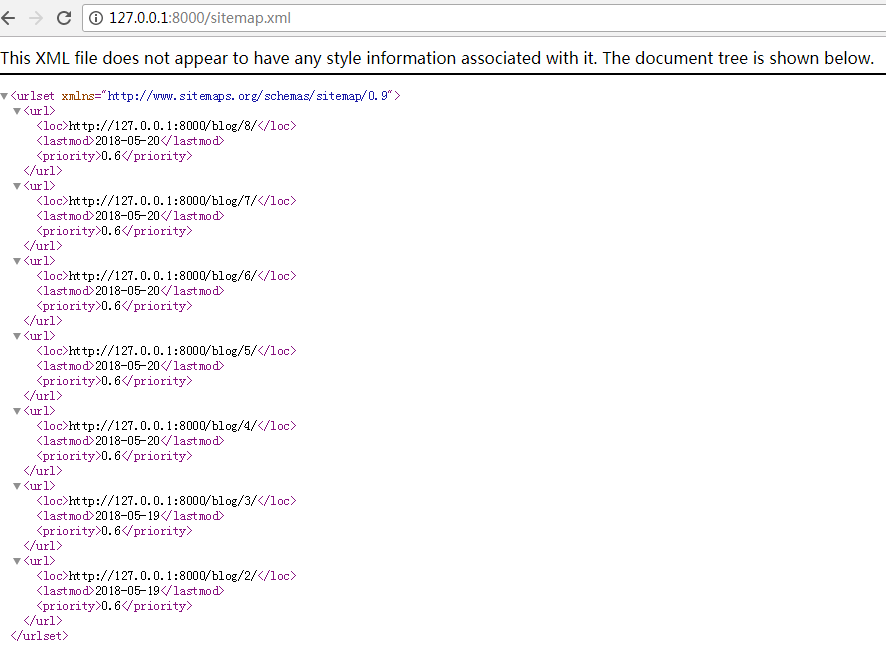
(3)访问地址:http://127.0.0.1:8000/sitemap.xml
5.3.博客详情页目录
(1)right_site_bar.html
因为只有详情页右边才显示目录,主页不显示,在right_side_bar.html添加一个block

(2)detail.html
 <div class="col-md-3">

                {% block toc %}

                    <div class="row">

                        <div class="widget">

                            <h3>博客目录</h3>

                            {{ entry.toc|safe }}

                        </div>

                    </div>

                {% endblock %}

                {% include 'blog/right_site_bar.html' %}

            </div>
把之前在正文里面显示的目录删了,只要右侧显示目录就行了
5.4.返回顶部功能
(1)base.html
  <div id="back-to-top">

        <i class="glyphicon glyphicon-arrow-up"></i>

    </div>
(2)css代码
base.html引用
<link href="{% static 'blog/css/back-to-top.css' %}" rel="stylesheet">
blog/css/back-top-css.css代码
#back-to-top {

    box-shadow: 5px 5px 5px #888888;

    border-radius: 2px;

    position: fixed;

    bottom: 70px;

    right: 70px;

    color: whitesmoke;

    background: #3ac57d;

    width: 50px;

    height: 50px;

    text-align: center;

}

#back-to-top i {

    font-size: 30px;

    margin: 10px auto;

}
(3)js代码
base.html
 <script>

    $("#back-to-top").click(function () {

        window.scrollTo(0,0);

    });

 </script>
Django+Bootstrap+Mysql 搭建个人博客(五)的更多相关文章
- Django+Bootstrap+Mysql 搭建个人博客(一)
1.1.环境搭建 (1)虚拟环境 mkvirtualenv website pip install django==1.11.7 (2)创建项目和app:website和blog (3)设置中文set ...
- Django+Bootstrap+Mysql 搭建个人博客(四)
4.1.博客分类 (1)blog_tags.py @register.simple_tag def get_categories(): return Category.objects.all() @r ...
- Django+Bootstrap+Mysql 搭建个人博客(三)
3.1.分页功能 (1)views.py from django.core.paginator import Paginator,EmptyPage,PageNotAnInteger def make ...
- Django+Bootstrap+Mysql 搭建个人博客(二)
2.1.博客首页设计 (1)settings.py MEDIA_ROOT = os.path.join(BASE_DIR,'media').replace("//","/ ...
- Django+Bootstrap+Mysql 搭建个人博客(六)
6.1.comments插件 (1)安装 pip install django-contrib-comments (02)settings INSTALLED_APPS = [ 'django.con ...
- Django+Bootstrap+Mysql 搭建个人博客 (六)
6.1.comments插件 (1)安装 pip install django-contrib-comments (02)settings INSTALLED_APPS = [ 'django.con ...
- Python Web开发:Django+BootStrap实现简单的博客项目
创建blog的项目结构 关于如何创建一个Django项目,请查看[Python Web开发:使用Django框架创建HolleWorld项目] 创建blog的数据模型 创建一个文章类 所有开发都是数据 ...
- django入门--django-blog-zinnia搭建个人博客
1.安装python 选择合适python2.7及以上版本安装https://www.python.org/downloads/ 2.建立虚拟环境 这不是必须的,但是建议使用,为每个项目单独引入依赖, ...
- Django两天搭建个人博客
传送门:https://github.com/1417766861/django-blog(可直接运行,上面有步骤) 效果: 首页: 侧栏: 详情页面: 修改头像,资料,文章发布: 支持添加标签拖拽 ...
随机推荐
- 1、Linux下部署NetCore应用
1.根据官方文档配好.NetCore环境 https://www.microsoft.com/net/learn/get-started-with-dotnet-tutorial 2.安装Nginx ...
- IIS+Tomcat功能iis端口2
之前写过IIS桥接Tomcat是通过isapi_redirect.dll,组件方式实现共用端口的,但是在Windows2012服务器 iis8.0版本中,配置完成后没有效果,比较抓狂,分析发现如下信息 ...
- resume
源码链接(码云):https://gitee.com/tinqiao/level_17_software_engineering.git 截图效果: 源码: <!DOCTYPE html> ...
- Pytorch: cuda runtime error (59) : device-side assert triggered at /pytorch/aten/src/THC/generic/THCTensorMa
更换了数据集, 在计算交叉熵损失时出现错误 : cuda runtime error (59) : device-side assert triggered at /pytorch/aten/src/ ...
- python copy模块
python copy模块 copy模块用于对象的拷贝操作 该模块只提供了两个主要的方法: copy.copy:浅复制 copy.deepcopy:深复制 直接赋值,深拷贝和浅拷贝的区别 直接赋值:简 ...
- 解决Spring boot中读取属性配置文件出现中文乱码的问题
问题描述: 在配置文件application.properties中写了 server.port=8081 server.servlet.context-path=/boy name=张三 age=2 ...
- KaliLinuxNetHunter教程刷入第三方Recovery与开始刷机
KaliLinuxNetHunter教程刷入第三方Recovery与开始刷机 2.刷入第三方Recovery(即TWRP) TWRP(TeamWin Recovery Project)是一款XDA大神 ...
- C++使用 jsoncpp 解析json数据
整合自网路 一.安装的方法 1.安装 scons 下载地址:http://sourceforge.net/projects/scons/files/scons/2.1.0/scons-2.1.0.ta ...
- 【转】window.onerror跨域问题
What the heck is "Script error"? Ben Vinegar/ May 17, 2016 If you’ve done any work with th ...
- [JZOJ3588]【中山市选2014】J语言(表达式解析+栈)
Description J语言作为一门编程语言,诞生于20世纪90年代.............. 好学的小H今天又学到了一种新东西——J语言.显然,J语言的背景已经被小H忘得一干二净了,但是小H仍然 ...