restful framework 认证源码流程
一、请求到来后,都要先执行dispatch方法
dispatch根据请求方式的不同触发get/post/put/delete等方法
注意,APIView中的dispatch方法有很多的功能
    def dispatch(self, request, *args, **kwargs):

        """

        `.dispatch()` is pretty much the same as Django's regular dispatch,

        but with extra hooks for startup, finalize, and exception handling.

        """

        self.args = args

        self.kwargs = kwargs

        第一步:对request进行加工(添加数据)

        request = self.initialize_request(request, *args, **kwargs)

        self.request = request

        self.headers = self.default_response_headers  # deprecate?

        try:

            #第二步:

                #处理版权信息

                #认证

                #权限

                #请求用户进行访问频率的限制

            self.initial(request, *args, **kwargs)

            # Get the appropriate handler method

            if request.method.lower() in self.http_method_names:

                handler = getattr(self, request.method.lower(),

                                  self.http_method_not_allowed)

            else:

                handler = self.http_method_not_allowed

            # 第三步、执行:get/post/put/delete函数

            response = handler(request, *args, **kwargs)

        except Exception as exc:

            response = self.handle_exception(exc)

        #第四步、 对返回结果再次进行加工

        self.response = self.finalize_response(request, response, *args, **kwargs)

        return self.response
二、上面是大致步骤,下面我们来具体分析一下
1、对request进行加工(添加数据)
我们来看看request里面都添加了那些数据
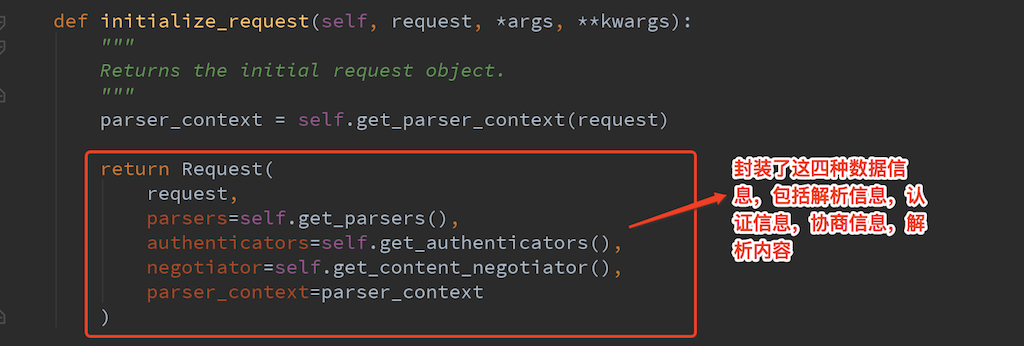
a、首先 request = self.initialize_request(request, *args, **kwargs)点进去,会发现:在Request里面多加了四个,如下
    def initialize_request(self, request, *args, **kwargs):

        """

        Returns the initial request object.

        """

        #把请求弄成一个字典返回了

        parser_context = self.get_parser_context(request)

        return Request(

            request,

            parsers=self.get_parsers(),  #解析数据,默认的有三种方式,可点进去看

            #self.get_authenticator优先找自己的,没有就找父类的

            authenticators=self.get_authenticators(), #获取认证相关的所有类并实例化,传入request对象供Request使用

            negotiator=self.get_content_negotiator(),

            parser_context=parser_context

        )
b、获取认证相关的类的具体 authenticators=self.get_authenticators(),
    def get_authenticators(self):

        """

        Instantiates and returns the list of authenticators that this view can use.

        """

        #返回的是对象列表

        return [auth() for auth in self.authentication_classes]  #[SessionAuthentication,BaseAuthentication]
c、查看认证的类:self.authentication_classes
authentication_classes = api_settings.DEFAULT_AUTHENTICATION_CLASSES #默认的,如果自定制了会优先执行自定制的
d、接着走进api_settings
api_settings = APISettings(None, DEFAULTS, IMPORT_STRINGS) #点击继承的DEFAULTS类
DEFAULTS = {

    # Base API policies

    'DEFAULT_AUTHENTICATION_CLASSES': (

        'rest_framework.authentication.SessionAuthentication',   #这时候就找到了他默认认证的类了,可以导入看看

        'rest_framework.authentication.BasicAuthentication'

    ),
e、导入了类看看类里面具体干了什么
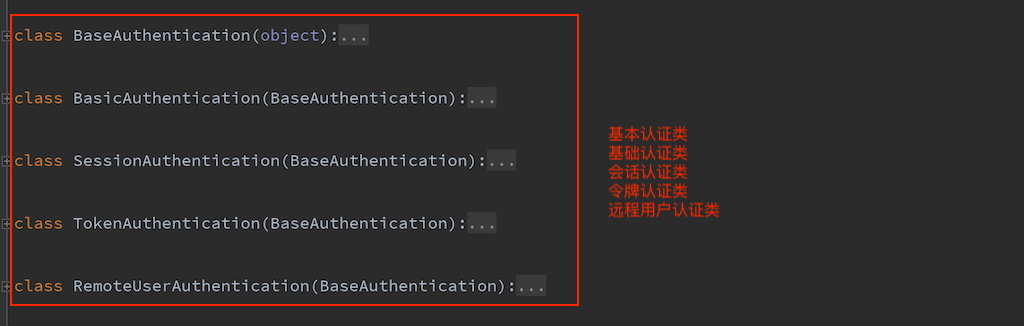
from rest_framework.authentication import SessionAuthentication

from rest_framework.authentication import BaseAuthentication
f、看到里面有个authenticate方法和authenticate_header方法
class BaseAuthentication(object):

    """

    All authentication classes should extend BaseAuthentication.

    """

    def authenticate(self, request):

        """

        Authenticate the request and return a two-tuple of (user, token).

        """

        raise NotImplementedError(".authenticate() must be overridden.")

    def authenticate_header(self, request):

        """

        Return a string to be used as the value of the `WWW-Authenticate`

        header in a `401 Unauthenticated` response, or `None` if the

        authentication scheme should return `403 Permission Denied` responses.

        """

        pass
具体处理认证,从headers里面能获取用户名和密码
class BasicAuthentication(BaseAuthentication):

    """

    HTTP Basic authentication against username/password.

    """

    www_authenticate_realm = 'api'

    def authenticate(self, request):

        """

        Returns a `User` if a correct username and password have been supplied

        using HTTP Basic authentication.  Otherwise returns `None`.

        """

        auth = get_authorization_header(request).split()

        if not auth or auth[0].lower() != b'basic':

            return None   #返回none不处理。让下一个处理

        if len(auth) == 1:

            msg = _('Invalid basic header. No credentials provided.')

            raise exceptions.AuthenticationFailed(msg)

        elif len(auth) > 2:

            msg = _('Invalid basic header. Credentials string should not contain spaces.')

            raise exceptions.AuthenticationFailed(msg)

        try:

            auth_parts = base64.b64decode(auth[1]).decode(HTTP_HEADER_ENCODING).partition(':')   #用partition切割,保留了分割项冒号

        except (TypeError, UnicodeDecodeError, binascii.Error):

            msg = _('Invalid basic header. Credentials not correctly base64 encoded.')

            raise exceptions.AuthenticationFailed(msg)

        userid, password = auth_parts[0], auth_parts[2]  # 返回用户和密码

        return self.authenticate_credentials(userid, password, request)

    def authenticate_credentials(self, userid, password, request=None):

        """

        Authenticate the userid and password against username and password

        with optional request for context.

        """

        credentials = {

            get_user_model().USERNAME_FIELD: userid,

            'password': password

        }

        user = authenticate(request=request, **credentials)

        if user is None:

            raise exceptions.AuthenticationFailed(_('Invalid username/password.'))

        if not user.is_active:

            raise exceptions.AuthenticationFailed(_('User inactive or deleted.'))

        return (user, None)

    def authenticate_header(self, request):

        return 'Basic realm="%s"' % self.www_authenticate_realm
g、当然restfulframework默认定义了两个类。我们也可以自定制类,自己有就用自己的了,自己没有就去找父类的了,但是里面必须实现authenticate方法,不然会报错。
2、进行以下操作(处理版权信息,认证,权限,访问频率限制)
- 处理版权信息
- 认证
- 权限
- 请求用户进行访问频率的限制
我们主要来看一下认证流程
认证流程:
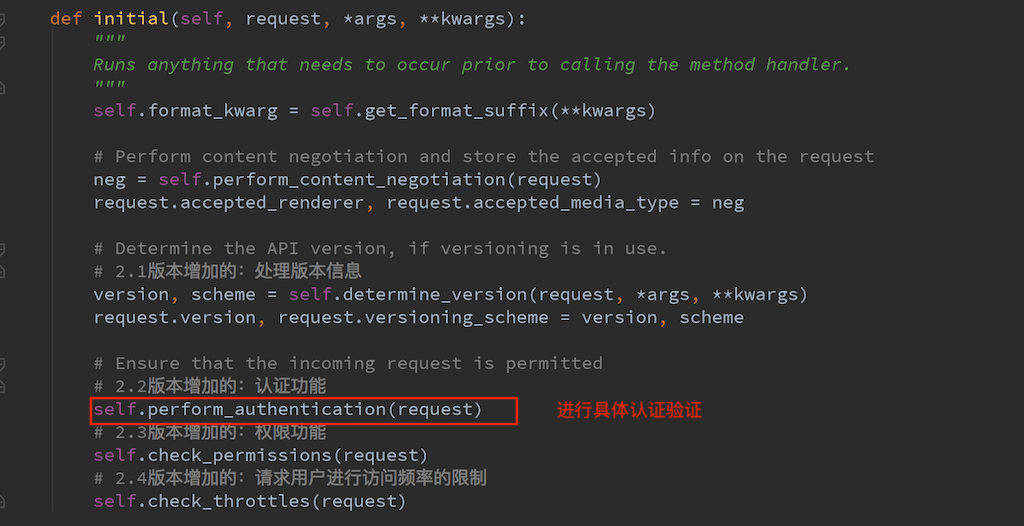
a、首先 self.initial(request, *args, **kwargs)可以看到做了以下操作
    def initial(self, request, *args, **kwargs):

        """

        Runs anything that needs to occur prior to calling the method handler.

        """

        self.format_kwarg = self.get_format_suffix(**kwargs)

        # Perform content negotiation and store the accepted info on the request

        neg = self.perform_content_negotiation(request)

        request.accepted_renderer, request.accepted_media_type = neg

        # Determine the API version, if versioning is in use.

        #2.1 处理版本信息

        version, scheme = self.determine_version(request, *args, **kwargs)

        request.version, request.versioning_scheme = version, scheme

        # Ensure that the incoming request is permitted

        #2.2 认证

        self.perform_authentication(request)

        # 2.3 权限

        self.check_permissions(request)

        # 2.4 请求用户进行访问频率的限制

        self.check_throttles(request)
b、我们先来看认证,self.perform_authentication(request) 具体干了什么,按住ctrl点击进去
    def perform_authentication(self, request):

        """

        Perform authentication on the incoming request.

        Note that if you override this and simply 'pass', then authentication

        will instead be performed lazily, the first time either

        `request.user` or `request.auth` is accessed.

        """

        request.user   #执行request的user,这是的request已经是加工后的request了
c、那么我们可以从视图里面导入一下Request,找到request对象的user方法
from rest_framework.views import Request
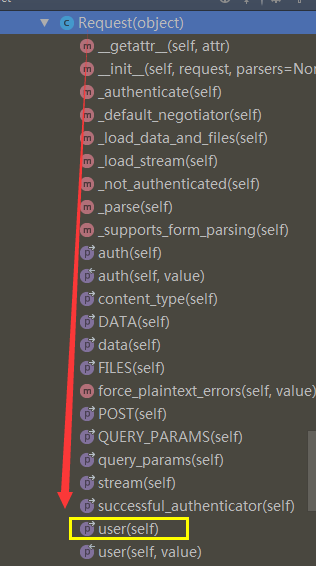
    @property

    def user(self):

        """

        Returns the user associated with the current request, as authenticated

        by the authentication classes provided to the request.

        """

        if not hasattr(self, '_user'):

            with wrap_attributeerrors():

                self._authenticate()  #

        return self._user  #返回user
d、执行self._authenticate() 开始用户认证,如果验证成功后返回元组: (用户,用户Token)
 def _authenticate(self):

        """

        Attempt to authenticate the request using each authentication instance

        in turn.

        """

        #循环对象列表

        for authenticator in self.authenticators:

            try:

                #执行每一个对象的authenticate 方法

                user_auth_tuple = authenticator.authenticate(self)

            except exceptions.APIException:

                self._not_authenticated()

                raise

            if user_auth_tuple is not None:

                self._authenticator = authenticator

                self.user, self.auth = user_auth_tuple  #返回一个元组,user,和auth,赋给了self,

                # 只要实例化Request,就会有一个request对象,就可以request.user,request.auth了

                return

        self._not_authenticated()
e、在user_auth_tuple = authenticator.authenticate(self) 进行验证,如果验证成功,执行类里的authenticatie方法
f、如果用户没有认证成功:self._not_authenticated()
 def _not_authenticated(self):

        """

        Set authenticator, user & authtoken representing an unauthenticated request.

        Defaults are None, AnonymousUser & None.

        """

        #如果跳过了所有认证,默认用户和Token和使用配置文件进行设置

        self._authenticator = None  #

        if api_settings.UNAUTHENTICATED_USER:

            self.user = api_settings.UNAUTHENTICATED_USER() # 默认值为:匿名用户AnonymousUser

        else:

            self.user = None  # None 表示跳过该认证

        if api_settings.UNAUTHENTICATED_TOKEN:

            self.auth = api_settings.UNAUTHENTICATED_TOKEN()  # 默认值为:None

        else:

            self.auth = None

    # (user, token)

    # 表示验证通过并设置用户名和Token;

    # AuthenticationFailed异常
3、执行get/post/delete等方法
4、对返回结果在进行加工
三、完整过程
现在我们主要去分析rest_framework内部对这个url的具体实现过程。
- 首先我们访问http://127.0.0.1:8000/user/ 根据urls.py中的配置,执行views.TestView.as_view()函数
as_view方法是被定义在rest_framework/views.py里面的一个静态方法,所以可以通过类名直接调用。
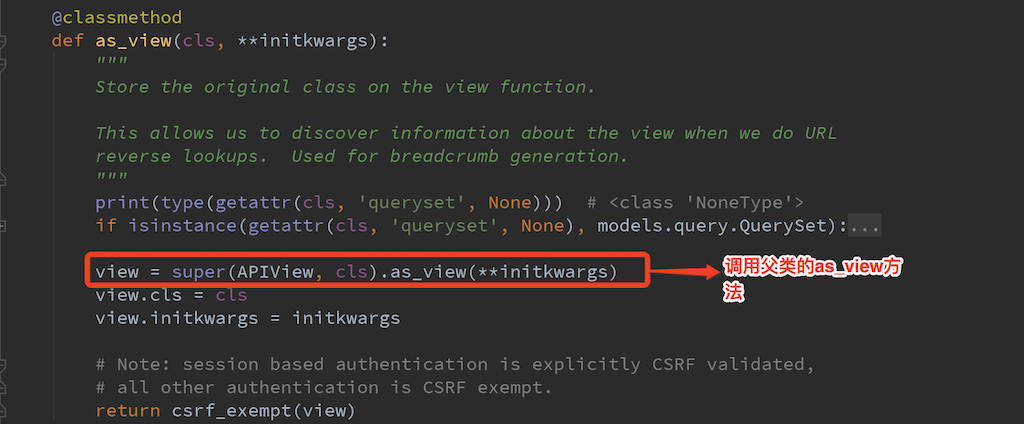
父类的as_view方法是定义在django/views/generic/base.py里面的View类中的方法。在这个方法中最终会执行cls.dispatch,在第一步中我们知道cls是<class 'app01.views.TestView'>
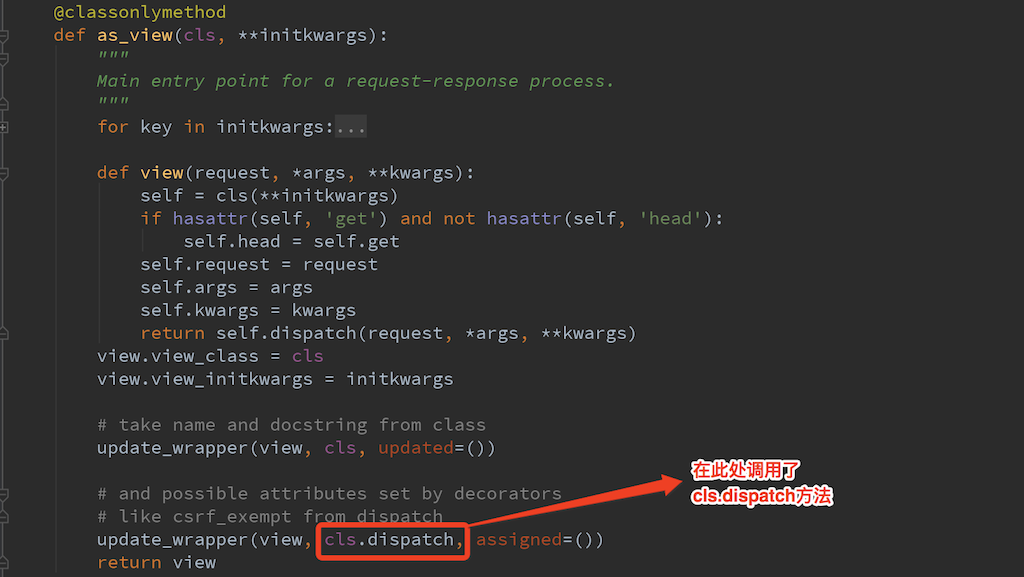
dispatch是定义在TestView继承的父类APIView(rest_framework/views.py)里面的方法。在这个方法里面,首先通过
request = self.initialize_request(request, *args, **kwargs)这条语句重新封装了request对象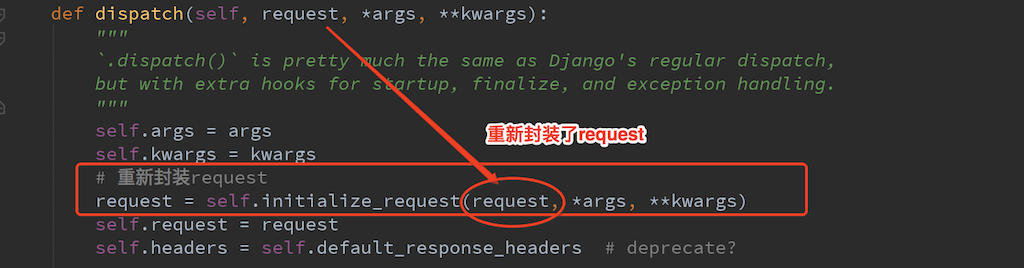
initialize_request是APIView类里面的一个方法,重新封装了request对象,增加了一些属性信息
认证信息。主要通过APIView类中的get_authenticators(rest_framework/views.py)方法获取,这个方法会返回一个所有认证对象的列表
在全局定义的authentication_classes = api_settings.DEFAULT_AUTHENTICATION_CLASSES
默认的认证配置信息是在rest_framework/settings.py文件中定义的

在rest_framework/authentication.py中定义了几种认证类型,一般情况我们需要自定义认证类,也可以使用django-oauth-toolkit组件进行认证。
- dispatch中的initialize_request方法执行完成之后,还有执行一个重要方法是self.initial(request, *args, **kwargs),这个方法也是APIView类里的。在这个方法里面初始化
被重新封装的request对象
实现功能:- 版本处理
- 用户认证
- 权限
- 访问频率限制
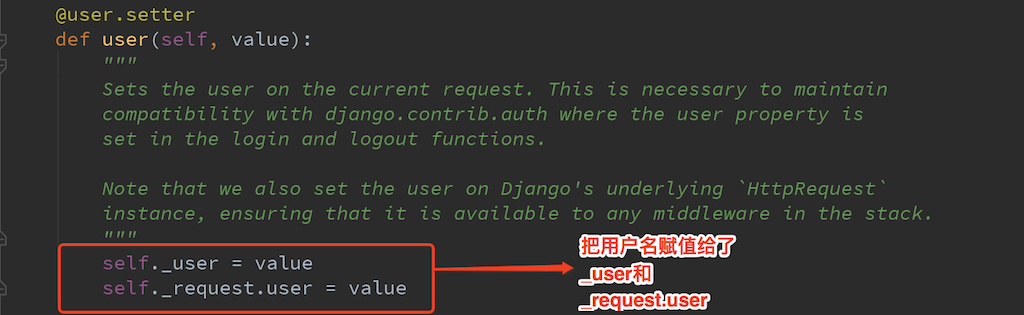
执行APIView里面的perform_authentication方法,该方法返回request.user,则会调用<rest_framework.request.request object="" at="" 0x10e80deb8="">里面的user方法。在user方法里面最终调用了Request类里面的_authenticate方法

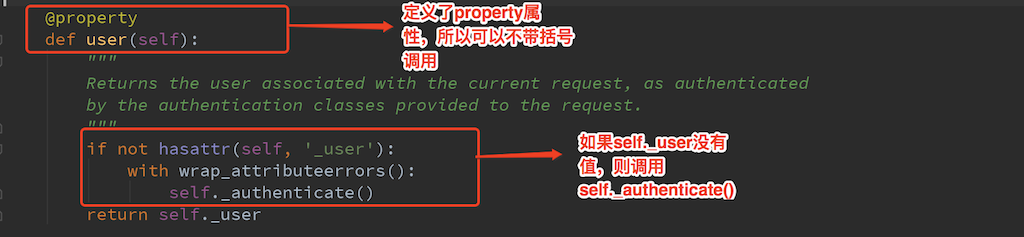
执行rest_framework.request.Request类中的_authenticate方法,这个方法会遍历认证类,并根据认证结果给self.user, self.auth赋值。由于user,和auth都有property属性,
所以给赋值的时候先在先执行setter方法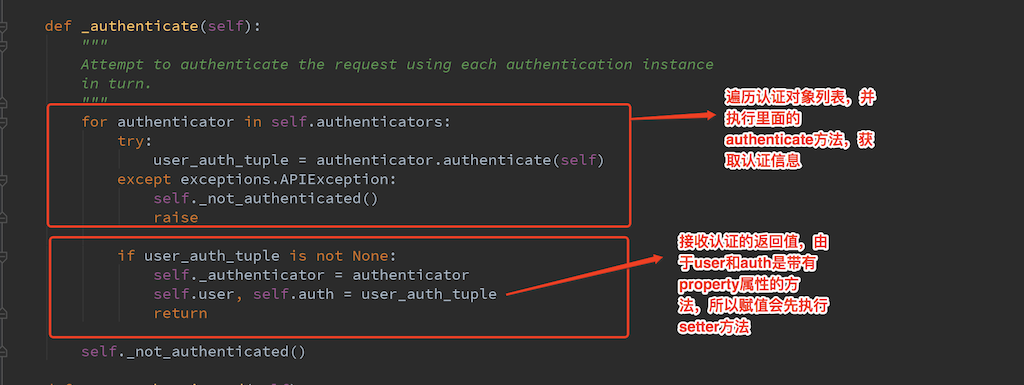
dispatch中的initial方法执行完之后,会继续判断request.method并执行method相应的method.
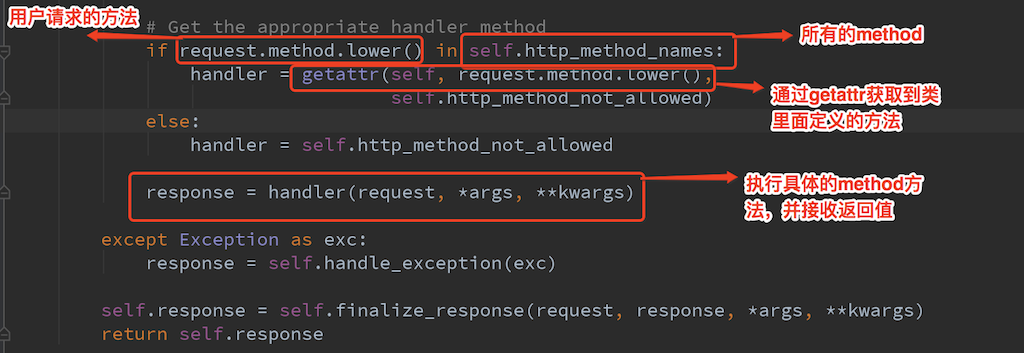
执行TestView中定义的get方法,返回数据
restful framework 认证源码流程的更多相关文章
- Django后端项目----restful framework 认证源码流程
一.请求到来之后,都要先执行dispatch方法,dispatch方法方法根据请求方式的不同触发get/post/put/delete等方法 注意,APIView中的dispatch方法有很多的功能 ...
- Rest Framework 认证源码流程
一.请求到来之后,都要先执行dispatch方法,dispatch方法方法根据请求方式的不同触发get/post/put/delete等方法 注意,APIView中的dispatch方法有很多的功能 ...
- Django Rest Framework框架源码流程
在详细说django-rest-framework源码流程之前,先要知道什么是RESTFUL.REST API . RESTFUL是所有Web应用都应该遵守的架构设计指导原则. REST是Repres ...
- Django rest_framework 认证源码流程
一.请求到来后,都要先执行dispatch方法 dispatch根据请求方式的不同触发get/post/put/delete等方法 注意,APIView中的dispatch方法有很多的功能 def d ...
- Django drf:序列化增删改查、局部与全局钩子源码流程、认证源码分析、执行流程
一.序列化类的增.删.改.查 用drf的序列化组件 -定义一个类继承class BookSerializer(serializers.Serializer): -写字段,如果不指定source ...
- Flask 源码流程,上下文管理
源码流程 创建对象 from flask import Flask """ 1 实例化对象 app """ app = Flask(__na ...
- Django session 源码流程
流程 Django session源码流程 首先执行的是SessionMiddleware的init方法 import_module(settings.SESSION_ENGINE) 导入了一个 dj ...
- Shiro 登录认证源码详解
Shiro 登录认证源码详解 Apache Shiro 是一个强大且灵活的 Java 开源安全框架,拥有登录认证.授权管理.企业级会话管理和加密等功能,相比 Spring Security 来说要更加 ...
- ES6.3.2 index操作源码流程
ES 6.3.2 index 操作源码流程 client 发送请求 TransportBulkAction#doExecute(Task,BulkRequest,listener) 解析请求,是否要自 ...
随机推荐
- 98、vue.js简单入门
本篇导航: 介绍与安装 vue常用指令 一.介绍与安装 vue是一套构建用户界面的JAVASCRIPT框架.与其它大型框架不同的是,Vue 被设计为可以自底向上逐层应用.Vue 的核心库只关注视图层, ...
- 规范的python编码
规范的 python 编码令人赏心悦目,令代码的表达逻辑更清晰,使得工程代码更容易被维护和交流: 编码规范包括对于代码书写格式的约束,不良语法的禁用和推荐的编码手法,下面做些简要的描述: 1. 代码规 ...
- Codeforces 895C - Square Subsets 状压DP
题意: 给了n个数,要求有几个子集使子集中元素的和为一个数的平方. 题解: 因为每个数都可以分解为质数的乘积,所有的数都小于70,所以在小于70的数中一共只有19个质数.可以使用状压DP,每一位上0表 ...
- Performance Testing 前期准备以及场景设计
性能测试的session参加过几个,也查阅了很多相关的资料.年前被分配了测试任务,一直拖到现在,准备开始做的时候,才发现真的是不知道如何做起啊.今天和同事聊了一下,有很大启发.测试小白一枚,只分享一下 ...
- linux 磁盘加密和tpm搭配使用1
一.基本名称,容易混淆 1.dm-crypt是linux的2.6内核开始集成的一种磁盘加密功能.十几年来,连sche调度算法都被改了N次,但dm-crypt一直稳定在内核中,稳定性还是很好的. 2.c ...
- 解决svn--Unable to connect to a repository at URL ‘https://xxxxxx’ 问题
在checkout项目时,出现如下错误: Error Unable to connect to a repository at URL 'https://XXXX' Error Access to ...
- 修改mysqlcharacter_set_database与character_set_server的默认编码(windows环境)
@参考文章 修改前是这个样子的 mysql> show variables like "%char%";+--------------------------+------- ...
- java利用poi生成/读取excel表格
1.引入jar包依赖 <dependency> <groupId>org.apache.poi</groupId> <artifactId>poi< ...
- Runtime.addShutdownHook的用法
原文出处:http://kim-miao.iteye.com/blog/1662550.感谢作者的无私分享. 一.Runtime.addShutdownHook理解 在看别人的代码时,发现其中有这个方 ...
- junit4X系列--Statement
原文出处:http://www.blogjava.net/DLevin/archive/2012/05/11/377954.html.感谢作者的无私分享. 初次用文字的方式记录读源码的过程,不知道怎么 ...