ASP.NET Core 2 学习笔记(三)中间件
之前ASP.NET中使用的HTTP Modules及HTTP Handlers,在ASP.NET Core中已不复存在,取而代之的是Middleware。Middleware除了简化了HTTP Modules/Handlers的使用方式,还带入了Pipeline的概念。
本篇将介绍ASP.NET Core的Middleware概念及用法。
Middleware 概念
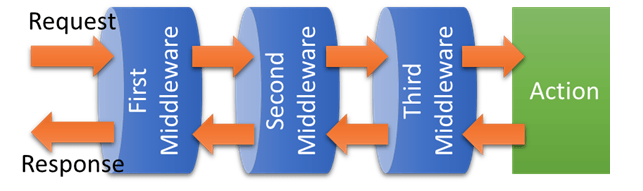
ASP.NET Core在Middleware的官方说明中,使用了Pipeline这个名词,意指Middleware像水管一样可以串联在一起,所有的Request及Response都会层层经过这些水管。
用图例可以很容易理解,如下图:
App.Use
Middleware的注册方式是在Startup.cs的Configure对IApplicationBuilder使用Use方法注册。
大部分扩展的Middleware也都是以Use开头的方法注册,例如:
- UseMvc():MVC的Middleware
- UseRewriter():URL rewriting的Middleware
一个简单的Middleware 范例。如下:
Startup.cs
using System;

using System.Collections.Generic;

using System.Linq;

using System.Threading.Tasks;

using Microsoft.AspNetCore.Builder;

using Microsoft.AspNetCore.Hosting;

using Microsoft.AspNetCore.Http;

using Microsoft.Extensions.DependencyInjection;

namespace MyWebsite

{

    public class Startup

    {

        // This method gets called by the runtime. Use this method to add services to the container.

        // For more information on how to configure your application, visit https://go.microsoft.com/fwlink/?LinkID=398940

        public void ConfigureServices(IServiceCollection services)

        {

        }

        // This method gets called by the runtime. Use this method to configure the HTTP request pipeline.

        public void Configure(IApplicationBuilder app, IHostingEnvironment env)

        {

            if (env.IsDevelopment())

            {

                app.UseDeveloperExceptionPage();

            }

            app.Use(async (context, next) =>

            {

                await context.Response.WriteAsync("First Middleware in. \r\n");

                await next.Invoke();

                await context.Response.WriteAsync("First Middleware out. \r\n");

            });

            app.Use(async (context, next) =>

            {

                await context.Response.WriteAsync("Second Middleware in. \r\n");

                await next.Invoke();

                await context.Response.WriteAsync("Second Middleware out. \r\n");

            });

            app.Use(async (context, next) =>

            {

                await context.Response.WriteAsync("Third Middleware in. \r\n");

                await next.Invoke();

                await context.Response.WriteAsync("Third Middleware out. \r\n");

            });

            app.Run(async (context) =>

            {

                await context.Response.WriteAsync("Hello World! \r\n");

            });

        }

    }

}
用浏览器打开网站任意连结,输出结果:
First Middleware in.

Second Middleware in.

Third Middleware in.

Hello World!

Third Middleware out.

Second Middleware out.

First Middleware out.
在Pipeline的概念中,注册顺序是很重要的事情。请求经过的顺序一定是先进后出。
Request 流程如下图:

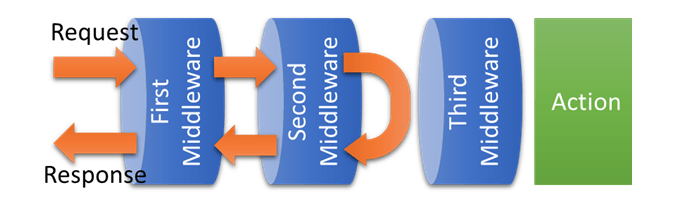
Middleware 也可以作为拦截使用,如下:
Startup.cs
using System;

using System.Collections.Generic;

using System.Linq;

using System.Threading.Tasks;

using Microsoft.AspNetCore.Builder;

using Microsoft.AspNetCore.Hosting;

using Microsoft.AspNetCore.Http;

using Microsoft.Extensions.DependencyInjection;

namespace MyWebsite

{

    public class Startup

    {

        // This method gets called by the runtime. Use this method to add services to the container.

        // For more information on how to configure your application, visit https://go.microsoft.com/fwlink/?LinkID=398940

        public void ConfigureServices(IServiceCollection services)

        {

        }

        // This method gets called by the runtime. Use this method to configure the HTTP request pipeline.

        public void Configure(IApplicationBuilder app, IHostingEnvironment env)

        {

            if (env.IsDevelopment())

            {

                app.UseDeveloperExceptionPage();

            }

            app.Use(async (context, next) =>

            {

                await context.Response.WriteAsync("First Middleware in. \r\n");

                await next.Invoke();

                await context.Response.WriteAsync("First Middleware out. \r\n");

            });

            app.Use(async (context, next) =>

            {

                await context.Response.WriteAsync("Second Middleware in. \r\n");

                // 水管阻塞,封包不往后送

                var condition = false;

                if (condition)

                {

                    await next.Invoke();

                }

                await context.Response.WriteAsync("Second Middleware out. \r\n");

            });

            app.Use(async (context, next) =>

            {

                await context.Response.WriteAsync("Third Middleware in. \r\n");

                await next.Invoke();

                await context.Response.WriteAsync("Third Middleware out. \r\n");

            });

            app.Run(async (context) =>

            {

                await context.Response.WriteAsync("Hello World! \r\n");

            });

        }

    }

}
输出结果:
First Middleware in.

Second Middleware in.

Second Middleware out.

First Middleware out.
在Second Middleware 中,因为没有达成条件,所以封包也就不在往后面的水管传送。流程如图:
App.Run
Run是Middleware的最后一个行为,以上面图例来说,就是最末端的Action。
它不像Use能串联其他Middleware,但Run还是能完整的使用Request及Response。
App.Map
Map是能用来处理一些简单路由的Middleware,可依照不同的URL指向不同的Run及注册不同的Use。
新增一个路由如下:
Startup.cs
using System;

using System.Collections.Generic;

using System.Linq;

using System.Threading.Tasks;

using Microsoft.AspNetCore.Builder;

using Microsoft.AspNetCore.Hosting;

using Microsoft.AspNetCore.Http;

using Microsoft.Extensions.DependencyInjection;

namespace MyWebsite

{

    public class Startup

    {

        // This method gets called by the runtime. Use this method to add services to the container.

        // For more information on how to configure your application, visit https://go.microsoft.com/fwlink/?LinkID=398940

        public void ConfigureServices(IServiceCollection services)

        {

        }

        // This method gets called by the runtime. Use this method to configure the HTTP request pipeline.

        public void Configure(IApplicationBuilder app, IHostingEnvironment env)

        {

            if (env.IsDevelopment())

            {

                app.UseDeveloperExceptionPage();

            }

            app.Use(async (context, next) =>

            {

                await context.Response.WriteAsync("First Middleware in. \r\n");

                await next.Invoke();

                await context.Response.WriteAsync("First Middleware out. \r\n");

            });

            // app.Use(async (context, next) =>

            // {

            //     await context.Response.WriteAsync("Second Middleware in. \r\n");

            //     // 水管阻塞,封包不往后送

            //     var condition = false;

            //     if (condition)

            //     {

            //         await next.Invoke();

            //     }

            //     await context.Response.WriteAsync("Second Middleware out. \r\n");

            // });

            app.Map("/second", mapApp =>

            {

                mapApp.Use(async (context, next) =>

                {

                    await context.Response.WriteAsync("Second Middleware in. \r\n");

                    await next.Invoke();

                    await context.Response.WriteAsync("Second Middleware out. \r\n");

                });

                mapApp.Run(async context =>

                {

                    await context.Response.WriteAsync("Second. \r\n");

                });

            });

            app.Use(async (context, next) =>

            {

                await context.Response.WriteAsync("Third Middleware in. \r\n");

                await next.Invoke();

                await context.Response.WriteAsync("Third Middleware out. \r\n");

            });

            app.Run(async (context) =>

            {

                await context.Response.WriteAsync("Hello World! \r\n");

            });

        }

    }

}
开启网站任意连结,会显示:
First Middleware in.

Third Middleware in.

Hello World!

Third Middleware out.

First Middleware out.
开启网站http://localhost:5000/second,则会显示:
First Middleware in.

Second Middleware in.

Second.

Second Middleware out.

First Middleware out.
创建Middleware 类
如果Middleware全部都写在Startup.cs,代码将很难维护,所以应该把自定义的Middleware逻辑独立出来。
建立Middleware类不需要额外继承其它类或接口,一般的类即可,例子如下:
FirstMiddleware.cs
using System.Threading.Tasks;

using Microsoft.AspNetCore.Http;

namespace MyWebsite

{

    public class FirstMiddleware

    {

        private readonly RequestDelegate _next;

        public FirstMiddleware(RequestDelegate next)

        {

            _next = next;

        }

        public async Task Invoke(HttpContext context)

        {

            await context.Response.WriteAsync($"{nameof(FirstMiddleware)} in. \r\n");

            await _next(context);

            await context.Response.WriteAsync($"{nameof(FirstMiddleware)} out. \r\n");

        }

    }

}
全局注册
在Startup.Configure注册Middleware就可以套用到所有的Request。如下:
Startup.cs
// ...

public class Startup

{

    // ...

    public void Configure(IApplicationBuilder app)

    {

        app.UseMiddleware<FirstMiddleware>();

        // ...

    }

}
局部注册
Middleware 也可以只套用在特定的Controller 或Action。注册方式如下:
Controllers\HomeController.cs
// ..

[MiddlewareFilter(typeof(FirstMiddleware))]

public class HomeController : Controller

{

    // ...

    [MiddlewareFilter(typeof(SecondMiddleware))]

    public IActionResult Index()

    {

        // ...

    }

}
Extensions
大部分扩展的Middleware都会用一个静态方法包装,如:UseMvc()、UseRewriter()等。
自定义的Middleware当然也可以透过静态方法包,范例如下:
Extensions\CustomMiddlewareExtensions.cs
using Microsoft.AspNetCore.Builder;

namespace MyWebsite

{

    public static class CustomMiddlewareExtensions

    {

        public static IApplicationBuilder UseFirstMiddleware(this IApplicationBuilder builder)

        {

            return builder.UseMiddleware<FirstMiddleware>();

        }

    }

}
注册Extension Middleware 的方式如下:
Startup.cs
// ...

public class Startup

{

    // ...

    public void Configure(IApplicationBuilder app)

    {

        app.UseFirstMiddleware();

        // ...

    }

}
参考
ASP.NET Core Middleware Fundamentals
Creating Custom Middleware In ASP.Net Core
老司机发车啦:https://github.com/SnailDev/SnailDev.NETCore2Learning
ASP.NET Core 2 学习笔记(三)中间件的更多相关文章
- Asp .Net core 2 学习笔记(2) —— 中间件
这个系列的初衷是便于自己总结与回顾,把笔记本上面的东西转移到这里,态度不由得谨慎许多,下面是我参考的资源: ASP.NET Core 中文文档目录 官方文档 记在这里的东西我会不断的完善丰满,对于文章 ...
- sql server 关于表中只增标识问题 C# 实现自动化打开和关闭可执行文件(或 关闭停止与系统交互的可执行文件) ajaxfileupload插件上传图片功能,用MVC和aspx做后台各写了一个案例 将小写阿拉伯数字转换成大写的汉字, C# WinForm 中英文实现, 国际化实现的简单方法 ASP.NET Core 2 学习笔记(六)ASP.NET Core 2 学习笔记(三)
sql server 关于表中只增标识问题 由于我们系统时间用的过长,数据量大,设计是采用自增ID 我们插入数据的时候把ID也写进去,我们可以采用 关闭和开启自增标识 没有关闭的时候 ,提示一下错 ...
- Asp.Net Core WebApi学习笔记(四)-- Middleware
Asp.Net Core WebApi学习笔记(四)-- Middleware 本文记录了Asp.Net管道模型和Asp.Net Core的Middleware模型的对比,并在上一篇的基础上增加Mid ...
- ASP.NET Core 2 学习笔记(七)路由
ASP.NET Core通过路由(Routing)设定,将定义的URL规则找到相对应行为:当使用者Request的URL满足特定规则条件时,则自动对应到相符合的行为处理.从ASP.NET就已经存在的架 ...
- ASP.NET Core 2 学习笔记(十三)Swagger
Swagger也算是行之有年的API文件生成器,只要在API上使用C#的<summary />文件注解标签,就可以产生精美的线上文件,并且对RESTful API有良好的支持.不仅支持生成 ...
- ASP.NET Core 2 学习笔记(十二)REST-Like API
Restful几乎已算是API设计的标准,通过HTTP Method区分新增(Create).查询(Read).修改(Update)和删除(Delete),简称CRUD四种数据存取方式,简约又直接的风 ...
- ASP.NET Core 2 学习笔记(十)视图
ASP.NET Core MVC中的Views是负责网页显示,将数据一并渲染至UI包含HTML.CSS等.并能痛过Razor语法在*.cshtml中写渲染画面的程序逻辑.本篇将介绍ASP.NET Co ...
- ASP.NET Core 2 学习笔记(一)开始
原文:ASP.NET Core 2 学习笔记(一)开始 来势汹汹的.NET Core似乎要取代.NET Framework,ASP.NET也随之发布.NET Core版本.虽然名称沿用ASP.NET, ...
- 使用Visual Studio Code开发Asp.Net Core WebApi学习笔记(三)-- Logger
本篇是在上一篇的基础上添加日志功能,并记录NLog在Asp.Net Core里的使用方法. 第一部分:默认Logger支持 一.project.json添加日志包引用,并在cmd窗口使用 dotnet ...
随机推荐
- Django的模板语言介绍
模板语言: 1.我们先看下在命令行中渲染模板 先导入模块对象 2.渲染一个变量 <p>当前时间:{{ time }}</p> return render(request,&qu ...
- 【SQL模板】二.创建表视图模板TSQL
---Name: 创建表视图模板.sql ---Purpose: 用于创建 数据库中 新的数据表/视图 ---Author: xx ---Time: 2015-12-18 10:26:06 ---Re ...
- debian中默认不存在sudo命令解决方法
原创 2016年09月04日 21:44:14 5664 1.使用su安装sudo $su #apt-get install sudo 1 2 2.给账户设置管理员权限 #vim /etc/sudoe ...
- Laravel图表扩展包推荐:Charts
2016年11月15日 · 2283次 · 4条 · laravel,package,charts 介绍 在项目开发中,创建图表通常是一件痛苦的事情.因为你必须将数据转换为图表库支持的格式传输 ...
- [VBScript] 自动删除2小时以前生成的文件
保存为deleteTempFiles.vbs,双击即可运行 dim folder, file, mFSO, subfolder Set mFSO = CreateObject("Script ...
- 2018.10.08 NOIP模拟 序列(主席树)
传送门 T2防ak题? 其实也不是很难(考试时sb了). 直接变形一下求出区间长度在[l2,r2][l2,r2][l2,r2]之间,中位数≤l1−1\le l1-1≤l1−1的区间数,和区间长度在[l ...
- 微信JSSDK分享接口
<script type="text/javascript" src="http://res.wx.qq.com/open/js/jweixin-1.2.0.js& ...
- 44 The shopping psychology 购物心理
The shopping psychology 购物心理 ①People can be addicted to different things ---e. g.,alcohol, drugs, ce ...
- yum 报错:centos yum (28, 'Connection time-out') Trying other mirror.
前言: 在使用yum安装 软件时,经常出现 centos yum (28, 'Connection time-out') Trying other mirror. 或下面的那样情况imeout on ...
- IDEA SpringBoot Deprecated configuration property ‘server.servlet-path’
错误样式如图所示.说我这个版本中的这个标签是过时的. 解决: 出现这个问题后,这个标签被IDEA化成了黄线,同时,想使用server.servlet-path=*.html,配置servlet路径跳转 ...