单细胞测序最好的教程(九): 细胞类型自动注释|发表在Science的注释算法
作者按
本章节主要讲解了基于大模型的自动注释方法,包括CellTypist(发表在Science)和MetaTiME(发表在Nature communication),一个通用,一个泛癌专用。本教程首发于单细胞最好的中文教程,未经授权许可,禁止转载。
全文字数|预计阅读时间: 3000|3min
——Starlitnightly(星夜)
1. 背景
我们在3-3中介绍了基于marker的自动注释方法SCSA,在本章中,我们将介绍基于深度学习模型的自动注释方法CellTypist。该算法发表在Science,算是唯一一篇发表在正刊的单细胞注释算法。与别的自动注释算法不同,CellTypist可以自定义高精度和低精度,也就是说,CellTypist可以直接注释出细胞的亚群,在高精度下。此外,对于不认识的细胞类型,其会选择性注释,不会瞎注释,这与SCSA是相同的。
我们还介绍了一种关于癌症的细胞类型的自动注释算法Metatime,这是基于23种泛癌百万单细胞图谱所构建出来的自动注释模型
import omicverse as ov

print(f'omicverse version: {ov.__version__}')

import scanpy as sc

print(f'scanpy version: {sc.__version__}')

ov.ov_plot_set()

import celltypist

print(f'celltypist version: {celltypist.__version__}')

from celltypist import models
omicverse version: 1.5.1

scanpy version: 1.9.1

celltypist version: 1.6.0
2. 加载数据
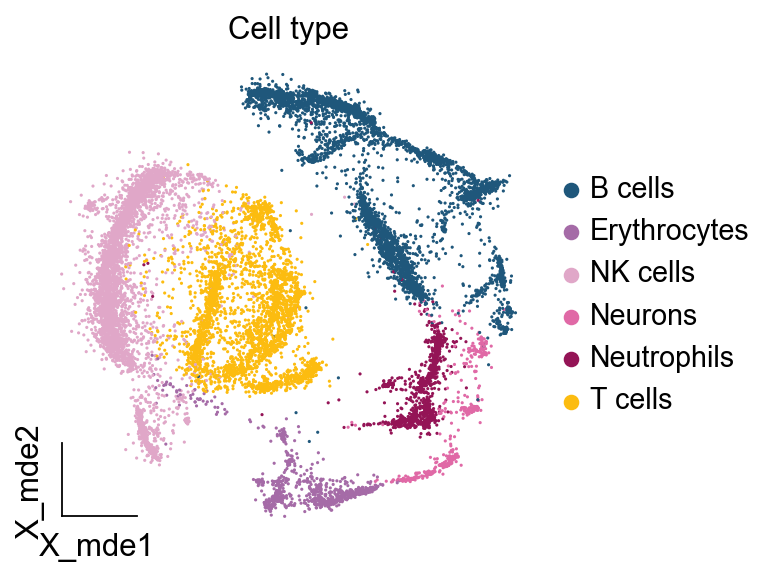
我们还是使用前面用到的已经手动注释好的单细胞测序数据
adata = ov.utils.read('data/s4d8_manual_annotation.h5ad')
由于Celltypist要求使用的归一化值为10,000,而omicverse自带预处理的归一化值为500,000。所以我们提取原始counts进行还原,然后重新归一化
adata=adata.raw.to_adata()

ov.utils.retrieve_layers(adata,layers='counts')

print('raw count adata:',adata.X.max())
......The X of adata have been stored in raw

......The layers counts of adata have been retreved

raw count adata: 889.0
adata=ov.pp.preprocess(adata,mode='shiftlog|pearson',n_HVGs=2000,target_sum=1e4)
Begin robust gene identification

After filtration, 20171/20171 genes are kept. Among 20171 genes, 20171 genes are robust.

End of robust gene identification.

Begin size normalization: shiftlog and HVGs selection pearson

normalizing counts per cell The following highly-expressed genes are not considered during normalization factor computation:

[]

    finished (0:00:00)

WARNING: adata.X seems to be already log-transformed.

extracting highly variable genes

--> added

    'highly_variable', boolean vector (adata.var)

    'highly_variable_rank', float vector (adata.var)

    'highly_variable_nbatches', int vector (adata.var)

    'highly_variable_intersection', boolean vector (adata.var)

    'means', float vector (adata.var)

    'variances', float vector (adata.var)

    'residual_variances', float vector (adata.var)

End of size normalization: shiftlog and HVGs selection pearson
ov.utils.embedding(adata,

                basis='X_mde',

                color=[ "major_celltype"],

                title=['Cell type'],

                palette=ov.palette()[11:],

                show=False,frameon='small',)
3. CellTypist模型加载
我们首先需要下载已经训练好的模型
# Enabling `force_update = True` will overwrite existing (old) models.

models.download_models(force_update = True)
 Retrieving model list from server https://celltypist.cog.sanger.ac.uk/models/models.json

 Total models in list: 31

 Storing models in /mnt/home/zehuazeng/.celltypist/data/models

 Downloading model [1/31]: Immune_All_Low.pkl

 Downloading model [2/31]: Immune_All_High.pkl

 Downloading model [3/31]: Adult_CynomolgusMacaque_Hippocampus.pkl

 Downloading model [4/31]: Adult_Mouse_Gut.pkl

 Downloading model [5/31]: Adult_Mouse_OlfactoryBulb.pkl

 Downloading model [6/31]: Adult_Pig_Hippocampus.pkl

 Downloading model [7/31]: Adult_RhesusMacaque_Hippocampus.pkl

 Downloading model [8/31]: Autopsy_COVID19_Lung.pkl

 Downloading model [9/31]: COVID19_HumanChallenge_Blood.pkl

 Downloading model [10/31]: COVID19_Immune_Landscape.pkl

 Downloading model [11/31]: Cells_Fetal_Lung.pkl

 Downloading model [12/31]: Cells_Intestinal_Tract.pkl

 Downloading model [13/31]: Cells_Lung_Airway.pkl

 Downloading model [14/31]: Developing_Human_Brain.pkl

 Downloading model [15/31]: Developing_Human_Hippocampus.pkl

 Downloading model [16/31]: Developing_Human_Thymus.pkl

 Downloading model [17/31]: Developing_Mouse_Brain.pkl

 Downloading model [18/31]: Developing_Mouse_Hippocampus.pkl

 Downloading model [19/31]: Healthy_COVID19_PBMC.pkl

 Downloading model [20/31]: Healthy_Mouse_Liver.pkl

 Downloading model [21/31]: Human_AdultAged_Hippocampus.pkl

 Downloading model [22/31]: Human_IPF_Lung.pkl

 Downloading model [23/31]: Human_Longitudinal_Hippocampus.pkl

 Downloading model [24/31]: Human_Lung_Atlas.pkl

 Downloading model [25/31]: Human_PF_Lung.pkl

 Downloading model [26/31]: Lethal_COVID19_Lung.pkl

 Downloading model [27/31]: Mouse_Dentate_Gyrus.pkl

 Downloading model [28/31]: Mouse_Isocortex_Hippocampus.pkl

 Downloading model [29/31]: Mouse_Postnatal_DentateGyrus.pkl

 Downloading model [30/31]: Nuclei_Lung_Airway.pkl

 Downloading model [31/31]: Pan_Fetal_Human.pkl
所有的模型被存放在models.models_path
models.models_path
'/mnt/home/zehuazeng/.celltypist/data/models'
我们可以使用models.models_description获取更加详细的信息
models.models_description().head()
Detailed model information can be found at `https://www.celltypist.org/models`
选择您要使用的模型,例如,包含低层次(高分辨率)免疫细胞类型/亚型的所有组织组合模型。
# Indeed, the `model` argument defaults to `Immune_All_Low.pkl`.

model = models.Model.load(model = 'Immune_All_Low.pkl')

model
CellTypist model with 98 cell types and 6639 features

    date: 2022-07-16 00:20:42.927778

    details: immune sub-populations combined from 20 tissues of 18 studies

    source: https://doi.org/10.1126/science.abl5197

    version: v2

    cell types: Age-associated B cells, Alveolar macrophages, ..., pDC precursor

    features: A1BG, A2M, ..., ZYX
4. CellTypist注释
我们使用celltypist.annotate中的默认模式()将细胞类型标签从模型传输到查询数据集。启用此模式后,每个查询单元格都会被预测为模型中所有可能的单元格类型中得分/概率最大的单元格类型。mode = 'best match'
# Not run; predict cell identities using this loaded model.

#predictions = celltypist.annotate(adata_500, model = model, majority_voting = True, mode = 'best match')

# Alternatively, just specify the model name (recommended as this ensures the model is intact every time it is loaded).

# `p_thres` defaults to 0.5.

predictions = celltypist.annotate(adata, model = 'Immune_All_Low.pkl', majority_voting = True, mode = 'prob match', p_thres = 0.5)
 Input data has 14814 cells and 20171 genes

 Matching reference genes in the model

 5295 features used for prediction

⚖️ Scaling input data

️ Predicting labels

 Prediction done!

 Detected a neighborhood graph in the input object, will run over-clustering on the basis of it

⛓️ Over-clustering input data with resolution set to 10

running Leiden clustering

    finished: found 111 clusters and added

    'over_clustering', the cluster labels (adata.obs, categorical) (0:00:01)

️ Majority voting the predictions

 Majority voting done!
默认情况下(majority_voting = False),CellTypist 会独立推断出每个查询单元格的身份。这会产生原始的预测单元格类型标签,通常会在几秒或几分钟内完成,具体取决于查询数据的大小。你也可以打开多数票分类器(majority_voting = True),它可以在过度聚类方法之后,以增加运行时间为代价,在本地子聚类中完善细胞身份。
结果包括预测的细胞类型标签(predicted_labels)、过度聚类结果(over_clustering)和本地子聚类中多数投票后的预测标签(majority_voting)。请注意,在预测标签中,每个查询单元格都是通过从给定模型中所有可能的单元格类型中选择最可能的单元格类型来获得推断标签的。
adata_new = predictions.to_adata()

ov.utils.embedding(adata_new,

                basis='X_mde',

                color=[ "major_celltype","majority_voting"],

                #title=['Cell type'],

                palette=sc.pl.palettes.default_102,

                show=False,frameon='small',wspace=0.45)
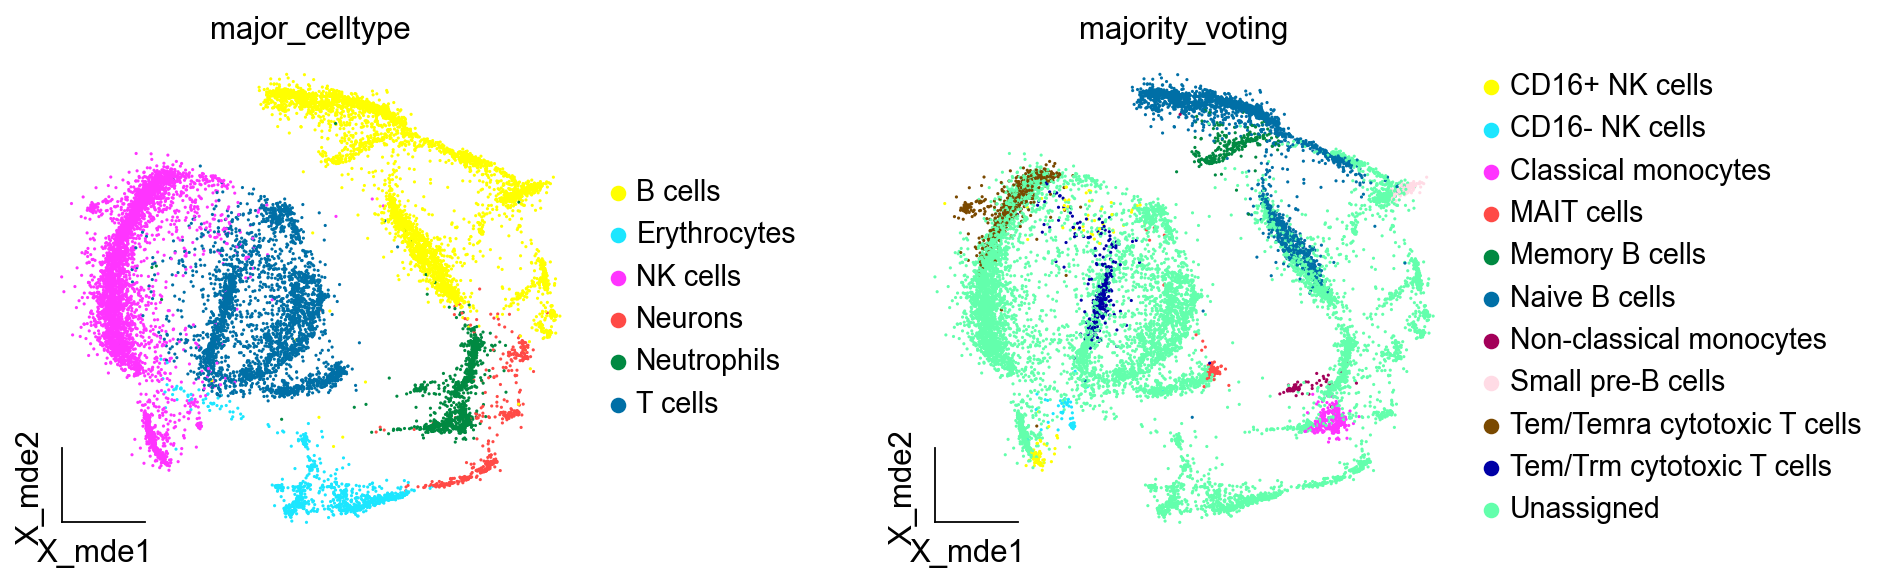
我们观察后发现,大部分细胞类型被标注为Unassigned,这是由于我们设定了预测概率0.5作为阈值,低于该阈值的细胞不被注释,表明Celltypist在注释复杂的未知的数据上的效果,并不如手动注释或者是SCSA。
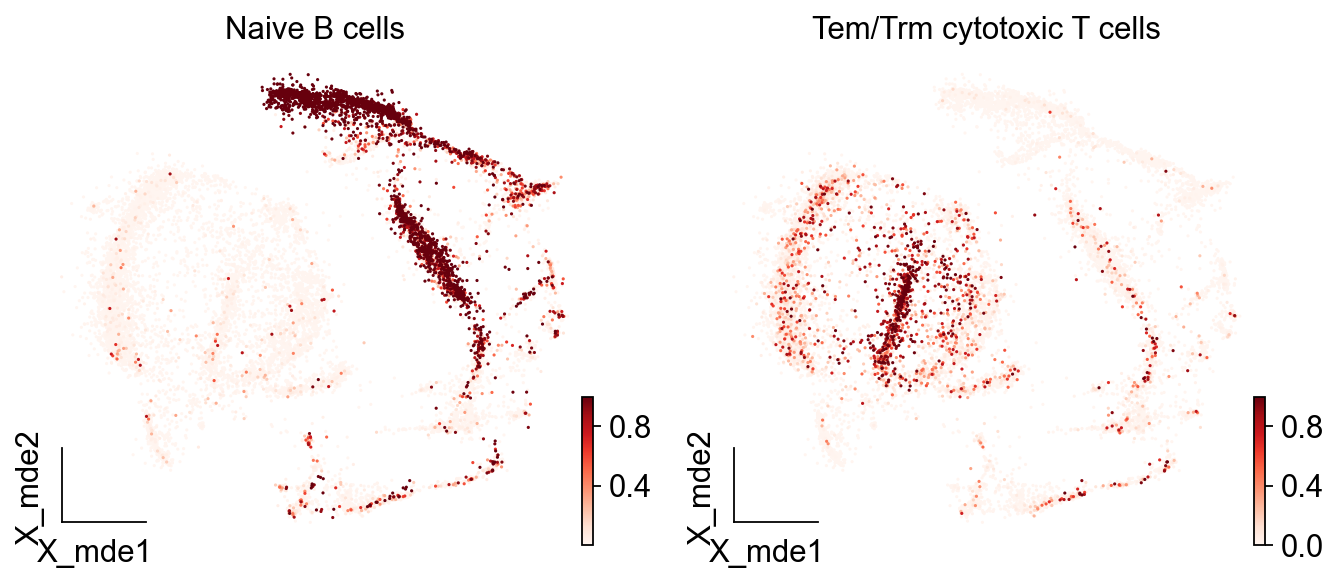
而如果我们想看到每一类细胞被注释的概率,我们可以设定参数insert_prob=True
adata_new= predictions.to_adata(insert_prob = True)

ov.utils.embedding(adata_new,

                basis='X_mde',

                color=[ "Naive B cells","Tem/Trm cytotoxic T cells"],

                #title=['Cell type'],

                palette=sc.pl.palettes.default_102,

                cmap='Reds',

                show=False,frameon='small')
实际上,您可能并不需要明确地将 celltypist.annotate 输出的预测结果转换成上述的 AnnData。更有用的方法是使用可视化函数 celltypist.dotplot,将 CellTypist 预测结果(例如这里的 majority_voting)与 AnnData 中预定义的单元格类型(这里的 cell_type)进行定量比较。您也可以将 use_as_prediction 的值改为 predicted_labels,将原始预测结果与预定义的细胞类型进行比较。
celltypist.dotplot(predictions, use_as_reference = 'major_celltype', use_as_prediction = 'majority_voting')
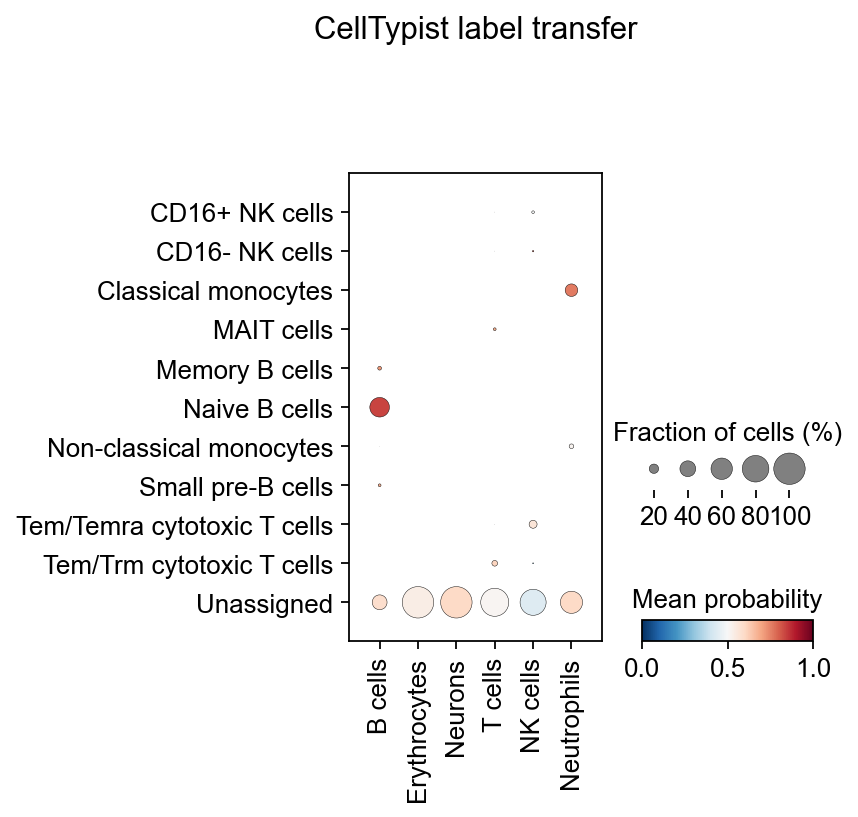
在髓系数据集上注释失败并不意味着该算法不好,而是说明对于没有典型marker的细胞类型来说,例如表达MS4A1相对一般的B细胞,我们大部分自动注释算法都会表现地比较差,这时候,手动注释相对会更可靠一些。
5. 泛癌细胞类型自动注释
MetaTiME 通过整合数百个肿瘤 scRNA-seq 数据中的数百万个单细胞,学习数据驱动、可解释和可重复的基因程序。我们的想法是从大规模数据中学习具有生物意义的单细胞空间图,这有助于理解功能性细胞状态,并将知识转移到新的数据分析中。MetaTiME 提供经过预训练的元组件(MeCs),可自动注释细粒度细胞状态,并绘制肿瘤微环境新单细胞的特征连续图。
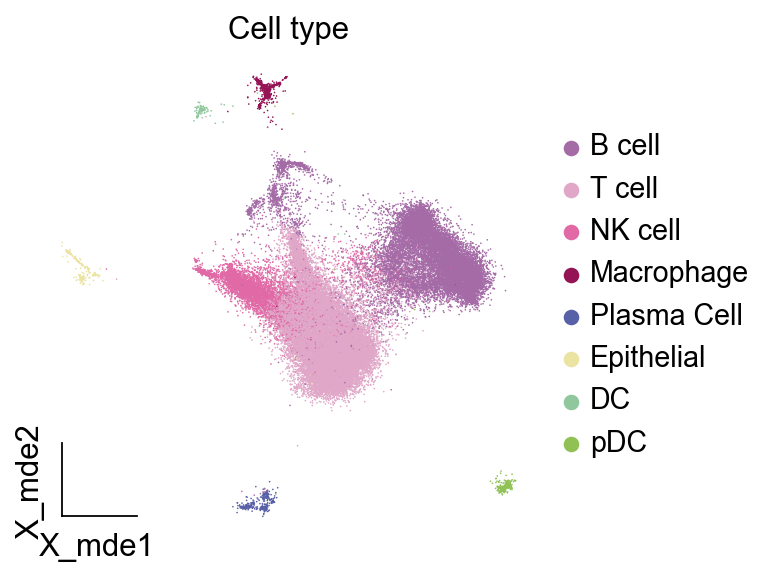
我们首先加载一个已经注释好的乳腺癌淋巴结的单细胞测序数据,我们所加载的数据都是已经注释好的,为了方便我们比较注释的效果
adata=ov.utils.read('/mnt/home/zehuazeng/analysis/brca/data/analysis_lymph/lymph_anno.h5ad')

adata
AnnData object with n_obs × n_vars = 55571 × 3000

    obs: 'sample_path', 'lymph_sample', 'lymph_sample_rep', 'GSM', 'nUMIs', 'mito_perc', 'detected_genes', 'cell_complexity', 'doublet_score', 'predicted_doublet', 'passing_mt', 'passing_nUMIs', 'passing_ngenes', 'n_genes', '_scvi_batch', '_scvi_labels', 'leiden', 'scsa_celltype', 'major_celltype'

    var: 'mt', 'n_cells', 'percent_cells', 'robust', 'mean', 'var', 'residual_variances', 'highly_variable_rank', 'highly_variable_features'

    uns: '_scvi_manager_uuid', '_scvi_uuid', 'hvg', 'leiden', 'leiden_colors', 'log1p', 'lymph_sample_colors', 'major_celltype_colors', 'neighbors', 'pearson_residuals_normalization', 'rank_genes_groups', 'scrublet', 'scsa_celltype_colors'

    obsm: 'X_mde', 'X_scVI'

    layers: 'counts'

    obsp: 'connectivities', 'distances'
ov.utils.embedding(adata,

                basis='X_mde',

                color=[ "major_celltype"],

                title=['Cell type'],

                #palette=sc.pl.palettes.default_102,

                cmap='Reds',

                show=False,frameon='small')
接下来,让我们加载预先计算好的 MetaTiME 元模型(MeCs)及其功能注释。
TiME_object=ov.single.MetaTiME(adata,mode='table')
metatime have been install version: 1.3.0

...load pre-trained MeCs

...load functional annotation for MetaTiME-TME
我们可以对细胞进行过度聚类,这对细粒度的细胞状态注释非常有用。
随着分辨率的提高,聚类的数量也会增加,为了尽最大可能地增加注释精度,我们将resolution设置为8
TiME_object.overcluster(resolution=8,clustercol = 'overcluster',)
...overclustering using leiden

running Leiden clustering

    finished: found 294 clusters and added

    'overcluster', the cluster labels (adata.obs, categorical) (0:00:24)
我们使用 TiME_object.predictTiME()来预测 TME 中的潜在细胞类型。
- 细胞亚群将存储在 adata.obs['MetaTiME'] 中。
- 细胞类型将存储在 adata.obs['Major_MetaTiME'] 中。
TiME_object.predictTiME(save_obs_name='MetaTiME')
...projecting MeC scores

......The predicted celltype have been saved in obs.MetaTiME

......The predicted major celltype have been saved in obs.Major_MetaTiME
对比手动注释与自动注释的结果,我们可以发现MetaTiME的注释准确率相当地高,其从百万泛癌图谱训练出来也正意味着其具有着较强的泛化能力
ov.utils.embedding(adata,

                  basis='X_mde',

                  color=['Major_MetaTiME','major_celltype'],

                   show=False, add_outline=False,

                   frameon='small',legend_fontoutline=2,

                 )

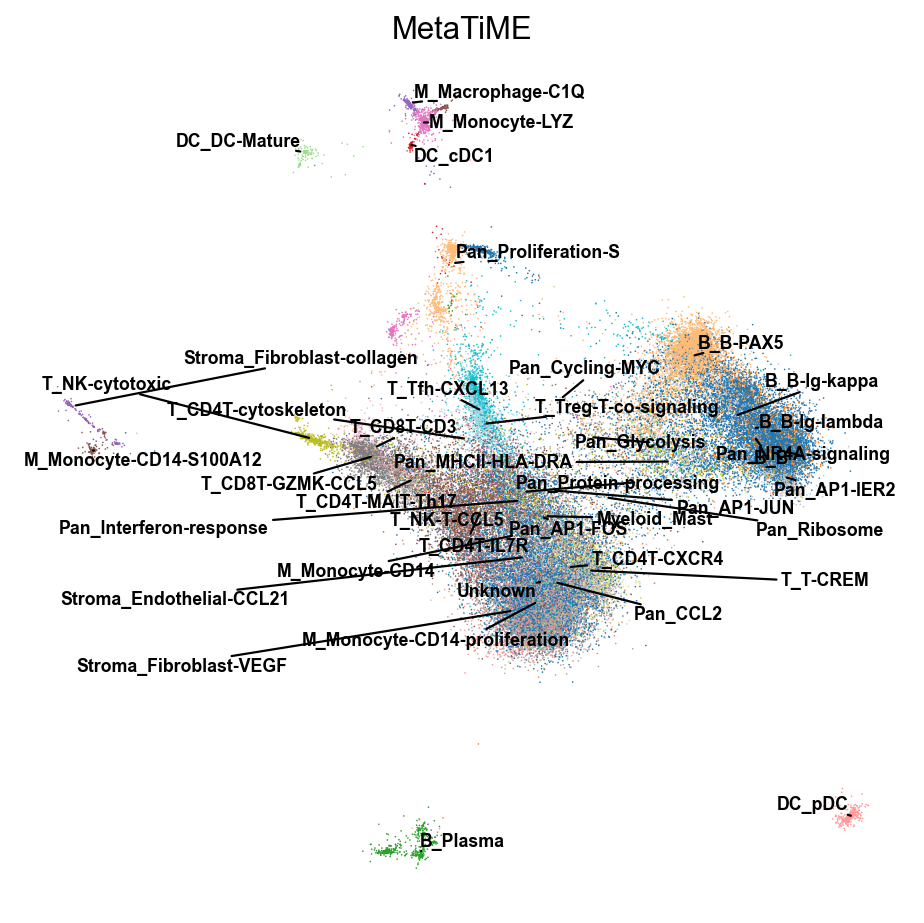
由于细胞亚群较多,常规的可视化方法可能会出现标签遮挡,我们这里提供了两个函数来避免这一情况的出现
- 你可以使用
TiME_object.plot来可视化 - 你也可以使用
ov.utils.gen_mpl_labels来优化重叠标签
fig,ax=TiME_object.plot(cluster_key='MetaTiME',basis='X_mde',dpi=80)

#fig.save
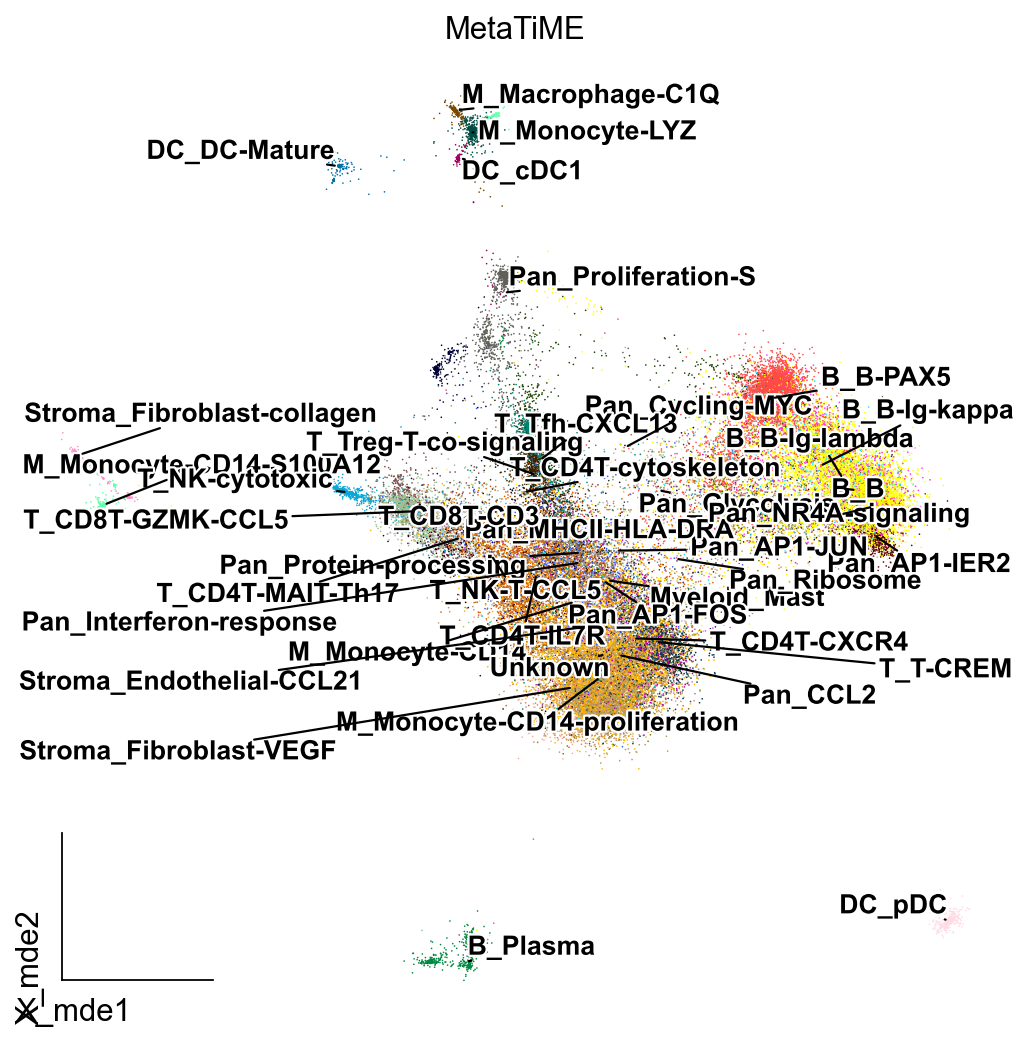
from matplotlib import patheffects

import matplotlib.pyplot as plt

fig, ax = plt.subplots(figsize=(8,8))

ov.utils.embedding(adata,

                  basis='X_mde',

                  color=['MetaTiME'],

                   show=False, legend_loc=None, add_outline=False,

                   frameon='small',legend_fontoutline=2,ax=ax

                 )

ov.utils.gen_mpl_labels(

    adata,

    'MetaTiME',

    exclude=("None",),

    basis='X_mde',

    ax=ax,

    adjust_kwargs=dict(arrowprops=dict(arrowstyle='-', color='black')),

    text_kwargs=dict(fontsize= 12 ,weight='bold',

                     path_effects=[patheffects.withStroke(linewidth=2, foreground='w')] ),

)
以上便是自动注释的全部内容了,事实上,自动注释的准确率完全取决于训练数据的规模以及数据集的匹配程度,在复杂的单细胞测序数据,以及稀有组织中,其注释能力往往较差,这时候我们就需要用手动注释的方式寻找簇的marker来完成细胞类型的注释。
单细胞测序最好的教程(九): 细胞类型自动注释|发表在Science的注释算法的更多相关文章
- 基于单细胞测序数据构建细胞状态转换轨迹(cell trajectory)方法总结
细胞状态转换轨迹构建示意图(Trapnell et al. Nature Biotechnology, 2014) 在各种生物系统中,细胞都会展现出一系列的不同状态(如基因表达的动态变化等),这些状态 ...
- 单细胞测序技术(single cell sequencing)
单细胞测序技术(single cell sequencing) 2018-03-02 11:02 来源: 一呼百诺 点击次数:6587关键词: 前言 单细胞生物学最近几年是非常热门的研究方向 ...
- 单细胞测序|单细胞基因组|单细胞转录组|Gene editing|
单细胞测序 单细胞基因组学 测量理由是单细胞的时间空间特异性. Gene expression&co-expression 比较正常cell与疾病cell,正常organ与疾病organ,看出 ...
- 无废话ExtJs 入门教程九[数字字段:NumberField、隐藏字段Hidden、日期字段:DataFiedl]
无废话ExtJs 入门教程九[数字字段:NumberField.隐藏字段Hidden.日期字段:DataFiedl] extjs技术交流,欢迎加群(201926085) 继上第六节内容,我们在表单里加 ...
- RabbitMQ入门教程(九):首部交换机Headers
原文:RabbitMQ入门教程(九):首部交换机Headers 版权声明:本文为博主原创文章,遵循CC 4.0 BY-SA版权协议,转载请附上原文出处链接和本声明. 本文链接:https://blog ...
- WPF教程九:理解WPF中的对象资源
在WPF中,所有继承自FrameworkElement的元素都包含一个Resources属性,这个属性就是我们这篇要讲的资源. 这一篇讲解的资源是不是上一篇的程序集资源(那个是在编译过程中打包到程序集 ...
- 答读者问(1):非模式物种找marker;如何根据marker定义细胞类型
下午花了两个小时回答读者的疑问,觉得可以记录下来,也许能帮到一部分人. 第一位读者做的是非模式物种的单细胞. 一开始以为是想问我非模式物种的marker基因在哪儿找,读者朋友也提到了blast 研究的 ...
- CRL快速开发框架系列教程九(导入/导出数据)
本系列目录 CRL快速开发框架系列教程一(Code First数据表不需再关心) CRL快速开发框架系列教程二(基于Lambda表达式查询) CRL快速开发框架系列教程三(更新数据) CRL快速开发框 ...
- Json.Net系列教程 2.Net类型与JSON的映射关系
原文 Json.Net系列教程 2.Net类型与JSON的映射关系 首先谢谢大家的支持和关注.本章主要介绍.Net类型与JSON是如何映射的.我们知道JSON中类型基本上有三种:值类型,数组和对象.而 ...
- 黄聪:Microsoft Enterprise Library 5.0 系列教程(九) Policy Injection Application Block
原文:黄聪:Microsoft Enterprise Library 5.0 系列教程(九) Policy Injection Application Block 代理对象(Proxy Object) ...
随机推荐
- C#简易商城收银系统v1.1简单工厂实现(2-2)
C#简易商城收银系统v1.1简单工厂实现(2-2) 当初: C#简易商城收银系统v1.0 现在: 用之前的工厂模式对商城收银系统v1.0进行升级 可以参考之前的 C#简易商城收银系统v1.0 随笔 ...
- 实战SQL优化(以MySQL深分页为例)
1 准备表结构 CREATE TABLE `student` ( `id` int NOT NULL AUTO_INCREMENT, `user_no` varchar(50) CHARACTER S ...
- 【jetson nano】yolov5环境配置tensorrt部署加速
安装pytorch Nano上预装的Jetpack版本为4.6.1,Python为3.6.9,CUDA环境为10.2.在PyTorch for Jetson中可以下载不同版本的torch,torch& ...
- mysql binlog查看指定数据库
1.mysql binlog查看指定数据库的方法 MySQL 的 binlog(二进制日志)主要记录了数据库上执行的所有更改数据的 SQL 语句,包括数据的插入.更新和删除等操作.但直接查看 binl ...
- 2023 Hive 面试宝典
先说一些废话 总结一下Hive面试宝典,方便读者快速过一遍Hive面试所需要的知识点 Hive的介绍 Hive和Hadoop的关系 Hive利用hdfs存储数据,利用MapReduce查询数据 Hiv ...
- NaN数值类型
<!DOCTYPE html> <html lang="en"> <head> <meta charset="UTF-8 ...
- NET9 提供HybridCache解决分布式缓存中存在的远程链接&序列化带来的性能问题
下面是一个标准的IDistributedCache用例: public class SomeService(IDistributedCache cache) { public async Task&l ...
- 腾讯视频遇到“前设备播放4K可能引发卡顿等异常,建议降低清晰度”
腾讯视频遇到"前设备播放4K可能引发卡顿等异常,建议降低清晰度". 解决方法: 在菜单-设置-播放设置-勾选"开启硬件加速"-应用,然后退出腾讯视频,重新打开腾 ...
- keepalived高可用性负载均衡
软件官网 http://www.keepalived.org/ 为什么需要keepalived 上图明显看出,LB机器应该是双节点,否则出现单点故障的问题,并且LB作为网站的入口,显然要提供高可用性的 ...
- 【干货分享】.NET人脸识别解决方案
前言 前段时间有同学在DotNetGuide技术社区交流群提问:.NET做人脸识别功能有什么好的解决方案推荐的吗?今天大姚给大家推荐2款.NET开源.免费.跨平台.使用简单的人脸识别库,希望可以帮助到 ...