
7、Flutter banner_view 轮播图的使用
1、前言
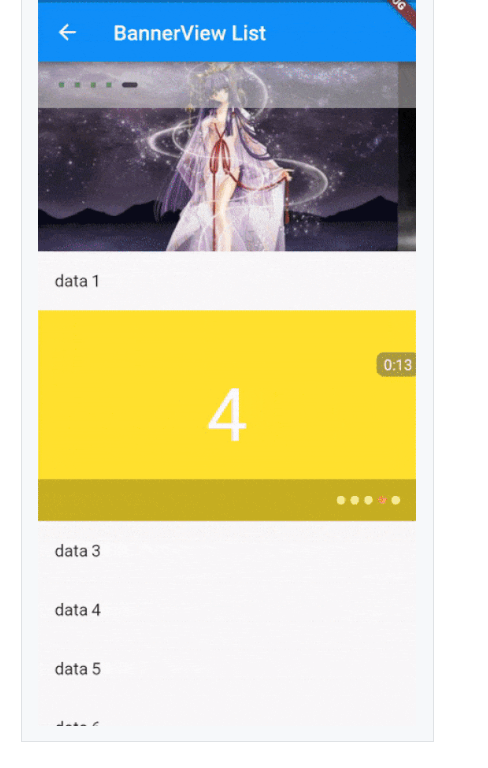
实现轮播图,效果如下:

2、实现
将采用 banner_view 实现:资源库地址
2.1、yaml 引入依赖
在 pubspec.yaml 声明需要引用的库,执行命令 flutter packages get 进行拉取即可使用。
banner_view: "^1.1.2"
2.2、代码中引入依赖
在资源库地址下方,作者提供了 banner_view 的几种展示方式。
import 'package:flutter/material.dart';

import 'package:banner_view/banner_view.dart';

import 'Pair.dart';

import 'factory/BannerItemFactory.dart';

class BannerViewPage extends StatefulWidget {

  @override

  _BannerViewPageState createState() => new _BannerViewPageState();

}

class _BannerViewPageState extends State<BannerViewPage> {

  @override

  Widget build(BuildContext context) {

    return new Scaffold(

      body:

          new Container(

            child:  new Column(

              children: <Widget>[

                new Container(

                  alignment: Alignment.center,

                  height: 200.0,

                  child: this._bannerView0(),

                  padding: EdgeInsets.only(bottom: 10.0),

                )

              ],

            ),

          ),

      );

  }

  /**

   * 第一种方式

   */

  BannerView _bannerView0() {

    // 盛放图片的 List

    List<Pair<String, Color>> param = [

      Pair.create('https://p5.ssl.qhimg.com/dm/456_209_/t01f43c5849ef5f521a.jpg', Colors.red[500]),

      Pair.create('https://p.ssl.qhimg.com/t0171bb61911ebe8899.jpg', Colors.green[500]),

      Pair.create('https://p.ssl.qhimg.com/t01ee77978d3a95a3ae.jpg', Colors.blue[500]),

    ];

    return new BannerView(

      BannerItemFactory.banners(param),

    );

//    return new BannerView(

//      BannerItemFactory.banners(param),

//      indicatorMargin: 10.0,

//      indicatorNormal: new Container(

//        width: 5.0,

//        height: 5.0,

//        decoration: new BoxDecoration(

//          color: Colors.green,

//          shape: BoxShape.rectangle,

//        ),

//      ),

//      indicatorSelected: new Container(

//        width: 15.0,

//        height: 5.0,

//        decoration: new BoxDecoration(

//          color: Colors.black,

//          shape: BoxShape.rectangle,

//          borderRadius: new BorderRadius.all(

//            new Radius.circular(5.0),

//          ),

//        ),

//      ),

//      indicatorBuilder: (context, indicator) {

//        Widget cc = new Container(

//          padding: new EdgeInsets.symmetric(horizontal: 20.0,),

//          height: 44.0,

//          width: double.infinity,

//          color: Colors.grey[300],

//          child: indicator,

//        );

//        return new Opacity(

//          opacity: 0.5,

//          child: cc,

//        );

//      },

//    );

  }

  /**

   * 第二种方式

   */

  BannerView _bannerView() {

    var pre = 'https://raw.githubusercontent.com/yangxiaoweihn/Assets/master';

    List<Pair<String, Color>> param = [

      Pair.create('https://raw.githubusercontent.com/yangxiaoweihn/Assets/master/cars/car_0.jpg', Colors.red[100]),

      Pair.create('https://raw.githubusercontent.com/yangxiaoweihn/Assets/master/cartoons/ct_0.jpg', Colors.green[100]),

      Pair.create('https://raw.githubusercontent.com/yangxiaoweihn/Assets/master/pets/cat_1.jpg', Colors.blue[100]),

      Pair.create('https://raw.githubusercontent.com/yangxiaoweihn/Assets/master/scenery/s_1.jpg', Colors.yellow[100]),

      Pair.create('https://raw.githubusercontent.com/yangxiaoweihn/Assets/master/cartoons/ct_1.jpg', Colors.red[100]),

//      Pair.create('$pre/cartoons/ct_1.jpg', Colors.red[100]),

    ];

    return new BannerView(

      BannerItemFactory.banners(param),

      indicatorMargin: 10.0,

      indicatorNormal: new Container(

        width: 5.0,

        height: 5.0,

        decoration: new BoxDecoration(

          color: Colors.green,

          shape: BoxShape.rectangle,

        ),

      ),

      indicatorSelected: new Container(

        width: 15.0,

        height: 5.0,

        decoration: new BoxDecoration(

          color: Colors.black,

          shape: BoxShape.rectangle,

          borderRadius: new BorderRadius.all(

            new Radius.circular(5.0),

          ),

        ),

      ),

      indicatorBuilder: (context, indicator) {

        Widget cc = new Container(

          padding: new EdgeInsets.symmetric(horizontal: 20.0,),

          height: 44.0,

          width: double.infinity,

          color: Colors.grey[300],

          child: indicator,

        );

        return new Opacity(

          opacity: 0.5,

          child: cc,

        );

      },

    );

  }

}
7、Flutter banner_view 轮播图的使用的更多相关文章
- 28 Flutter 轮播图 flutter_swiper
中文地址: https://github.com/best-flutter/flutter_swiper/blob/master/README-ZH.md 基本参数 参数 默认值 描述 scrollD ...
- 05-06 Flutter JSON和序列化反序列化、创建模型类转换Json数据、轮播图数据渲染:Flutter创建商品数据模型 、请求Api接口渲染热门商品 推荐商品
Config.dart class Config{ static String domain='http://jd.itying.com/'; } FocusModel.dart class Focu ...
- Flutter轮播图
前端开发当中最有意思的就是实现动画特效,Flutter提供的各种动画组件可以方便实现各种动画效果.Flutter中的动画组件主要分为两类: 隐式动画控件:只需设置组件开始值,结束值,执行时间,比如An ...
- Flutter学习五之网络请求和轮播图的实现
上期讲到了,怎样实现一个下拉刷新和加载更多的列表,数据更新,需要使用到网络请求,在flutter中,怎样实现一个网络请求呢?官方使用的是dart io中的HttpClient发起的请求,但HttpCl ...
- js 基础篇(点击事件轮播图的实现)
轮播图在以后的应用中还是比较常见的,不需要多少行代码就能实现.但是在只掌握了js基础知识的情况下,怎么来用较少的而且逻辑又简单的方法来实现呢?下面来分析下几种不同的做法: 1.利用位移的方法来实现 首 ...
- 实现下来ScrollView放大轮播图
创建工程,创建一个UIScrollView属性,并遵循其协议: #define kWidth self.view.frame.size.width//屏幕宽 #define kHeight self. ...
- ViewPager轮播图
LoopViewPagerLayout无限轮播 项目地址:https://github.com/why168/LoopViewPagerLayout 支持三种动画: 支持修改轮播的速度: 支持修改滑动 ...
- CSS-用伪类制作小箭头(轮播图的左右切换btn)
先上学习地址:http://www.htmleaf.com/Demo/201610234136.html 作者对轮播图左右按钮的处理方法一改往常,不是简单地用btn.prev+btn.next的图片代 ...
- phpcms首页实现轮播图
1.在你想要加轮播图的位置加入以下 <div id="flowDiagram" > <div id="button"> <span ...
随机推荐
- liunx mysql 备份
执行命令:mysqldump -uroot -p lanwei > lanwei2018-08-02.sql 出错 -bash: mysqldump: command not found 查看m ...
- 第一章:OEL6.8之虚拟机安装
一.在 Windows 上安装 VMware Workstation 具体安装请参考<VMware Workstation 15 Pro 永久激活密钥 下载> 二.创建虚拟机 1:选 ...
- 树dp:边覆盖,点覆盖
#493. 求树的最小支配集 问题描述 对于一棵n个结点的无根树,求它的最小支配集. 最小支配集:指从所有顶点中取尽量少的点组成一个集合,使得剩下的所有点都与取出来的点有边相连.顶点个数最小的支配集被 ...
- 剑指offer数组列表
一.数组 面试题3 : 找出数组中重复的数字 面试题3(二):不修改数组找出重复的数字 面试题4:二维数组的查找 面试题21:调整数组顺序使奇数位于偶数前面 面试题39:数组中出现次数超过一半的数字 ...
- 微信小程序换皮肤,动态切换菜单栏和导航栏的样式,动态修改TabBar和NavigationBar
在做微信小程序换皮肤的时候,需要动态修改菜单栏(TabBar)和导航栏(NavigationBar) 但是在小程序中它们的样式是写在app.json里面,而且app.json是静态编译,运行时哪怕你修 ...
- 期货大赛项目|八,ueditor的应用
百度开发的富文本编辑器还是很不错的,可以已经不维护了 下载ueditor1_4_3_3-utf8-net放到项目中 找到net文件夹下config.json 修改以下两行 "imageUrl ...
- vba 读取数据库
1.安装数据库 2.创建数据源 Private Sub Worksheet_Change(ByVal Target As Range) Then Call mySQL End If End Sub P ...
- java.net.NoRouteToHostException: No route to host解决方法
当访问192.168.10.98上的tomcat时候,tomcat日志异常 然后查看tomcat服务器上的防火墙 查看service层的防火墙: 至此问题解决: 永久关闭防火墙: 1.首先查看防火墙状 ...
- Android应用程序MVC框架实例分析
问题提出:如何优雅地分离出应用程序的状态.用户交互和数据表现?如何通过框架体现工程的高性能.高灵活性.高响应性? MVC定义:model.view.controller三者的有机组合,分别表示:模型. ...
- bat入门--第一个bat文件
所谓的批处理就是从记事本开始进行的. 1.新建一个记事本文件, 2, 打开的记事本上敲入一行字:@echo off 意思:隐藏以下输入的代码(off改成on是打开代码显示). 3.再输入:echo h ...