
centos 配置sentry+钉钉+邮件通知
1.sentry官方推荐docker方式安装。使用docker-compose,最好是centos7
2.卸载旧版本
yum remove docker docker-common docker-selinux docker-engine
3.安装依赖包
yum install -y yum-utils device-mapper-persistent-data lvm2
4.添加docker yum源
yum-config-manager --add-repo https://download.docker.com/linux/centos/docker-ce.repo
5.可选操作:允许拓展最新的不稳定repository
yum-config-manager --enable docker-ce-edge
6.安装Docker
yum -y install docker-ce
7.启动Docker
systemctl start docker
8.测试Docker
docker run hello-world
出现这个表示成功
Hello from Docker!

This message shows that your installation appears to be working correctly.

To generate this message, Docker took the following steps:

 1. The Docker client contacted the Docker daemon.

 2. The Docker daemon pulled the "hello-world" image from the Docker Hub.

    (amd64)

 3. The Docker daemon created a new container from that image which runs the

    executable that produces the output you are currently reading.

 4. The Docker daemon streamed that output to the Docker client, which sent it

    to your terminal.

To try something more ambitious, you can run an Ubuntu container with:

 $ docker run -it ubuntu bash
9.安装依赖,需要用到git,docker-compose,pip等组件
yum install epel-release
yum install -y python-pip
pip install docker-compose
yum install git
安装第三个的时候会报错:
Command "python setup.py egg_info" failed with error code 1 in /tmp/pip-build-SL8ohy/pycparser/

You are using pip version 8.1.2, however version 19.1.1 is available.

You should consider upgrading via the 'pip install --upgrade pip' command.
然后我升级了
pip install --upgrade pip
发现还是报错:
 ERROR: Complete output from command python setup.py egg_info:

    ERROR: Traceback (most recent call last):

      File "<string>", line 1, in <module>

      File "/tmp/pip-install-5OHP7Q/pycparser/setup.py", line 65, in <module>

        cmdclass={'install': install, 'sdist': sdist},

      File "/usr/lib64/python2.7/distutils/core.py", line 112, in setup

        _setup_distribution = dist = klass(attrs)

      File "/usr/lib/python2.7/site-packages/setuptools/dist.py", line 269, in __init__

        _Distribution.__init__(self,attrs)

      File "/usr/lib64/python2.7/distutils/dist.py", line 287, in __init__

        self.finalize_options()

      File "/usr/lib/python2.7/site-packages/setuptools/dist.py", line 302, in finalize_options

        ep.load()(self, ep.name, value)

      File "/usr/lib/python2.7/site-packages/pkg_resources/__init__.py", line 2341, in load

        return self.resolve()

      File "/usr/lib/python2.7/site-packages/pkg_resources/__init__.py", line 2351, in resolve

        raise ImportError(str(exc))

    ImportError: 'module' object has no attribute 'check_specifier'

    ----------------------------------------

ERROR: Command "python setup.py egg_info" failed with error code 1 in /tmp/pip-install-5OHP7Q/pycparser/
解决:
pip install --upgrade setuptools==30.1.0
如果报这个错误:
/usr/lib/python2.7/site-packages/requests/ __init__。py:91: RequestsDependencyWarning: urllib3(1.22)或chardet(2.2.1)与受支持的版本不匹配! RequestsDependencyWarning)
先卸载
sudo pip uninstall urllib3

sudo pip uninstall chardet
sudo pip install requests
10.浏览器打开:https://github.com/getsentry/onpremise ,查看README.md步骤
[root@iZ2zecyg8c7tlv5yz9c9vhZ www]# mkdir -p data/{sentry,postgres}

[root@iZ2zecyg8c7tlv5yz9c9vhZ www]# ll

total 4

drwxr-xr-x 4 root root 4096 Jun  6 18:18 data

[root@iZ2zecyg8c7tlv5yz9c9vhZ www]#
11.克隆该项目
git clone https://github.com/getsentry/onpremise.git
[root@iZ2zecyg8c7tlv5yz9c9vhZ www]# git clone https://github.com/getsentry/onpremise.git

Cloning into 'onpremise'...

remote: Enumerating objects: 190, done.

remote: Total 190 (delta 0), reused 0 (delta 0), pack-reused 190

Receiving objects: 100% (190/190), 37.55 KiB | 0 bytes/s, done.

Resolving deltas: 100% (90/90), done.

[root@iZ2zecyg8c7tlv5yz9c9vhZ www]# ll

total 8

drwxr-xr-x 4 root root 4096 Jun  6 18:18 data

drwxr-xr-x 3 root root 4096 Jun  6 18:19 onpremise

[root@iZ2zecyg8c7tlv5yz9c9vhZ www]#
12.进入onpremise目录
[root@iZ2zecyg8c7tlv5yz9c9vhZ www]# cd onpremise/

[root@iZ2zecyg8c7tlv5yz9c9vhZ onpremise]# ll

total 36

-rw-r--r-- 1 root root  1946 Jun  6 18:19 config.yml

-rw-r--r-- 1 root root  1240 Jun  6 18:19 docker-compose.yml

-rw-r--r-- 1 root root    24 Jun  6 18:19 Dockerfile

-rw-r--r-- 1 root root   500 Jun  6 18:19 Makefile

-rw-r--r-- 1 root root  2306 Jun  6 18:19 README.md

-rw-r--r-- 1 root root    19 Jun  6 18:19 requirements.txt

-rw-r--r-- 1 root root 11257 Jun  6 18:19 sentry.conf.py

[root@iZ2zecyg8c7tlv5yz9c9vhZ onpremise]# cp -n .env.example .env

[root@iZ2zecyg8c7tlv5yz9c9vhZ onpremise]# docker-compose build
13.生成秘钥:(copy最后一行的秘钥)
[root@iZ2zecyg8c7tlv5yz9c9vhZ onpremise]# docker-compose run --rm web config generate-secret-key

/usr/lib/python2.7/site-packages/requests/__init__.py:91: RequestsDependencyWarning: urllib3 (1.24.1) or chardet (2.2.1) doesn't match a supported version!

  RequestsDependencyWarning)

Creating network "onpremise_default" with the default driver

ERROR: Volume sentry-data declared as external, but could not be found. Please create the volume manually using `docker volume create --name=sentry-data` and try again.

[root@iZ2zecyg8c7tlv5yz9c9vhZ onpremise]# docker volume create --name=sentry-data && docker volume create --name=sentry-postgres

sentry-data

sentry-postgres
Status: Downloaded newer image for memcached:1.5-alpine

Creating onpremise_postgres_1  ... done

Creating onpremise_smtp_1      ... done

Creating onpremise_redis_1     ... done

Creating onpremise_memcached_1 ... done

38v@*^_b&&00%4yk8uvthl^8h3ycg3)1ovuf&&q+=^5#vrsj0h
14 将秘钥添加进入docker-compose.yml
vim docker-compose.yml
environment:

    SENTRY_SECRET_KEY: '38v@*^_b&&00%4yk8uvthl^8h3ycg3)1ovuf&&q+=^5#vrsj0h'

    SENTRY_MEMCACHED_HOST: memcached

    SENTRY_REDIS_HOST: redis

    SENTRY_POSTGRES_HOST: postgres

    SENTRY_EMAIL_HOST: smtp

  volumes:
15.创建数据库(在创建数据的时候会提示我们是否需要创建管理员,我们选择Y,填入对应的邮箱地址和密码,等一下登陆WEB需要,是否是超级管理员也选择Y)
docker-compose run --rm web upgrade
16.启动所有服务
docker-compose up -d
17.验证docker启动状态
docker ps
到此我们的sentry就已经部署完成了,访问我们的 服务器ip:9000端口就可以看见sentry的界面
root@iZ2zecyg8c7tlv5yz9c9vhZ onpremise]# docker ps

CONTAINER ID        IMAGE                  COMMAND                  CREATED             STATUS              PORTS                    NAMES

bf6f7118caae        onpremise_worker       "/entrypoint.sh run …"   57 seconds ago      Up 56 seconds       9000/tcp                 onpremise_worker_1

e4becbb4b226        onpremise_cron         "/entrypoint.sh run …"   57 seconds ago      Up 56 seconds       9000/tcp                 onpremise_cron_1

320e80f03c7c        onpremise_web          "/entrypoint.sh run …"   57 seconds ago      Up 56 seconds       0.0.0.0:9000->9000/tcp   onpremise_web_1

4b534ff5ffdb        memcached:1.5-alpine   "docker-entrypoint.s…"   8 minutes ago       Up 8 minutes        11211/tcp                onpremise_memcached_1

c45bbcd62618        redis:3.2-alpine       "docker-entrypoint.s…"   8 minutes ago       Up 8 minutes        6379/tcp                 onpremise_redis_1

1c1c90b47c0b        postgres:9.5           "docker-entrypoint.s…"   8 minutes ago       Up 8 minutes        5432/tcp                 onpremise_postgres_1

d3ba6bef6c12        tianon/exim4           "docker-entrypoint.s…"   8 minutes ago       Up 8 minutes        25/tcp                   onpremise_smtp_1
18.浏览器输入服务器ip+9000端口就可以访问
19.点击用户可更改中文模式和时间
20.配置钉钉通知:
vim requirements.txt
# Add plugins here

sentry-dingtalk-new

django-smtp-ssl~=1.0

redis-py-cluster==1.3.4
docker-compose build

docker-compose restart
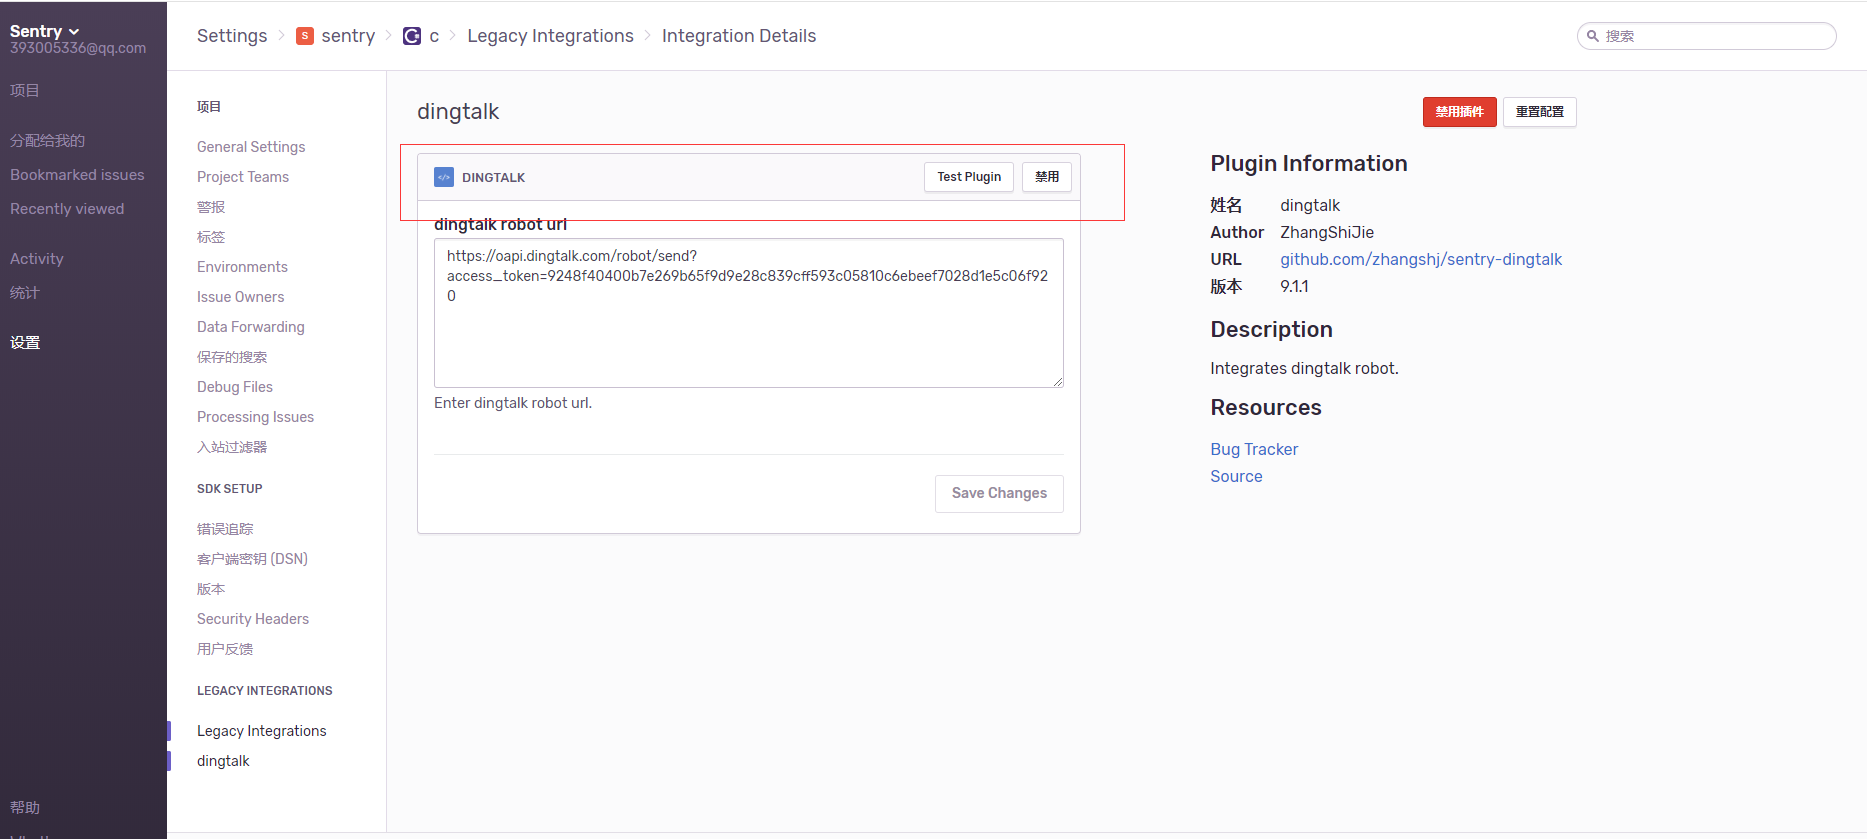
在web端,创建项目,配置,查看是否有dingtalk。在钉钉拉一个组,创建自定义机器人。将连接copy放入dingtalkRoot 里,保存,点击test plugin 测试查看消息
21.配置邮箱:
vim config.yml
username 邮箱地址
password不是密码。是客户端授权密码
mail.backend: 'django_smtp_ssl.SSLEmailBackend'  # Use dummy if you want to disable email entirely

mail.host: 'smtphz.qiye.163.com'

mail.port: 994

mail.username: 'xxxx@xxx.com'

mail.password: 'xxxx'

mail.use-tls: true

# The email address to send on behalf of

mail.from: 'xxx@xxxcom'
$ docker-compose build

$ docker-compose up -d
然后重新运行
22.在c# 中
导入 sentry 包
x1:公钥,x2:私钥,xxx:服务器ip,5=项目id
using Sentry;

using System;

using System.Collections.Generic;

using System.Linq;

using System.Text;

using System.Threading.Tasks;

namespace SentryTest {

    class Program {

        static void Main(string[] args) {

            using (SentrySdk.Init("http://x1:x2@xxx:9000/5")) {

                try {

                    var s = (/);

                    SentrySdk.CaptureMessage("ppp9");

                }

                catch (Exception ex) {

                    //SentrySdk.CaptureException(ex);

                }

            }

        }

    }

}
centos 配置sentry+钉钉+邮件通知的更多相关文章
- Jenkins上配置Robot Framework测试邮件通知模板
邮件效果 测试成功如下所示: jenkins_robot_success 测试失败如下所示: jenkins_robot_failure 通过这个模板,我们能够很直观地看出测试的执行情况,以及相关的统 ...
- wordpress建站如何用SMTP配置邮件通知
前提条件:你已经有了企业邮箱,相关文章请看:如何开通阿里云企业邮箱免费版(点此前往) 不建议使用主机商提供的邮箱,因为换主机商是比较常见的事情,因此导致的邮箱迁移就有些麻烦了,不如一开始就选择独立的第 ...
- Jenkins进阶系列之——01使用email-ext替换Jenkins的默认邮件通知
1 简述 众所周知,Jenkins默认提供了一个邮件通知,能在构建失败.构建不稳定等状态后发送邮件.但是它本身有很多局限性,比如它的邮件通知无法提供详细的邮件内容.无法定义发送邮件的格式.无法定义灵活 ...
- Jenkins : 邮件通知
目录 全局配置 为项目添加邮件通知 邮件模板 Pipeline 支持 总结 Jenkins 内置了 Mailer 插件用于发送邮件通知,但是 Mailer 插件的功能比较简单,无法按照用户的需求进行邮 ...
- sentry之二:sentry配置钉钉和email
springboot+springcloud后台项目配置日志采集 gradle: compile 'com.getsentry.raven:raven-logback:8.0.2' compile ' ...
- 基础架构之日志管理平台及钉钉&邮件告警通知
接上一篇,我们继续解释如何把ELK跟钉钉及发送邮件功能结合起来,让我们及时的了解重要日志并快速反馈. Sentinel 安装,项目介绍在https://github.com/sirensolution ...
- Zabbix-(四)邮件、钉钉告警通知
Zabbix-(四)邮件.钉钉告警通知 一.前言 在之前的文章里,通过Zabbix对主机的磁盘.CPU以及内存进行了监控,并在首页Dashboard里创建了监控图形,但是只有当我们登录到Zabbix后 ...
- Python 实现 T00ls 自动签到脚本(邮件+钉钉通知)
T00ls 每日签到是可以获取 TuBi 的,由于常常忘记签到,导致损失了很多 TuBi .于是在 T00ls 论坛搜索了一下,发现有不少大佬都写了自己的签到脚本,签到功能实现.定时任务执行以及签到提 ...
- Spring Cloud Admin健康检查 邮件、钉钉群通知
源码地址:https://github.com/muxiaonong/Spring-Cloud/tree/master/cloudadmin Admin 简介 官方文档:What is Spring ...
随机推荐
- Redis入门(三)-Redis的安装及操作key的命令介绍
前两节对Redis做了一些详细的介绍,那么接下来开始我们就正式进入Redis的学习阶段. 安装Redis Windows下安装redis非常方便, 下载压缩包解压即可使用. 链接:https://pa ...
- PlayJava Day021
容器: Collection接口:定义了存取一组对象的方法,其子接口Set和List分别定义了存储方式 List:存储数据有序且可重复 ----> ArrayList Set:存储数据无序且不可 ...
- 软件设计之基于Java的连连看小游戏(一)——开题及游戏首页的制作
原本计划紧张忙碌的考试月在图书馆和实验室度过,结果突如其来为期两周的软件设计把课余时间几乎捆绑在了机房.软设没有太多知识上的要求,只要成品简洁美观.实用准确即可.考虑了很久决定要用Java swing ...
- attempted to return null from a method with a primitive return type (int).
java接口文件 package com.cyb.ms.mapper; import org.apache.ibatis.annotations.Param; public interface Acc ...
- 【Gradle】Gradle插件
Gradle插件 插件的作用 把插件应用到项目中,插件会扩展项目的功能,帮助在项目构建过程中做很多事情. 1.可以添加任务到项目中,帮助完成测试.编译.打包等. 2.可以添加依赖配置到项目中,可以通过 ...
- Thread <number> cannot allocate new log, sequence <number>浅析
有时候,你会在ORACLE数据库的告警日志中发现"Thread <number> cannot allocate new log, sequence <number> ...
- 读书笔记_python网络编程3_(1)
0.前言 代码目录: https://github.com/brandon-rhodes/fopnp/tree/m/py3 0.1.网络实验环境:理解客户端与服务器是如何通过网络进行通信的 每台机器通 ...
- 如何在mac版本的python里安装pip
mac里面python自带easy_install,在终端里面执行sudo easy_install pip.运行完可以用pip help测试一下是否安装成功,成功安装后,直接pip install ...
- Python—导入自定义的模块和包(指定路径下的模块和包)
模块路径如下图: import sys sys.path.append(r"E:\project\path") print "===>", sys.arg ...
- go语言设计模式之visitor
这个确实没有调通,也要记录一下 visitor.go package visitor import ( "fmt" "io" "os" ) ...