基于 HTML5 Canvas 的可交互旋钮组件
前言
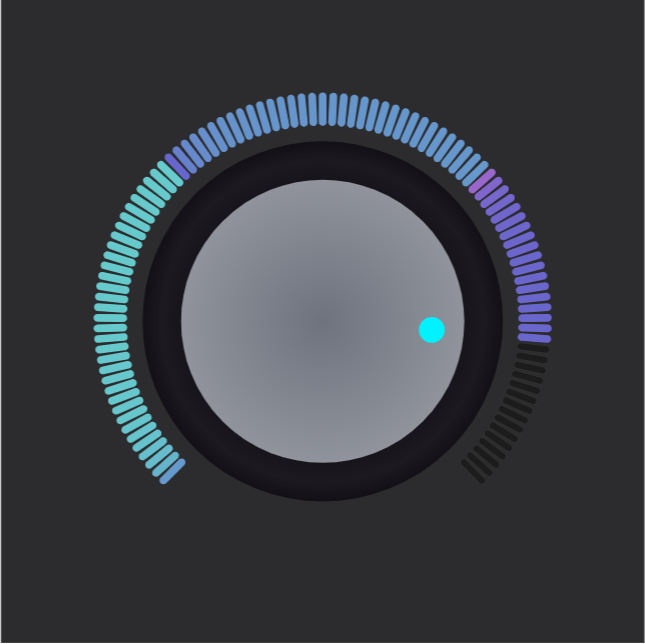
此次的 Demo 效果如下:
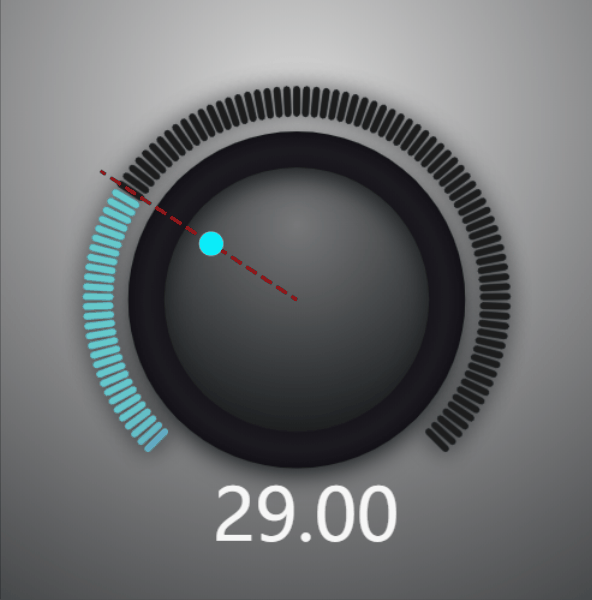
Demo 链接:https://hightopo.com/demo/comp-knob/
整体思路
- 组件参数
- 绘制旋钮
- 绘制刻度
- 绘制指针
- 绘制标尺
- 绘制文本
- 交互效果
1.组件参数
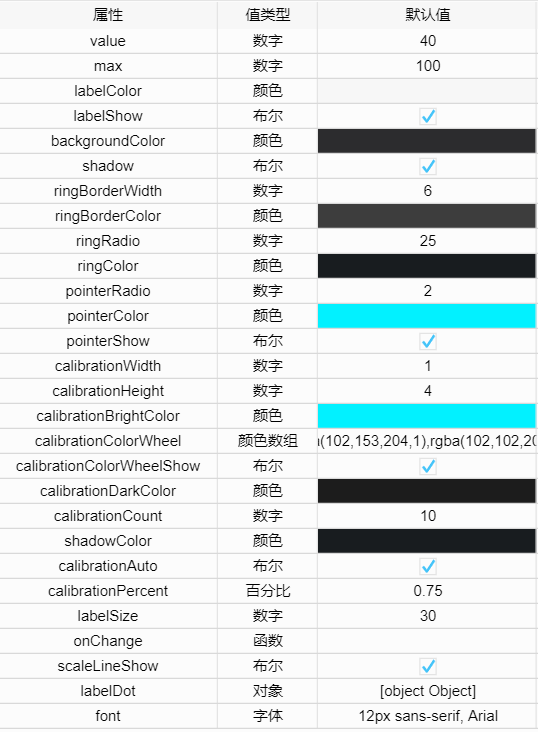
以下是下文会使用到的部分变量,在此先贴出来
var origin, // 原点

    percent, // 显示刻度占总刻度的百分比

    partAngle, // 每个刻度所占的角度

    startAngle, //刻度起始的角度

    calibrationPoints, // 每个刻度的信息

    pointer, // 指针的信息

    scaleLine, // 标尺的信息

    calibrationColors // 刻度渐变色
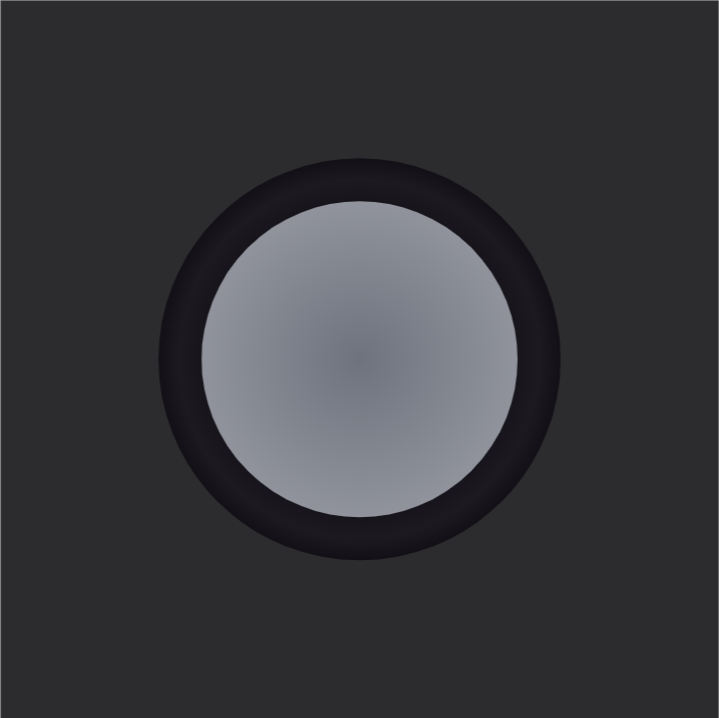
2.绘制旋钮
这里主要就使用了 canvas api 中的 arc() 和 createRadialGradient() 。
主要代码:
g.beginPath();

var ringRadial = g.createRadialGradient(origin.x, origin.y, , origin.x, origin.y, ringRadio);

ringRadial.addColorStop(, ht.Default.brighter(ringColor, ));

ringRadial.addColorStop(0.95, ht.Default.brighter(ringColor, ));

ringRadial.addColorStop(, ht.Default.darker(ringColor, ));

var borderRadial = g.createRadialGradient(origin.x, origin.y, ringRadio - ringBorderWidth / , origin.x, origin.y, ringRadio + ringBorderWidth / );

borderRadial.addColorStop(, ht.Default.brighter(ringBorderColor, ));

borderRadial.addColorStop(0.5, ht.Default.brighter(ringBorderColor, ));

borderRadial.addColorStop(, ht.Default.darker(ringBorderColor, ));

g.fillStyle = ringRadial;

g.lineWidth = ringBorderWidth;

g.strokeStyle = borderRadial;

g.arc(origin.x, origin.y, ringRadio, ,  * Math.PI);

g.closePath();

g.fill();

g.stroke();
效果图:
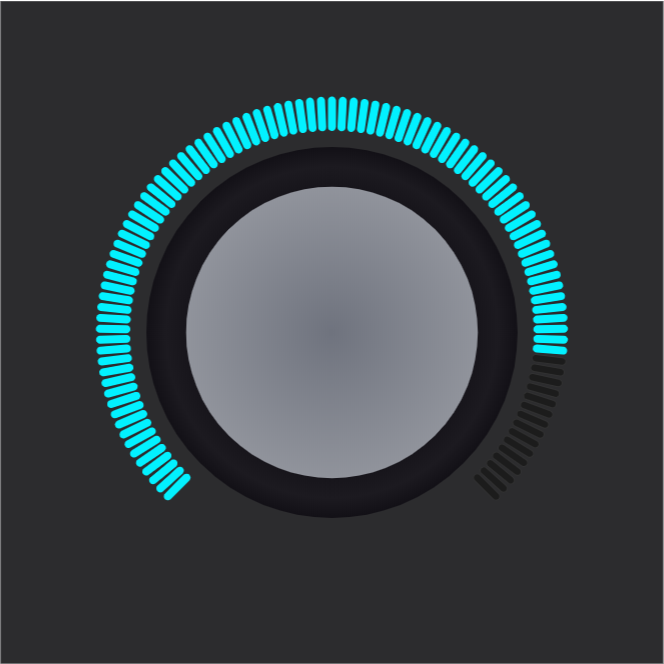
3.绘制刻度
这里绘制每个刻度采用的是绘制路径的方法,所以声明了一个变量 calibrationPoints 用来存放每个刻度的起始点坐标,根据配置的参数去计算 calibrationPoints 的信息。
首先根据参数 calibrationPercent 计算第一个刻度的起始角度 startAngle ,然后根绝 calibrationCount 的值去计算每个刻度所占用的角度 partAngle ,最后根据三角函数和相应的角度,转化为对应的坐标。
主要代码:
var calibrationPoints = [];

for (var i = ; i < calibrationCount + ; i++) {

    var point = {

        startx: origin.x + (ringRadio + ringBorderWidth +  * calibrationHeight) * Math.cos(startAngle - i * partAngle),

        starty: origin.y - (ringRadio + ringBorderWidth +  * calibrationHeight) * Math.sin(startAngle - i * partAngle),

        endx: origin.x + (ringRadio + ringBorderWidth +  * calibrationHeight) * Math.cos(startAngle - i * partAngle),

        endy: origin.y - (ringRadio + ringBorderWidth +  * calibrationHeight) * Math.sin(startAngle - i * partAngle)

    };

    if (i <= (calibrationCount * percent) && percent > ) {

        point.show = true;

    } else {

        point.show = false;

    }

    calibrationPoints.push(point);

}
有了每个刻度的信息后,接下来就开始绘制刻度。
主要代码:
calibrationPoints.forEach(function (i, index) {

    g.beginPath();

    if (calibrationColorWheelShow) {

        calibrationBrightColor = calibrationColors[index];

    }

    g.lineWidth = 1.2 * calibrationWidth;

    g.strokeStyle = i.show ? calibrationBrightColor : ht.Default.brighter(calibrationDarkColor, );

    g.moveTo(i.startx, i.starty);

    g.lineTo(i.endx, i.endy);

    g.closePath();

    g.stroke();

})

calibrationPoints.forEach(function (i, index) {

    g.beginPath();

    if (calibrationColorWheelShow) {

        calibrationBrightColor = calibrationColors[index];

    }

    g.lineWidth = calibrationWidth;

    g.strokeStyle = i.show ? calibrationBrightColor : calibrationDarkColor;

    g.moveTo(i.startx, i.starty);

    g.lineTo(i.endx, i.endy);

    g.closePath();

    g.stroke();

})
效果图:
考虑到一种高亮颜色太单调,于是加了个色轮。思路:给每个刻度都添加了颜色的标识。
每个刻度的颜色计算方法:把颜色值转换成 rgb 方式,设定多少秒改变完成,每次改变多少值,计算需要多少次,比如 rba(x,y,z) 到 rgb(a,b,c),假设需要 100 次,那么每次设定 rgb((a - x) / 100 + x, (b - y) / 100 + y, (c - z) / 100 + z) 。
主要代码:
if (calibrationColorWheelShow) { // 显示刻度色轮

    var colors = [];

    calibrationColorWheel.forEach(function (i) {

        colors.push(ht.Default.toColorData(i))

    })

    // 把颜色值转换成rgb方式,设定多少秒改变完成,每次改变多少值,计算需要多少次

    // ,比如rba(x,y,z)到rgb(a,b,c),假设需要100次,那么每次设定

    // rgb((a-x)/100+x,(b-y)/100+y,(c-z)/100+z)

    var count = Math.ceil(calibrationCount / (calibrationColorWheel.length - )); // 渐变次数

    calibrationColors = [];

    for (var i = ; i < colors.length - ; i++) {

        for (var j = ; j <= count; j++) {

            var item = 'rgb('

                + Math.round((colors[i + ][] - colors[i][]) / j + colors[i][])

                + ','

                + Math.round((colors[i + ][] - colors[i][]) / j + colors[i][])

                + ','

                + Math.round((colors[i + ][] - colors[i][]) / j + colors[i][])

                + ')';

            calibrationColors.push(item)

        }

    }

}
效果图:

4.绘制指针
这个主要是根据三角函数去计算相对圆心的偏移角度,按照当前值和刻度最大值的比例来计算偏移量,然后换算成对应的坐标。
主要代码:
pointer = {

    x: origin.x + (ringRadio - pointerRadio - ringBorderWidth) * Math.cos(startAngle - Math.PI *  * calibrationPercent * percent),

    y: origin.y - (ringRadio - pointerRadio - ringBorderWidth) * Math.sin(startAngle - Math.PI *  * calibrationPercent * percent),

    r: pointerRadio,

    color: percent >  ? calibrationBrightColor : calibrationDarkColor,

    show: true,

}

if (pointerShow) {

    g.beginPath();

    g.fillStyle = pointer.color;

    g.arc(pointer.x, pointer.y, pointer.r, , Math.PI * );

    g.closePath();

    g.fill();

}
效果图:
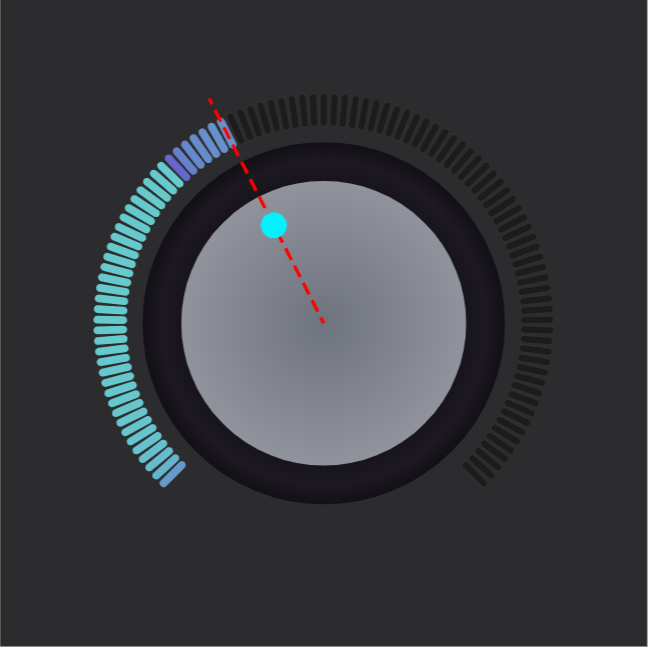
5.绘制标尺
计算标尺角度的算法同指针。
主要代码:
scaleLine = {

    startx: origin.x,

    starty: origin.y,

    endx: origin.x + (ringRadio + ringBorderWidth + 2 * calibrationHeight) * Math.cos(startAngle - Math.PI * 2 * calibrationPercent * percent),

    endy: origin.y - (ringRadio + ringBorderWidth + 2 * calibrationHeight) * Math.sin(startAngle - Math.PI * 2 * calibrationPercent * percent),

    color: percent > 0 ? calibrationBrightColor : calibrationDarkColor,

    show: scaleLineShow,

}

if (scaleLine) {

    g.beginPath();

    g.strokeStyle = 'red';

    g.setLineDash([1, 2]);

    g.lineWidth = 0.5 * calibrationWidth;

    g.moveTo(scaleLine.startx, scaleLine.starty);

    g.lineTo(scaleLine.endx, scaleLine.endy);

    g.closePath();

    g.stroke();

}
效果图:
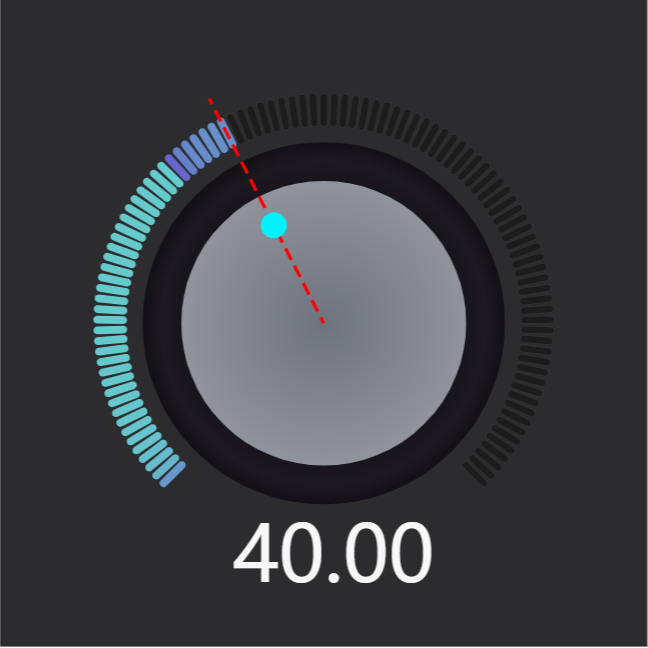
6.绘制文本
这里主要的就是确定文本所要绘制的位置,然后根据 ht.Default.getTextSize() 来获取文本长度,方便设置文本居中。
主要代码:
if (labelShow) {

    var text = ht.Default.getTextSize(font, value);

    g.fillStyle = labelColor;

    g.font = font;

    g.fillText(value.toFixed(2), labelDot.x, labelDot.y);

}
效果图:
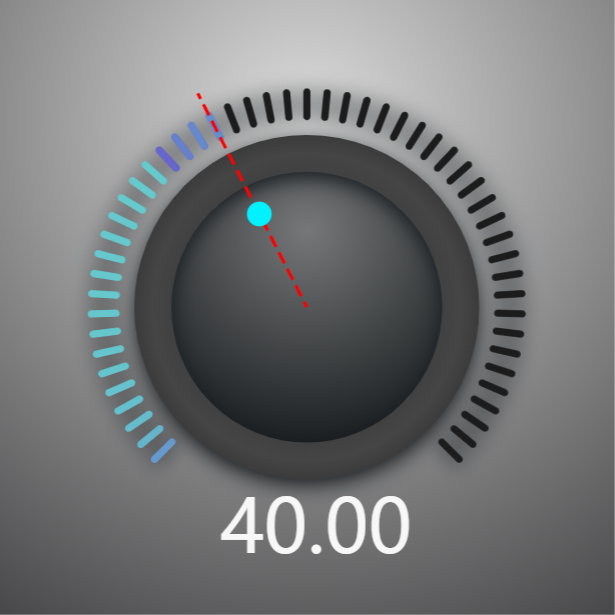
到这就完成了基本的旋钮组件,下面继续做一些细节上的优化。
例如加一些阴影效果,颜色渐变,配色调整等。
主要代码:
var backgroundRadial = g.createRadialGradient(x + 0.5 * width, y + 0.2 * height, 0, x + 0.5 * width, y + 0.2 * height, Math.sqrt(Math.pow(width / 2, 2) + Math.pow(height, 2)));

backgroundRadial.addColorStop(0, 'rgba(220,220,220,1)');

backgroundRadial.addColorStop(1, backgroundColor);

g.fillStyle = backgroundRadial;

g.fillRect(x, y, width, height);

g.beginPath();

var ringRadial = g.createRadialGradient(origin.x, origin.y - ringRadio / 2, 0, origin.x, origin.y - ringRadio / 2, 1.5 * ringRadio);

ringRadial.addColorStop(0, ht.Default.brighter(ringColor, 40));

// ringRadial.addColorStop(0.25, ht.Default.brighter(ringColor, 40));

ringRadial.addColorStop(1, ht.Default.darker(ringColor, 20));

var borderRadial = g.createRadialGradient(origin.x, origin.y, ringRadio - ringBorderWidth / 2, origin.x, origin.y, ringRadio + ringBorderWidth / 2);

borderRadial.addColorStop(0, ht.Default.brighter(ringBorderColor, 2));

borderRadial.addColorStop(0.5, ht.Default.brighter(ringBorderColor, 4));

borderRadial.addColorStop(1, ht.Default.darker(ringBorderColor, 4));

g.fillStyle = ringRadial;

g.lineWidth = ringBorderWidth;

g.strokeStyle = borderRadial;

g.arc(origin.x, origin.y, ringRadio, 0, 2 * Math.PI);

g.closePath();

g.fill();

g.shadowBlur = 20;

g.shadowColor = shadowColor;

g.shadowOffsetY = ringBorderWidth;

g.stroke();

g.shadowBlur = 0;

g.shadowOffsetY = 0;
效果图:
7.交互效果
以上就是绘制好了一张静态图,最后就只要再加上一些交互效果就可以了。
这里我采用的是 HT for Web 的矢量来实现。可参考 → 戳这
监听 onUp 和 onDraw 事件。
onUp:
当鼠标抬起时,获取当前旋钮显示的值,然后四舍五入,取其最近的刻度校准,使用 ht.Default.startAnim() 添加动画效果。
onDraw:
根据当前鼠标停留的位置,以旋钮原点为参照点,根据三角函数来计算指针和起始刻度的夹角 A ,计算 A 占总刻度的百分比 p ,然后设置当前值为 max * p 。
最后使用 HT 实现:
var gv = new ht.graph.GraphView();

      dm = gv.dm();

      dm.a('pannable', true);

      dm.a('zoomable', true);

      dm.a('rectSelectable', true);

      ht.Default.setCompType('knob',func); //注册组件

      ht.Default.setImage('iconKnob', data); //注册图片

var node = new ht.Node();

      node.setImage('iconKnob');

      node.s('2d.movable', false);

      dm.add(node);

      gv.fitContent();

      gv.addToDOM();

      window.addEventListener(

        'resize',

        function(e) {

          gv.invalidate();

          gv.fitContent();

        },

        false

      );
基于 HTML5 Canvas 的可交互旋钮组件的更多相关文章
- 基于HTML5 Canvas实现用户交互
很多人都有这样的疑问,基于HTML5 Canvas实现的元素怎么和用户进行交互?在这里我们用到HT for Web(http://www.hightopo.com/guide/guide/core/b ...
- 基于html5 Canvas图表库 : ECharts
ECharts开源来自百度商业前端数据可视化团队,基于html5 Canvas,是一个纯Javascript图表库,提供直观,生动,可交互,可个性化定制的数据可视化图表.创新的拖拽重计算.数据视图.值 ...
- 基于 HTML5 Canvas 的智能安防 SCADA 巡逻模块
基于 HTML5 Canvas 的智能安防 SCADA 巡逻模块 前言 最近学习了 HT for Web flow 插件,除了正常的 flow 效果,其中还有两个十分好用的两个接口 getPercen ...
- 基于HTML5 Canvas和jQuery 的绘图工具的实现
简单介绍 HTML5 提供了强大的Canvas元素.使用Canvas并结合Javascript 能够实现一些很强大的功能.本文就介绍一下基于HTML5 Canvas 的绘图工具的实现.废话少说,先看成 ...
- 基于HTML5 Canvas实现的图片马赛克模糊特效
效果请点击下面网址: http://hovertree.com/texiao/html5/1.htm 一.开门见山受美国肖像画家Chuck Close的启发,此脚本通过使用HTML5 canvas元素 ...
- 基于html5 canvas和js实现的水果忍者网页版
今天爱编程小编给大家分享一款基于html5 canvas和js实现的水果忍者网页版. <水果忍者>是一款非常受喜欢的手机游戏,刚看到新闻说<水果忍者>四周年新版要上线了.网页版 ...
- 基于HTML5 Canvas的线性区域图表教程
之前我们看到过很多用jQuery实现的网页图表,有些还是比较实用的.今天我们来介绍一款基于HTML5 Canvas的线性区域图表应用,这个图表应用允许你使用多组数据来同时展示,并且将数据结果以线性图的 ...
- 基于HTML5 Canvas的网页画板实现教程
HTML5的功能非常强大,尤其是Canvas的应用更加广泛,Canvas画布上面不仅可以绘制任意的图形,而且可以实现多种多样的动画,甚至是一些交互式的应用,比如网页网版.这次我们要来看的就是一款基于H ...
- 基于html5 canvas 的客户端异步上传图片的插件,支持客户端压缩图片尺寸
/** * Created by xx on 15-05-28. * 基于html5 canvas 的客户端异步上传画片的插件 * 在实际应用中,常常要用于上传图片的功能.在现在越来越多的手机weba ...
随机推荐
- 玩转Java多线程(Lock.Condition的正确使用姿势)
转载请标明博客的地址 本人博客和github账号,如果对你有帮助请在本人github项目AioSocket上点个star,激励作者对社区贡献 个人博客:https://www.cnblogs.com/ ...
- Docker PHP7 Cannot find OpenSSL's <evp.h>
configure: error: Cannot find OpenSSL's <evp.h> apt-get install libssl-dev
- grub密码
[root@lnmp ~]# grub-md5-cryptPassword: Retype password: $1$k9fQ//$Fh3/O8i3.9dw4zarIHtIx1 [root@lnmp ...
- Spark学习之路(五)—— Spark运行模式与作业提交
一.作业提交 1.1 spark-submit Spark所有模式均使用spark-submit命令提交作业,其格式如下: ./bin/spark-submit \ --class <main- ...
- 如何用 Flutter 实现混合开发?闲鱼公开源代码实例
Flutter: 必火,转两篇软文预热哈哈~ 中文网: https://flutterchina.club/get-started/test-drive/ 如何用 Flutter 实现混合开发?闲鱼公 ...
- 深入理解Java内存模型JMM与volatile关键字
深入理解Java内存模型JMM与volatile关键字 多核并发缓存架构 Java内存模型 Java线程内存模型跟CPU缓存模型类似,是基于CPU缓存模型来建立的,Java线程内存模型是标准化的,屏蔽 ...
- 字符串匹配问题(暴力,kmp)
对于字符串的匹配问题,现在自己能够掌握的就只有两种方法, 第一种就是我们常用的暴力匹配法,那什么是暴力匹配法呢? 假设我们现在有一个文本串和一个模式串,我们现在要找出模式串在文本串的哪个位置. 文本串 ...
- Java学习笔记之---API的应用
Java学习笔记之---API的应用 (一)Object类 java.lang.Object 类 Object 是类层次结构的根类.每个类都使用 Object 作为超类.所有对象(包括数组)都实现这个 ...
- 《转载黑马教程》HTML&&CSS讲义0,,包含教程_仅供参考
今日内容 1. web概念概述 2. HTML web概念概述 * JavaWeb: * 使用Java语言开发基于互联网的项目 * 软件架构: 1. C/S: Client/Server 客户端/服务 ...
- vue-cli · Failed to download repo vuejs-templates/webpack: self signed certificate in certificate chain
vue init webpack <Project name> 报错: vue-cli · Failed to download repo vuejs-templates/webpack: ...