SpringBoot框架 之 Thymeleaf
Thymeleaf
介绍

	SpringBoot并不推荐使用jsp

	Thymeleaf 是一个跟 Velocity、FreeMarker 类似的模板引擎,它可以完全替代 JSP

特点

	动静结合

		Thymeleaf 在有网络和无网络的环境下皆可运行

		它可以让美工在浏览器查看页面的静态效果,也可以让程序员在服务器查看带数据的动态页面效果

		这是由于它支持 html 原型,然后在 html 标签里增加额外的属性来达到模板+数据的展示方式

		浏览器解释 html 时会忽略未定义的标签属性,所以 thymeleaf 的模板可以静态地运行

		当有数据返回到页面时,Thymeleaf 标签会动态地替换掉静态内容,使页面动态显示

	开箱即用

		它提供标准和spring标准两种方言,可以直接套用模板实现JSTL、 OGNL表达式效果,避免每天套模板、该jstl、改标签的困扰。

		同时开发人员也可以扩展和创建自定义的方言。

	多方言支持

		Thymeleaf 提供spring标准方言和一个与 SpringMVC 完美集成的可选模块,可以快速的实现表单绑定、属性编辑器、国际化等功能。

	与SpringBoot完美整合

		与SpringBoot完美整合,SpringBoot提供了Thymeleaf的默认配置

		并且为Thymeleaf设置了视图解析器,我们可以像以前操作jsp一样来操作Thymeleaf。
添加启动器
<dependency>

    <groupId>org.springframework.boot</groupId>

    <artifactId>spring-boot-starter-thymeleaf</artifactId>

</dependency>
创建模板文件夹
SpringBoot会自动为Thymeleaf注册一个视图解析器ThymeleafViewResolver
还配置了模板文件(html)的位置,与jsp类似的前缀+ 视图名 + 后缀风格:
与解析JSP的InternalViewResolver类似,Thymeleaf也会根据前缀和后缀来确定模板文件的位置:
@ConfigurationProperties(prefix="spring.thymeleaf")

public class ThymeleafProperties{

	private static final Charset DEFAULT_ENCODING=StandardCharsets.UTF_8;

	public static final String DEFAULT_PREFIX="classpath:/templates/";

	public static final String DERAULT_SUEEIX=". html";

	......

}
在配置文件中配置缓存,编码
spring:

  thymeleaf:

    cache: false

    mode: HTML5

    encoding: UTF-8
基本使用
引入名称空间

	<html lang="en" xmlns:th="http://www.thymeleaf.org">

表达式

	${}:变量表达式

	*{} :选择变量表达式,取出hero对象中的属性

		<div th:object="${hero}">

            <p th:text="*{username}"></p>

            <p th:text="*{phone}"></p>

            <p th:text="*{id}"></p>

            <p th:text="${hero.username}"></p>

        </div>

	#{...} : Message 表达式

URL

	绝对网址

		绝对URL用于创建到其他服务器的链接,它们需要指定一个协议名称(http://或https://)开头

		<a th:href="@{https://www.itlike.com/}">

	上下文相关URL

		与Web应用程序根相关联URL

		<a th:href="@{/hello}">跳转</a>

	与服务器相关URL

		服务器相关的URL与上下文相关的URL非常相似

		<a th:href="@{~/hello}">跳转</a>

	携带参数

		<a th:href="@{/hero/detail(id=3,action='show_all')}">aa</a>

字面值

	有的时候,我们需要在指令中填写基本类型如:字符串、数值、布尔等,并不希望被Thymeleaf解析为变量,这个时候称为字面值。(也就是原样输出)

	字符串字面值

		<p>

			内容:<span th:text=”'thymeleaf'+1">template</span>

		</p>

	数字字面值

		<p>

			内容:<span th:text=”2+1">template</span>

		</p>

    布尔字面值

        布尔类型的字面值是true或false

拼接

	普通字符串与表达式拼接的情况

		<span th:text=”'欢迎您:'+${hero.username}+'!'"></span>

	字符串字面值需要用'',拼接起来非常麻烦,Thymeleaf对此进行了简化,使用一对|即可

		<span th:text="|欢迎您:${hero.username}|"></span>

运算符

	算术操作符

		+ - * / %

  	比较运算

        > , <, >= and <=

        但是>和<不能直接使用,因为xml会解析为标签

        >  gt

        <  lt

        >= ge

        <= le

        <!-- 返回值为true -->

        <h1 th:text=" 1 lt 2"></h1>

        <!-- 返回值为假 -->

		<h1 th:text="1 gt 2 ? '真' : '假'"></h1>

    三元运算

        condition ? then : else

        	<span th:text="${false}?'男':'女'"></span〉

        简写

            <!--

    默认表达式

    变量值为空  就显示默认值

    否则就显示变量本身

    -->

    <h1 th:text="${hero.username}?:'我是空值'"></h1>

    <h1 th:text="${hero.username} != null ? ${hero.username} : '我是空值'"></h1>

内联写法

    <!--原样输出-->

    <p>pppp-------—-[(${hero.username})]</p>

    <!--解析内部标签-->

    <p>pppp-------—-[[${hero.username}]]</p>

局部变量

    <div th:with="heroN = ${allHero[0]}">

        <h1 th:text="${heroN.username}"></h1>

        <h1 th:text="${heroN.phone}"></h1>

    </div>

判断

    th:if

        <!--当条件满足时, 才会显示标签-->

        <h1 th:if="${1 lt 2}">内容1</h1>

    th:unless

        <!--

        unless是与if相反

        不满足条件时,才会显示标签

        -->

        <h1 th:unless="${1 gt 2}">内容2</h1>

    th:switch

        <div th:switch="${hero.username}">

            <p th:case="'itlike'">itlike</p>

            <p th:case="'gxq'">gxq</p>

            <p th:case="*">*为默认的值,相当于default</p>

        </div>

迭代

    <div>

        <p th:each="heroItem:${allHero}">

            <span th:text="${heroItem.username}"></span>

            <span th:text="${heroItem.phone}"></span>

            <span th:text="${#dates.format(heroItem.onlinetime,'yyyy-MM-dd')}"></span>

        </p>

    </div>

    <hr>

    <div>

        <p th:each="heroItem,stat:${allHero}">

            <span th:text="${heroItem.username}"></span>

            <span th:text="${heroItem.phone}"></span>

            <span th:text="${stat.index}"></span>

        </p>

    </div>

    stat对象包含以下属性

        index,从0开始的角标

        count,当前遍历到第几个元素,从1开始

        size,总元素个数

        current,当前遍历到的元素信息

        odd/even,返回是否为奇偶,boolean值

        first/last,返回是否为第一或最后,boolean值

内置对象

	环境相关对象

		${#ctx} 上下文对象,可用于获取其它内置对象。

		${#vars}:    上下文变量。

		${#locale}:上下文区域设置。

		${#request}: HttpServletRequest对象。

		${#response}: HttpServletResponse对象。

		${#session}: HttpSession对象。

		${#servletContext}:  ServletContext对象。

	全局对象功能

		#strings:字符串工具类

		#lists:List 工具类

		#arrays:数组工具类

		#sets:Set 工具类

		#maps:常用Map方法。

		#objects:一般对象类,通常用来判断非空

		#bools:常用的布尔方法。

		#execInfo:获取页面模板的处理信息。

		#messages:在变量表达式中获取外部消息的方法,与使用#{...}语法获取的方法相同。

		#uris:转义部分URL / URI的方法。

		#conversions:用于执行已配置的转换服务的方法。

		#dates:时间操作和时间格式化等。

		#calendars:用于更复杂时间的格式化。

		#numbers:格式化数字对象的方法。

		#aggregates:在数组或集合上创建聚合的方法。

		#ids:处理可能重复的id属性的方法。

	示例

		${#strings.abbreviate(str,10)}  str截取0-10位,后面的全部用…这个点代替,注意,最小是3位

		${#strings.toUpperCase(name)}

		判断是不是为空:null:

		<span th:if="${name} != null">不为空</span>

		<span th:if="${name1} == null">为空</span>

		判断是不是为空字符串: “”

		<span th:if="${#strings.isEmpty(name1)}">空的</span>

		判断是否相同:

		<span th:if="${name} eq 'jack'">相同于jack,</span>

		<span th:if="${name} eq 'ywj'">相同于ywj,</span>

		<span th:if="${name} ne 'jack'">不相同于jack,</span>

		不存在设置默认值:

		<span th:text="${name2} ?: '默认值'"></span>

		是否包含(分大小写):

		<span th:if="${#strings.contains(name,'ez')}">包ez</span>

		<span th:if="${#strings.contains(name,'y')}">包j</span>

		是否包含(不分大小写)

		<spanth:if="${#strings.containsIgnoreCase(name,'y')}">包</span>

		${#strings.startsWith(name,'o')}

		${#strings.endsWith(name, 'o')}

		${#strings.indexOf(name,frag)}// 下标

		${#strings.substring(name,3,5)}// 截取

		${#strings.substringAfter(name,prefix)}// 从 prefix之后的一位开始截取到最后,比如 (ywj,y) = wj, 如果是(abccdefg,c) = cdefg//里面有2个c,取的是第一个c

		${#strings.substringBefore(name,suffix)}// 同上,不过是往前截取

		${#strings.replace(name,'las','ler')}// 替换

		${#strings.prepend(str,prefix)}// 拼字字符串在str前面

		${#strings.append(str,suffix)}// 和上面相反,接在后面

		${#strings.toUpperCase(name)}

		${#strings.toLowerCase(name)}

		${#strings.trim(str)}

		${#strings.length(str)}

		${#strings.abbreviate(str,10)}//  str截取0-10位,后面的全部用…这个点代替,注意,最小是3位

布局

	方式1

		hello.html

        <nav th:fragment="header">

            <h1>头部</h1>

        </nav>

        base.html

		<div th:include="{common/base::header}"></div>

	方式2

		hello.html

		<footer id="footer">

            <h1  th:class="${active == 'footer' ? 'red' : ''}" >尾部---</h1>

            <p>aaaaaa</p>

        </footer>

        base.html

		<div th:insert="{common/base::#footer}"></div>

	引入方式

		th:insert

			将公共的标签及内容插入到指定标签当中

		th:replace

			将公共的标签替换指定的标签

		th:include

			将公共标签的内容包含到指定标签当中

	传值

		hello.html

		<div th:include="~{base::#footer(active='footers')}"></div>

		base.html

		<footer id="footer">

            <h1 th:class="${active == 'footer' ? 'red' : ''}" >尾部---</h1>

            <p>aaaaaa</p>

        </footer>

js模板

	模板引擎不仅可以渲染html,也可以对JS中的进行预处理。而且为了在纯静态环境下可以运行

	在script标签中通过th:inline="javascript"来声明这是要特殊处理的js脚本

	取值要采用注释的形式

	<script th:inline="javascript">

        var username = /*[[${name}]]*/ "myxq";

        console.log(username);

    </script>
综合使用
导入资源
引入bootstrap

    <dependency>

        <groupId>org.webjars</groupId>

        <artifactId>bootstrap</artifactId>

        <version>4.0.0</version>

    </dependency>

在页面中引入资源文件

    <link rel="stylesheet" href="js/bootstrap/dist/css/bootstrap.css" th:href="@{/webjars/bootstrap/4.0.0/css/bootstrap.css}">

    <link rel="stylesheet" href="js/font-awesome/css/font-awesome.css" th:href="@{/css/font-awesome/css/font-awesome.css}">

    <link rel="stylesheet" href="css/index.css" th:href="@{/css/index.css}">

    <script  th:href="@{/webjars/bootstrap/4.0.0/js/bootstrap.js}"></script>
设置默认主页
@Configuration

public class WebMvcConfig implements WebMvcConfigurer {

    @Override

    public void addInterceptors(InterceptorRegistry registry) {

        registry.addVievController("/")).setViewName("login");

        registry.addVievController("/index.html")).setViewName("login");

    }

}
国际化
1.编写国际化配置文件
在资源文件夹resources下,创建一个国际化文件夹i18n
在i18n文件夹中创建一个login.properties文件
创建中文/英文国际化文件
在i18n文件夹中创建一个login_en_US.properties文件
在i18n文件夹中创建一个login_zh_CN.properties文件
点击Resource Bundle,新建property key name为login.username
在login.properties窗口下输入用户名
login_en_US.properties窗口中输入username
login_zh_CN.properties窗口中输入用户
注意
要更改文件编码
idea中,设置->编译器->文本编码属性文件(*.properties)
设置属性文件的默认编码为UTF-8
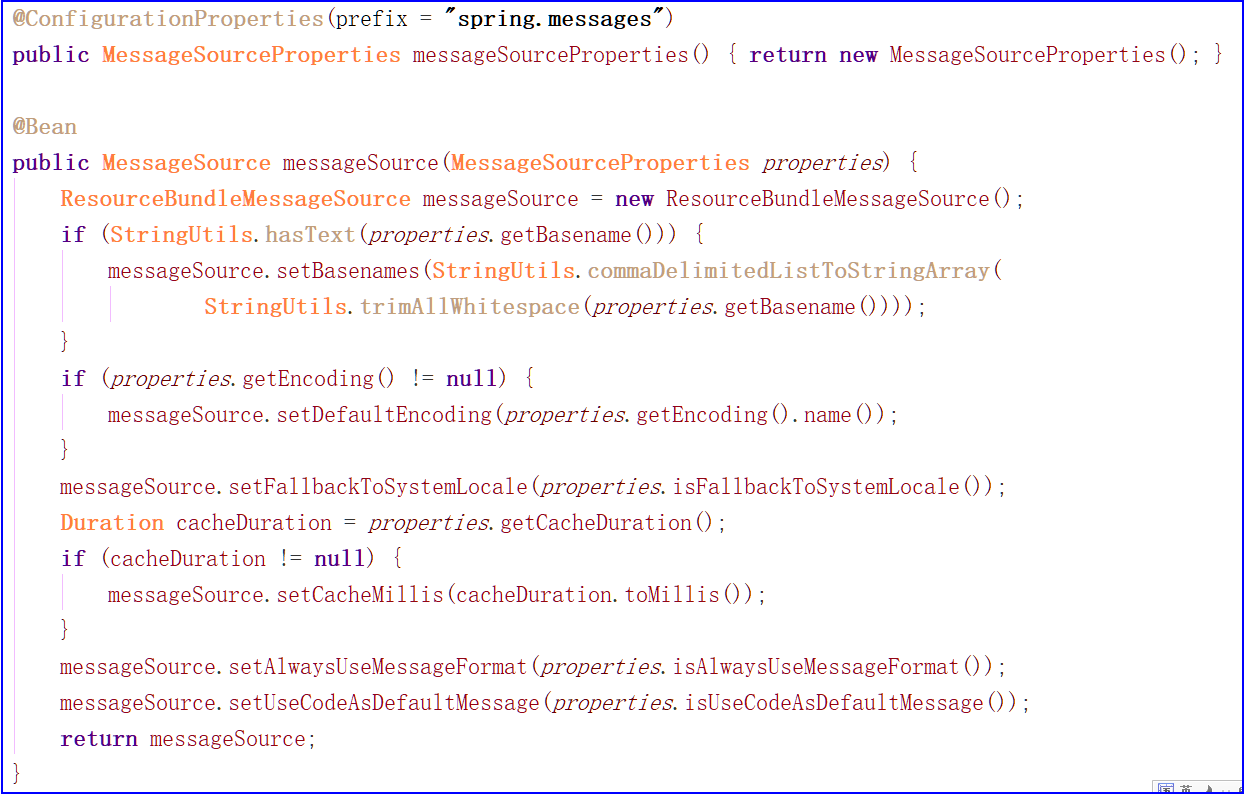
2.在springboot中有一个messageSourceAutoConfiguration
会自动管理国际化资源文件
在全局配置文件中设置基础名
spring:
messages:
basename: i18n.login
3.在页面中获取国际化的值
<!-- 登录 -->
<div class="login">
<div class="login-wrap">
<div class="avatar">
<img src="./images/logo.jpg" class="img-circle" alt="">
</div>
<form action="" class="col-md-offset-1 col-md-10">
<div class="input-group input-group-lg">
<span class="input-group-addon">
<i class="fa fa-id-card-o"></i>
</span>
<input type="text" class="form-control" name="username" th:placeholder="#{login.username}">
</div>
<div class="input-group input-group-lg">
<span class="input-group-addon">
<i class="fa fa-key"></i>
</span>
<input type="password" class="form-control" name="password" th:placeholder="#{login.password}">
</div>
<button type="submit" class="btn btn-lg btn-danger btn-block" th:text="#{login.btn}">登 录</button>
<a class="language" th:href="@{/login(lan='zh_CN')}">中文</a>|<a class="language" th:href="@{/login(lan='en_US')}">English</a>
</form>
</div>
</div>
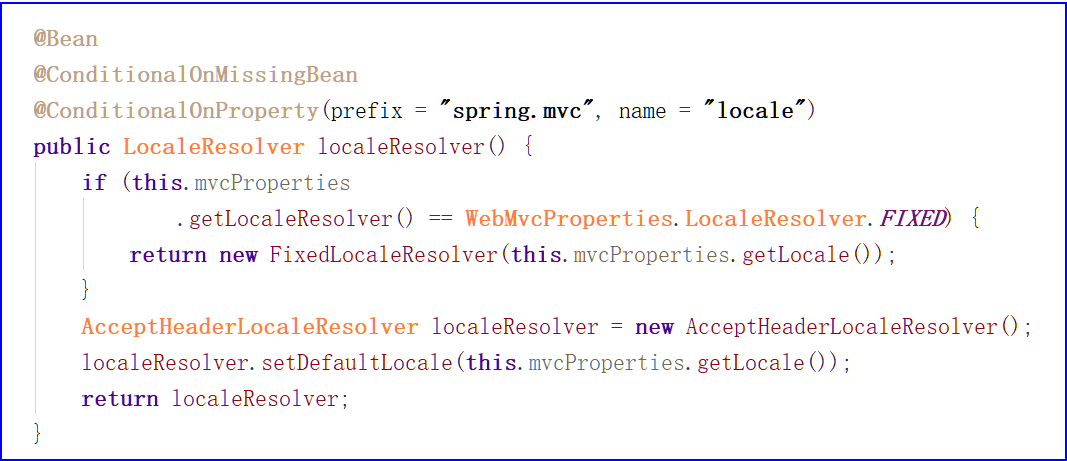
4.切换中英文
默认
自定义
public class MyLocaleResolver implements LocaleResolver {
@Override
public Locale resolveLocale(HttpServletRequest request){
String lan=request.getParameter("lan");
Locale locale=Locale.getDefault();
if(!StringUtils.isEmpty(lan)){
String[] split=lan.split("_");
locale=new Locale(split[0],split[1]);
}
return locale;
}
@Override
public void setLocale(HttpServletRequest request, HttpServletResponse response, Locale locale){
}
}
@Configuration
public class WebMvcConfig implements WebMvcConfigurer {
@Bean
public LocaleResolver localeResolver() {
return new MyLocaleResolver();
}
}
MessageSourceAutoConfiguration(自动管理国际化资源文件)
默认切换中英文
登录
界面处理
<!-- 登录 -->

<div class="login">

	<div class="login-wrap">

		<div class="avatar">

			<img src="./images/logo.jpg" class="img-circle" alt="">

		</div>

		<form action="" class="col-md-offset-1 col-md-10">

			<div class="input-group input-group-lg">

					<span class="input-group-addon">

						<i class="fa fa-id-card-o"></i>

					</span>

				<input type="text" class="form-control" name="username" th:placeholder="#{login.username}">

			</div>

			<div class="input-group input-group-lg">

					<span class="input-group-addon">

						<i class="fa fa-key"></i>

					</span>

				<input type="password" class="form-control" name="password" th:placeholder="#{login.password}">

			</div>

			<button type="submit" class="btn btn-lg btn-danger btn-block" th:text="#{login.btn}">登 录</button>

			<a class="language" th:href="@{/login(lan='zh_CN')}">中文</a>|<a class="language" th:href="@{/login(lan='en_US')}">English</a>

		</form>

	</div>

</div>
接收请求
@PostMapping("/login")

public String login(@RequestParam("username") String username,@RequestParam("password")String password,Model model,HttpSession session){

	if(!StringUtils.isEmpty(username)&& "123456".equals(password)){

		//登陆成功,防止表单重复提交,可以重定向到主页

		session.setAttribute("loginUser",username);

		return "redirect:/main.html";

	}else{

		//登陆失败

		model.addAttribute("msg","用户名密码错误");

		return "login";

	}

}
登录错误处理
<!--判断-->

<p style="color:red;margin-left:60px;font-size:18px" th:text="${msg}" th:if="${not #strings.isEmpty(msg)}"></p>
登录状态处理
public class LoginHandlerInterceptor implements HandlerInterceptor {

    @Override

    public boolean preHandle(HttpServletRequest request, HttpServletResponse response, Object handler) throws ServletException, IOException {

        Object user=request.getSession().getAttribute("loginUser");

        if(user==null){

            //未登陆,返回登陆页面

            request.setAttribute("msg","没有权限请先登陆");

            request.getRequestDispatcher("/login").forward(request,response);

            return false;

        }

        else{

            //已登陆,放行请求

            return true;

        }

    }

}
springBoot2.0之后添加拦截器时,要自己添加静态资源文件路径(2.0之前是自动添加静态资源文件路径)
@Configuration

public class WebMvcConfig implements WebMvcConfigurer {

    @Override

    public void addInterceptors(InterceptorRegistry registry) {

        registry.addInterceptor(new LoginHandlerInterceptor()).addPathPatterns("/**")

                .excludePathPatterns("/","/1ogin","/main.html","login","/static/**");

    }

    @Override

    public void addResourceHandlers(ResourceHandlerRegistry registry) {

        registry.addResourceHandler("/static/**").addResourceLocations("classpath:/static/**");

        WebMvcConfigurer.super.addResourceHandlers(registry);

    }

}
列表
列表数据获取
public interface HeroMapper extends Mapper<Hero> {

}
@Autowired

private MainService mainService;

@RequestMapping("/main")

public String main(Model mode){

	List<Hero> herolist=mainService.getHeroList();

	model.addAttribute("heroList",heroList);

	return"main";

}
列表展示
<tr th:each="hero:${heroList}">

	<td th:text="${hero.id}"></td>

	<td th:text="${hero.profession}"></td>

	<td th:text="${hero.username}"></td>

	<td th:text="${hero.email}"></td>

	<td th:text="${#dates.format(hero.onlinetime,'yyyy-MM-dd HH:mm')}"></td>

	<td>

		<a th:href="@{/edit}" class="btn btn-danger btn-sm">编辑</a>

		<a href="javascript:;" class="btn btn-warning btn-sm">删除</a>

	</td>

</tr>
添加
跳转到添加页面

<div class="panel-body">

	<a href="@{/addPage}" class="btn btn-primary">添加英雄</a>

</div>

添加按钮点击

<form th:action="@{/addHero}" class="form-horizontal" method="post">

	<input type="hidden" name="_method" value="put" th:if="${hero!=null}"/>

	<input type="hidden" name="id" th:if="${hero!=null}" th:value="${hero.id}">

	<div class="form-group">

		<label  class="col-md-2 control-label">名称</label>

		<div class="col-md-6">

			<input type="text" name="username" th:value="${hero!=null}?${hero.username}" class="form-control">

		</div>

	</div>

	<div class="form-group">

		<label  class="col-md-2 control-label">职业</label>

		<div class="col-md-6">

			<input type="text" name="profession" th:value="${hero!=null}?${hero.profession}" class="form-control">

		</div>

	</div>

	<div class="form-group">

		<label  class="col-md-2 control-label">电话</label>

		<div class="col-md-6">

			<input type="text" name="phone" th:value="${hero!=null}?${hero.phone}"  class="form-control">

		</div>

	</div>

	<div class="form-group">

		<label  class="col-md-2 control-label">邮箱</label>

		<div class="col-md-6">

			<input type="text" name="email" th:value="${hero!=null}?${hero.email}"  class="form-control">

		</div>

	</div>

	<div class="form-group">

		<label  class="col-md-2 control-label">上线日期</label>

		<div class="col-md-6">

			<input type="text" name="onlinetime" th:value="${hero!=null}?${#dates.format(hero.onlinetime,'yyyy-MM-dd')}"  class="form-control">

		</div>

	</div>

	<div class="modal-footer">

		<input type="submit" class="btn btn-danger"   th:value="${hero!=null}?'修改':'添加'">

	</div>

</form>

日期处理(写在控制器中)

@InitBinder

public void InitBinder(WebDataBinder dataBinder){

        dataBinder.registerCustomEditor(Date.class,new PropertyEditorSupport(){

        public void setAsText(String value){

            try{

                setValue(new SimpleDateFormat("yyyy-MM-dd").parse(value));

            }

            catch(ParseException e){

                setValue(null);

            }

        }

        public String getAsText(){

            return new SimpleDateFormat("yyyy-MM-dd").format((Date)getValue());

        }

    });

}
SpringBoot框架 之 Thymeleaf的更多相关文章
- springboot框架中集成thymeleaf引擎,使用form表单提交数据,debug结果后台获取不到数据
springboot框架中集成thymeleaf引擎,使用form表单提交数据,debug结果后台获取不到数据 表单html: <form class="form-horizontal ...
- 8.SpringBoot 模板引擎 Thymeleaf
1.模板引擎原理 JSP.Velocity.Freemarker.Thymeleaf 都是模板引擎.SpringBoot推荐的Thymeleaf:语法更简单,功能更强大: Thymeleaf模板引擎 ...
- SpringBoot框架的权限管理系统
springBoot框架的权限管理系统,支持操作权限和数据权限,后端采用springBoot,MyBatis,Shiro,前端使用adminLTE,Vue.js,bootstrap-table.tre ...
- spring boot 学习(二)spring boot 框架整合 thymeleaf
spring boot 框架整合 thymeleaf spring boot 的官方文档中建议开发者使用模板引擎,避免使用 JSP.因为若一定要使用 JSP 将无法使用. 注意:本文主要参考学习了大神 ...
- SpringBoot入门篇--Thymeleaf引擎模板的基本使用方法
我们在使用SpringBoot框架的时候在前面已经介绍了Thymelea引擎模板,因为SpringBoot对JSP惨不忍睹的支持.那我们在使用引擎模板对前端页面进行渲染能够返回的情况下我们怎么才能在静 ...
- Springboot框架
本片文章主要分享一下,Springboot框架为什么那么受欢迎以及如何搭建一个Springboot框架. 我们先了解一下Springboot是个什么东西,它是干什么用的.我是刚开始接触,查了很多资料, ...
- Springboot 框架学习
Springboot 框架学习 前言 Spring Boot是Spring 官方的顶级项目之一,她的其他小伙伴还有Spring Cloud.Spring Framework.Spring Data等等 ...
- SpringBoot 同时整合thymeleaf html、vue html和jsp
问题描述 SpringBoot如何同时访问html和jsp SpringBoot访问html页面可以,访问jsp页面报错 SpringBoot如何同时整合thymeleaf html.vue html ...
- 小程序后端项目【Springboot框架】部署到阿里云服务器【支持https访问】
前言: 我的后端项目是Java写的,用的Springboot框架.在部署服务器并配置https访问过程中,因为做了一些令人窒息的操作(事后发现),所以老是不能成功. 不成功具体点说就是:域名地址可以正 ...
随机推荐
- 记.net core 项目在linux系统下启动失败的一个教训
最近准备用.net core开发一个项目.使用的是Coldairarrow的框架.做了一部分之后,准备部署到服务器上测试一下.然后就遇到了这个问题. 项目路径: /home/www/webapi/ 启 ...
- MySQL主从复制什么原因会造成不一致,如何预防及解决?
一.导致主从不一致的原因主要有: 人为原因导致从库与主库数据不一致(从库写入) 主从复制过程中,主库异常宕机 设置了ignore/do/rewrite等replication等规则 binlog非ro ...
- eclipse svn 提交、更新报错
问题描述: svn: Unable to connect to a repository at URL 'https://test.com/svn/clouds/trunk/fire_Alarm'sv ...
- 新建本地用户连接vsftp出现530 Login incorrect
新建的用户的方式 [root@centos2 /var/ftp]# useradd -s /sbin/nologin user1 出错原因: /etc/pam.d/vsftp文件作了限制 [root@ ...
- 【HCIA Gauss】学习汇总-数据库管理(SQL语法 数据类型 函数)-4
DDL data definition language 数据库定义语言 定义修改等DML data manipulation language 数据库操控语言 增删改 DCL data crontr ...
- python基础---python基础语法
1.常用符号 逗号,枚举:一个函数有多个参数sum(1,2) 等于,赋值:把一个值,给一个变量,a=1 括号,函数的参数部分sum(x,y) 冒号,一个子过程的开始 双引号/单引号:表示字符串 运算符 ...
- python笔记38-使用zmail发各种邮件案例代码
前言 本篇介绍使用zmail发各种格式的邮件,并运行成功的代码,小伙伴们只需更换自己的邮箱就可以运行起来了 content_text发送纯文本 先从最简单的发送纯文本的邮件开始,调通发送邮件的代码. ...
- Python库资源大全【收藏】
本文是一个精心设计的Python框架.库.软件和资源列表,是一个Awesome XXX系列的资源整理,由BigQuant整理加工而成,欢迎扩散.欢迎补充! 对机器学习.深度学习在量化投资中应用感兴趣的 ...
- Appache Flume 中文介绍(转)
Flume 是什么 Apache Flume是一个高可靠.高可用的分布式的海量日志收集.聚合.传输系统.它可以从不同的日志源采集数据并集中存储. Flume也算是Hadoop生态系统的一 ...
- 2019牛客多校第九场AThe power of Fibonacci——扩展BM
题意 求斐波那契数列m次方的前n项和,模数为 $1e9$. 分析 线性递推乘线性递推仍是线性递推,所以上BM. 由于模数非质数,上扩展版的BM. 递推多少项呢?本地输入发现最大为与前57项有关(而且好 ...