VUE简单的语法
这篇主要记录了在使用过程的当中,对于vue的一些方法的理解
1.Vue生命周期中mounted和created的区别
例子
- <span style="font-size:14px;">Vue.component("demo1",{
- data:function(){
- return {
- name:"",
- age:"",
- city:""
- }
- },
- template:"<ul><li id='name'>{{name}}</li><li>{{age}}</li><li>{{city}}</li></ul>",
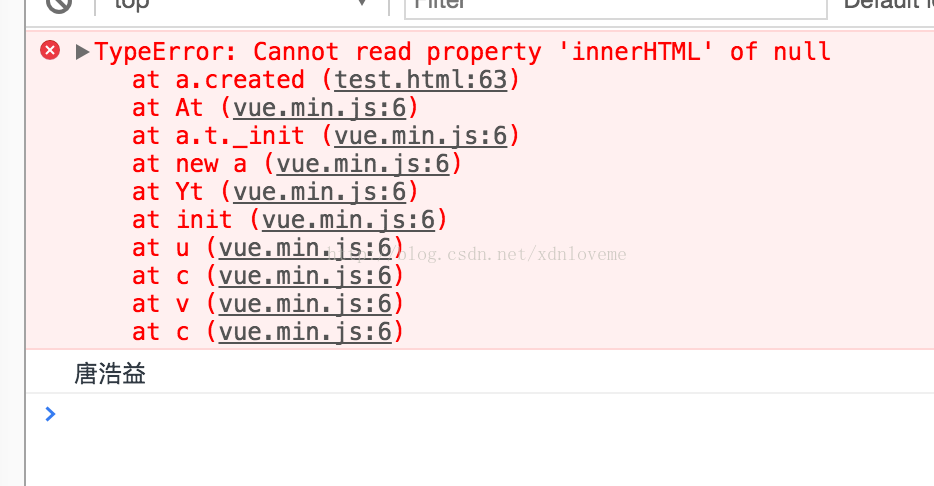
- created:function(){
- this.name="唐浩益"
- this.age = "12"
- this.city ="杭州"
- var x = document.getElementById("name")//第一个命令台错误
- console.log(x.innerHTML);
- },
- mounted:function(){
- var x = document.getElementById("name")/</span>/第二个命令台输出的结果<span style="font-size:14px;">
- console.log(x.innerHTML);
- }
- });
- var vm = new Vue({
- el:"#example1"
- })</span>
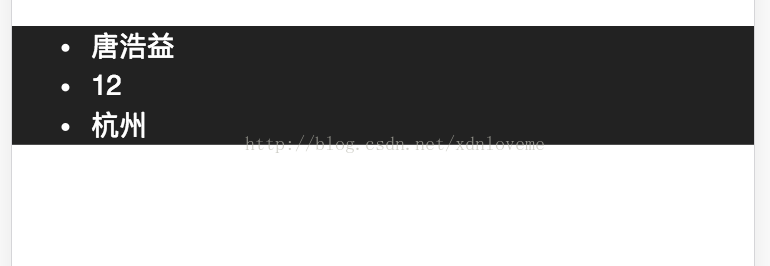
可以看到输出如下:
最近,在项目中要使用Swiper做一个移动端轮播插件。需要先异步动态加载数据后,然后使用v-for渲染节点,再执行插件的滑动轮播行为。解决这个问题,我们通过在组件中使用vm.$nextTick来解决这一需求。
1、在数据调用结束后再进行swiper初始化
 //调用接口查询需要循环的商品

    this.$http.get('../../../static/json/foodkind.json').then((res) => {

      this.foodArr = res.data.foodkind;

      // $nextTick,它会在数据变化以后,DOM更新以后进行回调函数

      this.$nextTick(function() {

        new Swiper('.swiper-container', {

          pagination: '.swiper-pagination',

          paginationClickable: true,

          spaceBetween: 30,

          centeredSlides: true,

          autoplay: 2500,

          autoplayDisableOnInteraction: false

        });

      })

    }, (res) => {

      console.log("error");

    })
这里还要用到$nextTick,它会在数据变化以后,DOM更新以后进行回调函数,不然的话轮播还是会出现错乱的情况
总结:
* `Vue.nextTick(callback)`,当数据发生变化,更新后执行回调。
* `Vue.$nextTick(callback)`,当dom发生变化,更新后执行的回调。
三 vue的跨域解决
我们在项目中,有的时候会遇到vue的跨域问题,这个时候我们要么使用jsonp的形式获取,要么使用配置vue的proxy代理的方式,前者,我还没研究懂,现在先介绍配置proxy代理的方式
dev: {

        env: require('./dev.env'),

        port: ,

        autoOpenBrowser: true,

        assetsSubDirectory: 'static',

        assetsPublicPath: '/',

        proxyTable: {

            '/api/**': {

                target: 'http://api.douban.com/v2', //表示你跨域请求的接口的域名

                secure: false, //如果是https接口,需要配置这个参数

                changeOrigin: true, //如果接口跨域,需要进行这个参数配置
                pathRewrite: {
                   '^/api': ''
                }
             },
'/users/*': {

                target: 'http://127.0.0.1:8089'

            }

        },

        // CSS Sourcemaps off by default because relative paths are "buggy"

        // with this option, according to the CSS-Loader README

        // (https://github.com/webpack/css-loader#sourcemaps)

        // In our experience, they generally work as expected,

        // just be aware of this issue when enabling this option.

        cssSourceMap: false

    }

在main.js当中可以配置一个公共的路由路径
axios.defaults.baseURL = '';
或者可以在调用该接口的时候,直接使用加上/api

四 proos的简单用法
使用 props 传递数据
组件实例的作用域是孤立的。这意味着不能并且不应该在子组件的模板内直接引用父组件的数据。可以使用 props 把数据传给子组件。
“prop” 是组件数据的一个字段,期望从父组件传下来。子组件需要显式地用 props 选项 声明 props:
|
1
2
3
4
5
6
7
|
Vue.component('child', { // 声明 props props: ['msg'], // prop 可以用在模板内 // 可以用 `this.msg` 设置 template: '<span>{{ msg }}</span>'}) |
然后向它传入一个普通字符串:
<child msg="hello!"></child>
举例
错误写法:
|
1
2
3
4
5
6
7
8
9
10
11
12
13
14
15
16
17
18
19
20
21
22
23
24
25
26
27
28
29
30
31
32
33
34
35
36
37
38
39
40
|
<!DOCTYPE html><html lang="en"><head> <script type="text/javascript" src="./vue.js"></script> <meta charset="UTF-8"> <title>vue.js</title></head><body><pre> //使用 props 传输资料予子组件 //props , data 重复名称会出现错误</pre><div id="app1"> <child mssage="hello!"></child></div><script> Vue.config.debug = true; Vue.component('child', { // declare the props props: ['msg','nihao','nisha'], // the prop can be used inside templates, and will also // be set as `this.msg` template: '<span>{{ msg }}{{nihao}}{{nisha}}</span>', data: function() { return { mssage: 'boy' } } }); var vm = new Vue({ el: '#app1' })</script></body></html> |
正确写法:
|
1
2
3
4
5
6
7
8
9
10
11
12
13
14
15
16
17
18
19
20
21
22
23
24
25
26
27
28
29
30
31
32
33
34
35
|
<!DOCTYPE html><html lang="en"><head> <script type="text/javascript" src="./vue.js"></script> <meta charset="UTF-8"> <title>vue.js</title></head><body><pre> //使用 props 传输资料予子组件 //props , data 重复名称会出现错误</pre><div id="app1"> <child mssage="hello!"></child></div><script> Vue.config.debug = true; Vue.component('child', { // declare the props props: ['msg','nihao','nisha'], // the prop can be used inside templates, and will also // be set as `this.msg` template: '<span>{{ msg }}{{nihao}}{{nisha}}</span>' }); var vm = new Vue({ el: '#app1' })</script></body></html> |
props 传入多个数据(顺序问题)
第一种:
HTML
|
1
2
3
4
5
|
<div id="app1"><child msg="hello!"></child><child nihao="hello1!"></child><child nisha="hello2!"></child></div> |
JS
|
1
2
3
4
5
6
7
8
9
10
11
12
13
14
15
16
|
Vue.config.debug = true;Vue.component('child', {// declare the propsprops: ['msg','nihao','nisha'],// the prop can be used inside templates, and will also// be set as `this.msg`template: '<span>{{ msg }}{{nihao}}{{nisha}}</span>',/*data: function() {return {msg: 'boy'}}*/});var vm = new Vue({el: '#app1'}) |
结果:hello! hello1! hello2!
第二种:
HTML
|
1
2
3
4
5
|
<div id="app1"><child msg="hello!"></child> <child nihao="hello1!"></child> <child nisha="hello2!"></child></div> |
JS
|
1
2
3
4
5
6
7
8
9
10
11
12
13
14
15
16
|
Vue.config.debug = true;Vue.component('child', {// declare the propsprops: ['msg','nihao','nisha'],// the prop can be used inside templates, and will also// be set as `this.msg`template: '<span>123{{ msg }}{{nihao}}{{nisha}}</span>',/*data: function() {return {msg: 'boy'}}*/});var vm = new Vue({el: '#app1'}) |
结果:123hello! 123hello1! 123hello2!
第三种:
HTML
|
1
2
3
4
5
|
<div id="app1"><child msg="hello!"></child><child nihao="hello1!"></child> <child nisha="hello2!"></child></div> |
JS
|
1
2
3
4
5
6
7
8
9
10
11
12
13
14
15
16
|
Vue.config.debug = true;Vue.component('child', {// declare the propsprops: ['msg','nihao','nisha'],// the prop can be used inside templates, and will also// be set as `this.msg`template: '<span>{{ msg }}{{nihao}}{{nisha}}123</span>',/*data: function() {return {msg: 'boy'}}*/});var vm = new Vue({el: '#app1'}) |
结果:hello! 123 hello1! 123 hello2!123
第四种:
HTML
|
1
2
3
4
5
|
<div id="app1"><child msg="hello!"></child><child nihao="hello1!"></child><child nisha="hello2!"></child></div> |
JS
|
1
2
3
4
5
6
7
8
9
10
11
12
13
14
15
16
|
Vue.config.debug = true;Vue.component('child', {// declare the propsprops: ['msg','nihao','nisha'],// the prop can be used inside templates, and will also// be set as `this.msg`template: '<span>{{ msg }}123{{nihao}}{{nisha}}123</span>',/*data: function() {return {msg: 'boy'}}*/});var vm = new Vue({el: '#app1'}) |
结果:hello! 123 123hello1! 123hello2!
结论:
在props 中传入多个数据是,如果在父组件的模板类添加其他元素或者字符会有:
1-在最前面加入—每个子组件渲染出来都会在其前面加上
2-在最后面加入—每个子组件渲染出来都会在其后面加上
3-在中间加入—他前面子组件后面加上,后面的子组件后面加上
五 proos的简单用法
ps:App.vue 父组件
Hello.vue 子组件

ps:App.vue 父组件

  Hello.vue 子组件

<!--App.vue  :-->

<template>

  <div id="app">

    <hello @newNodeEvent="parentLisen" />

  </div>

</template>

<script>

    import hello from './components/Hello'

    export default {

        name: 'app',

        'components': {

            hello

        },

        methods: {

            parentLisen(evtValue) {

                //evtValue 是子组件传过来的值

                alert(evtValue)

            }

        }

    }

</script>

<!--Hello.vue  :-->

<template>

  <div class="hello">

    <input type="button" name="" id="" @click="chilCall()" value="子调父" />

  </div>

</template>

<script>

    export default {

        name: 'hello',

        'methods': {

            chilCall(pars) {

                this.$emit('newNodeEvent', '我是子元素传过来的')

            }

        }

    }

</script>
VUE简单的语法的更多相关文章
- vue(2)—— vue简单语法运用,常用指令集
按照前面的文章:vue(1)——node.js安装使用,利用npm安装vue 安装完vue之后,就可以使用vue了 vue vue简介 前面安装好vue之后,确实还没有对vue进行介绍,首先,官网: ...
- Vue.js 数据绑定语法详解
Vue.js 数据绑定语法详解 一.总结 一句话总结:Vue.js 的模板是基于 DOM 实现的.这意味着所有的 Vue.js 模板都是可解析的有效的 HTML,且通过一些特殊的特性做了增强.Vue ...
- Vue 1-- ES6 快速入门、vue的基本语法、vue应用示例,vue基础语法
一.ES6快速入门 let和const let ES6新增了let命令,用于声明变量.其用法类似var,但是声明的变量只在let命令所在的代码块内有效. { let x = 10; var y = 2 ...
- Vue(1)- es6的语法、vue的基本语法、vue应用示例,vue基础语法
一.es6的语法 1.let与var的区别 ES6 新增了let命令,用来声明变量.它的用法类似于var(ES5),但是所声明的变量,只在let命令所在的代码块内有效.如下代码: { let a = ...
- Vue 简单的总结一
let 变量 1. 局部作用域 2. 不会存在变量提升 3. 变量不能重复声明 const 变量 1. 局部作用域 2. 不会存在变量提升 3. 变量不能重复声明 4. 只能声明常量,不可变得量 th ...
- vue 的基本语法
一 . Vue 的介绍 1 . 前端的三大框架 (可以去 GitHub 查看三个框架的 star 星) vue : 作者尤雨溪, 渐进式的JavaScript 框架 react : Faceb ...
- vue基础---模板语法
Vue.js 使用了基于 HTML 的模板语法,允许开发者声明式地将 DOM 绑定至底层 Vue 实例的数据.所有 Vue.js 的模板都是合法的 HTML ,所以能被遵循规范的浏览器和 HTML 解 ...
- Vue.js 模板语法
本章节将详细介绍 Vue.js 模板语法,如果对 HTML +Css +JavaScript 有一定的了解,学习起来将信手拈来. Vue.js 使用了基于 HTML 的模版语法,允许开发者声明式地将 ...
- Vue简单基础 + 实例 及 组件通信
vue的双向绑定原理:Object.defineProperty() vue实现数据双向绑定主要是:采用数据劫持结合发布者-订阅者模式的方式,通过 Object.defineProperty() 来劫 ...
随机推荐
- 图论问题(1) : hdu 1198
题目转自hdu 1198,题目传送门 题目大意: 给你11种单位水管摆放位置,若上下或左右有水管连接则视为这两点相连. 最后让你求这些张图中有几个连通块. 解题思路: 本来觉得这道题很简单,不就一个建 ...
- [LeetCode] 164. Maximum Gap 求最大间距
Given an unsorted array, find the maximum difference between the successive elements in its sorted f ...
- dogcom在openwrt上的使用
前提,先配置并运行mentohust(作为802.1x认证) 1,取得编译完成的可执行文件(可先在虚拟机里测试) 2,上传到路由器 3,把dogcom主程序和配置文件放在/etc/storage/do ...
- 【沙龙报名中】与微信&云开发官方团队零距离互动,揭秘爆款微信小游戏背后的技术!
有人说 微信小程序游戏的百花齐放 活像十几年前的4399小游戏称霸互联网的景象 " 歪,斗地主吗,三缺二, 不用下app,小程序就能玩,我保证不抢地主让你抢!" ...... &q ...
- Docker下构建centos7容器无法使用systemctl命令的解决办法
最近在使用docker 构建centos7 容器时,发现无法使用systemctl 命令.后来万能的百度解决了问题,随记之以备后用. 解决办法: docker run --privileged -it ...
- Spring69道面试题
Spring 概述 1. 什么是spring? Spring 是个java企业级应用的开源开发框架.Spring主要用来开发Java应用,但是有些扩展是针对构建J2EE平台的web应用.Spring ...
- The multi-part request contained parameter data (excluding uploaded files) that exceeded the limit for maxPostSize set on the associated connector.
springboot 表单体积过大时报错: The multi-part request contained parameter data (excluding uploaded files) tha ...
- Blackbox_exporter黑盒监测
一.概述 blackbox_exporter是Prometheus 官方提供的 exporter 之一,可以提供 http.dns.tcp.icmp 的监控数据采集.Blackbox_exporter ...
- .net core 2.2部署到Windows Server 2012 R2 standard
安装.net core 2.2 下载地址:https://dotnet.microsoft.com/download/dotnet-core/2.2 找到ASP.NET Core Runtime 2. ...
- Jenkins的使用(三)-------Publish over SSH和Publish over FTP
七.构建后操作 1.使用Publish over SSH 1.左边菜单栏 Manage Jenkins --->ManagePlugins--->可选插件,然后搜索 Publish ...