Spring Cloud分区发布实践(4) FeignClient
上面看到直接通过网关访问微服务是可以实现按区域调用的, 那么微服务之间调用是否也能按区域划分哪?
下面我们使用FeignClient来调用微服务, 就可以配合LoadBalancer实现按区域调用.
首先我们新建一个微服务模块 hello-nameservice, 用来调用 hello-remotename服务. 模块需要使用Feign, 还要开启Feign的负载均衡, pom.xml文件如下:
<?xml version="1.0" encoding="UTF-8"?>

<project xmlns="http://maven.apache.org/POM/4.0.0" xmlns:xsi="http://www.w3.org/2001/XMLSchema-instance"

         xsi:schemaLocation="http://maven.apache.org/POM/4.0.0 https://maven.apache.org/xsd/maven-4.0.0.xsd">

    <modelVersion>4.0.0</modelVersion>

    <parent>

        <groupId>com.cnscud.betazone</groupId>

        <artifactId>betazone-root</artifactId>

        <version>0.0.1-SNAPSHOT</version>

        <relativePath/> <!-- lookup parent from repository -->

    </parent>

    <artifactId>hello-nameservice</artifactId>

    <version>0.0.1-SNAPSHOT</version>

    <name>hello-nameservice</name>

    <description>Demo project for Spring Boot</description>

    <dependencies>

        <dependency>

            <groupId>com.cnscud.betazone</groupId>

            <artifactId>hello-remotename-core</artifactId>

            <version>0.0.1-SNAPSHOT</version>

        </dependency>

        <!-- https://mvnrepository.com/artifact/org.apache.commons/commons-lang3 -->

        <dependency>

            <groupId>org.apache.commons</groupId>

            <artifactId>commons-lang3</artifactId>

            <version>3.0</version>

        </dependency>

        <dependency>

            <groupId>org.springframework.cloud</groupId>

            <artifactId>spring-cloud-starter-openfeign</artifactId>

        </dependency>

        <dependency>

            <groupId>org.springframework.boot</groupId>

            <artifactId>spring-boot-starter-web</artifactId>

        </dependency>

        <dependency>

            <groupId>org.springframework.cloud</groupId>

            <artifactId>spring-cloud-starter-netflix-eureka-client</artifactId>

        </dependency>

        <dependency>

            <groupId>org.springframework.boot</groupId>

            <artifactId>spring-boot-starter-webflux</artifactId>

        </dependency>

        <dependency>

            <groupId>org.springframework.cloud</groupId>

            <artifactId>spring-cloud-loadbalancer</artifactId>

        </dependency>

    </dependencies>

    <build>

        <plugins>

            <plugin>

                <groupId>org.springframework.boot</groupId>

                <artifactId>spring-boot-maven-plugin</artifactId>

            </plugin>

        </plugins>

    </build>

</project>
注意上面的 webflux , 用于新版本的DiscoveryClient适配.
使用Feign调用微服务
首先声明一个被调用服务的Feign接口, 如下
@FeignClient(value = "betazone-hello-remotename")

public interface FeignRemoteNameService extends RemoteNameService {

    @RequestMapping("/remote/id/{id}")

    @Override

    String readName(@PathVariable("id") int id) ;

}
这个类映射到前面讲过的 "betazone-hello-remotename", 接口格式一致, 使用FeignClient标注.
然后我们实现自己的微服务逻辑:
package com.cnscud.betazone.hellonameservice.feign;

import org.apache.commons.lang3.StringUtils;

import org.slf4j.Logger;

import org.slf4j.LoggerFactory;

import org.springframework.beans.factory.annotation.Autowired;

import org.springframework.core.env.Environment;

import org.springframework.web.bind.annotation.PathVariable;

import org.springframework.web.bind.annotation.RequestMapping;

import org.springframework.web.bind.annotation.RestController;

import java.net.Inet4Address;

import java.net.InetAddress;

import java.net.UnknownHostException;

/**

 * Hello Controller from Remote Service.

 *

 * @author Felix Zhang 2021-06-04 09:29

 * @version 1.0.0

 */

@RestController

@RequestMapping("remote")

public class HelloNameByRemoteController {

    private static Logger logger = LoggerFactory.getLogger(HelloNameByRemoteController.class);

    @Autowired

    private FeignRemoteNameService feignRemoteNameService;

    @Autowired

    Environment environment;

    @RequestMapping("/id/{userid}")

    public String helloById(@PathVariable("userid") String userid) {

        logger.debug("call helloById with " + userid);

        if (StringUtils.isNotBlank(userid) && StringUtils.isNumeric(userid)) {

            return "hello " + feignRemoteNameService.readName(Integer.parseInt(userid)) + getServerName();

        }

        return "hello guest"  +  getServerName();

    }

    //......其他代码

}
这个类里面注入了FeignRemoteNameService服务, Feign会自动初始化.
为了让Feign能用, 我们还必须启用 @EnableFeignClients(basePackages = "com.cnscud.betazone.hellonameservice"), 包名就是你的服务的包名. 声明可以放在HelloNameServiceApplication 类里面.
准备一下应用的配置 application.yml
server:

  port: 8101

spring:

  application:

    name: betazone-hello-nameservice

  cloud:

    loadbalancer:

      ribbon:

        enabled: false

eureka:

  instance:

    prefer-ip-address: true

    metadata-map:

      zone: main #服务区域

  client:

    register-with-eureka: true

    fetch-registry: true

    service-url:

      defaultZone: http://localhost:8001/eureka/

logging:

  level:

    org.springframework.cloud: debug
启动应用, 访问 http://localhost:8101/remote/id/2 , 正常情况下, 访问到的remotename服务是不确定的, 9001或者9002, 看来还是需要做一些设置才能按区域生效.
通用, 回想上一节的内容, 我们使用zone-preference 或者自定义ServiceInstanceListSupplier都可以实现, 这里不在重复.
代码里依然使用了 SamezoneAutoConfiguration 和CustomLoadBalancerConfiguration, 就可以按区域访问了.
我们在复制一份配置,用于beta区域, application-beta.yml 如下
server:

  port: 8103

spring:

  application:

    name: betazone-hello-nameservice

  cloud:

    loadbalancer:

      ribbon:

        enabled: false

eureka:

  instance:

    prefer-ip-address: true

    metadata-map:

      zone: beta # zone服务区域 beta

  client:

    register-with-eureka: true

    fetch-registry: true

    service-url:

      defaultZone: http://localhost:8001/eureka/

logging:

  level:

    org.springframework.cloud: debug
这个实例用于接下来演示区域继承的beta区域用途.
网关里声明betazone-hello-nameservice 微服务
让我们回到之前的hello-gateway项目, 修改application.yml等三个文件, routes节点下变更为:
      routes:

        - id: default

          uri: lb://betazone-hello-nameservice

          predicates:

            - Path=/api/**

          filters:

            - StripPrefix=1

        - id: remotename

          uri: lb://betazone-hello-remotename

          predicates:

            - Path=/remoteapi/**

          filters:

            - StripPrefix=1
这样网关就代理了betazone-hello-nameservice服务, 路径为/api . 重新启动三个gateway应用的实例, 试着访问
- 默认实例(无区域设置) http://localhost:8800/api/remote/id/2 , 发现背后的2个微服务都在轮询.
- main实例(区域为main) http://localhost:8801/api/remote/id/2 发现背后的2个微服务只调用了区域为main的实例, 区域可以继承.
- beta实例(区域为beta) http://localhost:8802/api/remote/id/2 发现背后的2个微服务只调用了区域为beta的实例, 区域可以继承.
到此, 我们的目的达到, 可以按区域来划分服务了.
特殊备注: 如果某个微服务缺少某个区域的实例, 此项目用的ServiceInstanceListSupplier会自动使用所有实例, 那此时zone的继承就继承的是被使用的实例的zone了, 而不是网关的zone设置了.
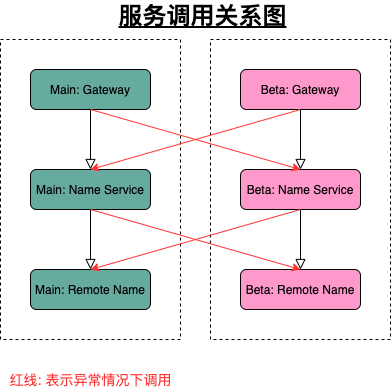
项目图如下:
实际应用场景?
假设我们有个网站, 正常访问是 http://www.cnscud.com , 线上预发布时 http://beta.cnscud.com , 就可以设置两个区域, 通过Nginx映射, 就可以映射到不同的网关, 就自然可以区分了.
项目源码: https://github.com/cnscud/javaroom/tree/main/betazone2
接下来我们试试定制自己的自己定制一下ServiceInstanceListSupplier ......
Spring Cloud分区发布实践(4) FeignClient的更多相关文章
- Spring Cloud分区发布实践(1) 环境准备
最近研究了一下Spring Cloud里面的灰度发布, 看到各种各样的使用方式, 真是纷繁复杂, 眼花缭乱, 不同的场景需要不同的解决思路. 那我们也来实践一下最简单的场景: 区域划分: 服务分为be ...
- Spring Cloud分区发布实践(6)--灰度服务-根据Header选择实例区域
此文是一个完整的例子, 包含可运行起来的源码. 此例子包含以下部分: 网关层实现自定义LoadBalancer, 根据Header选取实例 服务中的Feign使用拦截器, 读取Header Feign ...
- Spring Cloud分区发布实践(3) 网关和负载均衡
注意: 因为涉及到配置测试切换, 中间环节需按此文章操作体验, 代码仓库里面的只有最后一步的代码 准备好了微服务, 那我们就来看看网关+负载均衡如何一起工作 新建一个模块hello-gateway, ...
- Spring Cloud分区发布实践(5)--定制ServiceInstanceListSupplier
现在我们简单地来定制二个 ServiceInstanceListSupplier, 都是zone-preference的变种. 为了方便, 我重新调整了一下项目的结构, 把一些公用的类移动到hello ...
- Spring Cloud分区发布实践(2) 微服务
我们准备一下用于查询姓名的微服务. 首先定义一下服务的接口, 新建一个空的Maven模块hello-remotename-core, 里面新建一个类: public interface RemoteN ...
- spring cloud微服务实践二
在上一篇,我们已经搭建了spring cloud微服务中的注册中心.但只有一个注册中心还远远不够. 接下来我们就来尝试提供服务. 注:这一个系列的开发环境版本为 java1.8, spring boo ...
- 厉害了,Spring Cloud Alibaba 发布 GA 版本!
? 小马哥 & Josh Long ? 喜欢写一首诗一般的代码,更喜欢和你共同 code review,英雄的相惜,犹如时间沉淀下来的对话,历久方弥新. 相见如故,@杭州. 4 月 18 日, ...
- Spring Cloud Alibaba发布第二个版本,Spring 发来贺电
还是熟悉的面孔,还是熟悉的味道,不同的是,这次的配方升级了. 今年10月底,Spring Cloud联合创始人Spencer Gibb在Spring官网的博客页面宣布:阿里巴巴开源 Spring Cl ...
- Spring Boot 2.x 已经发布了很久,现在 Spring Cloud 也发布了 基于 Spring Boot 2.x 的 Finchley 版本,现在一起为项目做一次整体框架升级。
升级前 => 升级后 Spring Boot 1.5.x => Spring Boot 2.0.2 Spring Cloud Edgware SR4 => Spring Cloud ...
随机推荐
- WPF Frame 的 DataContext 不能被 Page 继承
转载至https://blog.csdn.net/sinat_31608641/article/details/88914517 已测试解决方案可行,因为WPF相关资料稀少,防止日后404,特搬运到自 ...
- JNI相关笔记 [TOC]
JNI相关笔记 目录 JNI相关笔记 1 生成native code所需要的头文件 2 JNI提供的一些函数和方法 3 局部引用,全局引用,全局弱引用. 4 异常 1 生成native code所需要 ...
- Eureka中读写锁的奇思妙想,学废了吗?
前言 很抱歉 好久没有更新文章了,最近的一篇原创还是在去年十月份,这个号确实荒废了好久,感激那些没有把我取消关注的小伙伴. 有读者朋友经常私信问我: "你号卖了?" "文 ...
- kubernetes之副本控制器(RC/RS)
1.了解ReplicationController ReplicationController是一种kubernetes资源,可确保它的pod始终保持运行状态. 如果pod因任何原因消失(例如节点从集 ...
- UV贴图类型
凹凸贴图Bump Map.法线贴图Normal Map.高度贴图Height map.漫反射贴图Diffuse Map.高光贴图Specular Map.AO贴图Ambient Occlusion ...
- 19、lnmp_mysql、nfs组件分离
19.1.LNMP一体机的数据库分离成独立的数据库: 1.根据以上学习过的方法在db01服务器上安装独立的mysql数据库软件: 2.在web01服务器上导出原先的数据库: [root@web01 t ...
- Docker构建mysql主从
一.为什么要搭建主从架构呢 1.数据安全,可以进行数据的备份. 2.读写分离,大部分的业务系统来说都是读数据多,写数据少,当访问压力过大时,可以把读请求给到从服务器.从而缓解数据库访问的压力 3.故障 ...
- CentOS7-磁盘扩容(LVM-非空目录拓展卷空间大小)
查看存储情况 $ df -kh 查看磁盘情况 $ fdisk -l 创建分区(注:可操作存储上限2TB) $ fdisk /dev/sdb 根据提示,依次输入"n","p ...
- 从S3中拷贝或同步文件
p.p1 { margin: 0; font: 16px "Helvetica Neue"; color: rgba(53, 53, 53, 1) } p.p2 { margin: ...
- centos安装报错:license information (license not accepted)
前言:在最近部署的centos系统发现个问题 出现报错:安装配置完成后,重启虚拟机出现license information (license not accepted) 截图: 解决方案: 在界 ...