
【转载】springboot + swagger
注:本文参考自
http://www.jianshu.com/p/0465a2b837d2
https://www.cnblogs.com/java-zhao/p/5348113.html
swagger用于定义API文档。
好处:
- 前后端分离开发
- API文档非常明确
- 测试的时候不需要再使用URL输入浏览器的方式来访问Controller
- 传统的输入URL的测试方式对于post请求的传参比较麻烦(当然,可以使用postman这样的浏览器插件)
- spring-boot与swagger的集成简单的一逼
1、项目结构
和上一节一样,没有改变。
2、pom.xml
引入了两个jar。

         <dependency>

            <groupId>io.springfox</groupId>

            <artifactId>springfox-swagger2</artifactId>

            <version>2.2.2</version>

         </dependency>

         <dependency>

            <groupId>io.springfox</groupId>

            <artifactId>springfox-swagger-ui</artifactId>

            <version>2.2.2</version>

         </dependency>
3、Application.java
 package com.xxx.firstboot;

 import org.springframework.boot.SpringApplication;

 import org.springframework.boot.autoconfigure.SpringBootApplication;

 import springfox.documentation.swagger2.annotations.EnableSwagger2;

 @SpringBootApplication        //same as @Configuration+@EnableAutoConfiguration+@ComponentScan

 @EnableSwagger2             //启动swagger注解

 public class Application {

     public static void main(String[] args) {

         SpringApplication.run(Application.class, args);

     }

 }
说明:
- 引入了一个注解@EnableSwagger2来启动swagger注解。(启动该注解使得用在controller中的swagger注解生效,覆盖的范围由@ComponentScan的配置来指定,这里默认指定为根路径"com.xxx.firstboot"下的所有controller)
4、UserController.java
 package com.xxx.firstboot.web;

 import org.springframework.beans.factory.annotation.Autowired;

 import org.springframework.web.bind.annotation.RequestHeader;

 import org.springframework.web.bind.annotation.RequestMapping;

 import org.springframework.web.bind.annotation.RequestMethod;

 import org.springframework.web.bind.annotation.RequestParam;

 import org.springframework.web.bind.annotation.RestController;

 import com.xxx.firstboot.domain.User;

 import com.xxx.firstboot.service.UserService;

 import io.swagger.annotations.Api;

 import io.swagger.annotations.ApiImplicitParam;

 import io.swagger.annotations.ApiImplicitParams;

 import io.swagger.annotations.ApiOperation;

 import io.swagger.annotations.ApiResponse;

 import io.swagger.annotations.ApiResponses;

 @RestController

 @RequestMapping("/user")

 @Api("userController相关api")

 public class UserController {

     @Autowired

     private UserService userService;

 //    @Autowired

 //    private MyRedisTemplate myRedisTemplate;

     @ApiOperation("获取用户信息")

     @ApiImplicitParams({

         @ApiImplicitParam(paramType="header",name="username",dataType="String",required=true,value="用户的姓名",defaultValue="zhaojigang"),

         @ApiImplicitParam(paramType="query",name="password",dataType="String",required=true,value="用户的密码",defaultValue="wangna")

     })

     @ApiResponses({

         @ApiResponse(code=400,message="请求参数没填好"),

         @ApiResponse(code=404,message="请求路径没有或页面跳转路径不对")

     })

     @RequestMapping(value="/getUser",method=RequestMethod.GET)

     public User getUser(@RequestHeader("username") String username, @RequestParam("password") String password) {

         return userService.getUser(username,password);

     }

 //    @RequestMapping("/testJedisCluster")

 //    public User testJedisCluster(@RequestParam("username") String username){

 //        String value =  myRedisTemplate.get(MyConstants.USER_FORWARD_CACHE_PREFIX, username);

 //        if(StringUtils.isBlank(value)){

 //            myRedisTemplate.set(MyConstants.USER_FORWARD_CACHE_PREFIX, username, JSON.toJSONString(getUser()));

 //            return null;

 //        }

 //        return JSON.parseObject(value, User.class);

 //    }

 }
说明:
- @Api:用在类上,说明该类的作用
- @ApiOperation:用在方法上,说明方法的作用
- @ApiImplicitParams:用在方法上包含一组参数说明
- @ApiImplicitParam:用在@ApiImplicitParams注解中,指定一个请求参数的各个方面
- paramType:参数放在哪个地方
- header-->请求参数的获取:@RequestHeader
- query-->请求参数的获取:@RequestParam
- path(用于restful接口)-->请求参数的获取:@PathVariable
- body(不常用)
- form(不常用)
- name:参数名
- dataType:参数类型
- required:参数是否必须传
- value:参数的意思
- defaultValue:参数的默认值
- paramType:参数放在哪个地方
- @ApiResponses:用于表示一组响应
- @ApiResponse:用在@ApiResponses中,一般用于表达一个错误的响应信息
- code:数字,例如400
- message:信息,例如"请求参数没填好"
- response:抛出异常的类
- @ApiModel:描述一个Model的信息(这种一般用在post创建的时候,使用@RequestBody这样的场景,请求参数无法使用@ApiImplicitParam注解进行描述的时候)
- @ApiModelProperty:描述一个model的属性
以上这些就是最常用的几个注解了。
具体其他的注解,查看:
https://github.com/swagger-api/swagger-core/wiki/Annotations#apimodel
测试:
启动服务,浏览器输入"http://localhost:8080/swagger-ui.html"
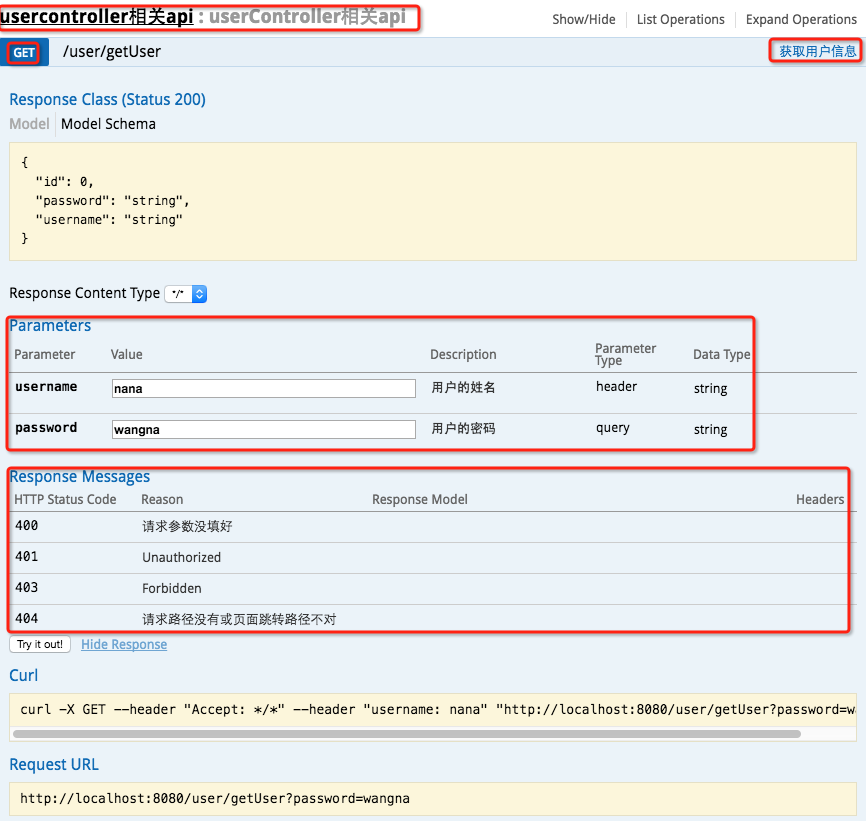
最上边一个红框:@Api
GET红框:method=RequestMethod.GET
右边红框:@ApiOperation
parameter红框:@ApiImplicitParams系列注解
response messages红框:@ApiResponses系列注解
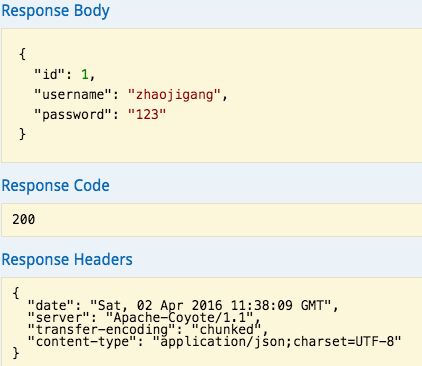
输入参数后,点击"try it out!",查看响应内容:
【转载】springboot + swagger的更多相关文章
- Swagger详解(SpringBoot+Swagger集成)(转)
版权声明:本文为博主原创文章,遵循 CC 4.0 BY-SA 版权协议,转载请附上原文出处链接和本声明.本文链接:https://blog.csdn.net/ai_miracle/article/de ...
- 【转】Swagger详解(SpringBoot+Swagger集成)
Swagger-API文档接口引擎Swagger是什么 Swagger是一个规范和完整的框架,用于生成.描述.调用和可视化 RESTful 风格的 Web 服务.总体目标是使客户端和文件系统作为服务器 ...
- SpringBoot+Swagger整合API
SpringBoot+Swagger整合API Swagger:整合规范的api,有界面的操作,测试 1.在pom.xml加入swagger依赖 <!--整合Swagger2配置类--> ...
- springboot+swagger集成
一.swagger介绍 Swagger 是一款RESTFUL接口的文档在线自动生成+功能测试功能软件.本文简单介绍了在项目中集成swagger的方法和一些常见问题.如果想深入分析项目源码,了解更多内容 ...
- springboot+swagger接口文档企业实践(下)
目录 1.引言 2. swagger接口过滤 2.1 按包过滤(package) 2.2 按类注解过滤 2.3 按方法注解过滤 2.4 按分组过滤 2.4.1 定义注解ApiVersion 2.4.2 ...
- springboot+swagger接口文档企业实践(上)
目录 1.引言 2.swagger简介 2.1 swagger 介绍 2.2 springfox.swagger与springboot 3. 使用springboot+swagger构建接口文档 3. ...
- 第四章 springboot + swagger(转载)
此篇博客转发自:http://www.cnblogs.com/java-zhao/p/5348113.html swagger用于定义API文档. 好处: 前后端分离开发 API文档非常明确 测试的时 ...
- springboot + swagger
swagger用于定义API文档. 好处: 前后端分离开发 API文档非常明确 测试的时候不需要再使用URL输入浏览器的方式来访问Controller 传统的输入URL的测试方式对于post请求的传参 ...
- 【第四章】 springboot + swagger
注:本文参考自 http://www.jianshu.com/p/0465a2b837d2 swagger用于定义API文档. 好处: 前后端分离开发 API文档非常明确 测试的时候不需要再使用URL ...
随机推荐
- hbase源码系列(二)HTable 探秘
hbase的源码终于搞一个段落了,在接下来的一个月,着重于把看过的源码提炼一下,对一些有意思的主题进行分享一下.继上一篇讲了负载均衡之后,这一篇我们从client开始讲吧,从client到master ...
- 初入android驱动开发之字符设备(四-中断)
上一篇讲到android驱动开发中,应用是怎样去操作底层硬件的整个流程,实现了按键控制led的亮灭.当然,这是一个非常easy的实例,只是略微演变一下,就能够得到广泛的应用. 如开发扫描头,应用透过监 ...
- spring中 context:property-placeholder 导入多个独立的 .properties配置文件
spring中 context:property-placeholder 导入多个独立的 .properties配置文件? Spring容器采用反射扫描的发现机制,在探测到Spring容器中有一个 o ...
- css实现三角形及应用示例
css实现三角形,网上讲了很多,但我发现一般都是三角向上或者向下的,向左向右这两方向似乎讲得很少,本人试了一下,发现原来在IE下很难搞~~(万恶的IE)...css实现三角形的原理是:当元素的宽高为0 ...
- 使用Selenium来抓取动态加载的页面
原文:http://my.oschina.net/flashsword/blog/147334?p=1 一般的爬虫都是直接使用http协议,下载指定url的html内容,并对内容进行分析和抽取.在我写 ...
- SpringBoot系列四:SpringBoot开发(改变环境属性、读取资源文件、Bean 配置、模版渲染、profile 配置)
声明:本文来源于MLDN培训视频的课堂笔记,写在这里只是为了方便查阅. 1.概念 SpringBoot 开发深入 2.具体内容 在之前已经基本上了解了整个 SpringBoot 运行机制,但是也需要清 ...
- CI框架 -- 核心文件 之 Model.php
class CI_Model { /** * Class constructor * * @return void */ public function __construct() { log_mes ...
- [poj 1947] Rebuilding Roads 树形DP
Rebuilding Roads Time Limit: 1000MS Memory Limit: 30000K Total Submissions: 10653 Accepted: 4884 Des ...
- Android清单文件具体解释(二) ---- 应用程序权限声明
我们知道,Android系统的各个模块提供了很强大的功能(比方电话,电源和设置等),通过使用这些功能.应用程序能够表现的更强大.更灵活.只是,使用这些功能并非无条件的.而是须要拥有一些权限.接下来,我 ...
- Winform控件学习笔记【第五天】——ListView
[第五天] 常用的基本属性: FullRowSelect:设置是否行选择模式.(默认为false) 提示:只有在Details视图该属性才有意义. GridLines:设置行和列之间是否显示网格线.( ...