【共享单车】—— React后台管理系统开发手记:员工管理之增删改查
前言:以下内容基于React全家桶+AntD实战课程的学习实践过程记录。最终成果github地址:https://github.com/66Web/react-antd-manager,欢迎star。
一、创建员工表单子组件
- 创建员工、编辑员工、员工详情、删除员工共用一个Modal弹框表单
<Modal

      title={this.state.title}

      visible={this.state.isVisible}

      onOk={this.handleSubmit}

      onCancel={() => {

             this.userForm.props.form.resetFields();

             this.setState({

                  isVisible: false

             })

      }}

      width={600}

      {...footer}

>

     <UserForm type={this.state.type} userInfo={this.state.userInfo} wrappedComponentRef={(inst) => {this.userForm = inst;}}/>

</Modal> - 创建、编辑员工提交:共用handleSubmit(),判断type,通过axios.ajax()调用不同的Easy Mock数据接口请求
//创建编辑员工提交

handleSubmit = () => {

        let type = this.state.types;

        let data = this.userForm.props.form.getFieldsValue();

        axios.ajax({

            url: type=='create'?'/user/add':'/user/edit',

            data: {

                params: data

            }

        }).then((res) => {

            if(res.code === 0){

               this.userForm.props.form.resetFields();

               this.setState({

                   isVisible: false

               })

               this.requestList();

            }

        })

} - 关键:
- getFieldDecorator实现表单数据双向绑定
const {getFieldDecorator} = this.props.form; - 获取this.props.userInfo:【编辑员工】中设置表单默认数据、【员工信息】中显示员工信息
- 判断this.props.type:当type == 'detail'时,直接渲染员工信息userInfo,不再渲染Form表单
- 判断this.state.type:当type == 'detail'时,不显示Modal的footer按钮
let footer = {};

if(this.state.type == 'detail'){

       footer = {

           footer: null

       }

}
- 组件实现
//子组件:创建员工表单

class UserForm extends React.Component{

    getState = (state) => {

        let config = {

            '1':'咸鱼一条',

            '2':'风华浪子',

            '3':'北大才子一枚',

            '4':'百度FE',

            '5':'创业者'

        }

        return config[state];

    }

    render(){

        let type = this.props.type;

        let userInfo = this.props.userInfo || {};

        const {getFieldDecorator} = this.props.form;

        const formItemLayout= {

            labelCol:{span: 5},

            wrapperCol:{span: 19}

        }

        return (

            <Form layout="horizontal">

                  <FormItem label="用户名" {...formItemLayout}>

                        {

                            type == 'detail' ? userInfo.userName :

                            getFieldDecorator('user_name',{

                                initialValue: userInfo.userName

                            })(

                                <Input type="text" placeholder="请输入用户名"/>

                            )

                        }

                  </FormItem>

                  <FormItem label="性别" {...formItemLayout}>

                        {

                            type == 'detail' ? userInfo.sex == 1 ? '男' : '女' :

                            getFieldDecorator('sex',{

                                initialValue: userInfo.sex

                            })(

                                <RadioGroup>

                                    <Radio value={1}>男</Radio>

                                    <Radio value={2}>女</Radio>

                                </RadioGroup>

                            )

                        }

                  </FormItem>

                  <FormItem label="状态" {...formItemLayout}>

                        {

                            type == 'detail' ? this.getState(userInfo.state) :

                            getFieldDecorator('state',{

                                initialValue: userInfo.state

                            })(

                                <Select>

                                    <Option value={1}>咸鱼一条</Option>

                                    <Option value={2}>风华浪子</Option>

                                    <Option value={3}>北大才子一枚</Option>

                                    <Option value={4}>百度FE</Option>

                                    <Option value={5}>创业者</Option>

                                </Select>

                            )

                        }

                  </FormItem>

                  <FormItem label="生日" {...formItemLayout}>

                        {

                            type == 'detail' ? userInfo.birthday :

                            getFieldDecorator('birthday',{

                                initialValue: moment(userInfo.birthday)

                            })(

                                <DatePicker format="YYYY-MM-DD"/>

                            )

                        }

                  </FormItem>

                  <FormItem label="联系地址" {...formItemLayout}>

                        {

                            type == 'detail' ? userInfo.address :

                            getFieldDecorator('address',{

                                initialValue: userInfo.address

                            })(

                                <TextArea rows={3} placeholder="请输入联系地址"/>

                            )

                        }

                  </FormItem>

            </Form>

        )

    }

}

UserForm = Form.create({})(UserForm);
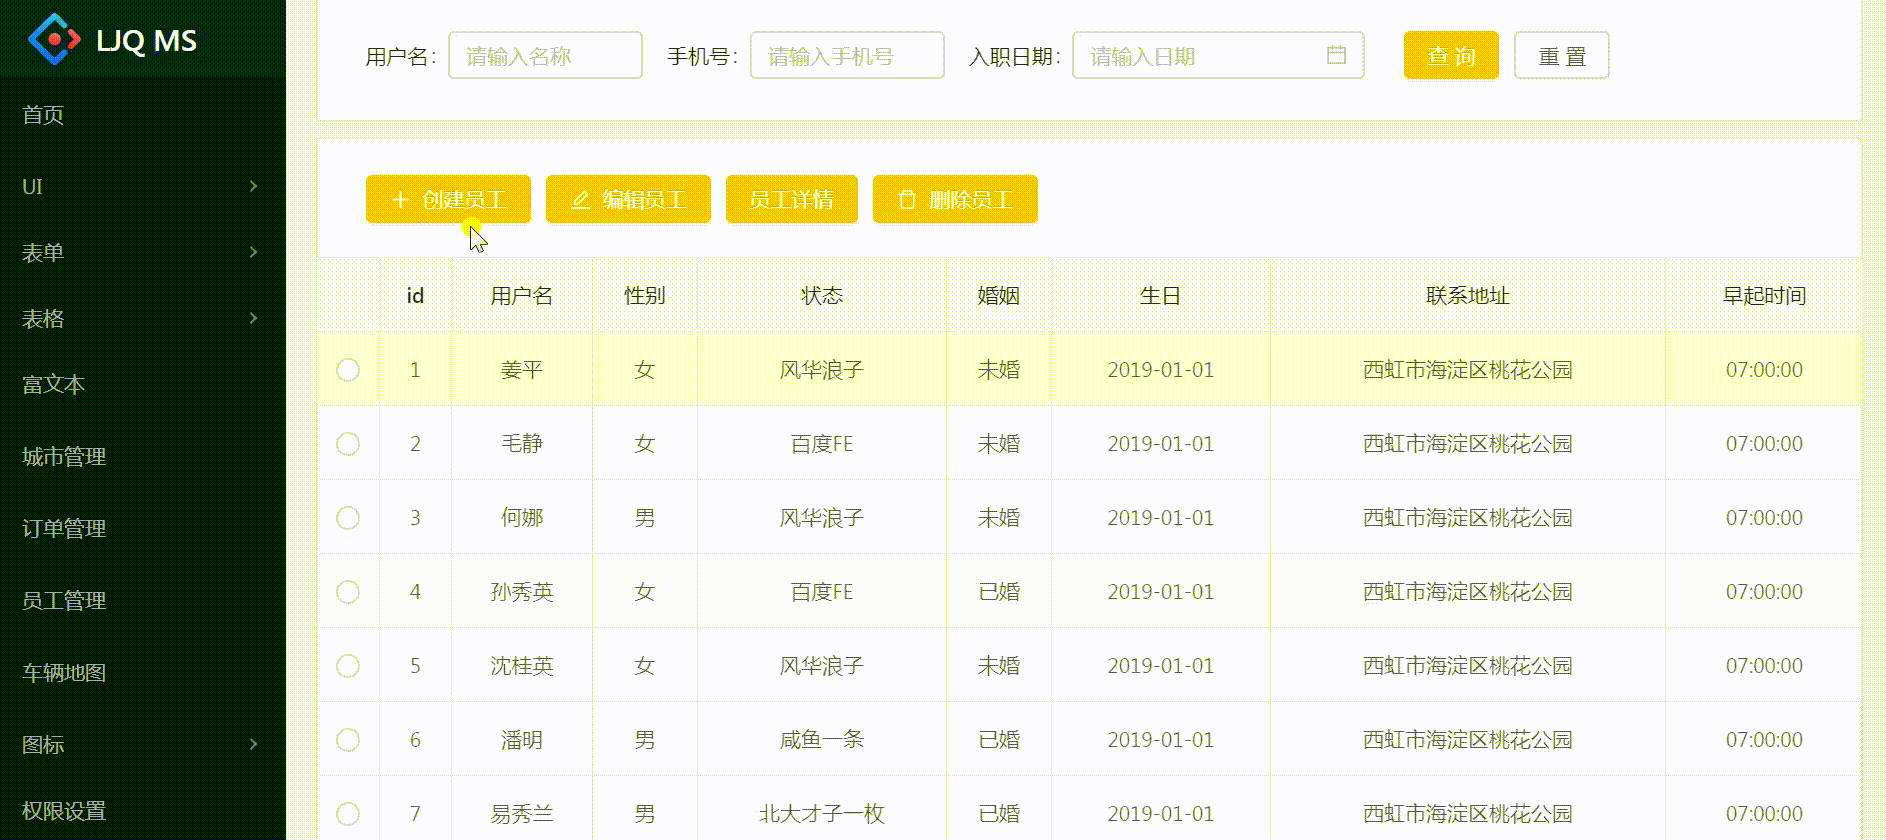
二、功能区操作
- 创建员工、编辑员工、员工详情、删除员工共用一个功能操作函数handleOperate()
 <Card style={{marginTop:10}} className="operate-wrap">

          <Button type="primary" icon="plus" onClick={() => this.handleOperate('create')}>创建员工</Button>

          <Button type="primary" icon="edit" onClick={() => this.handleOperate('edit')}>编辑员工</Button>

          <Button type="primary" onClick={() => this.handleOperate('detail')}>员工详情</Button>

          <Button type="primary" icon="delete" onClick={() => this.handleOperate('delete')}>删除员工</Button>

</Card>
关键:传入不同的参数[type],通过判断type的值,执行不同的操作
 //功能区操作

handleOperate = (type) => {

        let item = this.state.selectedItem;

        if(type == 'create'){

           this.setState({

               type,

               isVisible: true,

               title: '创建员工'

           })

        }else if(type == 'edit'){

           if(!item){

               Modal.info({

                   title: '提示',

                   content: '请选择一个用户'

               })

               return;

           }

           this.setState({

                type,

                isVisible: true,

                title: '编辑员工',

                userInfo: item

           })

        }else if(type == 'detail'){

           if(!item){

                Modal.info({

                    title: '提示',

                    content: '请选择一个用户'

                })

                return;

           }

           this.setState({

                type,

                isVisible: true,

                title: '员工详情',

                userInfo: item

           })

        }else if(type == 'delete'){

            if(!item){

                Modal.info({

                    title: '提示',

                    content: '请选择一个用户'

                })

                return;

           }

           let _this = this;

           Modal.confirm({

               title: '确认删除',

               content: `是否要删除当前选中的员工${item.id}`,

               onOk(){

                   axios.ajax({

                       url: '/user/delete',

                       data: {

                           params: {

                               id: item.id

                           }

                       }

                   }).then((res) => {

                       if(res.code === 0){

                           _this.setState({

                               isVisible: false

                           })

                           _this.requestList();

                       }

                   })

               }

           })

        }

}
实例代码:
import React from 'react'
import {Card, Button, Form, Input, Select,Radio, Icon, Modal, DatePicker} from 'antd'
import axios from './../../axios'
import Utils from './../../utils/utils'
import BaseForm from './../../components/BaseForm'
import ETable from './../../components/ETable'
import moment from 'moment'
const FormItem = Form.Item;
const RadioGroup = Radio.Group;
const TextArea = Input.TextArea;
const Option = Select.Option; export default class User extends React.Component{ state = {
list:[],
isVisible: false
} params = {
page: 1
} formList = [
{
type: 'INPUT',
label: '用户名',
field: 'user_name',
placeholder: '请输入名称',
width: 130
},
{
type: 'INPUT',
label: '手机号',
field: 'user_mobile',
placeholder: '请输入手机号',
width: 130
},
{
type: 'DATE',
label: '入职日期',
field: 'user_date',
placeholder: '请输入日期'
}
] componentDidMount(){
this.requestList();
} handleFilter = (params) => {
this.params = params;
this.requestList();
} requestList = () => {
axios.requestList(this, '/table/list1', this.params);
} //功能区操作
handleOperate = (type) => {
let item = this.state.selectedItem;
if(type == 'create'){
this.setState({
type,
isVisible: true,
title: '创建员工'
})
}else if(type == 'edit'){
if(!item){
Modal.info({
title: '提示',
content: '请选择一个用户'
})
return;
}
this.setState({
type,
isVisible: true,
title: '编辑员工',
userInfo: item
})
}else if(type == 'detail'){
if(!item){
Modal.info({
title: '提示',
content: '请选择一个用户'
})
return;
}
this.setState({
type,
isVisible: true,
title: '员工详情',
userInfo: item
})
}else if(type == 'delete'){
if(!item){
Modal.info({
title: '提示',
content: '请选择一个用户'
})
return;
}
let _this = this;
Modal.confirm({
title: '确认删除',
content: `是否要删除当前选中的员工${item.id}`,
onOk(){
axios.ajax({
url: '/user/delete',
data: {
params: {
id: item.id
}
}
}).then((res) => {
if(res.code === 0){
_this.setState({
isVisible: false
})
_this.requestList();
}
})
}
})
}
} //创建编辑员工提交
handleSubmit = () => {
let type = this.state.types;
let data = this.userForm.props.form.getFieldsValue();
axios.ajax({
url: type=='create'?'/user/add':'/user/edit',
data: {
params: data
}
}).then((res) => {
if(res.code === 0){
this.userForm.props.form.resetFields();
this.setState({
isVisible: false
})
this.requestList();
}
})
} render(){
const columns = [{
title: 'id',
dataIndex: 'id'
}, {
title: '用户名',
dataIndex: 'userName'
}, {
title: '性别',
dataIndex: 'sex',
render(sex){
return sex ==1 ?'男':'女'
}
}, {
title: '状态',
dataIndex: 'state',
render(state){
let config = {
'1':'咸鱼一条',
'2':'风华浪子',
'3':'北大才子一枚',
'4':'百度FE',
'5':'创业者'
}
return config[state];
}
},{
title: '婚姻',
dataIndex: 'isMarried',
render(isMarried){
return isMarried == 1 ?'已婚':'未婚'
}
},{
title: '生日',
dataIndex: 'birthday'
},{
title: '联系地址',
dataIndex: 'address'
},{
title: '早起时间',
dataIndex: 'time'
}
]; let footer = {};
if(this.state.type == 'detail'){
footer = {
footer: null
}
} return (
<div>
<Card>
<BaseForm formList={this.formList} filterSubmit={this.handleFilter}/>
</Card>
<Card style={{marginTop:10}} className="operate-wrap">
<Button type="primary" icon="plus" onClick={() => this.handleOperate('create')}>创建员工</Button>
<Button type="primary" icon="edit" onClick={() => this.handleOperate('edit')}>编辑员工</Button>
<Button type="primary" onClick={() => this.handleOperate('detail')}>员工详情</Button>
<Button type="primary" icon="delete" onClick={() => this.handleOperate('delete')}>删除员工</Button>
</Card>
<div className="content-wrap">
<ETable
columns={columns}
updateSelectedItem={Utils.updateSelectedItem.bind(this)}
selectedRowKeys={this.state.selectedRowKeys}
selectedItem={this.state.selectedItem}
dataSource={this.state.list}
pagination={this.state.pagination}
/>
</div>
<Modal
title={this.state.title}
visible={this.state.isVisible}
onOk={this.handleSubmit}
onCancel={() => {
this.userForm.props.form.resetFields();
this.setState({
isVisible: false
})
}}
width={600}
{...footer}
>
<UserForm type={this.state.type} userInfo={this.state.userInfo} wrappedComponentRef={(inst) => {this.userForm = inst;}}/>
</Modal>
</div>
)
}
} //子组件:创建员工表单
class UserForm extends React.Component{ getState = (state) => {
let config = {
'1':'咸鱼一条',
'2':'风华浪子',
'3':'北大才子一枚',
'4':'百度FE',
'5':'创业者'
}
return config[state];
} render(){
let type = this.props.type;
let userInfo = this.props.userInfo || {};
const {getFieldDecorator} = this.props.form;
const formItemLayout= {
labelCol:{span: 5},
wrapperCol:{span: 19}
}
return (
<Form layout="horizontal">
<FormItem label="用户名" {...formItemLayout}>
{
type == 'detail' ? userInfo.userName :
getFieldDecorator('user_name',{
initialValue: userInfo.userName
})(
<Input type="text" placeholder="请输入用户名"/>
)
}
</FormItem>
<FormItem label="性别" {...formItemLayout}>
{
type == 'detail' ? userInfo.sex == 1 ? '男' : '女' :
getFieldDecorator('sex',{
initialValue: userInfo.sex
})(
<RadioGroup>
<Radio value={1}>男</Radio>
<Radio value={2}>女</Radio>
</RadioGroup>
)
}
</FormItem>
<FormItem label="状态" {...formItemLayout}>
{
type == 'detail' ? this.getState(userInfo.state) :
getFieldDecorator('state',{
initialValue: userInfo.state
})(
<Select>
<Option value={1}>咸鱼一条</Option>
<Option value={2}>风华浪子</Option>
<Option value={3}>北大才子一枚</Option>
<Option value={4}>百度FE</Option>
<Option value={5}>创业者</Option>
</Select>
)
}
</FormItem>
<FormItem label="生日" {...formItemLayout}>
{
type == 'detail' ? userInfo.birthday :
getFieldDecorator('birthday',{
initialValue: moment(userInfo.birthday)
})(
<DatePicker format="YYYY-MM-DD"/>
)
}
</FormItem>
<FormItem label="联系地址" {...formItemLayout}>
{
type == 'detail' ? userInfo.address :
getFieldDecorator('address',{
initialValue: userInfo.address
})(
<TextArea rows={3} placeholder="请输入联系地址"/>
)
}
</FormItem>
</Form>
)
}
}
UserForm = Form.create({})(UserForm);
注:项目来自慕课网
【共享单车】—— React后台管理系统开发手记:员工管理之增删改查的更多相关文章
- 【共享单车】—— React后台管理系统开发手记:主页面架构设计
前言:以下内容基于React全家桶+AntD实战课程的学习实践过程记录.最终成果github地址:https://github.com/66Web/react-antd-manager,欢迎star. ...
- 【共享单车】—— React后台管理系统开发手记:Redux集成开发
前言:以下内容基于React全家桶+AntD实战课程的学习实践过程记录.最终成果github地址:https://github.com/66Web/react-antd-manager,欢迎star. ...
- 【共享单车】—— React后台管理系统开发手记:项目工程化开发
前言:以下内容基于React全家桶+AntD实战课程的学习实践过程记录.最终成果github地址:https://github.com/66Web/react-antd-manager,欢迎star. ...
- 【共享单车】—— React后台管理系统开发手记:城市管理和订单管理
前言:以下内容基于React全家桶+AntD实战课程的学习实践过程记录.最终成果github地址:https://github.com/66Web/react-antd-manager,欢迎star. ...
- 【共享单车】—— React后台管理系统开发手记:AntD Form基础组件
前言:以下内容基于React全家桶+AntD实战课程的学习实践过程记录.最终成果github地址:https://github.com/66Web/react-antd-manager,欢迎star. ...
- 【共享单车】—— React后台管理系统开发手记:Router 4.0路由实战演练
前言:以下内容基于React全家桶+AntD实战课程的学习实践过程记录.最终成果github地址:https://github.com/66Web/react-antd-manager,欢迎star. ...
- 【共享单车】—— React后台管理系统开发手记:权限设置和菜单调整(未完)
前言:以下内容基于React全家桶+AntD实战课程的学习实践过程记录.最终成果github地址:https://github.com/66Web/react-antd-manager,欢迎star. ...
- 【共享单车】—— React后台管理系统开发手记:AntD Table高级表格
前言:以下内容基于React全家桶+AntD实战课程的学习实践过程记录.最终成果github地址:https://github.com/66Web/react-antd-manager,欢迎star. ...
- 【共享单车】—— React后台管理系统开发手记:AntD Table基础表格
前言:以下内容基于React全家桶+AntD实战课程的学习实践过程记录.最终成果github地址:https://github.com/66Web/react-antd-manager,欢迎star. ...
随机推荐
- CF992E Nastya and King-Shamans 解题报告
CF992E Nastya and King-Shamans 题意翻译 给定一个序列 \(a_i\),记其前缀和序列为 \(s_i\),有 \(q\) 个询问,每次单点修改,询问是否存在一个 \(i\ ...
- 《c程序设计语言》读书笔记-5.9-指针转换天数和日期
#include "stdio.h" #include "stdlib.h" #include "string.h" static char ...
- bzoj 3111 蚂蚁 动态规划
题目描述 在一个 n*m 的棋盘上,每个格子有一个权值,初始时,在某个格子的顶点处一只面朝北的蚂蚁,我们只知道它的行走路线是如何转弯,却不知道每次转弯前走了多长. 蚂蚁转弯是有一定特点的,即它的转弯序 ...
- lesson 5
C#中的委托(delegate)与事件(event) 一.委托就是中间人的意思,c#中的委托允许将一个类中的方法传递给另一个能调用该方法的类的某个对象.程序员可以将A类的一个方法m(被包含在某个del ...
- webapp的favicon应该怎样组织代码
处理过那么多index 页面了那么关于特别针对于此页的favicon是时候详细的总结一下了 它是网站的头像,它出现在浏览器的收藏夹中(标题的旁边) ,浏览器标签页的左上角,微信公众号的logo,保存网 ...
- .ini配置CAN信息
#include <iostream> #include <windows.h>//这个头文件一定要添加,否则GetPrivateProfileString(...)函数无法使 ...
- 原生dialog
<!doctype html> <html lang="en"> <head> <meta charset="UTF-8&quo ...
- HDU 3853 LOOP (概率DP求期望)
D - LOOPS Time Limit:5000MS Memory Limit:65536KB 64bit IO Format:%I64d & %I64u Submit St ...
- C语言字节对齐问题详解【转】
引言 转自:http://www.cnblogs.com/clover-toeic/p/3853132.html 考虑下面的结构体定义: 1 typedef struct{ 2 char c1; 3 ...
- log4j配置文件动态指定日志文件名称
我们在项目当中经常会使用log4j进行日志记录,偶尔会遇到一些要求,比如日志文件名称按照启动参数动态配置,而不去修改log4j.xml,比较简单的一种做法是,通过设置系统属性的方式实现,代码: if( ...