CentOS 7 下编译安装lnmp之MySQL篇详解
一、安装环境
宿主机=> win7,虚拟机 centos => 系统版本:centos-release-7-5.1804.el7.centos.x86_64

二、MySQL下载
MySQL Community Server 5.5.62 下载: https://dev.mysql.com/downloads/mysql/
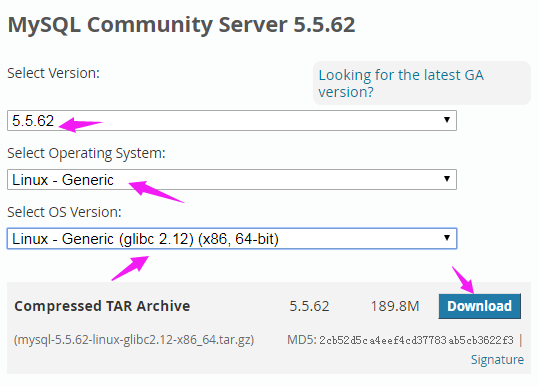
进入下载页面,复制链接地址

执行命令 wget https://dev.mysql.com/get/Downloads/MySQL-5.5/mysql-5.5.62-linux-glibc2.12-x86_64.tar.gz
将其下载到 /usr/local/src 目录
[root@bogon src]# wget https://dev.mysql.com/get/Downloads/MySQL-5.5/mysql-5.5.62-linux-glibc2.12-x86_64.tar.gz

--2018-12-18 03:52:54--  https://dev.mysql.com/get/Downloads/MySQL-5.5/mysql-5.5.62-linux-glibc2.12-x86_64.tar.gz

Resolving dev.mysql.com (dev.mysql.com)... 137.254.60.11

Connecting to dev.mysql.com (dev.mysql.com)|137.254.60.11|:443... connected.

HTTP request sent, awaiting response... 302 Found

Location: https://cdn.mysql.com//Downloads/MySQL-5.5/mysql-5.5.62-linux-glibc2.12-x86_64.tar.gz [following]

--2018-12-18 03:52:55--  https://cdn.mysql.com//Downloads/MySQL-5.5/mysql-5.5.62-linux-glibc2.12-x86_64.tar.gz

Resolving cdn.mysql.com (cdn.mysql.com)... 23.13.185.161

Connecting to cdn.mysql.com (cdn.mysql.com)|23.13.185.161|:443... connected.

HTTP request sent, awaiting response... 200 OK

Length: 198993245 (190M) [application/x-tar-gz]

Saving to: ‘mysql-5.5.62-linux-glibc2.12-x86_64.tar.gz’

100%[=========================================================>] 198,993,245 11.0MB/s   in 19s

2018-12-18 03:53:14 (10.1 MB/s) - ‘mysql-5.5.62-linux-glibc2.12-x86_64.tar.gz’ saved [198993245/198993245]
三、安装MySQL Community Server 5.5.62
1、解压 MySQL Community Server 5.5.62 并移动到 /usr/local 下重命名为 mysql
[root@bogon src]# tar -zxf mysql-5.5.-linux-glibc2.-x86_64.tar.gz

[root@bogon src]# mv mysql-5.5.-linux-glibc2.-x86_64 /usr/local/mysql

[root@bogon src]# ls /usr/local

etc  games  lib  lib64  libevent  libexec  memcached  mysql  nginx  php7  sbin  share  src
2、创建mysql用户组和mysql用户名并添加到mysql用户组
[root@bogon local]# groupadd mysql

[root@bogon local]# useradd -g mysql mysql
3、进入/usr/local/mysql目录修改拥有者为mysql用户(组)
[root@bogon mysql]# chown -R mysql:mysql ./

[root@bogon mysql]# ll

total

drwxr-xr-x.   mysql mysql   Dec  : bin

-rw-r--r--.   mysql mysql  Aug  : COPYING

drwxr-xr-x.   mysql mysql     Dec  : data

drwxr-xr-x.   mysql mysql     Dec  : docs

drwxr-xr-x.   mysql mysql   Dec  : include

-rw-r--r--.   mysql mysql    Aug  : INSTALL-BINARY

drwxr-xr-x.   mysql mysql   Dec  : lib

drwxr-xr-x.   mysql mysql     Dec  : man

drwxr-xr-x.  mysql mysql   Dec  : mysql-test

-rw-r--r--.   mysql mysql   Aug  : README

drwxr-xr-x.   mysql mysql     Dec  : scripts

drwxr-xr-x.  mysql mysql   Dec  : share

drwxr-xr-x.   mysql mysql   Dec  : sql-bench

drwxr-xr-x.   mysql mysql   Dec  : support-files
4、编辑 /etc/my.cnf ,加入以下内容
# 设置客户端

[mysql]

default-character-set=utf8

socket=/var/lib/mysql/mysql.sock

# 设置服务端

[mysqld]

skip-name-resolve

port =

socket=/var/lib/mysql/mysql.sock

# 设置mysql的安装目录

basedir=/usr/local/mysql

# 设置mysql数据库的数据的存放目录

datadir=/usr/local/mysql/data

# 允许最大连接数

max_connections=

# 服务端使用的字符集默认为8比特编码的latin1字符集

character-set-server=utf8

# 创建新表时将使用的默认存储引擎

default-storage-engine=INNODB

lower_case_table_names=

max_allowed_packet=16M
5、安装mysql
执行 ./scripts/mysql_install_db --user=mysql --basedir=/usr/local/mysql/ --datadir=/usr/local/mysql/data
[root@bogon mysql]# ./scripts/mysql_install_db --user=mysql --basedir=/usr/local/mysql/ --datadir=/usr/local/mysql/data

Installing MySQL system tables...

  :: [Note] Ignoring --secure-file-priv value as server is running with --bootstrap.

  :: [Note] /usr/local/mysql//bin/mysqld (mysqld 5.5.62) starting as process 2032 ...

OK

Filling help tables...

  :: [Note] Ignoring --secure-file-priv value as server is running with --bootstrap.

  :: [Note] /usr/local/mysql//bin/mysqld (mysqld 5.5.62) starting as process 2039 ...

OK

To start mysqld at boot time you have to copy

support-files/mysql.server to the right place for your system

PLEASE REMEMBER TO SET A PASSWORD FOR THE MySQL root USER !

To do so, start the server, then issue the following commands:

/usr/local/mysql//bin/mysqladmin -u root password 'new-password'

/usr/local/mysql//bin/mysqladmin -u root -h 218.28.144.38 password 'new-password'

Alternatively you can run:

/usr/local/mysql//bin/mysql_secure_installation

which will also give you the option of removing the test

databases and anonymous user created by default.  This is

strongly recommended for production servers.

See the manual for more instructions.

You can start the MySQL daemon with:

cd /usr/local/mysql/ ; /usr/local/mysql//bin/mysqld_safe &

You can test the MySQL daemon with mysql-test-run.pl

cd /usr/local/mysql//mysql-test ; perl mysql-test-run.pl

Please report any problems at http://bugs.mysql.com/
6、配置mysql
6.1 修改data拥有者和权限
[root@bogon mysql]# chown -R mysql:mysql data
[root@bogon mysql]# chmod 777 data
6.2 修改my.cnf权限
[root@bogon mysql]# chmod  /etc/my.cnf

[root@bogon mysql]# ll /etc/my.cnf

-rwxrwxrwx.  root root  Dec  : /etc/my.cnf
6.3 修改/var/lib/mysql拥有者为mysql用户(组)
[root@bogon ~]# chown -R mysql:mysql /var/lib/mysql
6.4 复制mysql.server到/etc/rc.d/init.d/并重命名为mysqld
[root@bogon mysql]# cp ./support-files/mysql.server /etc/rc.d/init.d/mysqld

[root@bogon mysql]# ls /etc/rc.d/init.d

functions  mysqld  netconsole  network  README
6.5 增加mysqld执行权限
[root@bogon mysql]# chmod +x /etc/rc.d/init.d/mysqld
6,6 将mysqld添加到自启动列表
[root@bogon mysql]# chkconfig --add mysqld
7、开启mysqld服务
[root@bogon mysql]# service mysqld start
8、配置PATH环境
[root@bogon mysql]# vi ~/.bash_profile
最后一行加入 export PATH=$PATH:/usr/local/mysql/bin
# .bash_profile

# Get the aliases and functions

if [ -f ~/.bashrc ]; then

        . ~/.bashrc

fi

# User specific environment and startup programs

PATH=$PATH:$HOME/bin

export PATH

export PATH=$PATH:/usr/local/mysql/bin
刷新文件
[root@bogon mysql]# source ~/.bash_profile
四、登陆mysql
[root@bogon mysql]# mysql -u root -p

Warning: World-writable config file '/etc/my.cnf' is ignored

Enter password:

Welcome to the MySQL monitor.  Commands end with ; or \g.

Your MySQL connection id is

Server version: 5.5. MySQL Community Server (GPL)

Copyright (c) , , Oracle and/or its affiliates. All rights reserved.

Oracle is a registered trademark of Oracle Corporation and/or its

affiliates. Other names may be trademarks of their respective

owners.

Type 'help;' or '\h' for help. Type '\c' to clear the current input statement.

mysql>
10、修改root密码
mysql> use mysql;

Database changed

mysql> update user set password=password('abc123456') where user='root' and host='localhost';

Query OK,  row affected (0.00 sec)

Rows matched:   Changed:   Warnings:

mysql> flush privileges;

Query OK,  rows affected (0.00 sec)
五、配置远程连接mysql
mysql> grant all privileges on *.* to 'root'@'%' identified by 'abc123456' with grant option;

Query OK,  rows affected (0.00 sec)

mysql> flush privileges;

Query OK,  rows affected (0.00 sec)
使用navicat远程连接mysql
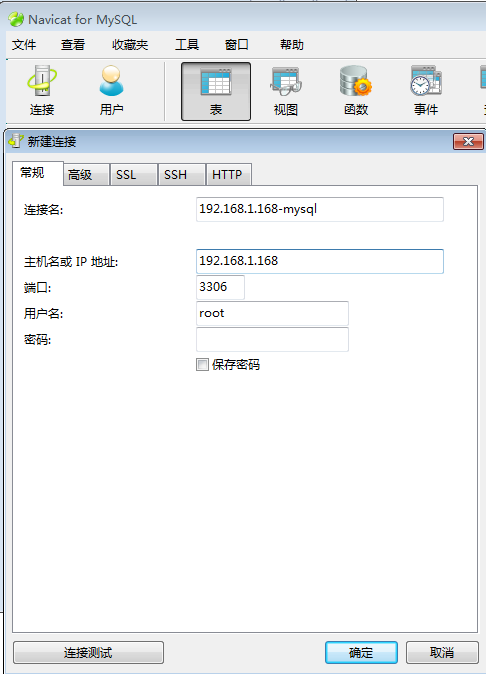
连接

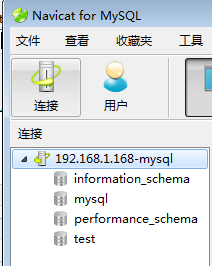
至此,CentOS 7下安装 MySQL-5.5.62 完毕。
CentOS 7 下编译安装lnmp之MySQL篇详解的更多相关文章
- CentOS 7 下编译安装lnmp之PHP篇详解
一.安装环境 宿主机=> win7,虚拟机 centos => 系统版本:centos-release-7-5.1804.el7.centos.x86_64 二.PHP下载 官网 http ...
- CentOS 7 下编译安装lnmp之nginx篇详解
一.安装环境 宿主机=> win7,虚拟机 centos => 系统版本:CentOS Linux release 7.5.1804 (Core),ip地址 192.168.1.168 ...
- 在CentOS 7下编译安装Nginx+PHP+MySQL环境
本文转载自:http://www.softeng.cn/?p=156,本文已获得作者授权,未经作者同意,不可转载. 1.前言 本文适合于已经对Linux操作系统具有基本操作经验,并且能够在Linux或 ...
- centos下编译安装lnmp
centos下编译安装lnmp 本文以centos为背景在其中编译安装nginx搭建lnmp环境. 编译安装nginx时,需要事先安装 开发包组"Development Tools" ...
- Centos 6.8编译安装LNMP环境
Centos 6.8编译安装LNMP环境 参考资料: http://www.jb51.net/article/107429.htm https://phperzh.com/articles/1360 ...
- CentOS7编译安装php7.1配置教程详解
这篇文章主要介绍CentOS7编译安装php7.1的过程和配置详解,亲测 ,需要的朋友可以参考. 1.首先安装依赖包: yum install libxml2 libxml2-devel openss ...
- CentOS 6.4 linux下编译安装 LNMP环境
1.nginx编译安装 2.PHP编译安装 3.mysql编译安装 4.NGINX配置模板 5.CentOS 6.4 php-fpm 添加service 添加平滑启动/重启
- centos6.7下编译安装lnmp
很多步骤不说明了,请参照本人的centos6.7下编译安装lamp,这次的架构是nginx+php-fpm一台服务器,mysql一台服务器 (1)首先编译安装nginx: 操作命令: yum -y g ...
- CentOS 6下编译安装MySQL 5.6
一:卸载旧版本 使用下面的命令检查是否安装有MySQL Server rpm -qa | grep mysql 有的话通过下面的命令来卸载掉 rpm -e mysql //普通删除模式 rpm -e ...
随机推荐
- error while loading shared libraries: libtest.so: cannot open shared object file: No such file or directory
一般我们在Linux下执行某些外部程序的时候可能会提示找不到共享库的错误, 比如: tmux: error while loading shared libraries: libevent-1.4.s ...
- 五、springboot单元测试
1.为什么要写测试用例 1. 可以避免测试点的遗漏,为了更好的进行测试,可以提高测试效率 2. 可以自动测试,可以在项目打包前进行测试校验 3. 可以及时发现因为修改代码导致新的问题的出现,并及时解决 ...
- python基础--shutil模块
shutil模块提供了大量的文件的高级操作. 特别针对文件拷贝和删除,主要功能为目录和文件操作以及压缩操作.对单个文件的操作也可参见os模块. 注意 即便是更高级别的文件复制函数(shutil.cop ...
- ubuntu和windows双系统启动顺序的修改
ubuntu和windows双系统启动顺序的修改 说到启动就不得不说GRUB,Linux下大名鼎鼎的启动管理工具(曾经的LILO已经风光不再),当然现在已经是GRUB2了,GRUB2和GRUB最重要的 ...
- sqlserver日期推算(年,季度,月,星期推算)
DECLARE @dt datetime SET @dt=GETDATE() DECLARE @number int SET @number=3 --1.指定日期该年的第一天或最后一天--第一天为1月 ...
- Dos.ORM - 目录、介绍
引言: Dos.ORM(原Hxj.Data)于2009年发布.2015年正式开源,该组件已在数百个成熟项目中应用,是目前国内用户量最大.最活跃.最完善的国产ORM.初期开发过程中参考了NBear与My ...
- (转)看懂UML类图
转自:http://design-patterns.readthedocs.io/zh_CN/latest/read_uml.html 这里不会将UML的各种元素都提到,我只想讲讲类图中各个类之间的关 ...
- python中list和str互转
1.list转str 假设有一个名为test_list的list,转换后的str名为test_str 则转换方法: test_str = "".join(test_list) 例子 ...
- ASP.NET MVC中在Action获取提交的表单数据方法
有Index视图如下: 视图代码如下: <%@ Page Language="C#" MasterPageFile="~/Views/Shared/Site.Mas ...
- web到service简单原理例子
这是目前的理解 附上服务端源码 package com.lsw.server; import java.io.*; import java.net.*; import java.util.HashMa ...