CentOS 7 下编译安装lnmp之MySQL篇详解
一、安装环境
宿主机=> win7,虚拟机 centos => 系统版本:centos-release-7-5.1804.el7.centos.x86_64

二、MySQL下载
MySQL Community Server 5.5.62 下载: https://dev.mysql.com/downloads/mysql/
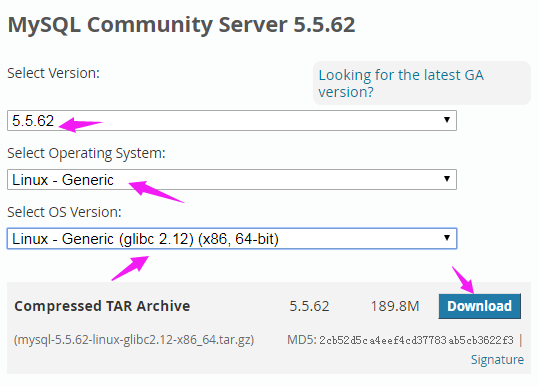
进入下载页面,复制链接地址

执行命令 wget https://dev.mysql.com/get/Downloads/MySQL-5.5/mysql-5.5.62-linux-glibc2.12-x86_64.tar.gz
将其下载到 /usr/local/src 目录
[root@bogon src]# wget https://dev.mysql.com/get/Downloads/MySQL-5.5/mysql-5.5.62-linux-glibc2.12-x86_64.tar.gz

--2018-12-18 03:52:54--  https://dev.mysql.com/get/Downloads/MySQL-5.5/mysql-5.5.62-linux-glibc2.12-x86_64.tar.gz

Resolving dev.mysql.com (dev.mysql.com)... 137.254.60.11

Connecting to dev.mysql.com (dev.mysql.com)|137.254.60.11|:443... connected.

HTTP request sent, awaiting response... 302 Found

Location: https://cdn.mysql.com//Downloads/MySQL-5.5/mysql-5.5.62-linux-glibc2.12-x86_64.tar.gz [following]

--2018-12-18 03:52:55--  https://cdn.mysql.com//Downloads/MySQL-5.5/mysql-5.5.62-linux-glibc2.12-x86_64.tar.gz

Resolving cdn.mysql.com (cdn.mysql.com)... 23.13.185.161

Connecting to cdn.mysql.com (cdn.mysql.com)|23.13.185.161|:443... connected.

HTTP request sent, awaiting response... 200 OK

Length: 198993245 (190M) [application/x-tar-gz]

Saving to: ‘mysql-5.5.62-linux-glibc2.12-x86_64.tar.gz’

100%[=========================================================>] 198,993,245 11.0MB/s   in 19s

2018-12-18 03:53:14 (10.1 MB/s) - ‘mysql-5.5.62-linux-glibc2.12-x86_64.tar.gz’ saved [198993245/198993245]
三、安装MySQL Community Server 5.5.62
1、解压 MySQL Community Server 5.5.62 并移动到 /usr/local 下重命名为 mysql
[root@bogon src]# tar -zxf mysql-5.5.-linux-glibc2.-x86_64.tar.gz

[root@bogon src]# mv mysql-5.5.-linux-glibc2.-x86_64 /usr/local/mysql

[root@bogon src]# ls /usr/local

etc  games  lib  lib64  libevent  libexec  memcached  mysql  nginx  php7  sbin  share  src
2、创建mysql用户组和mysql用户名并添加到mysql用户组
[root@bogon local]# groupadd mysql

[root@bogon local]# useradd -g mysql mysql
3、进入/usr/local/mysql目录修改拥有者为mysql用户(组)
[root@bogon mysql]# chown -R mysql:mysql ./

[root@bogon mysql]# ll

total

drwxr-xr-x.   mysql mysql   Dec  : bin

-rw-r--r--.   mysql mysql  Aug  : COPYING

drwxr-xr-x.   mysql mysql     Dec  : data

drwxr-xr-x.   mysql mysql     Dec  : docs

drwxr-xr-x.   mysql mysql   Dec  : include

-rw-r--r--.   mysql mysql    Aug  : INSTALL-BINARY

drwxr-xr-x.   mysql mysql   Dec  : lib

drwxr-xr-x.   mysql mysql     Dec  : man

drwxr-xr-x.  mysql mysql   Dec  : mysql-test

-rw-r--r--.   mysql mysql   Aug  : README

drwxr-xr-x.   mysql mysql     Dec  : scripts

drwxr-xr-x.  mysql mysql   Dec  : share

drwxr-xr-x.   mysql mysql   Dec  : sql-bench

drwxr-xr-x.   mysql mysql   Dec  : support-files
4、编辑 /etc/my.cnf ,加入以下内容
# 设置客户端

[mysql]

default-character-set=utf8

socket=/var/lib/mysql/mysql.sock

# 设置服务端

[mysqld]

skip-name-resolve

port =

socket=/var/lib/mysql/mysql.sock

# 设置mysql的安装目录

basedir=/usr/local/mysql

# 设置mysql数据库的数据的存放目录

datadir=/usr/local/mysql/data

# 允许最大连接数

max_connections=

# 服务端使用的字符集默认为8比特编码的latin1字符集

character-set-server=utf8

# 创建新表时将使用的默认存储引擎

default-storage-engine=INNODB

lower_case_table_names=

max_allowed_packet=16M
5、安装mysql
执行 ./scripts/mysql_install_db --user=mysql --basedir=/usr/local/mysql/ --datadir=/usr/local/mysql/data
[root@bogon mysql]# ./scripts/mysql_install_db --user=mysql --basedir=/usr/local/mysql/ --datadir=/usr/local/mysql/data

Installing MySQL system tables...

  :: [Note] Ignoring --secure-file-priv value as server is running with --bootstrap.

  :: [Note] /usr/local/mysql//bin/mysqld (mysqld 5.5.62) starting as process 2032 ...

OK

Filling help tables...

  :: [Note] Ignoring --secure-file-priv value as server is running with --bootstrap.

  :: [Note] /usr/local/mysql//bin/mysqld (mysqld 5.5.62) starting as process 2039 ...

OK

To start mysqld at boot time you have to copy

support-files/mysql.server to the right place for your system

PLEASE REMEMBER TO SET A PASSWORD FOR THE MySQL root USER !

To do so, start the server, then issue the following commands:

/usr/local/mysql//bin/mysqladmin -u root password 'new-password'

/usr/local/mysql//bin/mysqladmin -u root -h 218.28.144.38 password 'new-password'

Alternatively you can run:

/usr/local/mysql//bin/mysql_secure_installation

which will also give you the option of removing the test

databases and anonymous user created by default.  This is

strongly recommended for production servers.

See the manual for more instructions.

You can start the MySQL daemon with:

cd /usr/local/mysql/ ; /usr/local/mysql//bin/mysqld_safe &

You can test the MySQL daemon with mysql-test-run.pl

cd /usr/local/mysql//mysql-test ; perl mysql-test-run.pl

Please report any problems at http://bugs.mysql.com/
6、配置mysql
6.1 修改data拥有者和权限
[root@bogon mysql]# chown -R mysql:mysql data
[root@bogon mysql]# chmod 777 data
6.2 修改my.cnf权限
[root@bogon mysql]# chmod  /etc/my.cnf

[root@bogon mysql]# ll /etc/my.cnf

-rwxrwxrwx.  root root  Dec  : /etc/my.cnf
6.3 修改/var/lib/mysql拥有者为mysql用户(组)
[root@bogon ~]# chown -R mysql:mysql /var/lib/mysql
6.4 复制mysql.server到/etc/rc.d/init.d/并重命名为mysqld
[root@bogon mysql]# cp ./support-files/mysql.server /etc/rc.d/init.d/mysqld

[root@bogon mysql]# ls /etc/rc.d/init.d

functions  mysqld  netconsole  network  README
6.5 增加mysqld执行权限
[root@bogon mysql]# chmod +x /etc/rc.d/init.d/mysqld
6,6 将mysqld添加到自启动列表
[root@bogon mysql]# chkconfig --add mysqld
7、开启mysqld服务
[root@bogon mysql]# service mysqld start
8、配置PATH环境
[root@bogon mysql]# vi ~/.bash_profile
最后一行加入 export PATH=$PATH:/usr/local/mysql/bin
# .bash_profile

# Get the aliases and functions

if [ -f ~/.bashrc ]; then

        . ~/.bashrc

fi

# User specific environment and startup programs

PATH=$PATH:$HOME/bin

export PATH

export PATH=$PATH:/usr/local/mysql/bin
刷新文件
[root@bogon mysql]# source ~/.bash_profile
四、登陆mysql
[root@bogon mysql]# mysql -u root -p

Warning: World-writable config file '/etc/my.cnf' is ignored

Enter password:

Welcome to the MySQL monitor.  Commands end with ; or \g.

Your MySQL connection id is

Server version: 5.5. MySQL Community Server (GPL)

Copyright (c) , , Oracle and/or its affiliates. All rights reserved.

Oracle is a registered trademark of Oracle Corporation and/or its

affiliates. Other names may be trademarks of their respective

owners.

Type 'help;' or '\h' for help. Type '\c' to clear the current input statement.

mysql>
10、修改root密码
mysql> use mysql;

Database changed

mysql> update user set password=password('abc123456') where user='root' and host='localhost';

Query OK,  row affected (0.00 sec)

Rows matched:   Changed:   Warnings:

mysql> flush privileges;

Query OK,  rows affected (0.00 sec)
五、配置远程连接mysql
mysql> grant all privileges on *.* to 'root'@'%' identified by 'abc123456' with grant option;

Query OK,  rows affected (0.00 sec)

mysql> flush privileges;

Query OK,  rows affected (0.00 sec)
使用navicat远程连接mysql
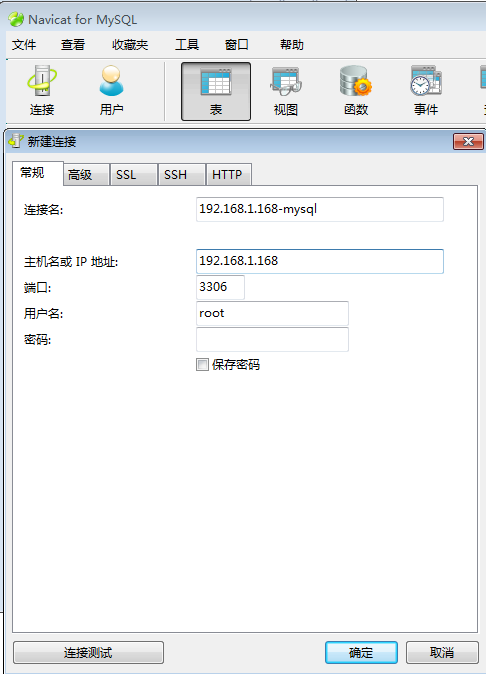
连接

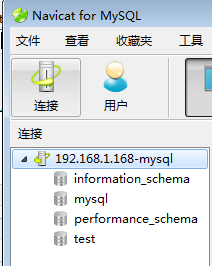
至此,CentOS 7下安装 MySQL-5.5.62 完毕。
CentOS 7 下编译安装lnmp之MySQL篇详解的更多相关文章
- CentOS 7 下编译安装lnmp之PHP篇详解
一.安装环境 宿主机=> win7,虚拟机 centos => 系统版本:centos-release-7-5.1804.el7.centos.x86_64 二.PHP下载 官网 http ...
- CentOS 7 下编译安装lnmp之nginx篇详解
一.安装环境 宿主机=> win7,虚拟机 centos => 系统版本:CentOS Linux release 7.5.1804 (Core),ip地址 192.168.1.168 ...
- 在CentOS 7下编译安装Nginx+PHP+MySQL环境
本文转载自:http://www.softeng.cn/?p=156,本文已获得作者授权,未经作者同意,不可转载. 1.前言 本文适合于已经对Linux操作系统具有基本操作经验,并且能够在Linux或 ...
- centos下编译安装lnmp
centos下编译安装lnmp 本文以centos为背景在其中编译安装nginx搭建lnmp环境. 编译安装nginx时,需要事先安装 开发包组"Development Tools" ...
- Centos 6.8编译安装LNMP环境
Centos 6.8编译安装LNMP环境 参考资料: http://www.jb51.net/article/107429.htm https://phperzh.com/articles/1360 ...
- CentOS7编译安装php7.1配置教程详解
这篇文章主要介绍CentOS7编译安装php7.1的过程和配置详解,亲测 ,需要的朋友可以参考. 1.首先安装依赖包: yum install libxml2 libxml2-devel openss ...
- CentOS 6.4 linux下编译安装 LNMP环境
1.nginx编译安装 2.PHP编译安装 3.mysql编译安装 4.NGINX配置模板 5.CentOS 6.4 php-fpm 添加service 添加平滑启动/重启
- centos6.7下编译安装lnmp
很多步骤不说明了,请参照本人的centos6.7下编译安装lamp,这次的架构是nginx+php-fpm一台服务器,mysql一台服务器 (1)首先编译安装nginx: 操作命令: yum -y g ...
- CentOS 6下编译安装MySQL 5.6
一:卸载旧版本 使用下面的命令检查是否安装有MySQL Server rpm -qa | grep mysql 有的话通过下面的命令来卸载掉 rpm -e mysql //普通删除模式 rpm -e ...
随机推荐
- mysql -> 简介&体系结构_01
数据库简介 数据库,简而言之可视为电子化的文件柜——存储电子文件的处所,用户可以对文件中的数据运行新增.截取.更新.删除等操作. 所谓“数据库”系以一定方式储存在一起.能予多个用户共享.具有尽可能小的 ...
- 教你用DrawLayout 实现Android 侧滑菜单
现在的APP越来越注重用户体验,百度视频客户端有一个特效还是挺吸引人的,在主界面手指向右滑动,就可以将菜单展示出来,而主界面会被隐藏大部分,但是仍有左侧的一小部分同菜单一起展示.类似的还有天天动听,人 ...
- Windows 10安装MongoDB(安装&启动)
Windows 10家庭中文版,MongoDB 3.6.3, 最近在学习Scrapy,可以却从未将scraped data存储到数据库中.在看过一些文档后,Scrapy会和MongoDB结合使用(还有 ...
- 如何使用 JMeter 调用你的 Restful Web Service?进行简单的压力测试和自动化测试
表述性状态传输(REST)作为对基于 SOAP 和 Web 服务描述语言(WSDL)的 Web 服务的简单替代,在 Web 开发上得到了广泛的接受.能够充分证明这点的是主流 Web 2.0 服务提供商 ...
- SSIS 学习之旅 第一个SSIS 示例(二)
这一章还是继上一章例子 进行一些小的知识扩展.主要是为了让大家更快的上手SSIS. 概要设计: 1.按用户组生成CSV文件到Pending目录下, 2.移动Pending目录下的CSV文件 ...
- CCF CSP 201703-5 引水入城(50分)
CCF计算机职业资格认证考试题解系列文章为meelo原创,请务必以链接形式注明本文地址 CCF CSP 201703-5 引水入城 问题描述 MF城建立在一片高原上.由于城市唯一的水源是位于河谷地带的 ...
- Linux mint 17.3系统安装及常用开发办公软件部署
关于为什么选择linuxmint17.3作为个人办公开发系统的选择说明: 编者按]提起Linux系统,大家可能最先想到的就是 Linux Mint 和 Ubuntu 两个版本了.近来,开源界貌似激进了 ...
- 【LOJ】 #2545. 「JXOI2018」守卫
题解 只会蠢蠢的\(n^3\)--菜啊-- 我们发现最右的端点一定会选,看到的点一定是当前能看到的斜率最小的点变得更小一点,记录下这个点,在我们遇到一个看不到的点的时候,然后只用考虑R到它斜率最小的这 ...
- 【POJ】2165.Gunman
题解 把直线的斜率分解成二维,也就是随着z的增加x的增量和y的增量 我们发现一条合法直线向上移一点一定能碰到一条横线 知道了这条横线可以算出y的斜率 我们旋转一下,让这条横线碰到两条竖线,就可以算出x ...
- USACO 4.3 Buy Low, Buy Lower
Buy Low, Buy Lower The advice to "buy low" is half the formula to success in the stock mar ...