[转]Creating a custom ribbon for Outlook 2013, 2010 and toolbar for Outlook 2007, 2003 – C# sample
The Outlook UI provides a lot of customization options, but one thing almost all Outlook add-ins share is either a ribbon tab or a toolbar or two. The Ribbon UI was introduced in Office 2007 although only the Inspector windows actually used it. The Explorer window still used the traditional menus and toolbars from previous Outlook versions.
Whichever version of Outlook you decide to develop for, Add-in Express for Office and .net provides visual designers and tools for both the Ribbon UI as well as for toolbars. Add-in Express fully supports Outlook 2013, 2010, 2007 and 2003 and works with Visual Studio 2012 – 2005 (C#, VB.NET or C++ .NET) .
Creating a custom Outlook ribbon
Before you can create your own Outlook ribbon, you need to add an ADXRibbonTab component to the AddinModule designer surface.

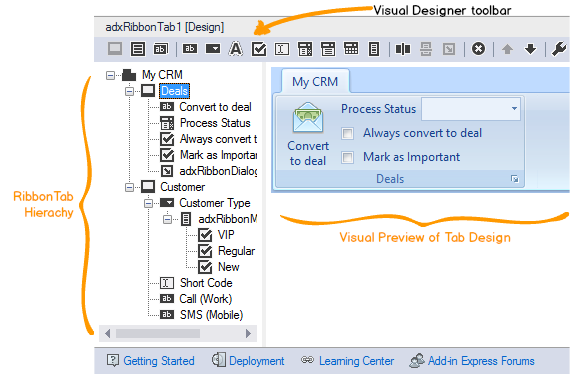
When you select the ADXRibbonTab component in Visual Studio, the visual designer will become active. When designing your Ribbon Tab, you need to follow a certain hierarchy, for example, any control you add to the Ribbon Tab, needs to be inside a Ribbon Group first.
You can add a Ribbon Group by clicking on its toolbar button inside the visual designer. The visual designer will display the control hierarchy as well as a preview of what the Ribbon Tab will look like inside Outlook.
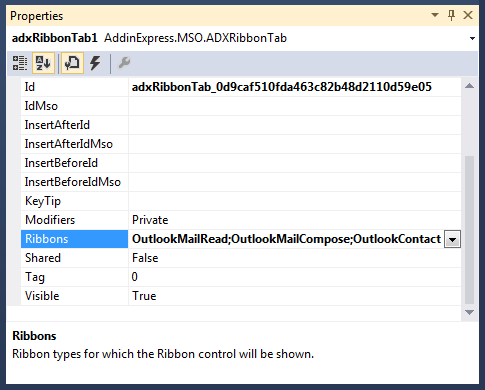
You need to stipulate the Ribbons property in order to specify where in Outlook your ribbon tab should be displayed.
Find more about Ribbon designer.
Ribbon context-sensitivity
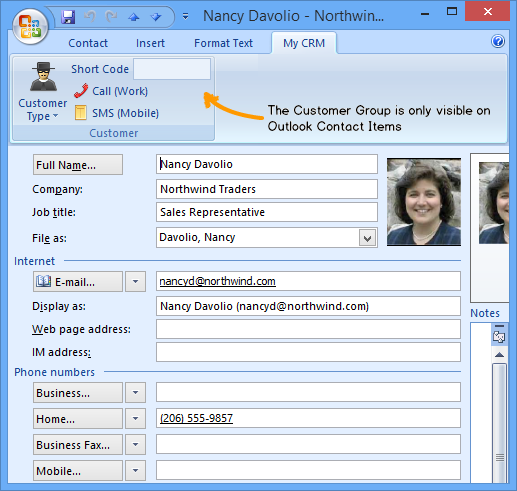
This property is available on all ribbon controls and it enables you to display or hide different controls based on the type of item in Outlook. Consider the following ribbon design:
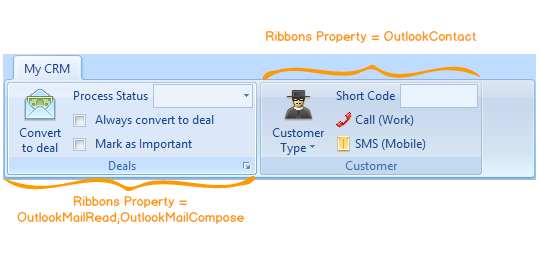
The Ribbons property of the first ribbon group is set to OutlookMailRead and OutlookMailCompose. The second ribbon group’s Ribbons property is set to OutlookContact. When building and running the add-in in Outlook, you’ll only see the first ribbon group when you either edit or open an e-mail.
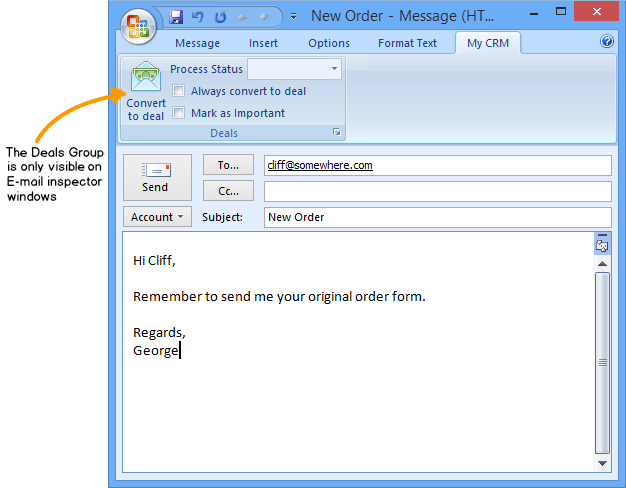
The second ribbon group will be visible when you have a contact inspector window open. Be careful thought, for this to work the Ribbon Tab’s Ribbons property needs to be set to OutlookMailRead,OutlookMailComposeandOutlookContact.
Creating a custom Outlook toolbar
Creating a custom toolbar or a commandbar for any pre-ribbon versions of Outlook 2007, 2003 and 2000 is done in a similar fashion as creating ribbons. However, Add-in Express provides two separate command bar components for pre-ribbon versions of Outlook:
- ADXOLExplorerCommandBar
- ADXOLInspectorCommandBar
The names of the two components are pretty self-explanatory. When you would like to add controls to an existing or create a new toolbar for the Outlook Explorer window, you would need to use the ADXOLExplorerCommandBar component.

For all other pre-ribbon Outlook Inspector windows you would need to use the ADXOLInspectorCommandBarcomponent.

When you select the ADXOLExplorerCommandBar component in Visual Studio, Add-in Express will display a visual designer for you, to visually design the toolbar.
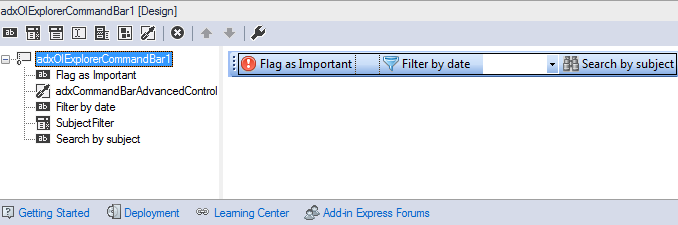
The visual designer also comes with its own toolbar that contains all the standard commandbar controls you can add. However, I want to draw your attention to a very special control: the CommandBar Advanced Control.
This control gives you the ability to embed any non-Office control to an Outlook toolbar. This can include anything from a date picker to a tree view control!
Find more about Toolbar designer.
Advanced Toolbar control
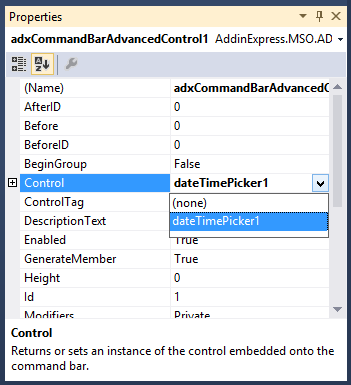
Once you’ve added an advanced command bar control to your toolbar, you need to add the control you want to embed to the AddinModule designer surface. In this example, I’ve simply dragged a DateTimePickercontrol onto my designer surface.
Next, you’ll need to add an Outlook Control Adapter control onto the designer surface as well. You’ll find this control in your Visual Studio toolbox, under the “Toolbar Controls for Microsoft Office” group.

With the control adapter in place, select the advanced command bar control and select the name of the Date Picker control in the drop-down list next to the Control property.
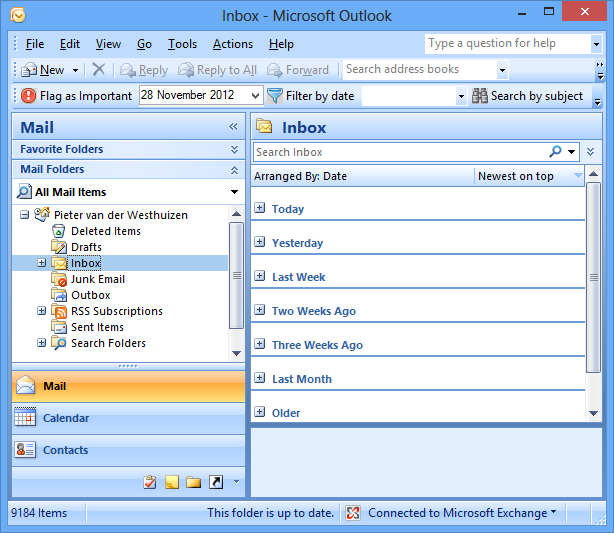
With the controls and properties in place, we can build, register and run our Outlook add-in project. When you have your Inbox open in Outlook 2007 and earlier, you should see the following toolbar:
Toolbar context-sensitivity
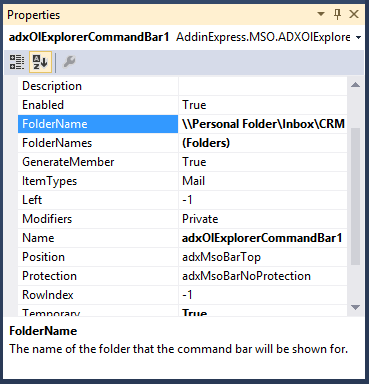
As with the ribbon control you can also display a toolbar or certain controls on the toolbar depending on the folder name or item types (Mail, Contact, Task, Calendar etc.). If you want to show the toolbar when a certain folder is selected, specify the folder name in the FolderName property. If you need it to show for a collection of forms, add their folder names to the FolderNames property.
If, for example, you would only like to show certain components on the toolbar based on which type(s) of item is selected, select the toolbar component and either specify the Outlook item type in the OlExplorerItemTypes or OlInspectorItemTypes property depending on whether you’re using an Explorer or Inspector toolbar.
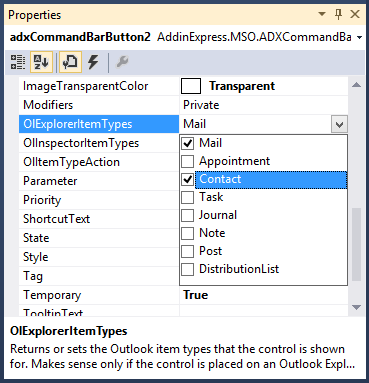
And as easy as that you can have a toolbar which only shows or hides certain controls depending on the types of items or folders that are selected.
Thank you for reading! Until next time, keep coding!
Outlook 2013 add-in development in Visual Studio 2012 for beginners
- Part 1: Outlook add-in development: Outlook Application and base objects
- Part 2: Creating custom Outlook views
- Part 3: Creating custom Outlook forms
- Part 4: Outlook UI – Explorer and Inspector Windows. What is customizable?
- Part 5: Customizing Outlook main menu, context menus and Backstage view
- Part 6: Creating custom Outlook ribbons and toolbars
- Part 7: Advanced view regions for Outlook 2013 – 2003
- Part 8: Advanced form regions for Outlook 2013 – 2003
- Part 9: Working with Outlook Accounts, Stores, Folders and Items
- Part 10: Working with Outlook calendar
- Part 11: Working with Outlook tasks
You may also be interested in:
[转]Creating a custom ribbon for Outlook 2013, 2010 and toolbar for Outlook 2007, 2003 – C# sample的更多相关文章
- Creating a Custom Page Layout in SharePoint 2013
Creating a Custom Page Layout in SharePoint 2013 In my last article, I documented how to create a Ma ...
- iOS Programming Recipe 6: Creating a custom UIView using a Nib
iOS Programming Recipe 6: Creating a custom UIView using a Nib JANUARY 7, 2013 BY MIKETT 12 COMMENTS ...
- 使用 InstallShield limited edition 打包部署Outlook 2013 Office add-in插件
原文: Outlook: Deploying an Outlook 2013 add-in (using InstallShield LE) Today I had to create an inst ...
- Outlook 2013 电子邮件账户设置备份与恢复
与之前版本不同,Outlook 2013需要备份以下注册表内容:HKEY_CURRENT_USER\Software\Microsoft\Office\15.0\Outlook\Profiles恢复时 ...
- outlook 2013撤消已经发送的邮件
使用Outlook 2013发送邮件的时候,发送后,发现邮件写错了或者其它原因需要撤消发送邮件,这里介绍一下. 工具/原料 outlook 2013 方法/步骤 需要打开已经发送的邮件 点 ...
- Creating a custom analyzer in ElasticSearch Nest client
Creating a custom analyzer in ElasticSearch Nest client Question: Im very very new to elasticsearch ...
- 配置Office Outlook 2013
导航 背景——配置过程——错误(Error)——参考资料 背景 最近,折腾了一阵子邮箱客户端,包括:Foxmail.thuderbird.outlook:最后,考虑到outlook对文本的强大的支持能 ...
- GHOST CMS - 创建自定义主页 Creating a custom home page
创建自定义主页 Creating a custom home page 为你的网站创建一个自定义的主页是一个让你从人群中脱颖而出的好方法,并把你自己独特的印记存放在你的网上.本教程向您展示了如何在Gh ...
- Outlook 2013 您的组织策略阻止我们为您完成此操作... 解决方法
问题:点击outlook超链接,弹出“您的组织策略阻止我们为您完成此操作”的提示,无法打开链接. 环境 OS: Win10 专业版x64bit Outlook: 2013 浏览器:搜狗浏览器 解决办法 ...
随机推荐
- Python 数据结构与算法——链表
#构造节点类 class Node(object): def __init__(self,data=None,_next=None): ''' self.data:为自定义的数据 self.next: ...
- XML文件之创建
1.创建XML文档对象XmlDocument doc=new XmlDocument() 2.创建XML根节点变量XmlElement xmlElement 3.判断XML文件是否已经存在 1)若存在 ...
- DI spring.net简单使用
IOC或DI spring.net简单使用 一.spring.net是什么? Spring 框架本是 Java 平台上一个应用非常多的.开源的框架.虽然语言是固定的,但是好的方法应该是通用的,于是 ...
- 实现liunx之间无密码访问——ssh密匙
环境描述 两台linux服务器 172.16.1.22[client],172.16.1.33[server],想要实现client服务器ssh无密码访问server服务器. 使用技术 linux 的 ...
- Day 30 面向对象的考试题
-摘自张磊同学博客. 面向对象 1.请简述类.对象.实例化.实例这些名词的含义: #类 : 是对具有相同属性和相似行为的一类事物的抽象 #对象: 是一个具有具体属性值的类的实例化 #实例化 : 从一个 ...
- python 多线程示例
原文链接:http://www.cnblogs.com/whatisfantasy/p/6440585.html 1 概念梳理: 1.1 线程 1.1.1 什么是线程 线程是操作系统能够进行运算调度的 ...
- java入门——面向对象
简介 对象具有自己的状态和行为: 描述一个对象具有什么状态和行为的过程叫做建模,不同的意图下我们对同一个事物的描述会产生不同的模型. 类 类描述一类对象的状态和行为的模板.可以把类想象成一个汽车设计图 ...
- 虚拟安装centos后无法上网、DNS无法解析问题解决
1.保证拟机ip和VMnet8的ip在同一网段内 2.虚拟机网关和VMnet8相同
- linux parallel rsync 拷贝N多文件
先来个对比图看一下, 左边图是普通 rsync 目录拷贝, 右边图是借助 parallel 工具并发起了多个 rsync centos6.5安装 parallel #!/bin/bash # Inst ...
- MyEclipse配置Hibernate具体步骤
工具: MyEclipse,MySQL 步骤: 1.打开MyEclipse,新建一个Java Project(取名:h1) 2.创建MySQL数据库 3.找到MyEclipse下的MyEclipse ...