ext3文件系统反删除利器ext3grep应用实战
推荐:10年技术力作:《高性能Linuxserver构建实战Ⅱ》全网发行,附试读章节和全书实例源代码下载!
一、“rm –rf”带来的困惑
国外一份非常著名的Linux系统管理员守则中有这么一条“慎用 rm –rf 命令,除非你知道此命令将带来什么后果”,可见。这个命令对系统管理员的重要性。在实际的工作中。由此命令带来的误删除数据案例屡见不鲜,非常多系统管理员都遇到过或者犯过这种错误。
因为开发者对命令的不熟悉。或者粗心大意、疏于管理。运行了此命令。数据在一瞬间就被清空了。Linux不具备类似回收站的功能,这就意味着数据丢失。尽管Linux自身提供了恢复数据的机制,可是这个功能基本没用,要恢复数据,通过常规手段是无法完毕的,此时,仅仅有找专业的数据恢复公司来恢复数据,这样无疑要付出非常大的成本和费用,造成无法估量的的损失。
可见,作为系统管理员。一定要有数据安全意识,数据保护意识,严格遵守相关维护守则,将这样的失误带来的损失减少到最低。幸运的是,Linux下提供了一款开源软件恢复误删的数据,利用这个ext3文件系统数据恢复工具ext3grep能够恢复误删除的数据。
二、 ext3grep的安装与使用
ext3grep是一个开源的ext3文件系统反删除工具,在ext3grep出现之前。数据被删除后。通过常规手段恢复基本是不可能的,尽管debugfs命令能够对ext2文件系统做一些恢复,可是对ext3文件系统就无能为力了。ext3是一个日志型文件系统,ext3grep正是通过分析ext3文件系统的日志信息来恢复被删除的文件和数据的。
操作系统环境:CentOS release 6.4。
ext3grep版本号:ext3grep-0.10.1。
ext3grep官方站点:http://code.google.com/p/ext3grep/,能够从这里下载最新的ext3grep版本号。这里下载的是ext3grep-0.10.1.tar.gz。
所需的系统相关包:
|
1
2
3
4
|
[root@localhost ~]# rpm -qa |grep e2fsprogse2fsprogs-1.41.12-21.el6.x86_64e2fsprogs-libs-1.41.12-21.el6.x86_64e2fsprogs-devel-1.41.12-21.el6.x86_64 |
系统必需要安装e2fsprogs-libs,不然后面ext3grep的安装会出现故障。
以下进入编译安装阶段,步骤例如以下:
|
1
2
3
4
5
6
|
[root@localhost /opt]# tar zxvf ext3grep-0.10.1.tar.gz[root@localhost ext3grep-0.10.1]# ./configure[root@localhost ext3grep-0.10.1]# make[root@localhost ext3grep-0.10.1]# make install[root@localhost ext3grep-0.10.1]# ext3grep -vRunning ext3grep version 0.10.1 |
这样,ext3grep就安装完毕了,默认的ext3grep命令放在/usr/local/bin文件夹下。ext3grep的使用很easy,这里不做介绍,能够通过“ext3grep --help”获取具体的使用帮助。
三、通过ext3grep恢复误删除的文件与文件夹
1、数据恢复准则
当发现某个分区的数据被误删除后,要做的第一件事是立马卸载被误删除文件所在的分区,或者又一次以仅仅读方式挂载此分区。
这么做的原因事实上非常easy:删除一个文件,就是中文件inode节点中的扇区指针清除。同一时候,释放这些数据相应的数据块,而真实的文件还存留在磁盘分区中,可是这些被删除的文件不一定会一直存留在磁盘中,当这些释放的数据块被操作系统又一次分配时,那些被删除的数据就会被覆盖,因此。在数据误删除后。立即卸载文件所在分区能够减少数据块中数据被覆盖的风险,进而提高成功恢复数据的机率。
2、实战ext3grep恢复文件
(1).模拟数据误删除环境
以下通过一个模拟环境,具体介绍利用ext3grep恢复数据文件的过程。
|
1
2
3
4
5
6
7
8
9
10
11
12
13
14
15
16
17
18
19
20
21
22
23
24
25
26
27
28
29
30
31
32
33
34
35
36
37
38
39
40
41
|
[root@localhost /]# mkdir /disk #建立一个挂载点[root@localhost /]# cd /mydata[root@localhost mydata]# dd if=/dev/zero of=/mydata/disk1 count=102400 #模拟磁盘分#区,创建一个空设备102400+0 records in102400+0 records out52428800 bytes (52 MB) copied, 1.20597 seconds, 43.5 MB/s[root@localhost mydata]# mkfs.ext3 /mydata/disk1 #将空设备格式化为ext3格式[root@localhost mydata]# mount -o loop /mydata/disk1 /disk #挂载设备到/disk文件夹下[root@localhost mydata]# cd /disk/[root@localhost disk]# cp /etc/profile /disk #拷贝文件到模拟磁盘分区[root@localhost disk]# cp /boot/initrd-2.6.18-164.11.1.el5xen.img /disk[root@localhost disk]# echo "ext3grep test">ext3grep.txt [root@localhost disk]# mkdir /disk/ext3grep [root@localhost disk]# cp /etc/hosts /disk/ext3grep[root@localhost disk]# pwd/disk[root@localhost disk]# ls -al总计 2512drwxr-xr-x 4 root root 4096 04-07 16:46 .drwxr-xr-x 31 root root 4096 04-07 16:45 ..drwxr-xr-x 2 root root 4096 04-07 16:46 ext3grep-rw-r--r-- 1 root root 14 04-07 16:31 ext3grep.txt-rw------- 1 root root 2535991 04-07 16:30 initrd-2.6.18-164.11.1.el5xen.imgdrwx------ 2 root root 4096 04-07 16:33 lost+found-rw-r--r-- 1 root root 1029 04-07 16:30 profile[root@localhost disk]# md5sum profile #获取文件校验码a6e82d979bb95919082d9aceddf56c39 profile[root@localhost disk]# md5sum initrd-2.6.18-164.11.1.el5xen.img 031226080e00d7f312b1f95454e5a1ff initrd-2.6.18-164.11.1.el5xen.img[root@localhost disk]# md5sum ext3grep.txt5afe55495cdb666daad667e1cd797dcb ext3grep.txt[root@localhost disk]# rm -rf /disk/* #模拟误删除数据操作[root@localhost disk]# ls(2).卸载磁盘分区运行下面命令卸载磁盘分区:[root@localhost disk]# cd /opt #切换到/opt文件夹下[root@localhost /opt]# umount /disk #卸载模拟磁盘分区(3).查询恢复数据信息运行例如以下命令。查询须要恢复的数据信息:[root@localhost /opt]# ext3grep /mydata/disk1 --ls --inode 2 |
运行该命令后。ext3grep就開始搜索能够恢复的数据文件信息,输出下图所看到的。
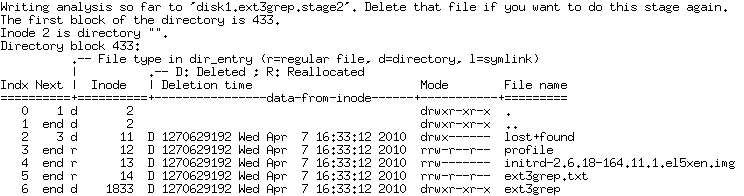
“ext3grep /mydata/disk1 --ls --inode 2”主要用于扫描当前文件系统下全部文件的信息,包含存在的和已经删除的文件,当中含有D标识的就是已被删除的文件。假设不记得被删除的文件的名称,能够通过这样的方式来获取要恢复的文件的名称。
通过以下的方式能够获取文件要恢复的路径信息。
|
1
2
3
4
5
6
7
8
9
10
11
12
13
14
|
[root@localhost /opt]# ext3grep /mydata/disk1 --dump-namesRunning ext3grep version 0.10.1Number of groups: 7Minimum / maximum journal block: 447 / 4561Loading journal descriptors... sorting... doneThe oldest inode block that is still in the journal, appears to be from 1270629014 = Wed Apr 7 16:30:14 2010Number of descriptors in journal: 63; min / max sequence numbers: 2 / 10Loading disk1.ext3grep.stage2... doneext3grepext3grep.txtext3grep/hostsinitrd-2.6.18-164.11.1.el5xen.imglost+foundprofile |
(4).恢复单个文件
假设要恢复被删除的某个文件。通过以下方式就可以。
|
1
2
3
4
5
6
7
8
9
10
|
[root@localhost /opt]# ext3grep /mydata/disk1 --restore-file ext3grep.txtRunning ext3grep version 0.10.1Number of groups: 7Minimum / maximum journal block: 447 / 4561Loading journal descriptors... sorting... doneThe oldest inode block that is still in the journal, appears to be from 1270629014 = Wed Apr 7 16:30:14 2010Number of descriptors in journal: 63; min / max sequence numbers: 2 / 10Writing output to directory RESTORED_FILES/Loading disk1.ext3grep.stage2... doneRestoring ext3grep.txt |
由上面的输出可知,被删除的文件ext3grep.txt已经成功恢复。那么恢复的数据放到哪里了呢?在这段操作中,在/opt文件夹下运行ext3grep命令,恢复的数据文件就存放在/opt/ RESTORED_FILES文件夹下,也就是说ext3grep会在运行恢复命令的当前文件夹下自己主动创建一个RESTORED_FILES文件夹。这个文件夹专门用于存放恢复的数据。
以下是恢复指定文件夹下的某个文件的操作:
|
1
2
3
4
5
6
7
8
9
|
[root@localhost /opt]# ext3grep /mydata/disk1 --restore-file ext3grep/hostsRunning ext3grep version 0.10.1Number of groups: 7Minimum / maximum journal block: 447 / 4561Loading journal descriptors... sorting... doneThe oldest inode block that is still in the journal, appears to be from 1270629014 = Wed Apr 7 16:30:14 2010Number of descriptors in journal: 63; min / max sequence numbers: 2 / 10Loading disk1.ext3grep.stage2... doneRestoring ext3grep/hosts |
这里要注意的是,“--restore-file”后面指定的是恢复文件路径。这个路径应该是文件的相对路径。这里的相对路径指的是相对指定设备的路径。比方,设备/mydata/disk1的挂载点是/disk,而ext3grep.txt文件就在/disk文件夹下,因此直接指定文件名称就能够了。假设要恢复/disk/ext3grep/hosts文件。那么指定的參数应该是“ext3grep/hosts”。也就是上面代码中所指定的形式。
通过“--restore-inode”參数,仅仅需指定文件相应的inode值就可以恢复文件,操作例如以下,当中inode值为12的是profile文件:
|
1
2
3
4
5
6
7
8
9
|
[root@localhost RESTORED_FILES]# ext3grep /mydata/disk1 --restore-inode 12Running ext3grep version 0.10.1Number of groups: 7Minimum / maximum journal block: 447 / 4561Loading journal descriptors... sorting... doneThe oldest inode block that is still in the journal, appears to be from 1270629014 = Wed Apr 7 16:30:14 2010Number of descriptors in journal: 63; min / max sequence numbers: 2 / 10Writing output to directory RESTORED_FILES/Restoring inode.12 |
以下是进入RESTORED_FILES文件夹,验证文件是否成功恢复:
|
1
2
3
4
5
6
7
|
[root@localhost /opt]# cd RESTORED_FILES[root@localhost RESTORED_FILES]# lsext3grep ext3grep.txt inode.12[root@localhost RESTORED_FILES]# md5sum ext3grep.txt 5afe55495cdb666daad667e1cd797dcb ext3grep.txt[root@localhost RESTORED_FILES]# md5sum inode.12a6e82d979bb95919082d9aceddf56c39 inode.12 |
依据校验结果可知,这个校验码与文件被删除之前的校验码全然一致,因此,通过这个方式恢复出来的文件是完整的。
(5).恢复全部已删除数据
当须要恢复的文件较少时,通过前面介绍的指定文件的方式进行逐个恢复是可行的,可是假设要恢复非常多个文件,如1000个以上。还採取逐个指定的方式,效率是非常低下的,此时就要利用ext3grep命令的“--restore-all”參数了。详细操作例如以下:
|
1
2
3
4
5
6
7
8
9
10
11
12
13
14
15
16
17
18
19
20
21
22
|
[root@localhost /opt]# ext3grep /mydata/disk1 --restore-all Running ext3grep version 0.10.1Number of groups: 7Minimum / maximum journal block: 447 / 4561Loading journal descriptors... sorting... doneThe oldest inode block that is still in the journal, appears to be from 1270629014 = Wed Apr 7 16:30:14 2010Number of descriptors in journal: 63; min / max sequence numbers: 2 / 10Loading disk1.ext3grep.stage2... doneRestoring ext3grep.txtRestoring ext3grep/hostsRestoring initrd-2.6.18-164.11.1.el5xen.imgRestoring profile[root@localhost /opt]# cd RESTORED_FILES/[root@localhost RESTORED_FILES]# ls -al总计 2512drwxr-xr-x 4 root root 4096 04-07 16:46 .drwxr-xr-x 31 root root 4096 04-07 16:45 ..drwxr-xr-x 2 root root 4096 04-07 16:46 ext3grep-rw-r--r-- 1 root root 14 04-07 16:31 ext3grep.txt-rw------- 1 root root 2535991 04-07 16:30 initrd-2.6.18-164.11.1.el5xen.imgdrwx------ 2 root root 4096 04-07 16:33 lost+found-rw-r--r-- 1 root root 1029 04-07 16:30 profile |
依据这个输出可知,“--restore-all”參数将指定存储设备中能够恢复的文件都恢复出来并放到了RESTORED_FILES文件夹中。
“--restore-all”參数对恢复大量数据文件是很实用的。
ext3文件系统反删除利器ext3grep应用实战的更多相关文章
- 高性能Linux服务器 第6章 ext3文件系统反删除利器ext3grep extundelete工具恢复rm -rf 误删除的文件
高性能Linux服务器 第6章 ext3文件系统反删除利器ext3grep extundelete工具恢复rm -rf 误删除的文件 只能用于ext3文件系统!!!!!!!高俊峰(高性能Linux ...
- ext3文件系统反删除利器-ext3grep
导读 Linux作为企业级服务器,数据的安全性至关重要,任何数据德尔丢失和误删都是不可容忍的!最近我接触到一款软件-ext3grep,它可以恢复误删的数据,下面简单讲解一下这个软件. ext3grep ...
- ext3文件系统,reiserfs,xfs,jsf那种性能好点
ext2 是一个旧的 Linux 档桉系统,没有日志功能. 启用的时间通常需要很久.目前有许多 日志型态 的档桉系统可以以更快的速度及更好的效率完成系统启用和检查. ext3 为 ext2 的日志版, ...
- 恢复Ext3下被删除的文件(转)
恢复Ext3下被删除的文件(转) 前言 下面是这个教程将教你如何在Ext3的文件系统中恢复被rm掉的文件. 删除文件 假设我们有一个文件名叫 ‘test.txt’ $ls -il test.txt 1 ...
- EXT2/EXT3文件系统(二)
整理自<鸟哥的Linux私房菜>,整理者:华科小涛http://www.cnblogs.com/hust-ghtao/ 接EXT2/EXT3文件系统(一): 2.3 Supe ...
- EXT3文件系统误删除导致文件系统中的邮件丢失恢复方法
一.故障描述 由8块盘组成的RAID5, 上层是EXT3文件系统,由于误删除导致文件系统中的邮件丢失 二.镜像磁盘为防止数据恢复过程中由于误操作对原始磁盘造成二次破坏, 使用winhex软件为每块磁盘 ...
- Linux学习之CentOS(十八)-----恢复Ext3下被删除的文件与 使用grep恢复被删文件内容(转)
前言 下面是这个教程将教你如何在Ext3的文件系统中恢复被rm掉的文件. 删除文件 假设我们有一个文件名叫 'test.txt' $ls -il test.txt 15 -rw-rw-r– 2 roo ...
- 恢复Ext3下被删除的文件
下面是这个教程将教你如何在Ext3的文件系统中恢复被rm掉的文件. 假设我们有一个文件名叫 ‘test.txt’ $ls -il test.txt 15 -rw-rw-r– 2 root root ...
- 深入理解Linux内核-Ext2和Ext3文件系统
Ext2的一般特征: 1.创建Ext2文件系统时,系统管理员可以根据预期的文件平均长度来选择最佳块大小(从1024B-4096B).来减少文件碎片2.创建Ext2文件系统时,系统管理员可以根据在给定大 ...
随机推荐
- js中 正則表達式
正則表達式使用具体解释 简单介绍 简单的说,正則表達式是一种能够用于模式匹配和替换的强有力的工具.其作用例如以下: 測试字符串的某个模式.比如,能够对一个输入字符串进行測试,看在该字符串是否存在一个电 ...
- Thinkpad X200 屏幕备案
妈妈蛋,屏幕废物前几天(闪屏->暗->变暗),因此,它只能监视房外 watermark/2/text/aHR0cDovL2Jsb2cuY3Nkbi5uZXQvdTAxMjk2NTg5MA= ...
- 【VMware混合云】掀起你的盖头来
作者:范军 (Frank Fan) 新浪微博:@frankfan7 微信:frankfan7 VMware混合云服务(vCHS)预计在2013年8月23日正式面向用户推出.目前开放服务的四个数据中 ...
- TextView 使用自定义的字体和亮点
尊重原创:http://blog.csdn.net/yuanzeyao/article/details/40478815 如今非常多应用中喜欢使用自己定义字体,今天我就来实如今TextView中使用自 ...
- java平台的常用资源
分离领域 翻译 from :akullpp | awesome-java 大家一起学习,共同进步. 如果大家觉得有用,就mark一下,赞一下,或评论一下,让更多的人知道.thanks. 构建 这里搜集 ...
- Android规范发展
一.Android 编码规范 1.java 代码中不出现中文.最多凝视中能够出现中文 2.局部变量命名.静态成员变量命名 仅仅能包括字母,单词首字母出第一个外,都为大写,其它字母都为小写 3.常量命名 ...
- cocos2d触摸事件处理机制(2.x和3.x变化)
2.x的触摸事件的版本号 触摸事件处理有2种子.以下单点触摸的样本.(另一种多点触摸屏). 创建cocos2d 该项目. 1. 重写下面虚函数. bool ccTouchBegan(cocos2d:: ...
- 生活中的大数据 hadoop
大数据和我有关吗?大数据就是大量的数据吗?只有互联网公司才有大数据吗?想盘活大数据必须买昂贵的软硬件吗?大数据怎么存储计算?大数据,这个时下最火热的互联网词语,你了解多少呢?
- 重新想象 Windows 8 Store Apps (30) - 信息: 获取包信息, 系统信息, 硬件信息, PnP信息, 常用设备信息
原文:重新想象 Windows 8 Store Apps (30) - 信息: 获取包信息, 系统信息, 硬件信息, PnP信息, 常用设备信息 [源码下载] 重新想象 Windows 8 Store ...
- Lua 服务器与客户端实例(转)
=============================================================== 服务器,main.lua ======================= ...