在 win11 下搭建并使用 ubuntu 子系统(同时测试 win10)——(附带深度学习环境搭建)
对于一个深度学习从事者来说,Windows训练模型有着诸多不便,还好现在Windows的Ubuntu子系统逐渐完善,近期由于工作需求,配置了Windows的工作站,为了方便起见,搭建了Ubuntu子系统,网上教程比较多,但是都或多或少存在一些小问题(也许是他们没有遇到), 于是我自己在尝试中,将自己踩到的坑记录如下。
总结:win11 直接去Microsoft store 下载即可,然后注册账号即可使用,无需任何骚操作(它自带cuda,而且源也是OK的)
1,ubuntu子系统安装预备工作
首先,win11的子系统开启前,需要进行一系列操作,并重启计算机,过程如下:
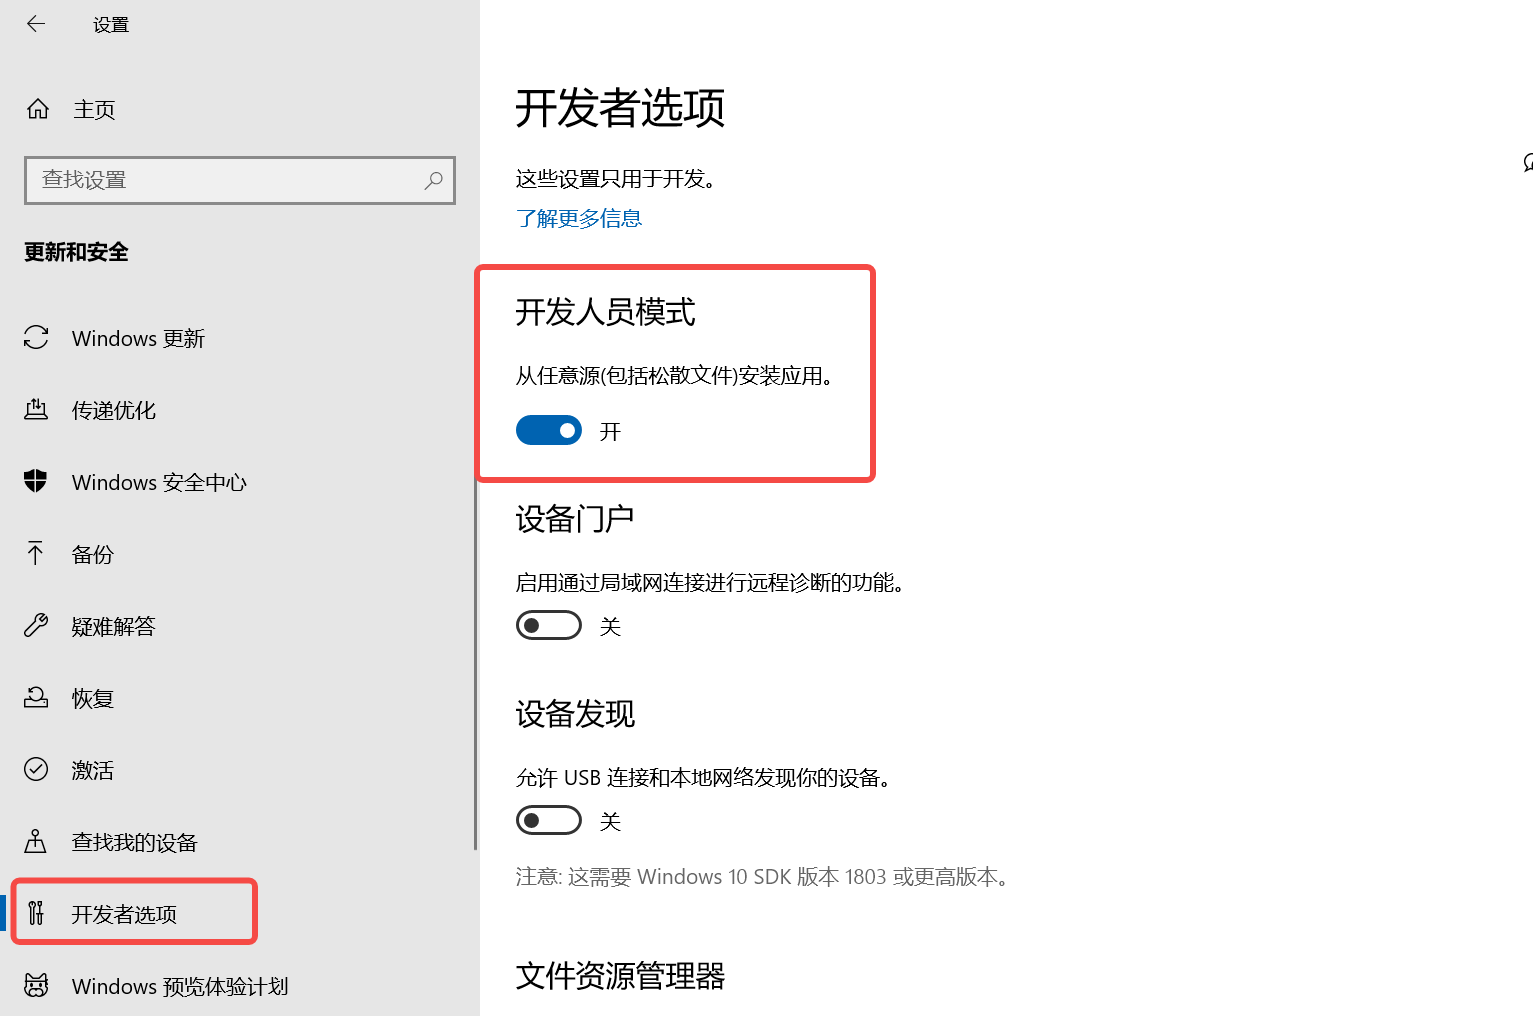
1.1 设置开发者模式
打开win10开发人员模式,在设置-->更新和安全-->针对开发人员,中勾选开发人员模式。
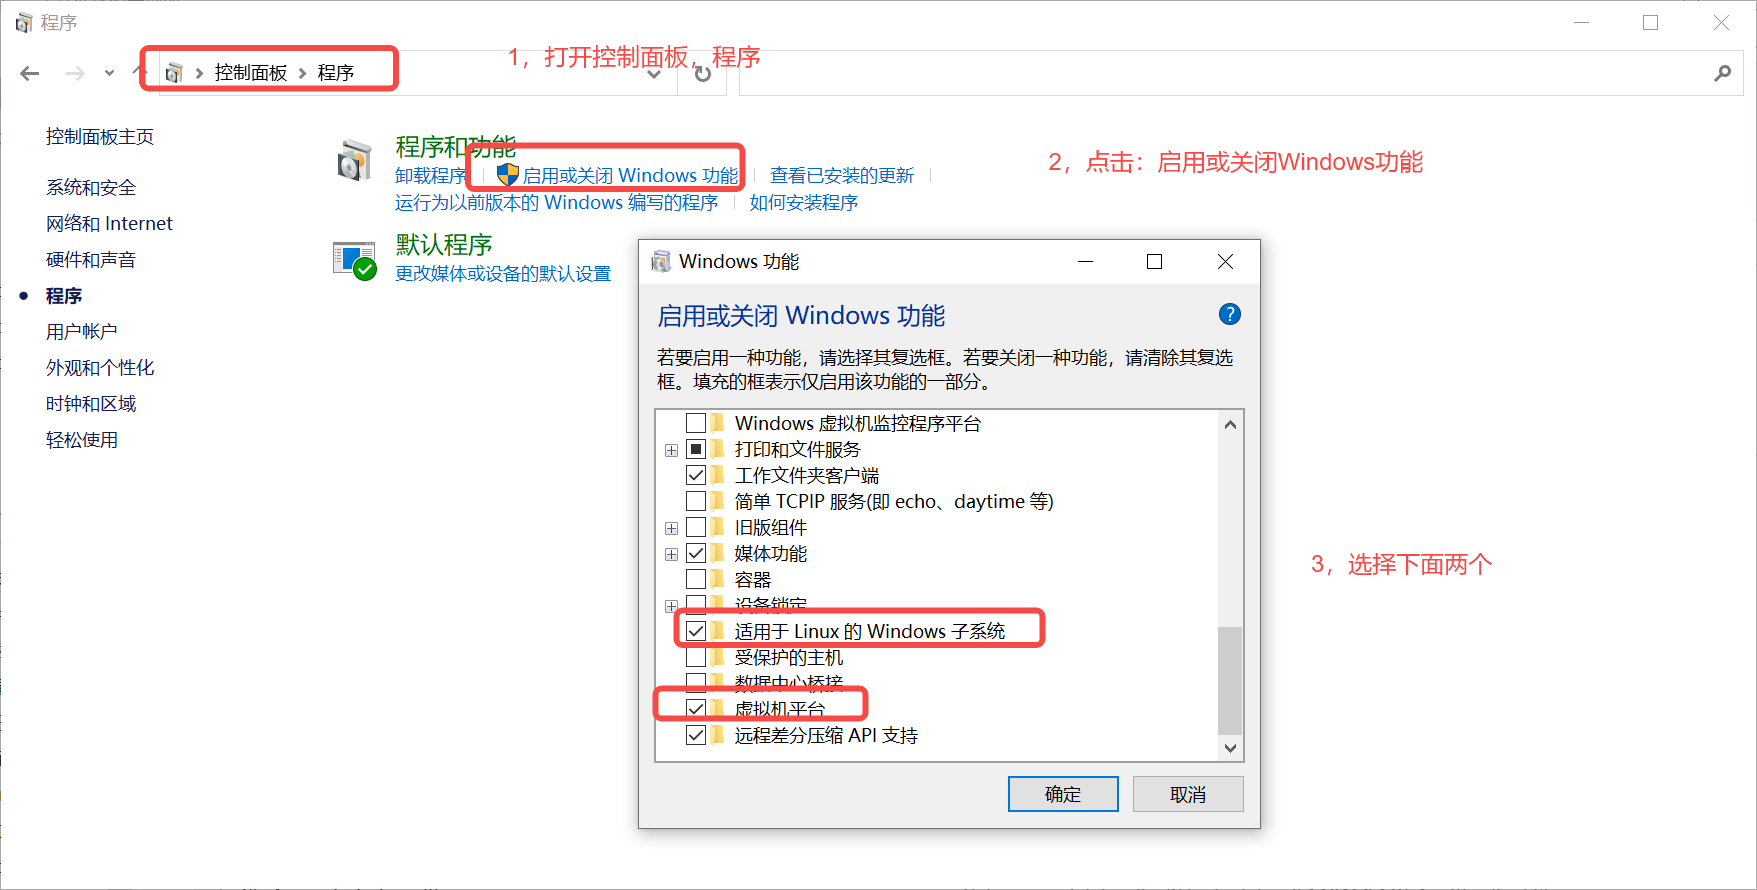
1.2 打开子系统选项和虚拟机选项
然后在控制面板中勾选添加Linux子系统。依次进入控制面板-->程序-->启用或关闭windows功能,勾选适用于windows的linux的子系统,点击确定。之后重启电脑。
1.3 下载Ubuntu
最后去Microsoft Store下载Ubuntu,进行安装:
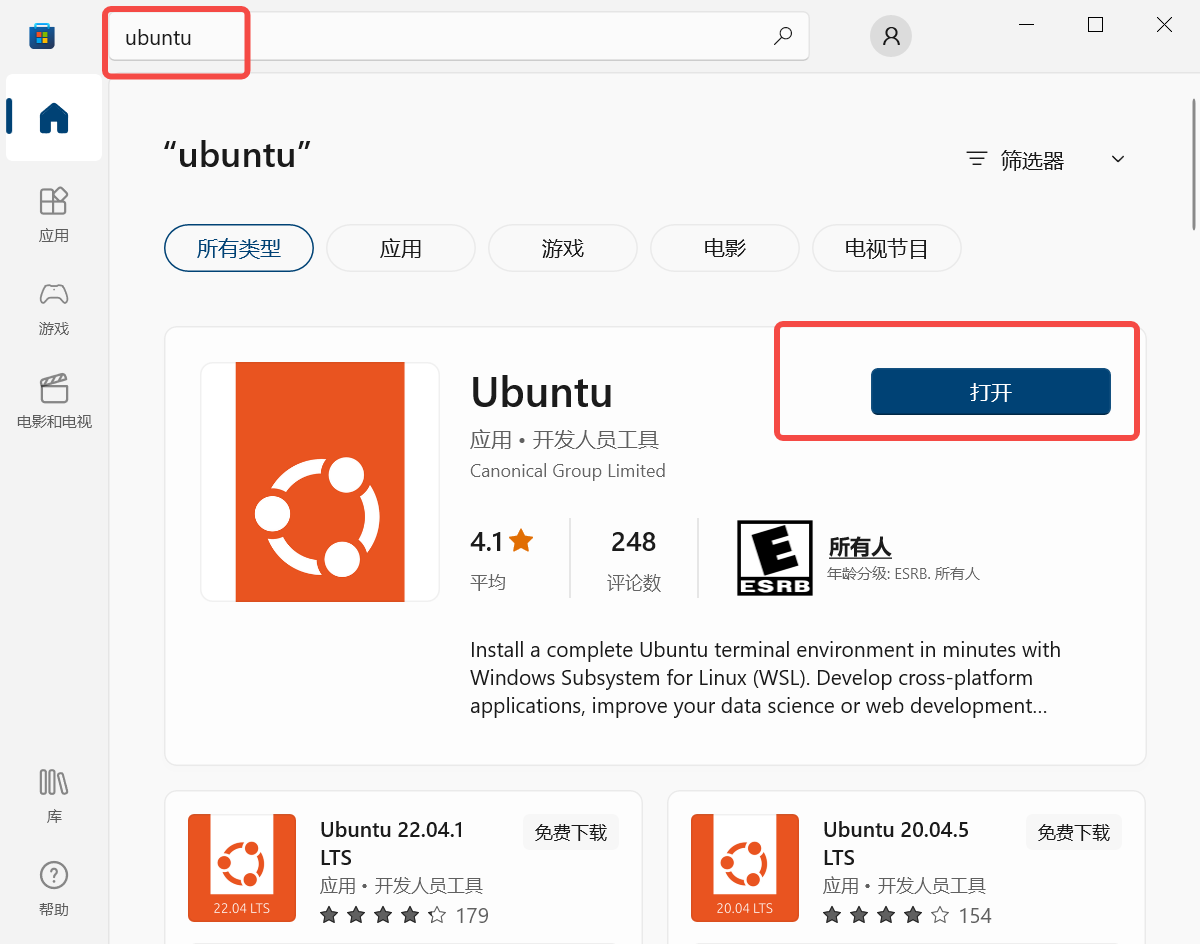
注意:这里我测试了 20.04 和 22.04 的 Ubuntu 版本,发现其差异不大,所以随便一个都可以。
2,ubuntu子系统注册和配置
2.1 配置个人资料
进入cmd中,配置个人账号和密码。

然后进行换源,我们需要更换Linux子系统ubuntu的apt镜像源,因为Linux的apt源使用的是官方源,需要连接到国外的服务器。所以安装一些包或一些软件时下载会很慢,我们可以改用国内的镜像apt源。
国内的源主要就是中科大,清华,阿里的,我这里在网上抄几个复制如下:
(大家想看全的,可以参考这个博客:https://blog.csdn.net/shangyuanlang/article/details/80737434)
2.2,Ubuntu子系统换源(不换源直接忽略,不要看)
注意:这里我测试了 换源后 和不换源,我发现对于Ubuntu子系统,根本不需要换源,而且没有任何问题。
反而是换源后,问题一大堆,存在了各种依赖不存在,报错。
总结:建议不要换源(对于Ubuntu子系统而言)。
不换源,直接 sudo apt-get update,结果无任何warning。
2.2.1 清华源
清华源地址:https://mirrors.tuna.tsinghua.edu.cn/ubuntu/
源数据如下:
# 默认注释了源码镜像以提高 apt update 速度,如有需要可自行取消注释

deb https://mirrors.tuna.tsinghua.edu.cn/ubuntu/ bionic main restricted universe multiverse

# deb-src https://mirrors.tuna.tsinghua.edu.cn/ubuntu/ bionic main restricted universe multiverse

deb https://mirrors.tuna.tsinghua.edu.cn/ubuntu/ bionic-updates main restricted universe multiverse

# deb-src https://mirrors.tuna.tsinghua.edu.cn/ubuntu/ bionic-updates main restricted universe multiverse

deb https://mirrors.tuna.tsinghua.edu.cn/ubuntu/ bionic-backports main restricted universe multiverse

# deb-src https://mirrors.tuna.tsinghua.edu.cn/ubuntu/ bionic-backports main restricted universe multiverse

deb https://mirrors.tuna.tsinghua.edu.cn/ubuntu/ bionic-security main restricted universe multiverse

# deb-src https://mirrors.tuna.tsinghua.edu.cn/ubuntu/ bionic-security main restricted universe multiverse

# 预发布软件源,不建议启用

# deb https://mirrors.tuna.tsinghua.edu.cn/ubuntu/ bionic-proposed main restricted universe multiverse

# deb-src https://mirrors.tuna.tsinghua.edu.cn/ubuntu/ bionic-proposed main restricted universe multiverse
2.2.2,阿里源
阿里源地址如下:http://mirrors.aliyun.com/ubuntu/
源数据如下:
# 默认注释了源码仓库,如有需要可自行取消注释

deb http://mirrors.aliyun.com/ubuntu/ bionic main restricted universe multiverse

# deb-src https://mirrors.aliyun.com/ubuntu/ bionic main restricted universe multiverse

deb http://mirrors.aliyun.com/ubuntu/ bionic-updates main restricted universe multiverse

# deb-src http://mirrors.aliyun.com/ubuntu/ bionic-updates main restricted universe multiverse

deb http://mirrors.aliyun.com/ubuntu/ bionic-backports main restricted universe multiverse

# deb-src http://mirrors.aliyun.com/ubuntu/ bionic-backports main restricted universe multiverse

deb http://mirrors.aliyun.com/ubuntu/ bionic-security main restricted universe multiverse

# deb-src http://mirrors.aliyun.com/ubuntu/ bionic-security main restricted universe multiverse

# 预发布软件源,不建议启用

# deb http://mirrors.aliyun.com/ubuntu/ bionic-proposed main restricted universe multiverse

# deb-src http://mirrors.aliyun.com/ubuntu/ bionic-proposed main restricted universe multiverse
2.2.3,中科大源
中科大源地址:https://mirrors.ustc.edu.cn/ubuntu/
源数据如下:
# 默认注释了源码仓库,如有需要可自行取消注释

deb https://mirrors.ustc.edu.cn/ubuntu/ bionic main restricted universe multiverse

# deb-src https://mirrors.ustc.edu.cn/ubuntu/ bionic main restricted universe multiverse

deb https://mirrors.ustc.edu.cn/ubuntu/ bionic-updates main restricted universe multiverse

# deb-src https://mirrors.ustc.edu.cn/ubuntu/ bionic-updates main restricted universe multiverse

deb https://mirrors.ustc.edu.cn/ubuntu/ bionic-backports main restricted universe multiverse

# deb-src https://mirrors.ustc.edu.cn/ubuntu/ bionic-backports main restricted universe multiverse

deb https://mirrors.ustc.edu.cn/ubuntu/ bionic-security main restricted universe multiverse

# deb-src https://mirrors.ustc.edu.cn/ubuntu/ bionic-security main restricted universe multiverse

# 预发布软件源,不建议启用

# deb https://mirrors.ustc.edu.cn/ubuntu/ bionic-proposed main restricted universe multiverse

# deb-src https://mirrors.ustc.edu.cn/ubuntu/ bionic-proposed main restricted universe multiverse
随便选一个源,进入Ubuntu子系统,进行修改。
首先,备份原来的数据源配置文件,就是对系统给的镜像源进行备份,以防出问题。
sudo cp /etc/apt/sources.list /etc/apt/sources.list.bak
然后,修改数据源配置文件。
sudo vim /etc/apt/sources.list
进去后,注释所有的,当然也可以清空内容,选择一个源添加到文件最前面或直接将官方的源注释掉替换掉原文件。
保存后运行下面代码更新配置即完成换源操作。
sudo apt-get update
2.3 报错1:由于没有公钥,无法验证下列签名
报错如下:

原因分析:GPG是一个加密与解密的工具,在apt更新下载包时会进行加密解密,提供相关支持。如果没有密钥的话是无法进行验证的。我们需要添加密钥。
解决方法:添加密钥(keys后面添加的就是上面报错NO_PUBKEY 后面的密钥代码):
sudo apt-key adv --keyserver keyserver.ubuntu.com --recv-keys 3B4FE6ACC0B21F32(密钥代码)
执行成功,显示如下;

然后再sudo apt-get update即可。
2.4 警告1:Key is stored in legacy trusted.gpg keyring
强迫症的我,看到warning就想给他干掉。查找了一些资料,大概是Ubuntu版本是22.04,更新源会出现这个问题。

首先查看key list,找到警告相关源的key,我们使用 apt-key 命令添加仓库密钥。首先,让我们使用命令列出添加的密钥:(此命令将列出所有添加的仓库密钥)

正如你在上面的输出中所看到的,那串长的(40 个字符)十六进制值是仓库密钥。如果你希望 APT 包管理器停止信任该密钥,只需使用以下命令将其删除:
sudo apt-key del "3820 03C2 C8B7 B4AB 813E 915B 14E4 9429 73C6 2A1B"
或者只指定最后八个字符
sudo apt-key del 557BEFF9
另外如果发现列表中某些key的状态是 [expired] 也可以用以下命令删除
$ sudo apt-key del 557BEFF9
我找了一个网友的key-list,里面存在过期的,大概如下:
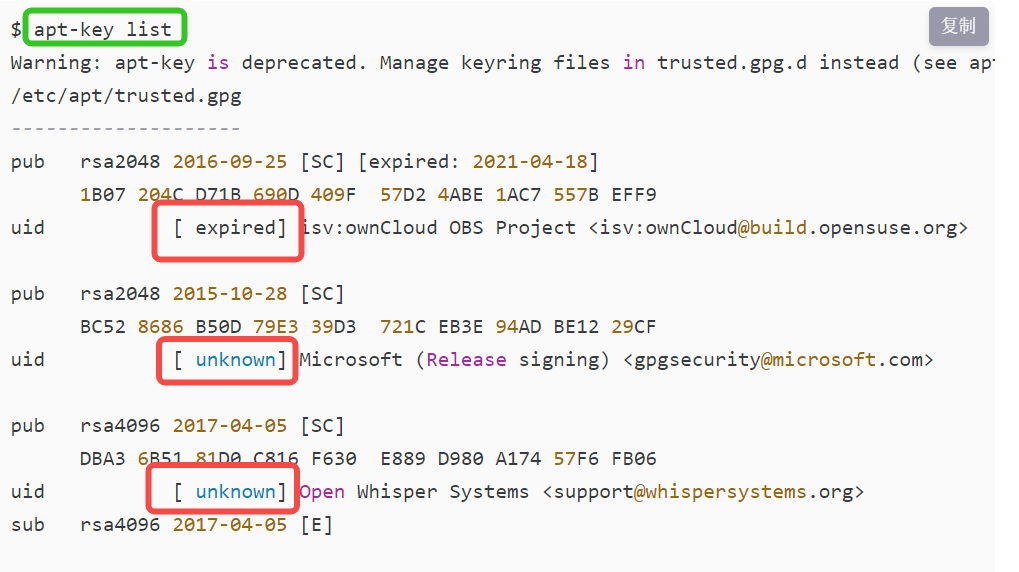
所以,发现自己的key也存在过期的,可以删除。
完成!仓库密钥已被删除。运行以下命令更新仓库列表:

3,安装深度学习环境
注意:这里我测试了Windows11 和 Windows10,其中window11自带cuda环境,不需要安装,而Windows10 则需要进行cuda安装。
3.1 安装CUDA
首先更新:
sudo apt-get upgrade

sudo apt-get update
然后去 nvidia 下载cuda
Download linking: https://developer.nvidia.com/cuda-toolkit
选择适合自己的版本

bash installer instructions as fellowing:
wget https://developer.download.nvidia.com/compute/cuda/repos/ubuntu2204/x86_64/cuda-ubuntu2204.pin

sudo mv cuda-ubuntu2204.pin /etc/apt/preferences.d/cuda-repository-pin-600

wget https://developer.download.nvidia.com/compute/cuda/11.8.0/local_installers/cuda-repo-ubuntu2204-11-8-local_11.8.0-520.61.05-1_amd64.deb

sudo dpkg -i cuda-repo-ubuntu2204-11-8-local_11.8.0-520.61.05-1_amd64.deb

sudo cp /var/cuda-repo-ubuntu2204-11-8-local/cuda-*-keyring.gpg /usr/share/keyrings/

sudo apt-get update

sudo apt-get -y install cuda
然后运行:
sudo sh cuda_11.7.1_515.65.01_linux.run

sudo sh cuda_11.7.1_515.65.01_linux.run -tmpdir /tmp
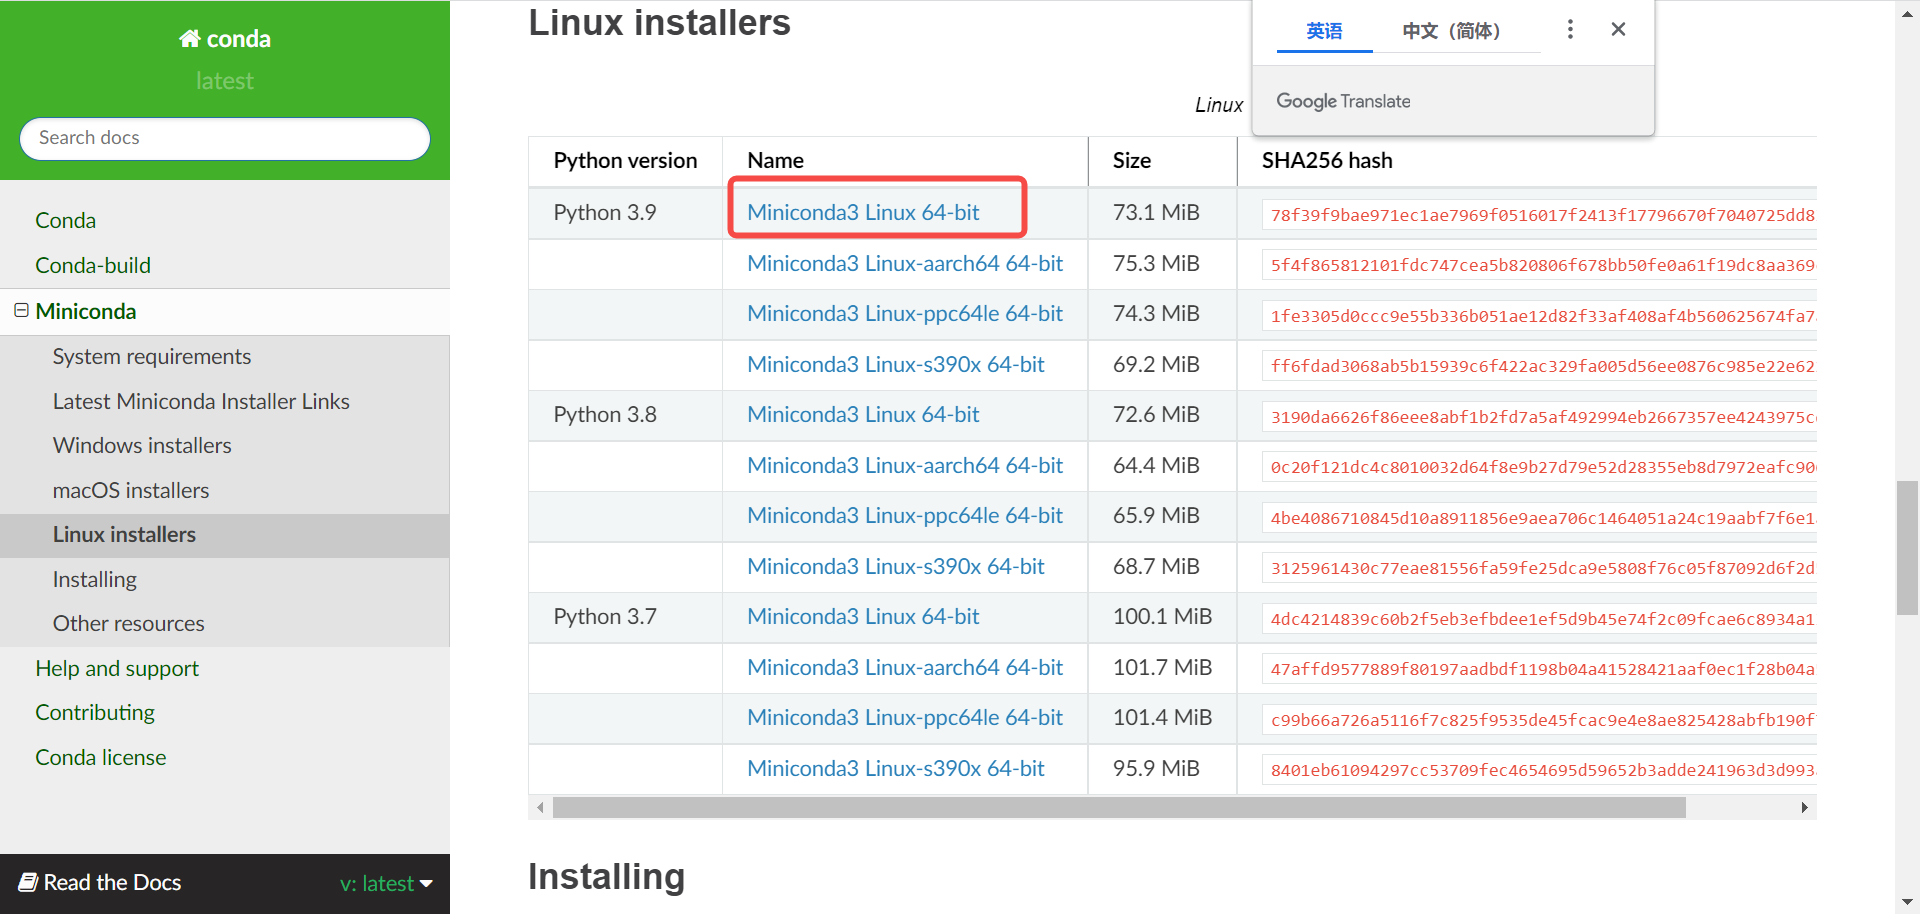
3.2 安装Anaconda
其实也可以按照miniconda,我这里以miniconda为例。
miniconda linux download linking: https://docs.conda.io/en/latest/miniconda.html#linux-installers
如果不知道自己系统的版本,可以使用下面命令查看:

然后使用命令下载:
# 下载

curl https://repo.anaconda.com/miniconda/Miniconda3-py39_4.12.0-Linux-x86_64.sh

# 安装

sudo sh Miniconda3-py39_4.12.0-Linux-x86_64.sh
安装完成后,直接使用conda命令的话,如果显示如下:
conda: command not found
则可以使用下面命令直接启动(需要每次都要启动):
source ~/miniconda3/bin/activate
也可以添加环境变量 进入 ~/.bashrc ,在最后一行添加:
export PATH=~/miniconda3/bin:$PATH
推出重启即可生效。
conda换源:
conda config --add channels https://mirrors.tuna.tsinghua.edu.cn/anaconda/pkgs/free/

conda config --add channels https://mirrors.tuna.tsinghua.edu.cn/anaconda/pkgs/main/

conda config --set show_channel_urls yes

pip config set global.index-url https://pypi.tuna.tsinghua.edu.cn/simple
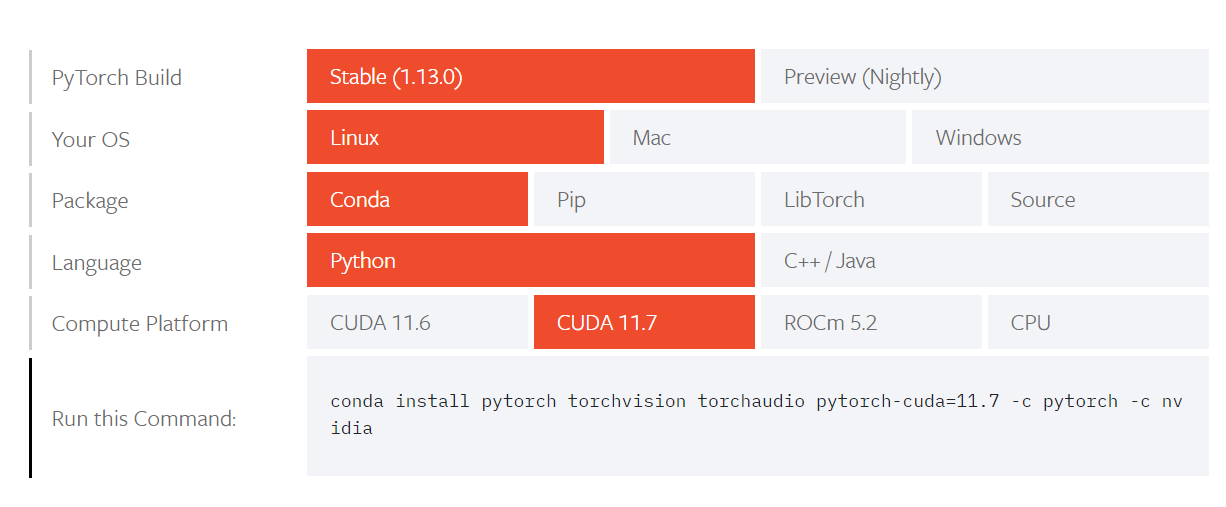
3.3 安装python环境(install pytorch)
创建环境
conda create -n env_name python==3.9.13(版本号)
进入环境
conda activate env_name
进入pytorch 官网: https://pytorch.org/get-started/locally/
可以使用命令安装,也可以离线安装。
4,怪异的bug(WSL无法启动 \\wsl$\Ubuntu无法访问。你可能没有权限使用网络资源)
报错如下:
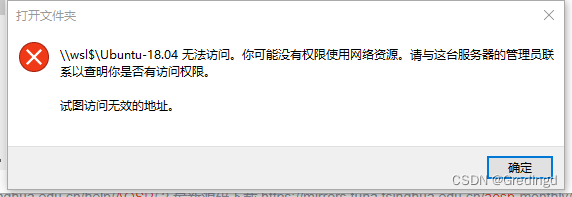
为啥说是怪异呢,这里凑巧,使用了 \\wsl.localhost\ ( \\wsl$ )点击发现可以进去,然后点击Linux按钮,竟然进去了。

在 win11 下搭建并使用 ubuntu 子系统(同时测试 win10)——(附带深度学习环境搭建)的更多相关文章
- Win10+RTX2080深度学习环境搭建:tensorflow、mxnet、pytorch、caffe
目录 准备工作 设置conda国内镜像源 conda 深度学习环境 tensorflow.mxnet.pytorch安装 tensorflow mxnet pytorch Caffe安装 配置文件修改 ...
- 保姆级教程——Ubuntu16.04 Server下深度学习环境搭建:安装CUDA8.0,cuDNN6.0,Bazel0.5.4,源码编译安装TensorFlow1.4.0(GPU版)
写在前面 本文叙述了在Ubuntu16.04 Server下安装CUDA8.0,cuDNN6.0以及源码编译安装TensorFlow1.4.0(GPU版)的亲身经历,包括遇到的问题及解决办法,也有一些 ...
- Ubuntu深度学习环境搭建 tensorflow+pytorch
目前电脑配置:Ubuntu 16.04 + GTX1080显卡 配置深度学习环境,利用清华源安装一个miniconda环境是非常好的选择.尤其是今天发现conda install -c menpo o ...
- 深度学习环境搭建:Tensorflow1.4.0+Ubuntu16.04+Python3.5+Cuda8.0+Cudnn6.0
目录 深度学习环境搭建:Tensorflow1.4.0+Ubuntu16.04+Python3.5+Cuda8.0+Cudnn6.0 Reference 硬件说明: 软件准备: 1. 安装Ubuntu ...
- linux系统下深度学习环境搭建和使用
作为一个AI工程师,对Linux的一些技能的掌握也能从一定层面反应工程师的资深水平. 要求1:基于SSH的远程访问(本篇文章) 能用一台笔记本电脑,远程登陆一台linux服务器 能随时使用笔记本电脑启 ...
- [AI开发]centOS7.5上基于keras/tensorflow深度学习环境搭建
这篇文章详细介绍在centOS7.5上搭建基于keras/tensorflow的深度学习环境,该环境可用于实际生产.本人现在非常熟练linux(Ubuntu/centOS/openSUSE).wind ...
- 深度学习环境搭建部署(DeepLearning 神经网络)
工作环境 系统:Ubuntu LTS 显卡:GPU NVIDIA驱动:410.93 CUDA:10.0 Python:.x CUDA以及NVIDIA驱动安装,详见https://www.cnblogs ...
- 深度学习环境搭建(Ubuntu16.04+GTX1080Ti+CUDA8.0+Cudnn6.0+TensorFlow+Caffe2(Pytorch))
OS System:Ubuntu16.04 GPU Device:GTX1080Ti Softwares:CUDA8.0.Cudnn6.0.TensorFlow(1.4.0).Caffe2(1.0.0 ...
- 深度学习环境搭建(CUDA9.0 + cudnn-9.0-linux-x64-v7 + tensorflow_gpu-1.8.0 + keras)
关于计算机的硬件配置说明 推荐配置 如果您是高校学生或者高级研究人员,并且实验室或者个人资金充沛,建议您采用如下配置: 主板:X299型号或Z270型号 CPU: i7-6950X或i7-7700K ...
- 深度学习环境搭建:window10+CUDA10.0+CUDNN+pytorch1.2.0
去年底入手一台联想Y7000P,配置了Nvidia GeForce GTX 1660 Ti GPU,GPU内存6G,但是因为有GPU服务器,所以一直没有在这台笔记本上跑过模型,如今经过一番折腾,终于在 ...
随机推荐
- Elastic:Elastic部署架构介绍
Elastic Stack是一套完整的从数据采集,解析,分析,丰富,到搜索,检索,数据程序等一套完整的软件栈.在具体的实践中,我们应该如何搭建我们的系统呢? 下图描述了常用的Elastic Stack ...
- PAT乙级 1024 科学计数法
思路 1.尝试失败:一开始想打算把结果直接存在一个字符串中,后来发现当指数大于0的时候还需要分别考虑两种情况,工程量巨大,尝试失败,于是借鉴了其他大佬思路,写出了ac代码 2.ac思路:首先取指数的绝 ...
- PAT (Basic Level) Practice 1020 月饼 分数 25
月饼是中国人在中秋佳节时吃的一种传统食品,不同地区有许多不同风味的月饼.现给定所有种类月饼的库存量.总售价.以及市场的最大需求量,请你计算可以获得的最大收益是多少. 注意:销售时允许取出一部分库存.样 ...
- [题解] Atcoder Beginner Contest ABC 270 G Ex 题解
点我看题 G - Sequence in mod P 稍微观察一下就会发现,进行x次操作后的结果是\(A^xS+(1+\cdots +A^{x-1})B\).如果没有右边那一坨关于B的东西,那我们要求 ...
- 用深度强化学习玩FlappyBird
摘要:学习玩游戏一直是当今AI研究的热门话题之一.使用博弈论/搜索算法来解决这些问题需要特别地进行周密的特性定义,使得其扩展性不强.使用深度学习算法训练的卷积神经网络模型(CNN)自提出以来在图像处理 ...
- acwing346 走廊泼水节 (最小生成树)
完全图就是每两个点都有直接相连的边. 模拟Kruskal算法的过程,每选择一条边加入时,他两端端点在同一个集合中就跳过,否则考虑合并两个集合,合并时需要增加的每条边的权值至少是edge[i]+1,这才 ...
- NOIP2011 提高组 聪明的质监员(二分+前缀和)
看到这道题,应该都能想到用二分,那问题是怎么去判定呢? 我们考虑用前缀和(a1统计w,a2统计v),枚举每个矿石,,当前判定的值是x,如果该矿石的w>=x,a1[i]=a1[i-1]+1,a2[ ...
- FastJson序列化对象复杂时出错问题解决
FastJson序列化对象复杂时出错问题解决 针对复杂的对象,如Map<String, List<Map<String, XxxObject<A, B, C>>&g ...
- C++函数模板和类模板的使用
一.函数模板 #include<iostream>using namespace std;template<class T1,class T2>T1 add(T1 x,T2 y ...
- Mac Mojave 10.14.5安装python tesserocr
<1>先安装两个依赖库: brew install tesseract brew install leptonica 网上有些教程说要安装imagemagick,这里我觉得应该是不需要的, ...