spring源码-Aware-3.4
一、Aware接口,这个也是spring的拓展之一,为啥要单独拿出来讲呢,因为他相比于BeanFactoryPostProcessor,BeanPostProcessor的实用性更加高,并且在具体的业务中也可以灵活使用,主要是能够达到解耦的目的。
二、常用的Aware接口有:第一类:BeanNameAware/BeanClassLoaderAware/BeanFactoryAware。 第二类:EmbeddedValueResolverAware/ResourceLoaderAware/ApplicationEventPublisherAware/MessageSourceAware/ApplicationContextAware。这两类到底有啥区别类,其实没有太大的区别。但是在源码实现中还是存在很大的差别的(后面统一说道)。
三、源码实现:
1、第一类:BeanNameAware/BeanClassLoaderAware/BeanFactoryAware
1)实现方式:
import org.springframework.beans.factory.BeanNameAware;

/**

 * BeanNameAware/BeanClassLoaderAware/BeanFactoryAware类似

 */

public class TestBeanAware implements BeanNameAware{

    private String beanName;

    @Override

    public void setBeanName(String beanName) {

        System.out.println(beanName);

        this.beanName = beanName;

    }

    public String getBeanName() {

        return beanName;

    }

}
2)有啥区别
这里简单说明一下:相对于普通的bean,这里可以获取到beanName/classLoader/beanFactory。是对普通bean的一种增强,然后合理的应用才是关键
3)源码实现部分:
protected Object initializeBean(final String beanName, final Object bean, RootBeanDefinition mbd) {

        if (System.getSecurityManager() != null) {

            AccessController.doPrivileged(new PrivilegedAction<Object>() {

                public Object run() {

                    AbstractAutowireCapableBeanFactory.this.invokeAwareMethods(beanName, bean);

                    return null;

                }

            }, this.getAccessControlContext());

        } else {

            this.invokeAwareMethods(beanName, bean);

        }

        Object wrappedBean = bean;

        if (mbd == null || !mbd.isSynthetic()) {

            wrappedBean = this.applyBeanPostProcessorsBeforeInitialization(bean, beanName);

        }

        try {

            this.invokeInitMethods(beanName, wrappedBean, mbd);

        } catch (Throwable var6) {

            throw new BeanCreationException(mbd != null ? mbd.getResourceDescription() : null, beanName, "Invocation of init method failed", var6);

        }

        if (mbd == null || !mbd.isSynthetic()) {

            wrappedBean = this.applyBeanPostProcessorsAfterInitialization(wrappedBean, beanName);

        }

        return wrappedBean;

    }

    private void invokeAwareMethods(String beanName, Object bean) {

        if (bean instanceof BeanNameAware) {

            ((BeanNameAware)bean).setBeanName(beanName);

        }

        if (bean instanceof BeanClassLoaderAware) {

            ((BeanClassLoaderAware)bean).setBeanClassLoader(this.getBeanClassLoader());

        }

        if (bean instanceof BeanFactoryAware) {

            ((BeanFactoryAware)bean).setBeanFactory(this);

        }

    }
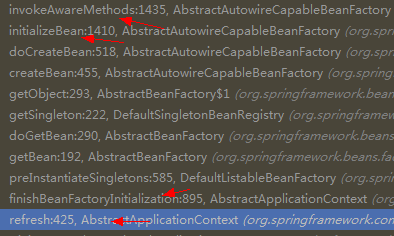
4)何时调用:spring源码-bean之加载-2 的3)点d.3 doCreateBean中的initializeBean()部分开始,所以这个其实是在getBean的时候才会调用。
5)测试的时候发现:在增强容器中refresh方法中finishBeanFactoryInitializationh会完成这部分的调用
2、第二类:EmbeddedValueResolverAware/ResourceLoaderAware/ApplicationEventPublisherAware/MessageSourceAware/ApplicationContextAware
1)实现方式:这里举两个例子EmbeddedValueResolverAware,ApplicationEventPublisherAware
a.EmbeddedValueResolverAware
import org.springframework.context.EmbeddedValueResolverAware;

import org.springframework.util.StringValueResolver;

import javax.annotation.PostConstruct;

public class TestEmbeddedValueResolverAware implements EmbeddedValueResolverAware {

    private StringValueResolver stringValueResolver;

    @Override

    public void setEmbeddedValueResolver(StringValueResolver stringValueResolver) {

        this.stringValueResolver = stringValueResolver;

    }

    public String getProperties (String name) {

        String elName = "${"+ name +"}";

        return stringValueResolver.resolveStringValue(elName);

    }

    @PostConstruct

    public void test() {

        System.out.println(getProperties("name"));

    }

}
注意:这里是读取方式配置
  <bean class="org.springframework.beans.factory.config.PropertyPlaceholderConfigurer">

        <property name="locations">

            <list>

                <value>aware.properties</value>

            </list>

        </property>

    </bean>
aware.properties
name=test

age=25

sex=boy
疑问:和这个有啥关系,看在StringValueResolver可以知道,这里的StringValueResolver指向的是PropertyPlaceholderConfigurer的内部类PlaceholderResolvingStringValueResolver,当然具体的实现有不同的方式
  private class PlaceholderResolvingStringValueResolver implements StringValueResolver {

        private final PropertyPlaceholderHelper helper;

        private final PlaceholderResolver resolver;

        public PlaceholderResolvingStringValueResolver(Properties props) {

            this.helper = new PropertyPlaceholderHelper(PropertyPlaceholderConfigurer.this.placeholderPrefix, PropertyPlaceholderConfigurer.this.placeholderSuffix, PropertyPlaceholderConfigurer.this.valueSeparator, PropertyPlaceholderConfigurer.this.ignoreUnresolvablePlaceholders);

            this.resolver = PropertyPlaceholderConfigurer.this.new PropertyPlaceholderConfigurerResolver(props, (PropertyPlaceholderConfigurer.PropertyPlaceholderConfigurerResolver)null);

        }

        public String resolveStringValue(String strVal) throws BeansException {

            String value = this.helper.replacePlaceholders(strVal, this.resolver);

            return value.equals(PropertyPlaceholderConfigurer.this.nullValue) ? null : value;

        }

    }
b.ApplicationEventPublisherAware
import org.springframework.context.ApplicationEvent;

import org.springframework.context.ApplicationEventPublisher;

import org.springframework.context.ApplicationEventPublisherAware;

import javax.annotation.PostConstruct;

public class TestApplicationEventPublisherAware implements ApplicationEventPublisherAware {

    private ApplicationEventPublisher publisher;

    @Override

    public void setApplicationEventPublisher(ApplicationEventPublisher applicationEventPublisher) {

        this.publisher = applicationEventPublisher;

    }

    public ApplicationEventPublisher getPublisher() {

        return publisher;

    }

    public class TestEvent extends ApplicationEvent {

        private Object object;

        public TestEvent(Object source, Object object) {

            super(source);

            this.object = object;

        }

        public Object getObject() {

            return object;

        }

    }

    @PostConstruct

    public void test() {

        publisher.publishEvent(new TestEvent(this, "test"));

    }
import org.springframework.context.ApplicationListener;

public class TestListener implements ApplicationListener<TestApplicationEventPublisherAware.TestEvent>{

    @Override

    public void onApplicationEvent(TestApplicationEventPublisherAware.TestEvent testEvent) {

        System.out.println("TestEvent is Happen" + testEvent.getObject());

    }

}
发布,监听的过程相信。在实际业务中很常用吧。这里监听过程后面会讲,这里不细说。
注意:这里用aware的接口方式实现发布,监听过程,会比直接调用的方式更加解耦。
2)重点来了,这玩意在哪里调用的呢。其实我们之前我们忽略了一个重点。
a.先看调用方式
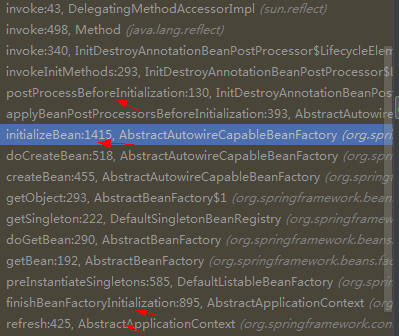
看到postProcessBeforeInitialization应该感到高兴了,因为这不就是实现了BeanPostProcessor接口的前置调用过程吗。
有问题可以参考:spring源码-BeanPostProcessor-3.3
b.疑问:我们并没有手动去实现BeanPostProcessor的接口并且对aware接口做处理啊。
通过debug和查看堆栈信息可以知道方法调用在ApplicationContextAwareProcessor类里面
package org.springframework.context.support;

import java.security.AccessControlContext;

import java.security.AccessController;

import java.security.PrivilegedAction;

import org.springframework.beans.BeansException;

import org.springframework.beans.factory.config.BeanPostProcessor;

import org.springframework.beans.factory.config.ConfigurableBeanFactory;

import org.springframework.context.ApplicationContextAware;

import org.springframework.context.ApplicationEventPublisherAware;

import org.springframework.context.ConfigurableApplicationContext;

import org.springframework.context.EmbeddedValueResolverAware;

import org.springframework.context.MessageSourceAware;

import org.springframework.context.ResourceLoaderAware;

import org.springframework.util.StringValueResolver;

class ApplicationContextAwareProcessor implements BeanPostProcessor {

    private final ConfigurableApplicationContext applicationContext;

    public ApplicationContextAwareProcessor(ConfigurableApplicationContext applicationContext) {

        this.applicationContext = applicationContext;

    }

    public Object postProcessBeforeInitialization(final Object bean, String beanName) throws BeansException {

        AccessControlContext acc = null;

        if (System.getSecurityManager() != null && (bean instanceof EmbeddedValueResolverAware || bean instanceof ResourceLoaderAware || bean instanceof ApplicationEventPublisherAware || bean instanceof MessageSourceAware || bean instanceof ApplicationContextAware)) {

            acc = this.applicationContext.getBeanFactory().getAccessControlContext();

        }

        if (acc != null) {

            AccessController.doPrivileged(new PrivilegedAction<Object>() {

                public Object run() {

                    ApplicationContextAwareProcessor.this.invokeAwareInterfaces(bean);

                    return null;

                }

            }, acc);

        } else {

            this.invokeAwareInterfaces(bean);

        }

        return bean;

    }

    private void invokeAwareInterfaces(Object bean) {

        if (bean instanceof EmbeddedValueResolverAware) {

            ((EmbeddedValueResolverAware)bean).setEmbeddedValueResolver(new ApplicationContextAwareProcessor.EmbeddedValueResolver(this.applicationContext.getBeanFactory()));

        }

        if (bean instanceof ResourceLoaderAware) {

            ((ResourceLoaderAware)bean).setResourceLoader(this.applicationContext);

        }

        if (bean instanceof ApplicationEventPublisherAware) {

            ((ApplicationEventPublisherAware)bean).setApplicationEventPublisher(this.applicationContext);

        }

        if (bean instanceof MessageSourceAware) {

            ((MessageSourceAware)bean).setMessageSource(this.applicationContext);

        }

        if (bean instanceof ApplicationContextAware) {

            ((ApplicationContextAware)bean).setApplicationContext(this.applicationContext);

        }

    }

    public Object postProcessAfterInitialization(Object bean, String beanName) {

        return bean;

    }

    private static class EmbeddedValueResolver implements StringValueResolver {

        private final ConfigurableBeanFactory beanFactory;

        public EmbeddedValueResolver(ConfigurableBeanFactory beanFactory) {

            this.beanFactory = beanFactory;

        }

        public String resolveStringValue(String strVal) {

            return this.beanFactory.resolveEmbeddedValue(strVal);

        }

    }

}
c、还有一个问题ApplicationContextAwareProcessor在哪里注册的呢?
通过源码方式查看到在refresh()的this.prepareBeanFactory(beanFactory);中提前准备了ApplicationContextAwareProcessor
protected void prepareBeanFactory(ConfigurableListableBeanFactory beanFactory) {

        beanFactory.setBeanClassLoader(this.getClassLoader());

        beanFactory.setBeanExpressionResolver(new StandardBeanExpressionResolver());

        beanFactory.addPropertyEditorRegistrar(new ResourceEditorRegistrar(this));

        beanFactory.addBeanPostProcessor(new ApplicationContextAwareProcessor(this));

        beanFactory.ignoreDependencyInterface(ResourceLoaderAware.class);

        beanFactory.ignoreDependencyInterface(ApplicationEventPublisherAware.class);

        beanFactory.ignoreDependencyInterface(MessageSourceAware.class);

        beanFactory.ignoreDependencyInterface(ApplicationContextAware.class);

        beanFactory.registerResolvableDependency(BeanFactory.class, beanFactory);

        beanFactory.registerResolvableDependency(ResourceLoader.class, this);

        beanFactory.registerResolvableDependency(ApplicationEventPublisher.class, this);

        beanFactory.registerResolvableDependency(ApplicationContext.class, this);

        if (beanFactory.containsBean("loadTimeWeaver")) {

            beanFactory.addBeanPostProcessor(new LoadTimeWeaverAwareProcessor(beanFactory));

            beanFactory.setTempClassLoader(new ContextTypeMatchClassLoader(beanFactory.getBeanClassLoader()));

        }

        Object systemEnvironment;

        if (!beanFactory.containsBean("systemProperties")) {

            try {

                systemEnvironment = System.getProperties();

            } catch (AccessControlException var4) {

                systemEnvironment = new ReadOnlySystemAttributesMap() {

                    protected String getSystemAttribute(String propertyName) {

                        try {

                            return System.getProperty(propertyName);

                        } catch (AccessControlException var3) {

                            if (AbstractApplicationContext.this.logger.isInfoEnabled()) {

                                AbstractApplicationContext.this.logger.info("Not allowed to obtain system property [" + propertyName + "]: " + var3.getMessage());

                            }

                            return null;

                        }

                    }

                };

            }

            beanFactory.registerSingleton("systemProperties", systemEnvironment);

        }
四:Aware接口部分就这么多吧,这里没有具体些实现和用法,但是相对于BeanFactoryPostProcessor,BeanPostProcessor。Aware在实际应用中会更加常用,这一部分是spring提供出来的拓展,也是必要重要的一个部分。
当然,我这里可能还存在一些纰漏,还请大佬指出来!
spring源码-Aware-3.4的更多相关文章
- spring源码:学习线索(li)
一.spring xml配置(不包括AOP,主要了解在初始化及实例化过程中spring配置文件中每项内容的具体实现过程,从根本上掌握spring) <bean>的名字 &,alia ...
- Spring源码情操陶冶-AbstractApplicationContext#initMessageSource
承接前文Spring源码情操陶冶-AbstractApplicationContext#registerBeanPostProcessors 约定web.xml配置的contextClass为默认值X ...
- 【Spring源码分析】非懒加载的单例Bean初始化过程(下篇)
doCreateBean方法 上文[Spring源码分析]非懒加载的单例Bean初始化过程(上篇),分析了单例的Bean初始化流程,并跟踪代码进入了主流程,看到了Bean是如何被实例化出来的.先贴一下 ...
- 【Spring源码分析】非懒加载的单例Bean初始化前后的一些操作
前言 之前两篇文章[Spring源码分析]非懒加载的单例Bean初始化过程(上篇)和[Spring源码分析]非懒加载的单例Bean初始化过程(下篇)比较详细地分析了非懒加载的单例Bean的初始化过程, ...
- 剑指Spring源码(二)
这是春节后的第一篇博客,我在构思这篇博客的时候,一度想放弃,想想要不要换个东西写,因为毕竟个人水平有限,Spring源码实在博大精深,不是我这个菜的抠脚的菜鸡可以驾驭的,怕误人子弟,还有就是源码分析类 ...
- 【spring源码分析】IOC容器初始化(二)
前言:在[spring源码分析]IOC容器初始化(一)文末中已经提出loadBeanDefinitions(DefaultListableBeanFactory)的重要性,本文将以此为切入点继续分析. ...
- spring源码:学习线索
一.spring xml配置(不包括AOP,主要了解在初始化及实例化过程中spring配置文件中每项内容的具体实现过程,从根本上掌握spring) <bean>的名字 &,alia ...
- 【spring源码分析】IOC容器初始化——查漏补缺(一)
前言:在[spring源码分析]IOC容器初始化(十一)中提到了初始化bean的三个步骤: 激活Aware方法. 后置处理器应用(before/after). 激活自定义的init方法. 这里我们就来 ...
- spring源码分析系列 (2) spring拓展接口BeanPostProcessor
Spring更多分析--spring源码分析系列 主要分析内容: 一.BeanPostProcessor简述与demo示例 二.BeanPostProcessor源码分析:注册时机和触发点 (源码基于 ...
- Spring源码分析:非懒加载的单例Bean初始化前后的一些操作
之前两篇文章Spring源码分析:非懒加载的单例Bean初始化过程(上)和Spring源码分析:非懒加载的单例Bean初始化过程(下)比较详细地分析了非懒加载的单例Bean的初始化过程,整个流程始于A ...
随机推荐
- codeforces 797 E. Array Queries【dp,暴力】
题目链接:codeforces 797 E. Array Queries 题意:给你一个长度为n的数组a,和q个询问,每次询问为(p,k),相应的把p转换为p+a[p]+k,直到p > n为 ...
- Spring Framework5.0 学习(1)—— 用Gradle构建一个Java Project
1.0 安装Gradle,参考之前文章<Gradle入门实战(Windows版)> 2.0 使用gradle 快速生成一个Java project gradle init --type ...
- IntelliJ IDEA设置编码格式
IntelliJ IDEA设置编码格式为UTF-8
- JSTL1.2学习总结
1.0 JSTL的下载 JSTL(JSP Standard Tag Library,JSP标准标签库)是一个不断完善的开放源代码的JSP标签库,是由apache的jakarta小组来维护的.JSTL只 ...
- UVa 1638 - Pole Arrangement(dp)
链接: https://uva.onlinejudge.org/index.php?option=com_onlinejudge&Itemid=8&page=show_problem& ...
- 总结PHP删除字符串最后一个字符的三种方法
一.前言 从数据库中select()读取一对多的信息时,经常需要将取出的数组用某个特定的字符分割,然后拼接成字符串. 常见的语法格式: foreach ($arr as $key => $val ...
- 说说DBA职责和目标
数据库管理员(Database Administrator,简称DBA),是从事管理和维护数据库管理系统(DBMS)的相关工作人员的统称,他属于运维工程师的一个分支,主要负责业务数据库从设计.测试到部 ...
- 陈正冲老师讲c语言之内存的申请malloc() 和释放free()
1.如何使用 malloc 函数 不要莫名其妙,其实上面这段小小的对话,就是malloc的使用过程.malloc是一个函数,专门用来从堆上分配内存.使用malloc函数需要几个要求: 内存分配给谁?分 ...
- 微信小程序跳H5页面
主页面:index.wxml 主页面:index.js ↑跳转到另一个wxml页面→recharge.wxml recharge.wxml web-view中设置跳转h5的链接,可以加上需要的参数: ...
- 史上最简单的SpringCloud教程 | 第十篇: 高可用的服务注册中心(Finchley版本)
转载请标明出处: 原文首发于 https://www.fangzhipeng.com/springcloud/2018/08/30/sc-f10-eureka/ 本文出自方志朋的博客 文章 史上最简单 ...