吴裕雄 python 机器学习——半监督学习标准迭代式标记传播算法LabelPropagation模型
import numpy as np

import matplotlib.pyplot as plt

from sklearn import  metrics

from sklearn import datasets

from sklearn.semi_supervised import LabelPropagation

def load_data():

    '''

    加载数据集

    '''

    digits = datasets.load_digits()

    ######   混洗样本 ########

    rng = np.random.RandomState(0)

    indices = np.arange(len(digits.data)) # 样本下标集合

    rng.shuffle(indices) # 混洗样本下标集合

    X = digits.data[indices]

    y = digits.target[indices]

    ###### 生成未标记样本的下标集合 ####

    # 只有 10% 的样本有标记

    n_labeled_points = int(len(y)/10)

    # 后面 90% 的样本未标记

    unlabeled_indices = np.arange(len(y))[n_labeled_points:]

    return X,y,unlabeled_indices

#半监督学习标准迭代式标记传播算法LabelPropagation模型

def test_LabelPropagation(*data):

    '''

    测试 LabelPropagation 的用法

    '''

    X,y,unlabeled_indices=data

    # 必须拷贝,后面要用到 y

    y_train=np.copy(y)

    # 未标记样本的标记设定为 -1

    y_train[unlabeled_indices]=-1

    clf=LabelPropagation(max_iter=100,kernel='rbf',gamma=0.1)

    clf.fit(X,y_train)

    ### 获取预测准确率

    # 预测标记

    predicted_labels = clf.transduction_[unlabeled_indices]

    # 真实标记

    true_labels = y[unlabeled_indices]

    print("Accuracy:%f"%metrics.accuracy_score(true_labels,predicted_labels))

    # 或者 print("Accuracy:%f"%clf.score(X[unlabeled_indices],true_labels))

# 获取半监督分类数据集

data=load_data()

# 调用 test_LabelPropagation

test_LabelPropagation(*data)

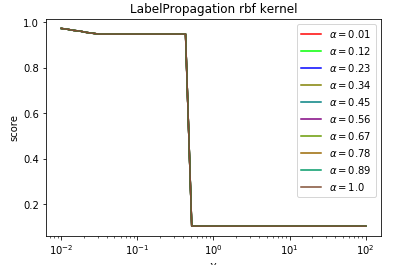
def test_LabelPropagation_rbf(*data):

    '''

    测试 LabelPropagation 的 rbf 核时,预测性能随 alpha 和 gamma 的变化

    '''

    X,y,unlabeled_indices=data

    # 必须拷贝,后面要用到 y

    y_train=np.copy(y)

    # 未标记样本的标记设定为 -1

    y_train[unlabeled_indices]=-1

    fig=plt.figure()

    ax=fig.add_subplot(1,1,1)

    alphas=np.linspace(0.01,1,num=10,endpoint=True)

    gammas=np.logspace(-2,2,num=50)

     # 颜色集合,不同曲线用不同颜色

    colors=((1,0,0),(0,1,0),(0,0,1),(0.5,0.5,0),(0,0.5,0.5),(0.5,0,0.5),(0.4,0.6,0),(0.6,0.4,0),(0,0.6,0.4),(0.5,0.3,0.2))

    ## 训练并绘图

    for alpha,color in zip(alphas,colors):

        scores=[]

        for gamma in gammas:

            clf=LabelPropagation(max_iter=100,gamma=gamma,alpha=alpha,kernel='rbf')

            clf.fit(X,y_train)

            scores.append(clf.score(X[unlabeled_indices],y[unlabeled_indices]))

        ax.plot(gammas,scores,label=r"$\alpha=%s$"%alpha,color=color)

    ### 设置图形

    ax.set_xlabel(r"$\gamma$")

    ax.set_ylabel("score")

    ax.set_xscale("log")

    ax.legend(loc="best")

    ax.set_title("LabelPropagation rbf kernel")

    plt.show()

# 调用 test_LabelPropagation_rbf

test_LabelPropagation_rbf(*data)
def test_LabelPropagation_knn(*data):

    '''

   测试 LabelPropagation 的 knn 核时,预测性能随 alpha 和 n_neighbors 的变化

    '''

    X,y,unlabeled_indices=data

    y_train=np.copy(y) # 必须拷贝,后面要用到 y

    y_train[unlabeled_indices]=-1 # 未标记样本的标记设定为 -1

    fig=plt.figure()

    ax=fig.add_subplot(1,1,1)

    alphas=np.linspace(0.01,1,num=10,endpoint=True)

    Ks=[1,2,3,4,5,8,10,15,20,25,30,35,40,50]

    # 颜色集合,不同曲线用不同颜色

    colors=((1,0,0),(0,1,0),(0,0,1),(0.5,0.5,0),(0,0.5,0.5),(0.5,0,0.5),(0.4,0.6,0),(0.6,0.4,0),(0,0.6,0.4),(0.5,0.3,0.2))

    ## 训练并绘图

    for alpha,color in zip(alphas,colors):

        scores=[]

        for K in Ks:

            clf=LabelPropagation(max_iter=100,n_neighbors=K,alpha=alpha,kernel='knn')

            clf.fit(X,y_train)

            scores.append(clf.score(X[unlabeled_indices],y[unlabeled_indices]))

        ax.plot(Ks,scores,label=r"$\alpha=%s$"%alpha,color=color)

    ### 设置图形

    ax.set_xlabel(r"$k$")

    ax.set_ylabel("score")

    ax.legend(loc="best")

    ax.set_title("LabelPropagation knn kernel")

    plt.show()

# 调用 test_LabelPropagation_knn

test_LabelPropagation_knn(*data)

吴裕雄 python 机器学习——半监督学习标准迭代式标记传播算法LabelPropagation模型的更多相关文章
- 吴裕雄 python 机器学习——半监督学习LabelSpreading模型
import numpy as np import matplotlib.pyplot as plt from sklearn import metrics from sklearn import d ...
- 吴裕雄 python 机器学习——人工神经网络与原始感知机模型
import numpy as np from matplotlib import pyplot as plt from mpl_toolkits.mplot3d import Axes3D from ...
- 吴裕雄 python 机器学习——分类决策树模型
import numpy as np import matplotlib.pyplot as plt from sklearn import datasets from sklearn.model_s ...
- 吴裕雄 python 机器学习——回归决策树模型
import numpy as np import matplotlib.pyplot as plt from sklearn import datasets from sklearn.model_s ...
- 吴裕雄 python 机器学习——线性判断分析LinearDiscriminantAnalysis
import numpy as np import matplotlib.pyplot as plt from matplotlib import cm from mpl_toolkits.mplot ...
- 吴裕雄 python 机器学习——逻辑回归
import numpy as np import matplotlib.pyplot as plt from matplotlib import cm from mpl_toolkits.mplot ...
- 吴裕雄 python 机器学习——ElasticNet回归
import numpy as np import matplotlib.pyplot as plt from matplotlib import cm from mpl_toolkits.mplot ...
- 吴裕雄 python 机器学习——Lasso回归
import numpy as np import matplotlib.pyplot as plt from sklearn import datasets, linear_model from s ...
- 吴裕雄 python 机器学习——岭回归
import numpy as np import matplotlib.pyplot as plt from sklearn import datasets, linear_model from s ...
随机推荐
- Win10安装4 —— 通过BIOS进入PE
本文内容皆为作者原创,如需转载,请注明出处:https://www.cnblogs.com/xuexianqi/p/12369367.html 一:"BIOS"与"PE& ...
- js中的window.location.search的用法与作用。
用该属性获取页面 URL 地址: window.location 对象所包含的属性 属性 描述 hash 从井号 (#) 开始的 URL(锚) host 主机名和当前 URL 的端口号 hostnam ...
- HTML span标签
span:行内标签,不会换行用于:组合文档中的行内元素.元素和文档的组合
- 3ds Max File Format (Part 5: How it all links together; ReferenceMaker, INode)
At this point, you should start to familiarize yourself a bit with the publicly available 3ds Max AP ...
- Cleaning Data in R
目录 R 中清洗数据 常见三种查看数据的函数 Exploring raw data 使用dplyr包里面的glimpse函数查看数据结构 \(提取指定元素 ```{r} # Histogram of ...
- my bug of VG algorithm
def visibility_graph(series): g = nx.Graph() # convert list of magnitudes into list of tuples that h ...
- 132. 分割回文串 II
Q: 给定一个字符串 s,将 s 分割成一些子串,使每个子串都是回文串. 返回符合要求的最少分割次数. 示例: 输入: “aab” 输出: 1 解释: 进行一次分割就可将 s 分割成 [“aa”,“b ...
- Vue中import '@...'的意思
转载: https://blog.csdn.net/xiazeqiang2018/article/details/81325996 写项目的时候看到很多导入都是@开头,这是webpack的路径别名,相 ...
- 记一次和“N+1”的擦肩而过
这周五,就是昨天,部门走了3个人.他们是"被离职"的,从被通知到走人,只过了一周左右.一开始经理和他们谈的时候,说有没有赔偿不能确定,然后到周四左右,上面的人可能是等急了,才说年终 ...
- 掩膜(mask)
1.掩膜(mask)的定义 用选定的图像,图形或物体,对处理的图像(全部或局部)进行遮挡,来控制图像处理的区域或处理过程.用于覆盖的特定图像或物体称为掩模或模板.光学图像处理中,掩模可以足胶片,滤光片 ...