吴裕雄 python 机器学习——半监督学习LabelSpreading模型
import numpy as np

import matplotlib.pyplot as plt

from sklearn import  metrics

from sklearn import datasets

from sklearn.semi_supervised.label_propagation import LabelSpreading

def load_data():

    '''

    加载数据集

    '''

    digits = datasets.load_digits()

    ######   混洗样本 ########

    rng = np.random.RandomState(0)

    indices = np.arange(len(digits.data)) # 样本下标集合

    rng.shuffle(indices) # 混洗样本下标集合

    X = digits.data[indices]

    y = digits.target[indices]

    ###### 生成未标记样本的下标集合 ####

    # 只有 10% 的样本有标记

    n_labeled_points = int(len(y)/10)

    # 后面 90% 的样本未标记

    unlabeled_indices = np.arange(len(y))[n_labeled_points:]

    return X,y,unlabeled_indices

#半监督学习LabelSpreading模型

def test_LabelSpreading(*data):

    X,y,unlabeled_indices=data

    y_train=np.copy(y) # 必须拷贝,后面要用到 y

    y_train[unlabeled_indices]=-1 # 未标记样本的标记设定为 -1

    clf=LabelSpreading(max_iter=100,kernel='rbf',gamma=0.1)

    clf.fit(X,y_train)

    ### 获取预测准确率

    predicted_labels = clf.transduction_[unlabeled_indices] # 预测标记

    true_labels = y[unlabeled_indices] # 真实标记

    print("Accuracy:%f"%metrics.accuracy_score(true_labels,predicted_labels))

    # 或者 print("Accuracy:%f"%clf.score(X[unlabeled_indices],true_labels))

# 获取半监督分类数据集

data=load_data()

# 调用 test_LabelSpreading

test_LabelSpreading(*data)

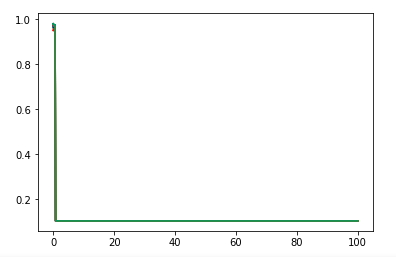
def test_LabelSpreading_rbf(*data):

    '''

    测试 LabelSpreading 的 rbf 核时,预测性能随 alpha 和 gamma 的变化

    '''

    X,y,unlabeled_indices=data

    # 必须拷贝,后面要用到 y

    y_train=np.copy(y)

    # 未标记样本的标记设定为 -1

    y_train[unlabeled_indices]=-1

    fig=plt.figure()

    ax=fig.add_subplot(1,1,1)

    alphas=np.linspace(0.01,1,num=10,endpoint=True)

    gammas=np.logspace(-2,2,num=50)

    # 颜色集合,不同曲线用不同颜色

    colors=((1,0,0),(0,1,0),(0,0,1),(0.5,0.5,0),(0,0.5,0.5),(0.5,0,0.5),(0.4,0.6,0),(0.6,0.4,0),(0,0.6,0.4),(0.5,0.3,0.2))

    ## 训练并绘图

    for alpha,color in zip(alphas,colors):

        scores=[]

        for gamma in gammas:

            clf=LabelSpreading(max_iter=100,gamma=gamma,alpha=alpha,kernel='rbf')

            clf.fit(X,y_train)

            scores.append(clf.score(X[unlabeled_indices],y[unlabeled_indices]))

        ax.plot(gammas,scores,label=r"$\alpha=%s$"%alpha,color=color)

    ### 设置图形

    ax.set_xlabel(r"$\gamma$")

    ax.set_ylabel("score")

    ax.set_xscale("log")

    ax.legend(loc="best")

    ax.set_title("LabelSpreading rbf kernel")

    plt.show()

# 调用 test_LabelSpreading_rbf

test_LabelSpreading_rbf(*data)
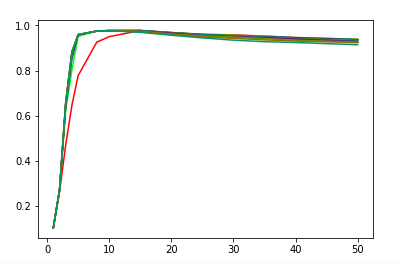
def test_LabelSpreading_knn(*data):

    '''

   测试 LabelSpreading 的 knn 核时,预测性能随 alpha 和 n_neighbors 的变化

    '''

    X,y,unlabeled_indices=data

    # 必须拷贝,后面要用到 y

    y_train=np.copy(y)

    # 未标记样本的标记设定为 -1

    y_train[unlabeled_indices]=-1

    fig=plt.figure()

    ax=fig.add_subplot(1,1,1)

    alphas=np.linspace(0.01,1,num=10,endpoint=True)

    Ks=[1,2,3,4,5,8,10,15,20,25,30,35,40,50]

    # 颜色集合,不同曲线用不同颜色

    colors=((1,0,0),(0,1,0),(0,0,1),(0.5,0.5,0),(0,0.5,0.5),(0.5,0,0.5),(0.4,0.6,0),(0.6,0.4,0),(0,0.6,0.4),(0.5,0.3,0.2))

    ## 训练并绘图

    for alpha,color in zip(alphas,colors):

        scores=[]

        for K in Ks:

            clf=LabelSpreading(kernel='knn',max_iter=100,n_neighbors=K,alpha=alpha)

            clf.fit(X,y_train)

            scores.append(clf.score(X[unlabeled_indices],y[unlabeled_indices]))

        ax.plot(Ks,scores,label=r"$\alpha=%s$"%alpha,color=color)

    ### 设置图形

    ax.set_xlabel(r"$k$")

    ax.set_ylabel("score")

    ax.legend(loc="best")

    ax.set_title("LabelSpreading knn kernel")

    plt.show()

# 调用 test_LabelSpreading_knn

test_LabelSpreading_knn(*data)
吴裕雄 python 机器学习——半监督学习LabelSpreading模型的更多相关文章
- 吴裕雄 python 机器学习——半监督学习标准迭代式标记传播算法LabelPropagation模型
import numpy as np import matplotlib.pyplot as plt from sklearn import metrics from sklearn import d ...
- 吴裕雄 python 机器学习——层次聚类AgglomerativeClustering模型
import numpy as np import matplotlib.pyplot as plt from sklearn import cluster from sklearn.metrics ...
- 吴裕雄 python 机器学习——密度聚类DBSCAN模型
import numpy as np import matplotlib.pyplot as plt from sklearn import cluster from sklearn.metrics ...
- 吴裕雄 python 机器学习——支持向量机非线性回归SVR模型
import numpy as np import matplotlib.pyplot as plt from sklearn import datasets, linear_model,svm fr ...
- 吴裕雄 python 机器学习——KNN回归KNeighborsRegressor模型
import numpy as np import matplotlib.pyplot as plt from sklearn import neighbors, datasets from skle ...
- 吴裕雄 python 机器学习——KNN分类KNeighborsClassifier模型
import numpy as np import matplotlib.pyplot as plt from sklearn import neighbors, datasets from skle ...
- 吴裕雄 python 机器学习——支持向量机线性回归SVR模型
import numpy as np import matplotlib.pyplot as plt from sklearn import datasets, linear_model,svm fr ...
- 吴裕雄 python 机器学习——分类决策树模型
import numpy as np import matplotlib.pyplot as plt from sklearn import datasets from sklearn.model_s ...
- 吴裕雄 python 机器学习——回归决策树模型
import numpy as np import matplotlib.pyplot as plt from sklearn import datasets from sklearn.model_s ...
随机推荐
- python创建字典的三种方式
创建空字典: dict_eq={} print(type(dict)) 直接赋值创建字典: dict_eq={'a':1,'b':2,'c':'adbc'} 通过关键字dict和关键字参数创建 dic ...
- nginx ip配置反向代理为本地域名
#### gitlab反向代理 server { listen ; server_name gitlab.hp.com; location / { proxy_pass http://192.168. ...
- 移动端调试神器vConsole
vConsole.js 其实就是重写console方法,实现了类似于微信小程序的移动端调试效果 在普通html文件里使用 <script src="https://cdn.bootcs ...
- vue中什么是模块 什么是组件?
模块: 封装好的应用程序,它只是js文件的封装. 组件: 一个完整的单位个体,可以有js可以有css和html. 作者:晋飞翔手机号(微信同步):17812718961希望本篇文章 能给正在学习 前端 ...
- Atom 基础使用
当你安装好了 Atom 之后,让我们来认识一下它吧. 当你第一次打开 Atom 的时候,你会看到这样的一个窗口: 这是 Atom 的欢迎屏幕(welcome screen),它展示了一些不错的建议 ...
- HDU1074 Doing Homework(状压dp)
链接:http://acm.hdu.edu.cn/showproblem.php?pid=1074 题意:给定有n门课的作业,每门课交作业有截止时间,和完成作业所花费的时间,如果超过规定时间完成,每超 ...
- JavaScript HTML DOM 关系层级(父子兄弟姐妹关系)
通过 HTML DOM,您能够使用节点关系来导航节点树. DOM 节点 根据 W3C HTML DOM 标准,HTML 文档中的所有事物都是节点: 整个文档是文档节点 每个 HTML 元素是元素节点 ...
- linux环境jacoco接入
我们通常会将测试覆盖率分为两个部分,即“需求覆盖率”和“代码覆盖率”. 需求覆盖:指的是测试人员对需求的了解程度,根据需求的可测试性来拆分成各个子需求点,来编写相应的测试用例,最终建立一个需求和用例的 ...
- MySQL判断数据是否为空
IFNULL(expr1,expr2)函数,这个函数只能判断是否为空 SELECT CONCAT(first_name,',',last_name,',',job_id,IFNULL(commissi ...
- util之Stack
定义 Stack<Integer>s = new Stack<>(); boolean isEmpty() 测试堆栈是否为空. Object peek( ) 查看堆栈顶部的对 ...